Willkommen zurück bei Park Escape ! Unsere Agenten haben sich mitten in der Basis des Verdächtigen wiedergefunden und sind jetzt auf der Jagd. Viele knifflige Rätsel erwarten Sie in diesem Kapitel, also fangen wir mit unserer exemplarischen Vorgehensweise in Kapitel 5 zu Park Escape! an
Früher: Park Escape Kapitel 4 Komplettlösung
Erster Stock Lobby
Untersuche die Topfpflanze, um einen Schlüssel zu finden. Untersuche den Schreibtisch und nimm den Kugelschreiber, untersuche ihn dann genau und klopfe auf den Kopf, um die Mine herauszunehmen. Sehen Sie sich den orangefarbenen Koffer auf dem Tisch in der Mitte der Lobby an und verwenden Sie die Stiftmine, um das Schloss zu knacken. Nehmen Sie den Widerstand und die Arbeitserlaubnis. Untersuchen Sie den unteren Teil des Kartenlesers und verwenden Sie den Schlüssel, um das Bedienfeld zu entriegeln.
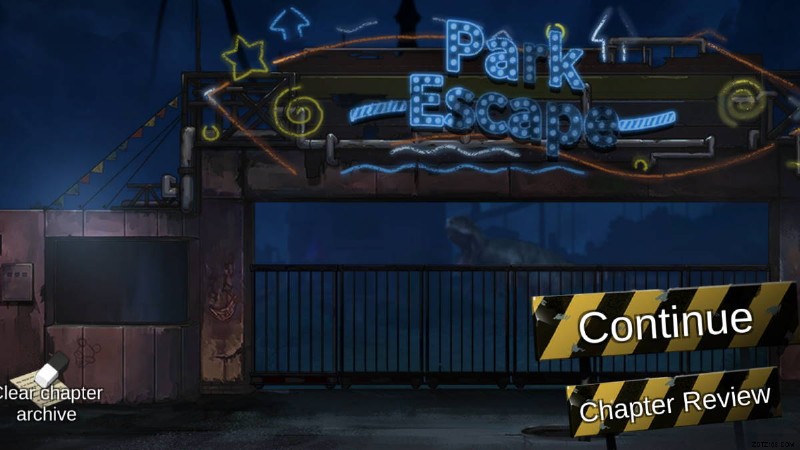
Tippen Sie auf eine Kachel, um sie entweder auf Schwarz oder Weiß einzustellen. Sie müssen die Kacheln so aufstellen – das letzte leere Feld sollte ein schwarzer Punkt sein.
Der Kartenleser sollte jetzt funktionieren, also verwenden Sie die Arbeitserlaubnis darauf.
Erster Stock Aufzugslobby
Nimm die Schere, die in den Fahrstuhltüren eingeklemmt ist. Untersuche den Aschenbecher und nimm den zweiten Widerstand, während du die seltsamen Kreise mit den Zahlen darin betrachtest. Untersuchen Sie das Gemälde an der linken Wand und verwenden Sie die Schere, um einen dritten Widerstand und einen Raketenschraubendreher zu erhalten. Öffnen Sie die Tastentafel des Aufzugs mit dem Schraubendreher und setzen Sie die Widerstände wie gezeigt ein und legen Sie den Schalter um.

Die Stromversorgung sollte jetzt wiederhergestellt sein, also fahren Sie fort und drücken Sie die Abwärtstaste auf dem Aufzugspanel.
Im rechten Fahrstuhl
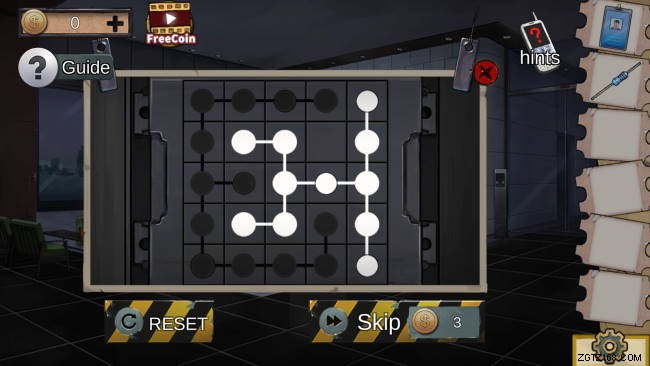
Wenn Sie die Uhr an der Rezeption untersucht haben, ist Ihnen vielleicht eine Skizze einer Ballerina aufgefallen. Tippen Sie an den Aufzugswänden auf die Beine und Arme der Ballerina, um sie in diese Position zu bringen:
Sie werden sehen, dass ein eigenartiges Muster erscheint. Fahren Sie mit dem Aufzug in den neunten Stock.
9. Etage Lobby
Untersuchen Sie die Trümmer auf der rechten Seite des Raums, um einen quadratischen Block und einen Gummieimer zu erhalten. Gehe zurück in den Raum und tippe dann auf das braune Stück mit einem Steinsockel, um eine halbe Statue zu erhalten.
Erster Stock Lobby
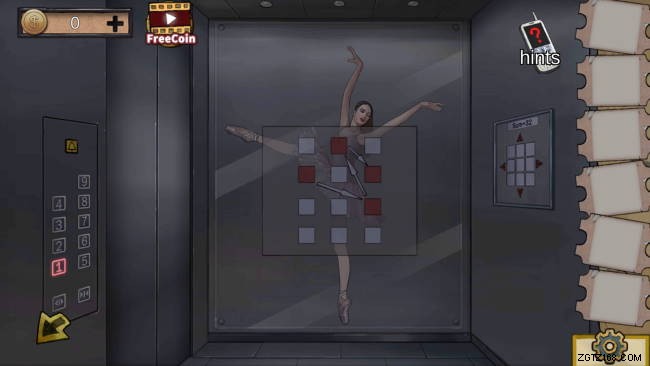
Untersuchen Sie die Couch in der Mitte der Lobby und schieben Sie die Abdeckung zur Seite, um darunter eine Kiste freizulegen. Untersuche es und benutze den quadratischen Block, um ein Rätsel zu starten. Dieses Puzzle ist nicht allzu schwierig und Sie können es ziemlich brutal erzwingen, da die Blöcke mit jedem anderen Teil in der Reihenfolge ausgetauscht werden können. Beginnen Sie mit dem Herzstück auf der linken Seite, dann Karo, Pik und schließlich Kreuz.
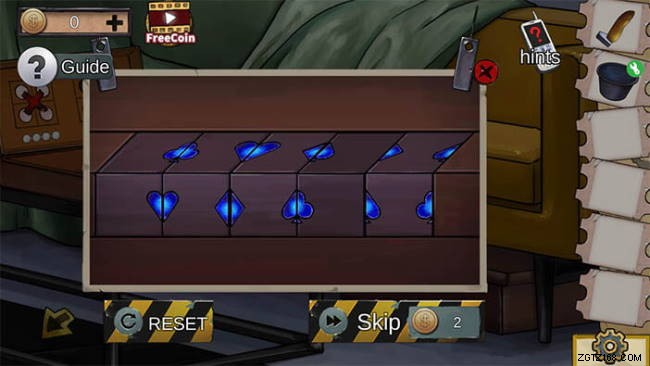
Du bekommst eine Batterie für deine Probleme.
9. Etage Lobby
Untersuche den kleinen Koffer oben auf dem Gerüst auf der rechten Seite des Raums. Setzen Sie die Batterie in den Steckplatz ein, um die Tastatur zu aktivieren. Sie beginnen in der Mitte und können das hervorgehobene Feld nach oben, unten, links oder rechts verschieben. Ihr Ziel ist es, 32 zu addieren, wie im Fahrstuhl angezeigt. Befolgen Sie diese Reihenfolge:
- 4
- 5
- 4
- 2
- 4
- 7
- 4
- 2
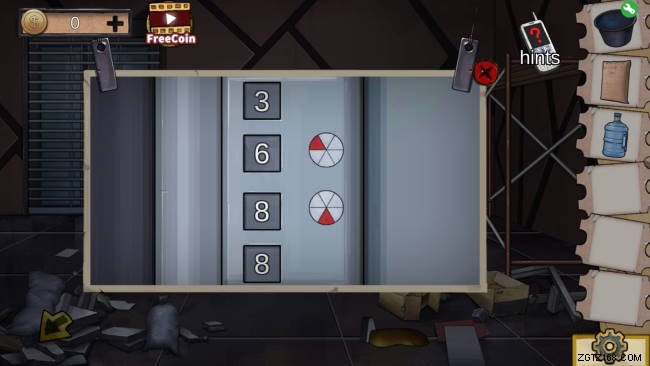
Nehmen Sie den Zement und kleben Sie. Untersuchen Sie die Trümmer auf dem Boden erneut und verwenden Sie den Stock, um einen Schlüssel herauszufischen. Benutze den Schlüssel, um die Tür aufzuschließen. Nimm das Fasswasser und untersuche dann die Tastatur. Die Kreise mit den ausgefüllten Quadranten sollen Ihnen einen Anhaltspunkt geben – Sie müssen die Aschenbechernummern den Quadranten zuordnen. Der Code lautet 3689.
Sie erhalten eine halbe Statue. Kombiniere den Gummieimer mit der Zementmischung und Wasser, um einen Eimer Zement zu erhalten. Kombiniere die beiden Hälften der Statue mit der Zementmischung, um die reparierte Statue zu erhalten.
Untersuchen Sie den verdächtigen Felsen mit der Kerbe und platzieren Sie die Statue in der Kerbe, um die Fensterläden zu öffnen. Die Tür ist mit einer Tastatur verschlossen, aber erinnerst du dich an das seltsame Diagramm im Aufzug? Die roten Quadrate sollen auf die Telefontastatur in der Lobby im 1. Stock verweisen, also wäre der Code 4926.
Bowen
Malzimmer
Die Agenten werden wieder getrennt. Bowen will be trapped behind a glass security door with an input, but he has no clues at the moment so switch to Qiuyu.
Qiuyu
Graffiti Room
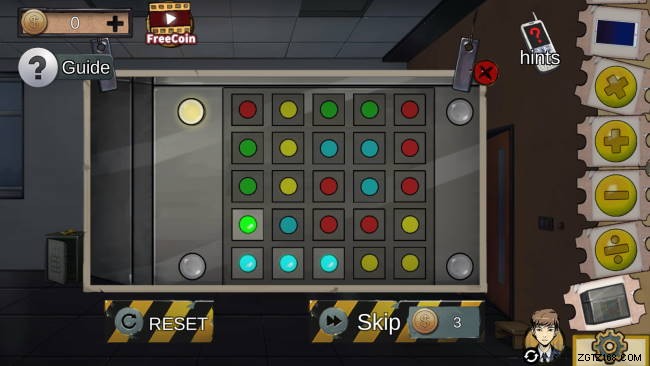
Examine the safe in the back of the room to start a dot puzzle. Follow these steps to unlock it:
- left column down
- bottom row right
- top row left
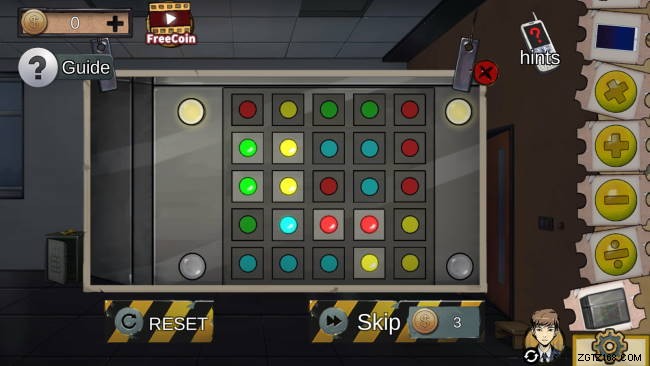
The first light will turn green. From here:
- left column up
- bottom row left
- right column down
- top row right
- middle row left
- left column up x2
- middle column up x2
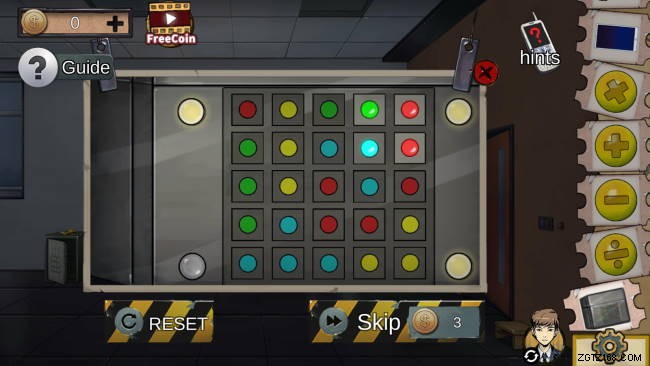
This turns the second light. Continuing on:
- left column down x2
- right column down x2
Grab the key. Examine the shelf with the flower pot on it and tap the pot to slide it aside. Use the key on the lock that’s hiding underneath the pot and grab the plastic card. Use the plastic card on the graffiti scribbled on the wall and line it up with the little lemon cut to see a string of letters:CPLF.
Bowen
Painting Room
Input CPLF into the keypad and the gate will disappear. Slide the cabinet open and grab the lever. Examine the painting and look closely:you’ll see parts of the painting flash for a brief moment. You need to hit the buttons that match the color of the fruit flashing. There are seven button presses you need to input, and this sequence is randomized every time you examine the painting. You’ll get half of a key. Move through the open door.
Ball Pit Room
Take the red ball from the ball pit, then examine the stink and grab the razor. Combine the ball with the razor to get a cut ball and the other half of the key. Combine the key halves to get a tubular key. Combine the cut ball with the razor one more time to get a star. Examine the penguin doll in the back and open its mouth to get a piece of paper.
Examine the pedestal in the middle of the room and place the star in the indent. Examine the four dials below the pedestal and set them like this, making sure to turn the top left dial one more time.
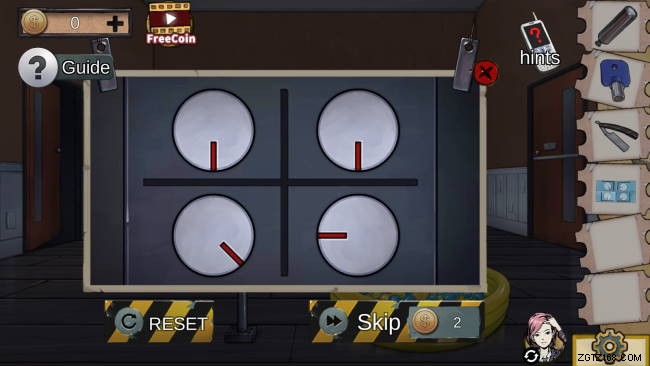
With the star placed, the pedestal will project a interesting number pattern on the wall.
Painting Room
Examine the small panel on the left wall and use the tubular key to activate it, then press the big button.
Ball Pit Room
Examine the door on the right and punch in 7851 – the down arrow is to let you know it’s the code on the wall, just upside down.
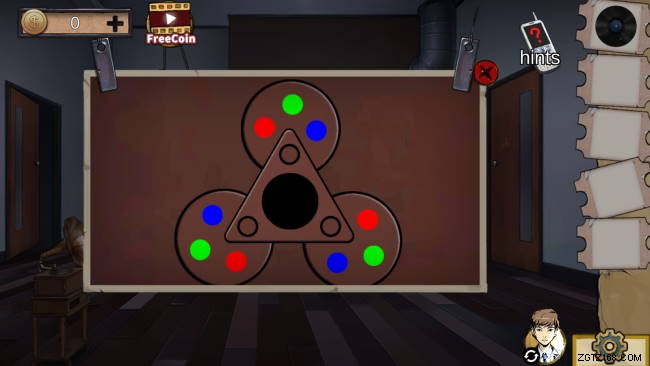
Statue Room
Examine the panel below the phonograph and you’ll see four buttons with icons on them. Tap on them to cycle through the icons, and set them like this:
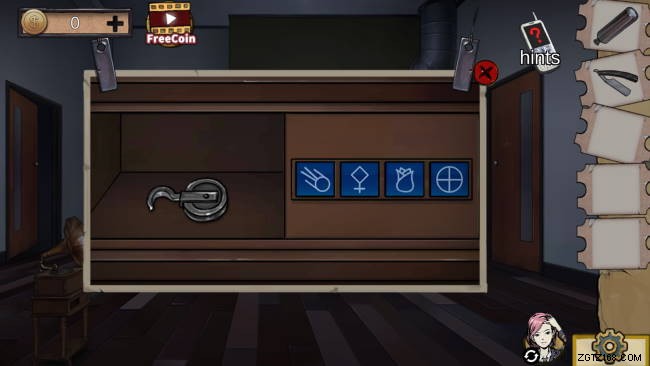
You might recognize these symbols from Qiuyu’s side of the beginning room. Get the pulley.
Qiuyu
Graffiti Room
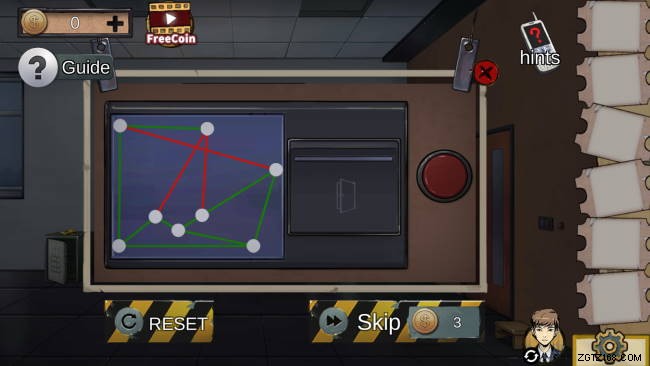
Examine the panel by the right side door and you’ll see there is a new puzzle on it. You need to rearrange the dots in a way that none of the lines are intersecting, and here’s one quick way to do it. Make sure to drag the top middle dot down below the red line.
Qiuyu’s Ball Pit Room
The next room will look pretty familiar with a ball pit and a penguin doll. Take the rope from the penguin and push it aside to reveal a hole in the floor. Examine the bag in the background and take the tablet and Chinese style key.
Take a closer look at the tablet in your inventory. Drag the bell in the middle of the screen and position it all the way to the right. When the bird on the bell is near the top, tap on the red switch to make the bird hit the bell and emit a sound wave. The sound wave will travel between bells – wait until it hits the middle bell, the quickly drag it all the way to the left. It may take a couple of tries, so hang in there. When you’re successful, the tablet will display a bunch of colored spheres.
Graffiti Room
Examine the shelf and use the chinese style key on the lock and get the iron box. Examine the iron box and you’ll see a bunch of colors – you need to repeat the colors you saw on the tablet. A bulb will light up when you input a valid combination. Here are all the patterns:

You’ll get a bottle of lubricant.
Qiuyu’s Ball Pit Room
Examine the ball pit and grab all of the yellow balls. Examine the door and you’ll be presented with a formula but you have to fill in the math. From left to right, slot in the multiply (X), then addition (+), and finally division (/). The bar will unlock, but it’s old and rusty so use the lubricant.
Tree Room
Examine the conveyor belt and place the rope on it to send to Bowen.
Bowen
Statue Room
Grab the rope and combine it with the pulley. Examine the conveyor belt and place the lever in the side mechanism, then place the pulley and razor on the conveyor belt and send them to Qiuyu.
Qiuyu
Qiuyu’s Ball Pit Room
Use the razor on the ball pit to cut it open and get the plaster apple.
Tree Room
Use the pulley on the little mechanism next to the tree to attach it. Activate it to lift the tree then grab the wrench underneath. Examine the panel under the gramophone to activate a circle puzzle.
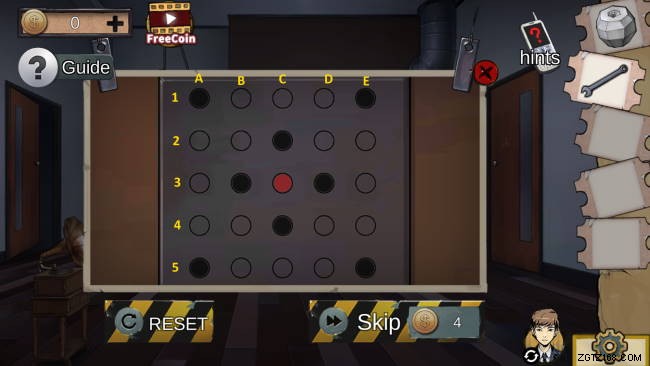
Follow this order carefully:A1, E5, A2, B1, B3, B5, C1, B2, A2, C2, D1, A1, A3, A4, E3, C4, D4, D5, D3, D2, D3, D2, D1, D5, D1, D3, D5, D1, C1, B1, A1, B1, A1, C5, C1, C5, C1, C2, B1, D1, C5, E5, A5, B5, B4, B5, B4, E4, D4, C4, B5, D5, E5, D1, C1, D2, then tap the red circle in the middle. Take the plastic dipper. Send everything back to Bowen.
Bowen
Statue Room
Place the apple in the statue’s hands to get an access card. Use the wrench to tighten the pipe.
Ball Pit Room
Use the wrench on the sink cabinet. You’ll have to rearrange the pipes, starting from the top drain all the way to the bottom. Here’s the solution, but make sure to rotate the bottom middle pipe.
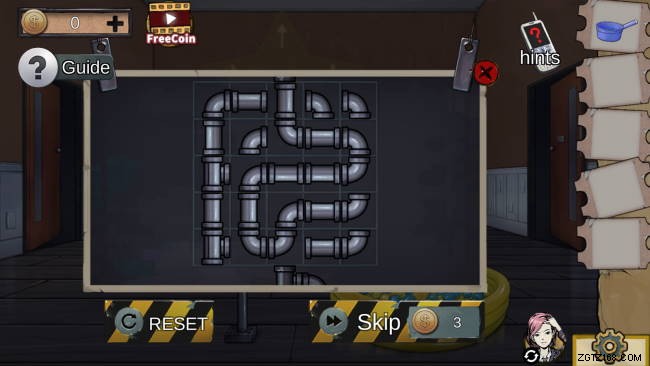
Use the plastic dipper in the sink after you turn the lever to get some water.
Statue Room
Send the plastic dipper filled to Qiuyu.
Qiuyu
Tree Room
Grab the plastic dipper then go to the Ball Pit room.
Qiuyu’s Ball Pit Room
Examine the hole in the floor that the penguin doll was covering and pour water into it. You’ll get a key from the ball in it.
Tree Room
Use the key on the cabinets above the conveyor belt to get salt. Send the salt to Bowen.
Bowen
Statue Room
Use the salt on the vinyl to defrost it. Play the vinyl on the gramophone and you’ll see a code flash:4806. This code is for Qiuyu’s door – note the green color of the numbers. Take the vinyl back and send it to Qiuyu.
Qiuyu
Tree Room
Play the vinyl in the gramophone to get another four digit number:5492. As you can guess this one is for Bowen’s door. Examine the marking on the door and you’ll see it lit up with color now.
You have to set the triangles to certain colors. Note the “B” above the panel – you need to set the middle circle on the door to black so rotate all three smaller circles until no color is selected.
Bowen
Statue Room
Now you have to do the same for Bowen’s door, but his must be set to white. Set the three circles to blue, green, and red to get white.
Congratulations, that concludes chapter 5 of Park Escape!