Einführung
Abenteuerflucht:Versteckte Ruinen ist ein Fluchtspiel, das von Haiku Games, entwickelt wurde die Macher der Adventure Escape Series! Das Spiel hat 7 Kapitel voller interessanter Hinweise und eine große Auswahl an Rätseln. Du spielst als Professor Burns , ein Mann, der entschlossen war, die mysteriöse Kumari-Zivilisation zu entdecken Gerüchten zufolge enthält es den Schlüssel zum ewigen Leben und will sich seinen Traum erfüllen! Mal sehen, ob du die versteckten Ruinen überleben kannst
Komplettlösung
Kapitel 1
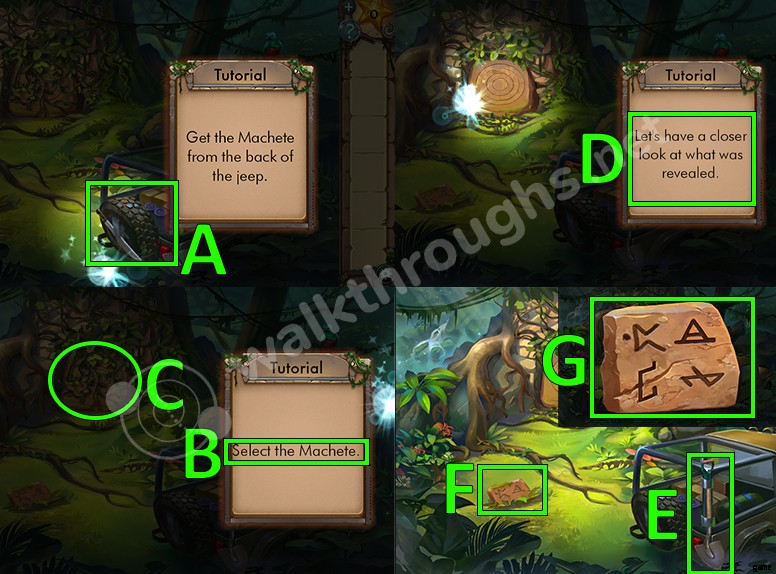
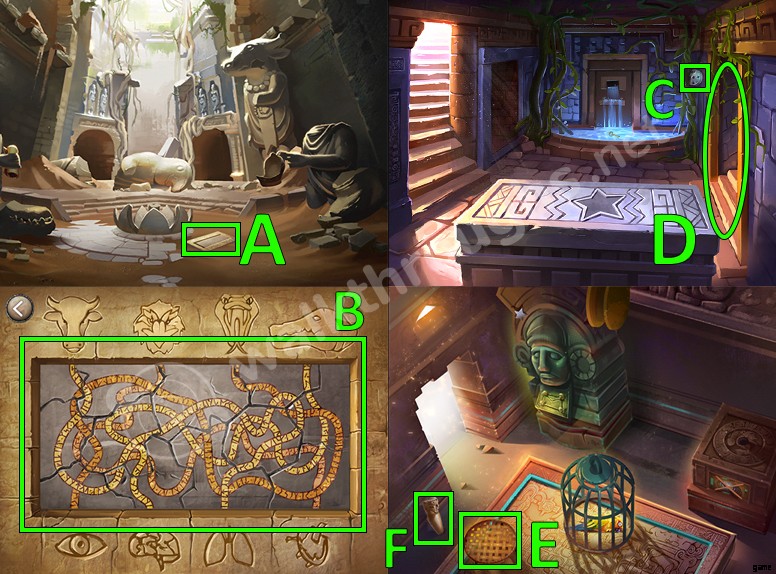
- Sammle dieMachete von der Rückseite des Jeep. (A)
- Wähle die Machete aus (B)
- Schneide die Ranken ab. (C)
- Klicken Sie auf denHolzstumpf. (D)
- Sammle die Schaufel. (E)
- Benutze dieSchaufel auf dem hängengebliebenen Tablet im Boden. Klicken Sie auf das Tablet. (F)
- Denken Sie an die Symbole vom Tablet. (G)
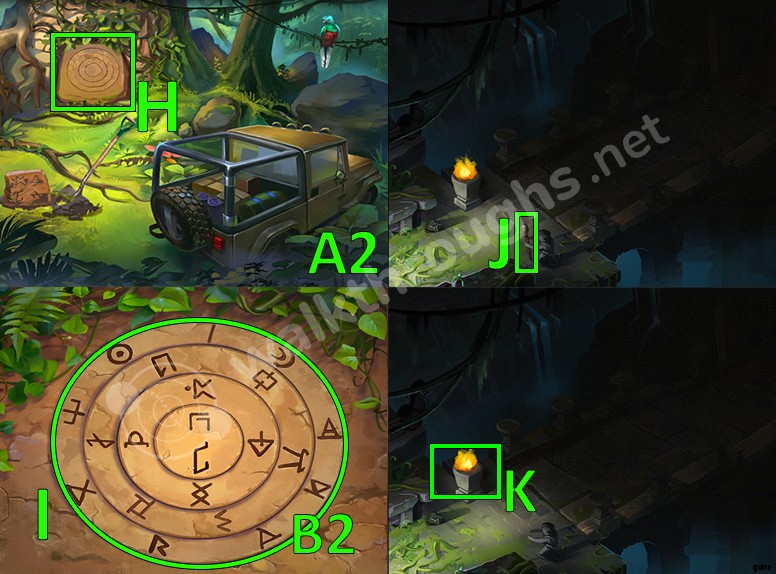
- Klicke auf den Holzstumpf. (H)
- Der richtige Weg, um das Rätsel zu lösen während Sie die Tablet-Symbole verwenden Gehen Sie durch den Eingang die Sie gerade geöffnet haben. (I)
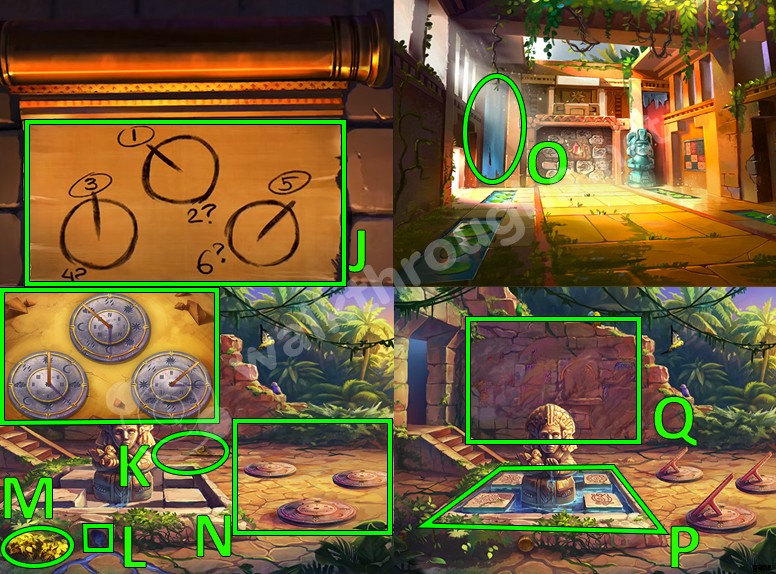
- Nimm dieFackel. (J)
- Zünde die Fackel an. (K)
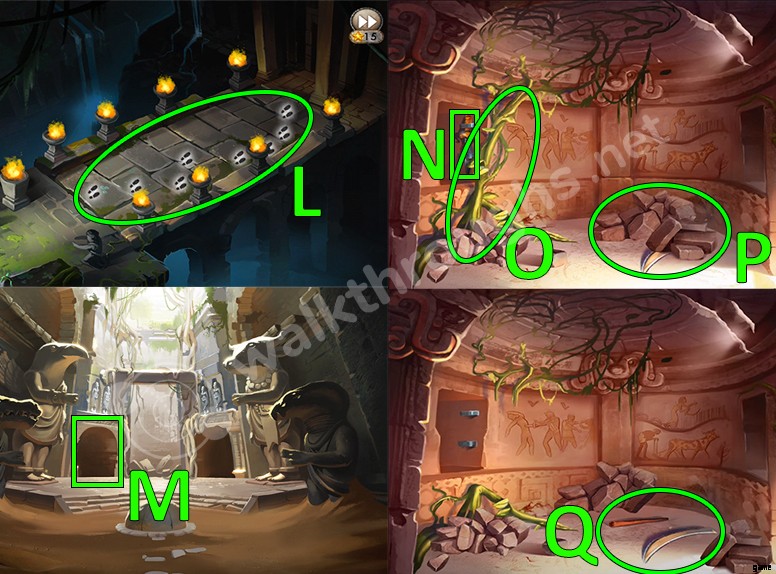
- Zünde das Öl an säumen die Brücke, um durch die Dunkelheit zu sehen. Tippe auf die Steine die auf dem Bild gezeigt werden um die Brücke zu überqueren ohne zu fallen. (L)
- Klicken Sie auf die linke Tür. (M)
- Sammle den Dolch. (N)
- Benutze denDolch um die Reben abzuschneiden. Hebe die Ranken auf (O)
- Bewege die Trümmerhaufen. Zwei Teile einer Sense wird auftauchen. (P)
- Benutze die Ranke um sie zu kombinieren, um die Sense zu reparieren. (Q)
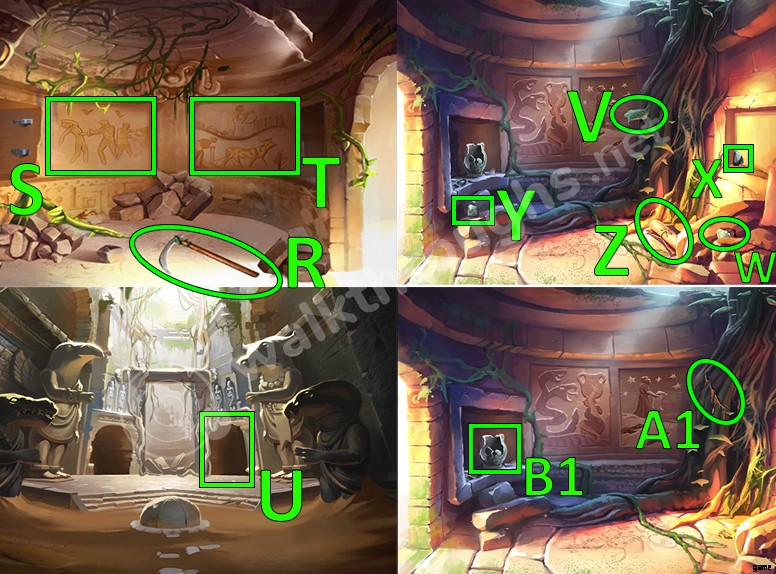
- Klicken Sie auf die erste Zeichnung an der Wand. (S)
- Klicken Sie auf die zweite Zeichnung an der Wand. (T)
- Sammle die fixierte Sense. (R)
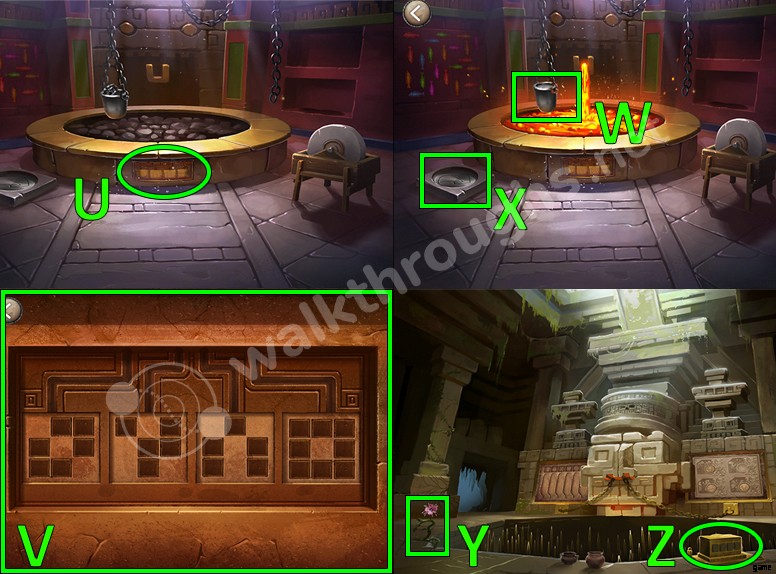
- Klicken Sie auf die rechte Tür. (U)
- Hebe das Blatt auf (V)
- Sammle die erste Tonscherbe. (W)
- Sammle die zweite Tonscherbe. (X)
- Sammle die dritte Tonscherbe. (J)
- Sammle die Schriftrolle. (Z)
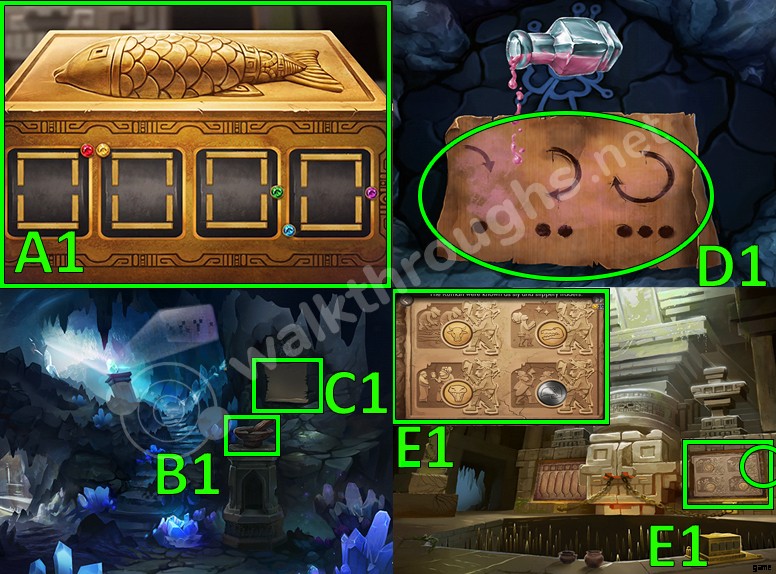
- Benutze den Dolch einen Schlitz schneiden in den Reben. Sammle etwas Saft von den Reben mit deinemBlatt. (A1)
- Klicken Sie auf denTopf. (B1)
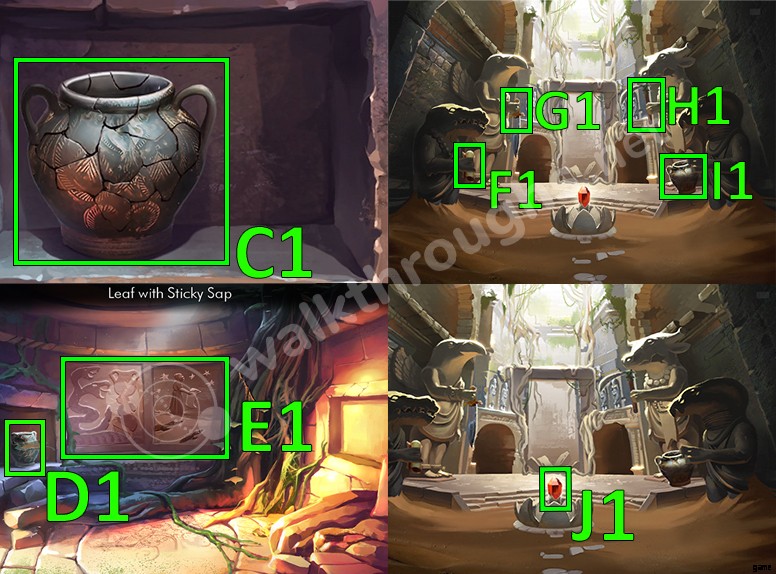
- Setze denTopf ab wieder zusammen. (C1)
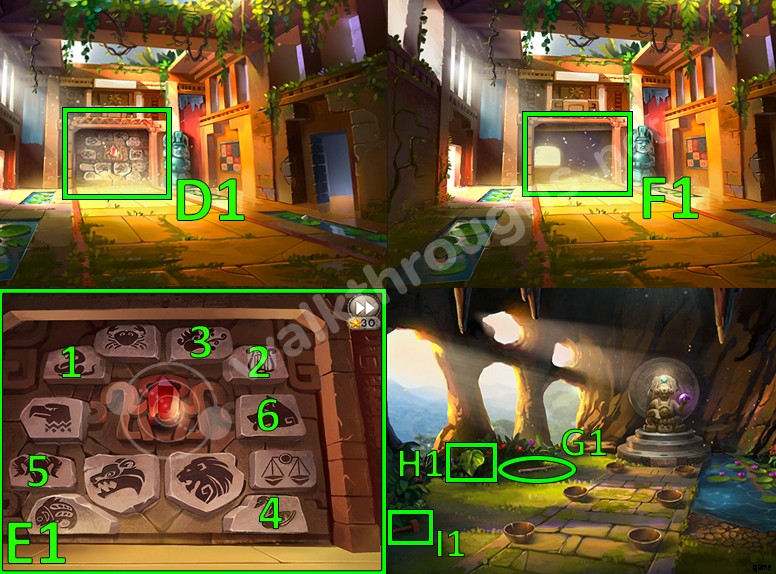
- Klebe den Topf fest mit dem Blatt mit dem klebrigen Saft . (D1)
- Klicken Sie auf die Zeichnungen an der Wand. (E1)
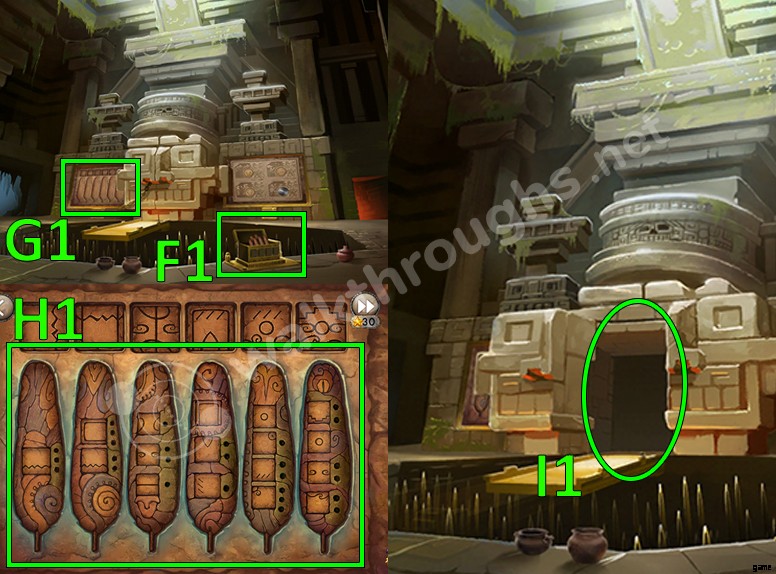
- Gib die Schriftrolle zur Krokodilstatue. (F1)
- Gib den Zeremonialdolch zur Hawk Statue. (G1)
- Gib die Sense zur Ochsenstatue. (H1)
- Gib den Topf zur Schlangenstatue. (I1)
- Nimm denSchlüssel der Zeitalter. (J1)
- Kapitel abgeschlossen.
Kapitel 2
Erster Teil
- Hebe dieFackel auf und die Pilze. (A)
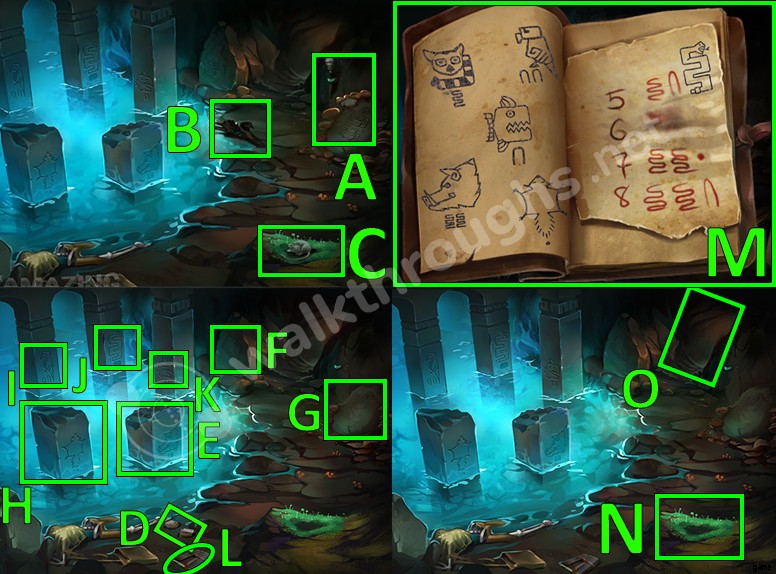
- Sammle das Treibholz. (B)
- Füttere diePilze zur Maus, damit sie geht. (C)
- Öffne das Leichenpaket. Sammle die Feuersteinfelsen. (D)
- Sehen Sie sich denersten Stein an. (E)
- Werfen Sie einen Blick auf denzweiten Stein. (F)
- Sehen Sie sich den dritten Stein an (G)
- Sehen Sie sich den vierten Stein an (H)
- Werfen Sie einen Blick auf denfünften Stein. (I)
- Sehen Sie sich den sechsten Stein an (J)
- Sehen Sie sich den siebten Stein an (K)
- Klicken Sie auf dasBuch. (L)
- Lesen Sie die Symbole auf dem Notebook. (M)
- Benutze die Feuersteinfelsen auf dem Trockenmoos Fügen Sie danach das Treibholz hinzu und benutze es dann, um die Fackel anzuzünden (N)
- Gehen Sie durch den Eingang. (O)
Zweiter Teil
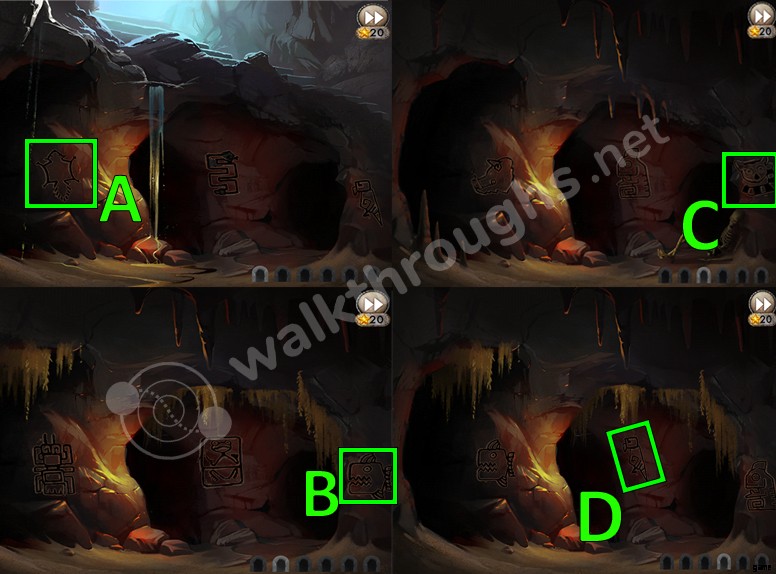
- ZurOrientierung durch die Höhleneingänge Sie müssen zu den richtigen Eingängen gehen um in die nächste Phase zu kommen. Für den ersten Eingang, Klicken Sie auf das fliegende Eichhörnchen. (A)
- Klicken Sie auf denFisch für den zweiten Eingang. (B)
- Klicken Sie auf den Lemur. (C)
- Klicken Sie auf den Papagei. (D)

- Klicken Sie auf dieSchlange. (E)
- Klicken Sie auf den Eber. (F)
- Zünde die zwei Fackeln an im Raum. (G, H)
- Nehmen Sie die Tierhaut. (I)
- Wirf den Schädelhaufen um. (J)
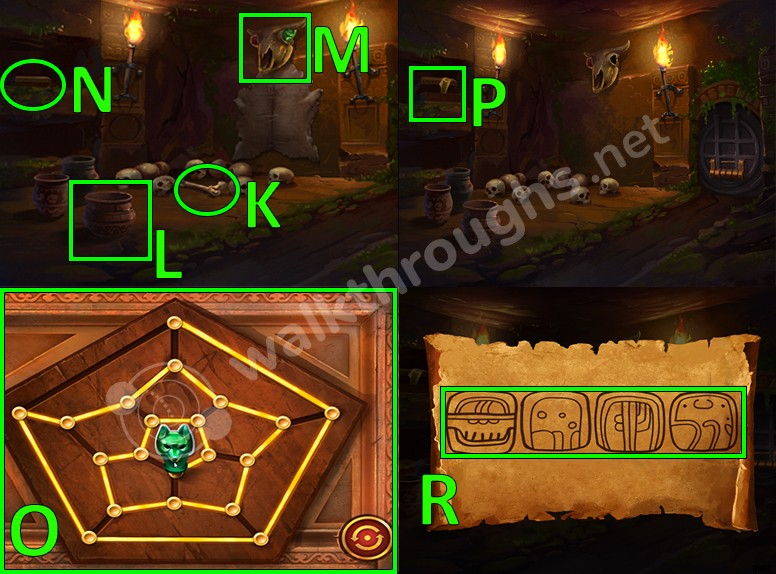
- Nimm den Knochen das sich im Schädelhaufen versteckte (K)
- Tauche die Tierhaut ein in Fischöl. (L)
- Verwenden Sie die fettige Tierhaut auf dem Ochsenkopf. Sammle den Jadefuchskopf ein wenn es zu Boden fällt. (M)
- Benutze den Knochen um die Kiste zu ziehen näher. Klicken Sie auf das Kästchen. (N)
- Setzen Sie denFuchskopf auf der Box. Das Bild zeigt den richtigen Weg, um das Rätsel zu lösen (O)
- Sammle die Schriftrolle. (P)
- Lies es. Es zeigt einen Hinweis für das nächste Rätsel. (R)
- Klicken Sie auf das Zahlenschloss-Rätsel. (S)
- Verwenden Sie dieSymbole aus der Schriftrolle um das Puzzle zu lösen. (T)
- Gehen Sie durch die Kanalisation. (U)
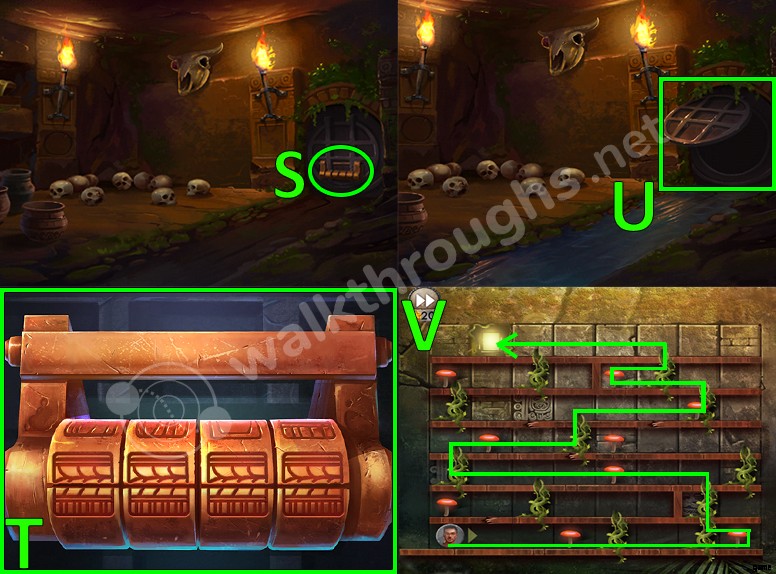
- Es ist Zeit, aus zwei Labyrinthen zu entkommen um Kapitel 2 abzuschließen! Das Bild zeigt den richtigen Fluchtweg aus Labyrinth 1. (V)
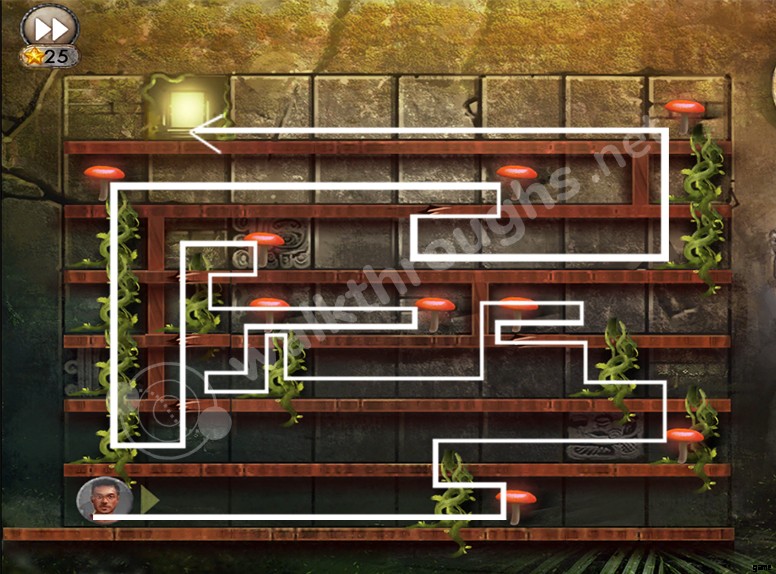
- DiesesBild zeigt den richtigen Fluchtweg aus Labyrinth 2.
- Kapitel abgeschlossen.
Kapitel 3
Erster Teil
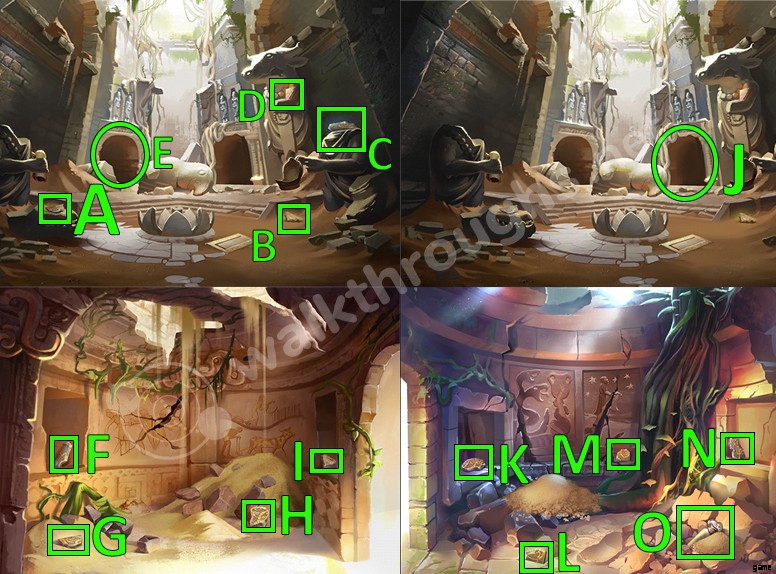
- Hebe das erste Fragment auf. (A)
- Hebe das zweite Fragment auf. (B)
- Hebe das dritte Fragment auf. (C)
- Sammle das vierte Fragment. (D)
- Gehen Sie durch dielinke Tür. (E)
- Sammle dasfünfte Fragment. (F)
- Sammle das sechste Fragment. (G)
- Sammle das siebte Fragment. (H)
- Sammle das achte Fragment. (I)
- Gehen Sie durch die rechte Tür (J)
- Sammle dasneunte Fragment. (K)
- Sammle daszehnte Fragment. (L)
- Sammle das elfte Fragment. (M)
- Sammle das zwölfte Fragment. (N)
- Nimm das Falkenglas (O)
Zweiter Teil
- Tippen Sie auf die Steintafel. (A)
- Stücke die Fragmente Sie haben gerade zusammen gesammelt. Sie können die Fragmente auch drehen wenn Sie nicht den richtigen Weg finden, sie zusammenzusetzen. DasBild zeigt, wie man die Fragmente zusammensetzt. Gehen Sie danach die Treppe hinunter und öffnen Sie sich. (B)
- Sammle die Ausrüstung (C)
- Gehen Sie durch die Tür. (D)
- Sammeln Sie das Sieb. (E)
- Sammle das Schlangenglas (F)
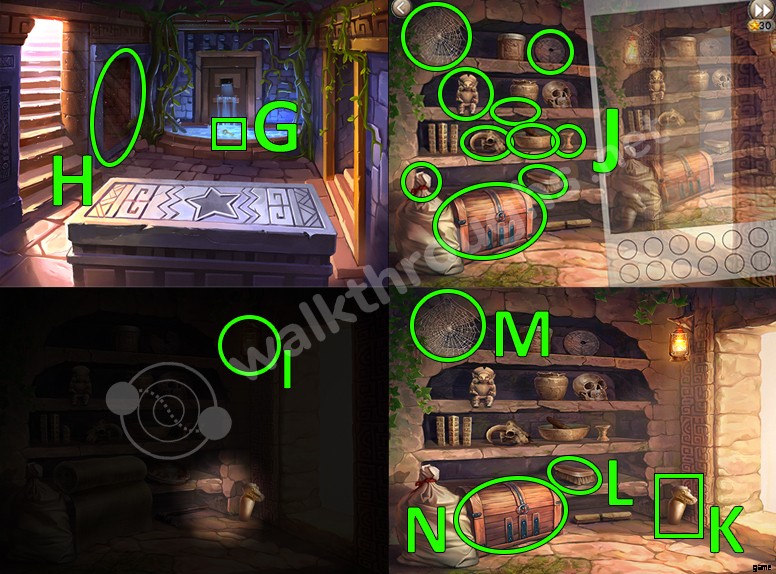
- Benutze das Sieb um den Schlüssel zu erhalten vom Brunnen. (G)
- Gehe durch die Tür auf der Linken. (H)
- Zielen Sie auf die Lampe um das Licht einzuschalten. (I)
- Tippen Sie auf alle Dinge im Foto das ist anders. (J)
- Nimm danach das Schlangenglas. (K)
- Nimm den Pinsel. (L)
- Nehmen Sie das Spinnennetz. (M)
- Verwenden Sie die Taste die du auf dem Brunnen gefunden hast um die Truhe zu öffnen. Sammle das Seil ein in der Brust. (N)
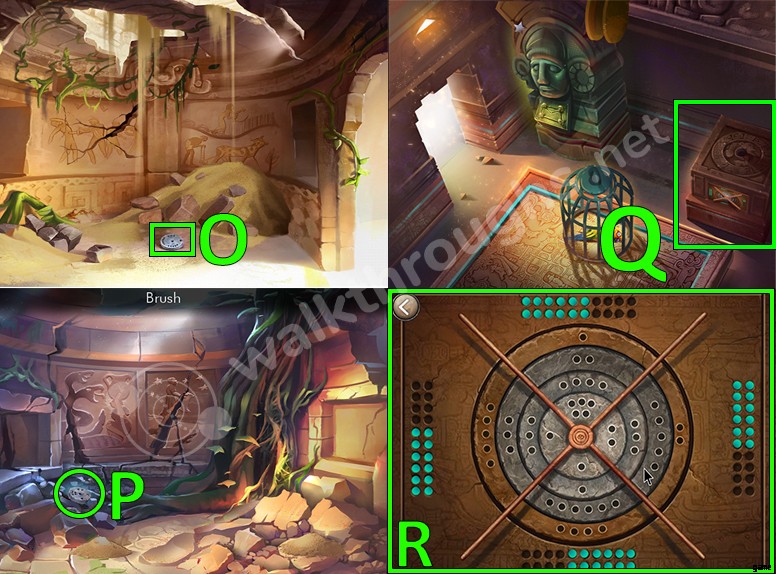
- Sammeln Sie den zweiten Gang. (O)
- Gehen Sie durch die rechte Tür. Sammle das dritte Zahnrad ein (P)
- Geh nach unten wieder und gehen Sie dann durch die linke Tür. Klicken Sie auf den Hebelmechanismus. (Q)
- Platziere alle Zahnräder am Hebelmechanismus. DasBild zeigt den richtigen Weg, um das Rätsel zu lösen. (R)
- Verbinde das Seil mit dem Hebelmechanismus. (S)
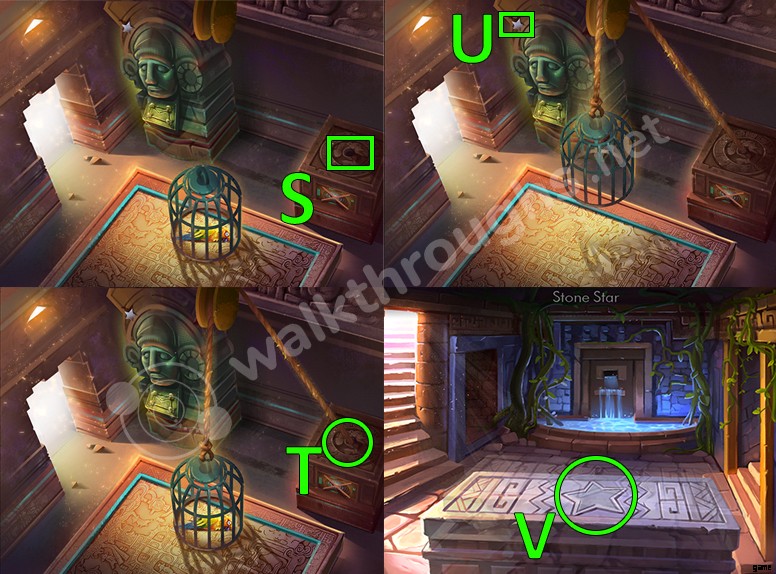
- Der Käfig wird aufsteigen. Verwenden Sie das Spinnennetz auf den Vogel, um die Blutung zu stoppen. Sammle den Vogel ein , wird es Bart. heißen (T)
- Wählen Sie den Vogel namens Bert aus auf Ihrem Inventar und klicken Sie auf den Stern damit der Vogel den Stern sammelt und gebe es dir. (U)
- Platziere denStab r auf stonephagus. (V)
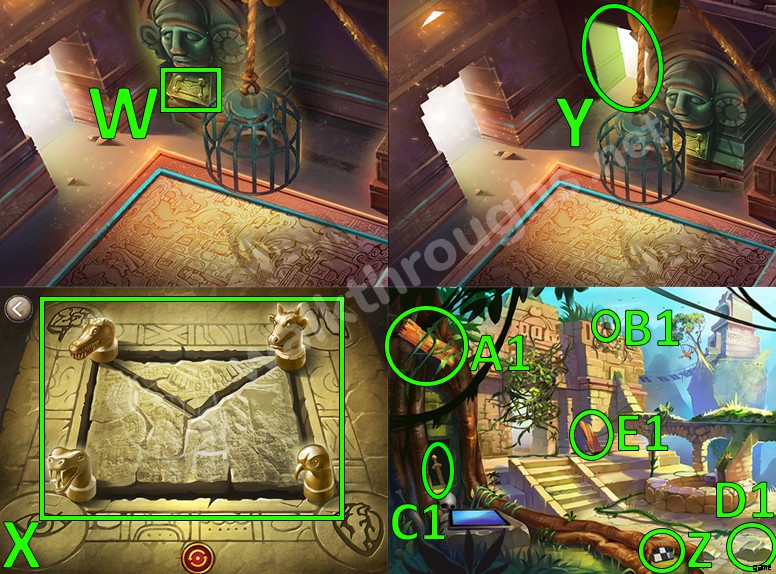
- Klicken Sie auf das Puzzle. (W)
- Sehen Sie sich die Plakette an erneut, um den Weg von jedem Tier zu einem Organ oder Körperteil zu sehen. Der Ochse geht in die Lunge der Hawk geht ins Herz die Schlange geht zum Auge und dasKrokodil geht zum Gehirn. (X)
- Gehen Sie durch den Eingang. (J)
- Sammle das karierte Stück. (Z)
- Benutze Bert um die Rebe. zu erreichen Sammle das Brett ein das fällt. (A1)
- Benutze Bert um das karierte Stück zu erreichen. (B1)
- Sammle dasSchwert. (C1)
- Bewege das Schwert und sammle das karierte Stück ein (D1)
- Sammle das Holzbrett. (E1)
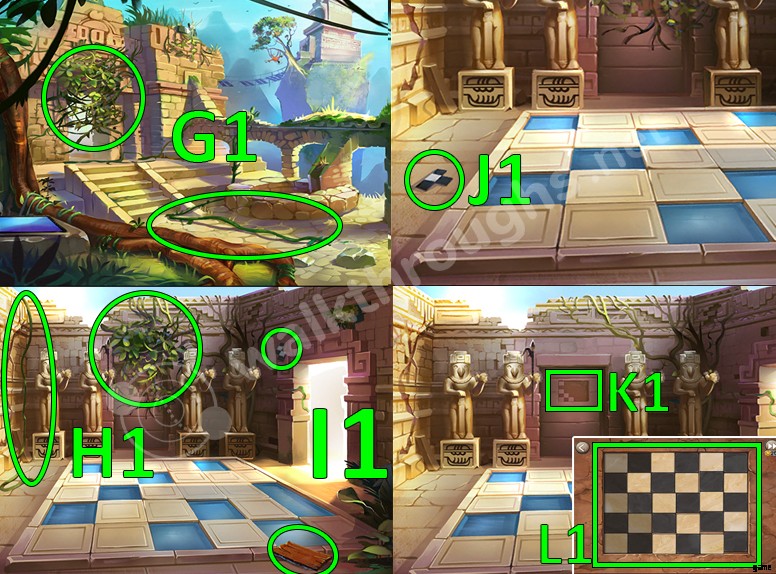
- Benutze das Schwert auf den zwei Reben. Sammle diezwei Reben. Gehen Sie durch den Torbogen. (G1)
- Benutze dasSchwert um zwei weitere Reben zu erhalten. (H1)
- Sammle das Holzbrett und das karierte Stück. (I1)
- Sammle das karierte Stück das sich unter der Rebe. versteckte (J1)
- Klicken Sie auf das Puzzle. (K1)
- Fügen Sie alle karierten Teile hinzu zum Rätsel. Das Endergebnis sollte wie ein Schachbrett aussehen um es zu lösen. (L1)
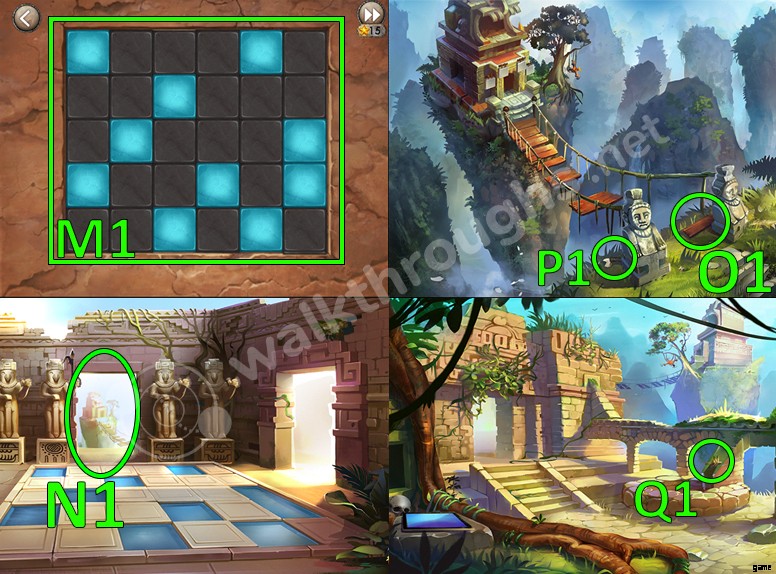
- Klicken Sie auf die Schaltflächen auf dem Bild gezeigt. Das Puzzle basiert auf den blauen Blöcken im Pool. (M1)
- Gehen Sie durch die Tür. (N1)
- Sammle dasHolzbrett. (O1)
- Sammle die Vogelkralle. (P1)
- Benutze die Vogelkralle in dem Objekt, das im Brunnen steckt. Sammle das letzte Brett ein (Q1)
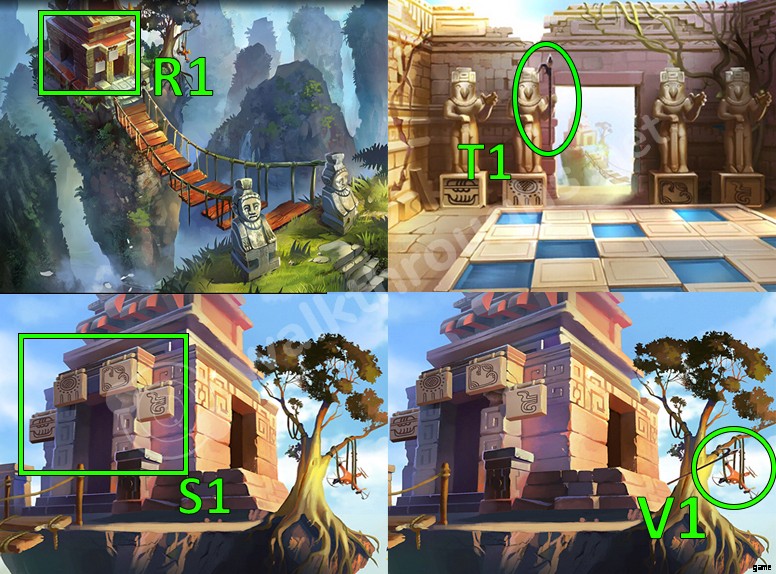
- Wiederaufbau mit der Brücke mit den Bohlen und Reben Sie haben gerade gesammelt. Gehe zum Turm. (R1)
- Denken Sie an dieSymbole die am Schrein. hängen
- Gehe in den Statuenraum. Ändern Sie die Symbole unter den Statuen passend zu den Symbolen am Schrein hängen. Sammle den Speer. ein (T1)
- Benutze den Speer um die Drohne und die Computerchips zu bekommen. (V1)
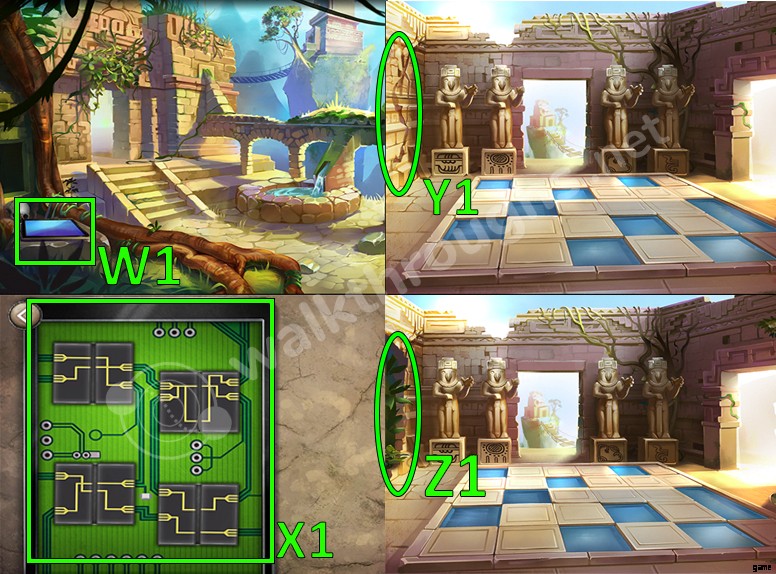
- Gehe zurück zum Ausgangspunkt und klicken Sie auf das Tablet. (W1)
- Das Bild zeigt die richtigen Steckplätze, um das Drohnentablett zu befestigen (X1)
- Gehe in den Statuenraum und sprengen Sie die Wand mit der Drohne. (Y1)
- Gehe durch die gebrochene Wand. (Z1)
- Kapitel abgeschlossen.
Kapitel 4

- Sammle den Stein . (A)
- Sammle den umgefallenen Ast. (B)
- Benutze Bert um die Banane zu bekommen vomBaum. (C)
- Lesen Sie die Nummern auf dem Heck des Flugzeugs da steht N481. Klicken Sie auf die Tastatur befindet sich im Flugzeug. (D)
- Verwende die Flugzeughecks Nummern auf der Tastatur, 481. Jetzt der Laderaum ist geöffnet. (E)
- Sammle dasFrachtnetz ein und die Angelrute im Laderaum. (F)
- Platziere den Ast auf demBaumstumpf. Dann gehen Sie nach rechts. (G)
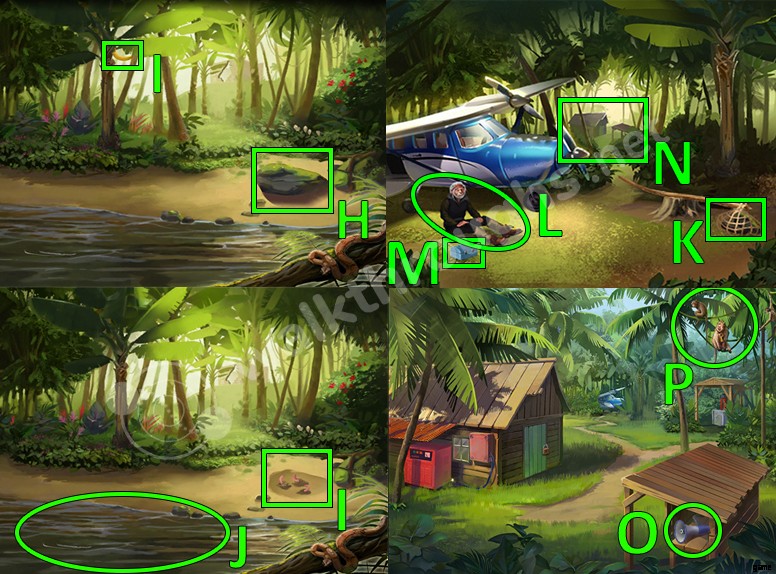
- Sammle den Stein. (H)
- Sammle dieBanane. (I)
- Benutze die Angelrute mit den Würmern die unter dem Felsen waren (I)
- Benutze die Angelrute im Wasser, um einen Fisch zu bekommen (J)
- Platziere das Netz auf den umgestürzten Ast und füge die zwei Felsen hinzu ins Netz, um den Mann zu retten, der unter dem Flugzeug gefangen ist. (K)
- Nach der Rettung des gefangenen Mannes eine Brotdose wird auftauchen. Gib den Fisch an den Mann im Austausch für eineBanane. (L)
- Öffne die Brotdose Sammle die Banane (M)
- Geh durch dieBäume um zu denGebäuden zu gehen. (N)
- Sammle das Melophon. (O)
- Klicken Sie auf die Affen. (P)
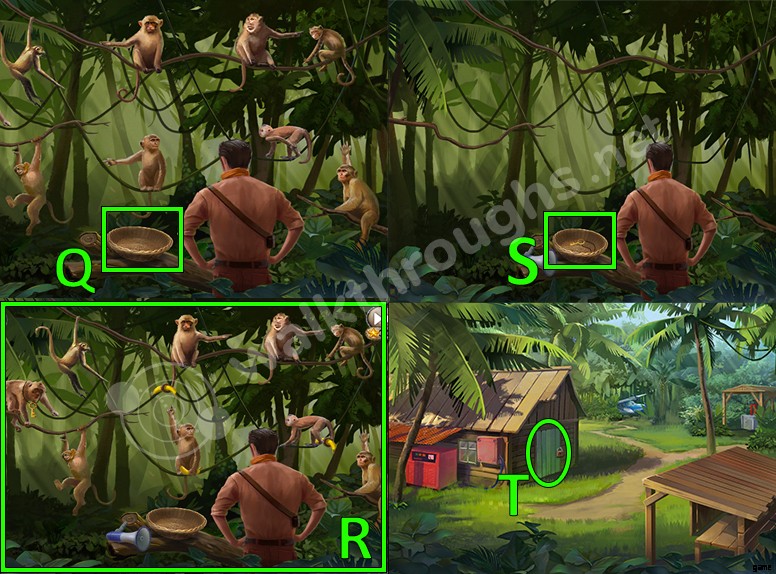
- Platziere die drei Bananen im Warenkorb und platziere das Melophon neben dem Korb. (Q)
- Geben Sie die richtigen Affen an die Bananen also beim Melophon wird geblasen, um den Schlüssel zu machen landen im Korb. Es sollte wie auf dem Bild aussehen unten, um das Rätsel zu lösen (R)
- Sammle den Schlüssel. (S)
- Verwenden Sie die Taste um die Tür zu öffnen. Gehen Sie es durch. (T)
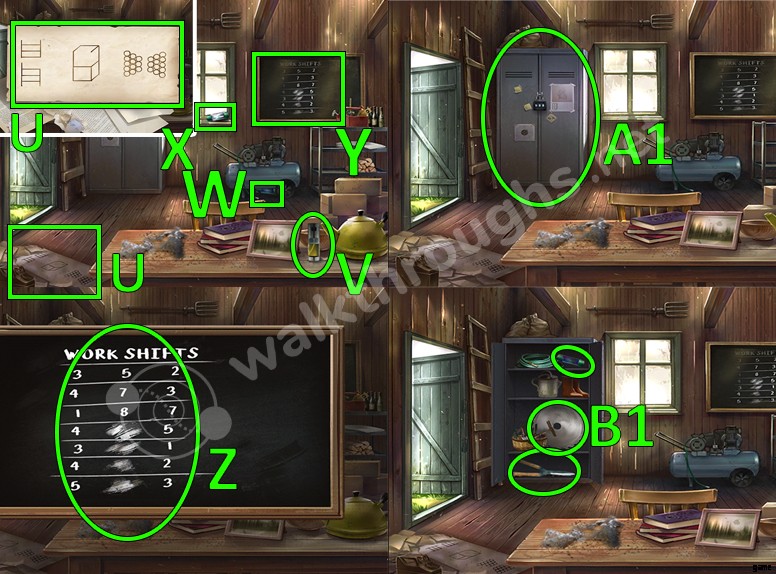
- Klicken Sie auf die Tafel. Füllen Sie die Zeilen aus die fehlen und Sie erhalten die Nummer 478. (U)
- Sammeln Sie denÖlnebel. (V)
- Sammle dieSicherung. (W)
- Sammle diezweite Sicherung. (X)
- Klicken Sie auf die Tafel. Schau es dir an, addiere die erste Zahl unddritte Zahl um diezweite Zahl zu finden. Die fehlenden zweiten Zahlen sind:9, 4, 6, 8. Merken Sie sich diese Zahlen, da sie für ein zukünftiges Rätsel verwendet werden. (A1)
- Klicken Sie auf den Schrank. Verwenden Sie die Nummer 478 in order to open it. (A1)
- Collect the saw blade, fuse and shears. (B1)
- Place the blade on the machine. (C1)
- Use the code 9468 to open the forklift. Use the oil spray to open the toolbox. Collect the screwdriver im Inneren. (D1)
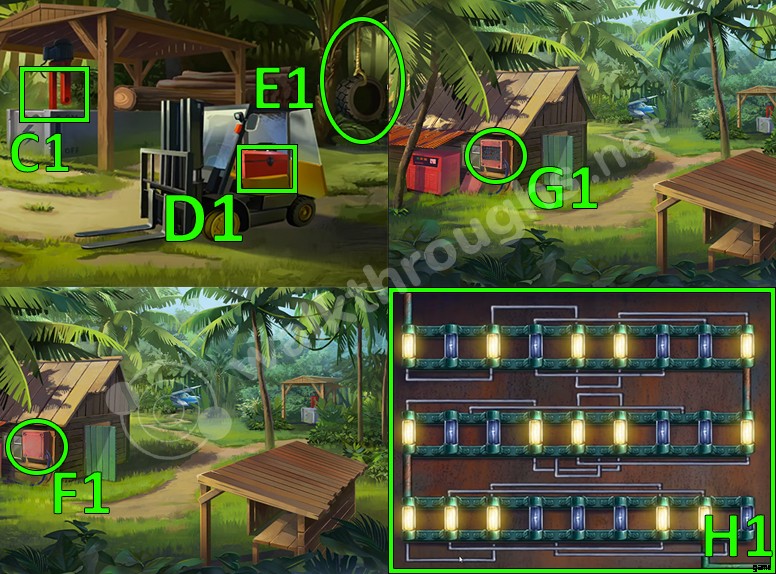
- Use the shears to cut the rope that is holding the tire. After that, collect the tire and the rope. (E1)
- Verwenden Sie denSchraubendreher to open the fuse box. (F1)
- Click on the fuse box. (G1)
- Place the three missing fuses on the box. The image shows the correct way to move the brackets to get electricity flowing.. (H1)
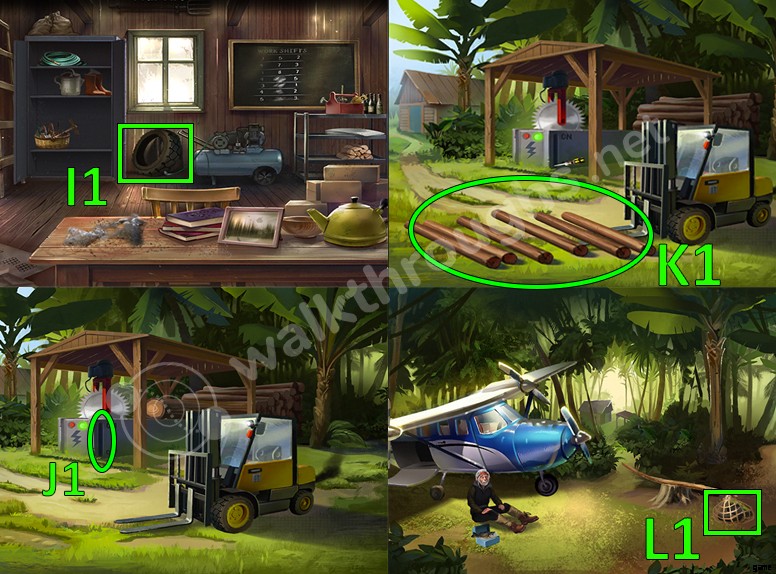
- Go inside the shed. Inflate the tire. After that, collect it. (I1)
- Verwenden Sie den Schraubendreher as a level to turn on the logger. Doing that with make the logger cut some wood. (J1)
- Use the first rope to tie them up together. We need another rope to tie them up into a raft, so lets find it. (K1)
- Go back to the plane and use the shears on the net to collect another rope. (L1)
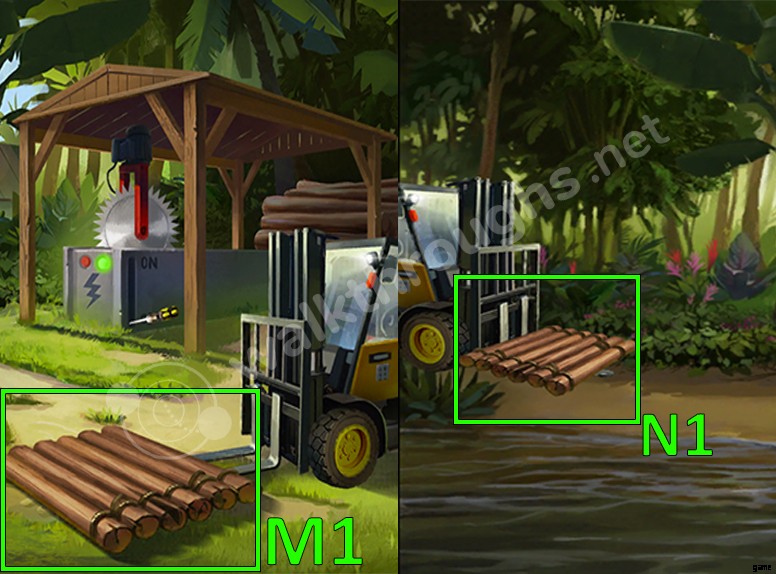
- Use the final rope to tie them up into a raft. Then place the inflated tire to the forklift to make the forklift move into the river. (M1)
- Chapter Completed. (N1)
Chapter 5
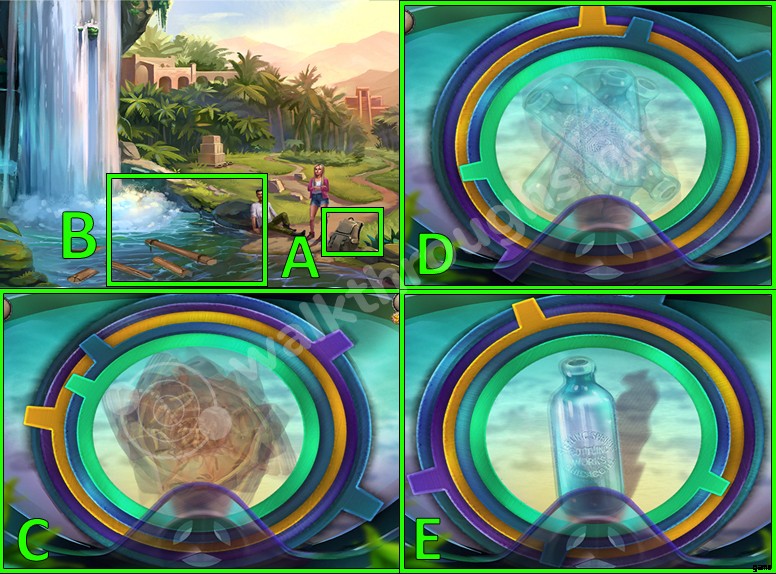
- Open the backpack. Collect the diving mask and slingshot. (A)
- Use the diving mask on the water. (B)
- Match up all the layers of the shoe. (C)
- Match up all the layers of the bottle. (D, E)

- Match up all the layers of the necklace. (F)
- Enter the cave located behind the waterfall. (G)
- Collect the pile of pebbles. (H)
- Get out of the cave and go to the temple. (I)
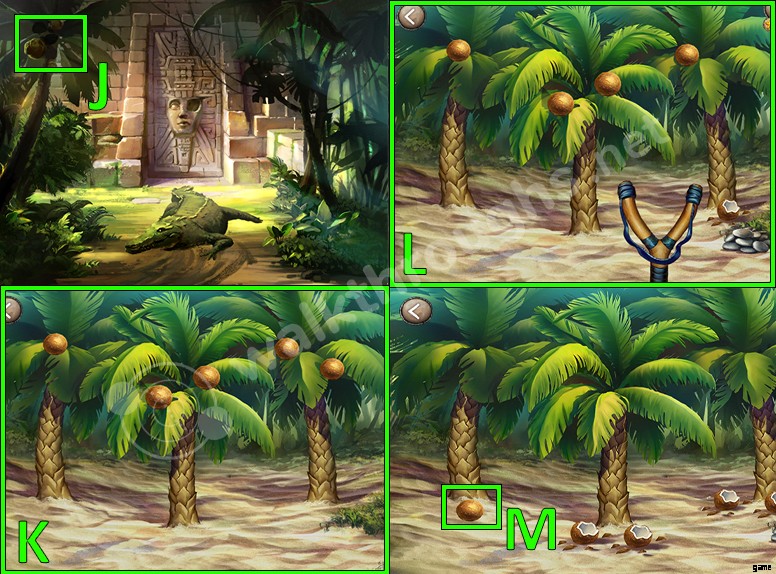
- Tap on the cocunut tree. (J)
- Place the pile of pebbles alongside the tree. (K)
- Use the slingshot and pebbles to shoot the coconuts. (L)
- Take the last coconut. (M)
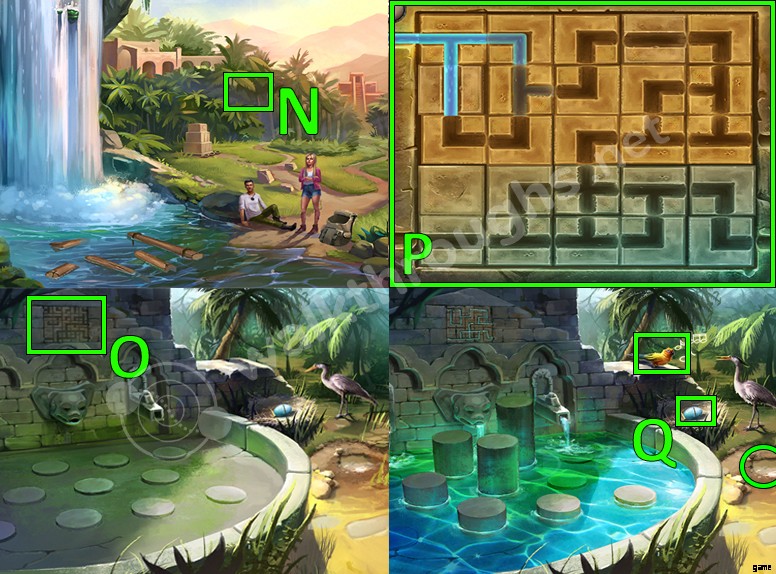
- Click on the middle of the trees. (N)
- Click on the puzzle. Stones will rise up after doing this puzzle, giving you a hint for the pegs located in the waterfall area. (O)
- The correct way to solve the puzzle. (P)
- Have Bart sing the crane to collect the egg. After Crane gets distracted, collect the blue egg. Also, pick up the puddle of mud. (Q)
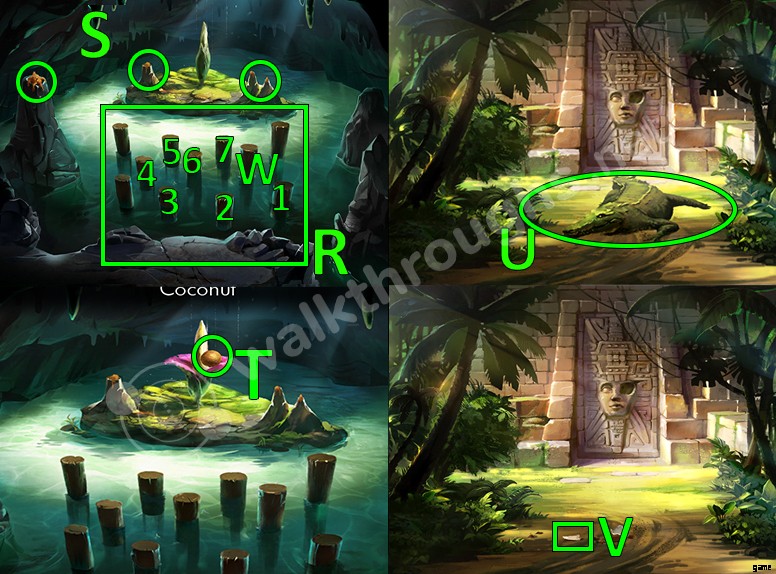
- Click on the pegs in the correct order to solve the pegs puzzle. (R)
- Stuff some mud in the spouts because after doing the puzzle, the spouts will steam. (S)
- Place the coconut into the meaty smelling flower to get a meaty smelling coconut. (T)
- Give the meaty smelling coconut to the crocodile. (U)
- Collect the crocodile tooth. (V)
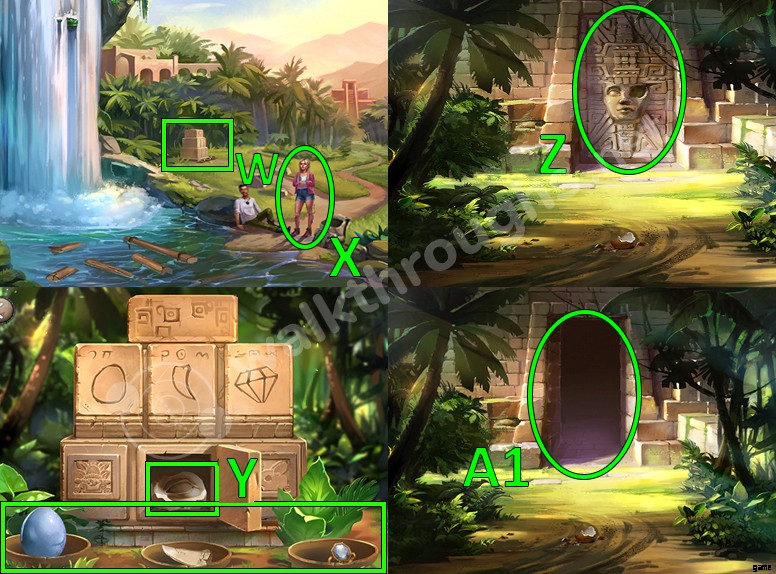
- Tap into the offering area. Place the tooth and the blue egg into the bowls, but we also need Rachel’s diamond to take the final item in order to complete this chapter. (W)
- Give the necklace to Rachel in exchange for the diamond. (X)
- Place all of the three items and take the stone eye. (J)
- Go back to the crocodile area. Place the stone eye on the pharaoh’s eye in order to make the door open. (Z)
- Go through. Chapter Completed. (A1)
Chapter 6
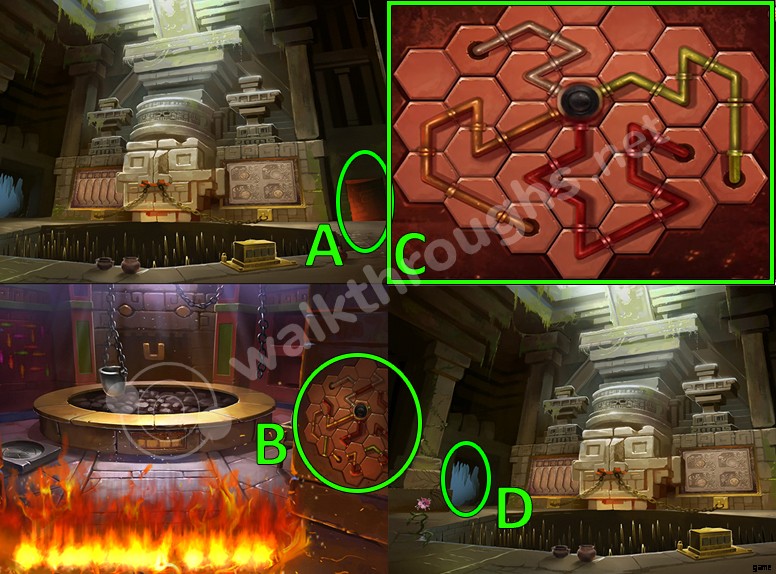
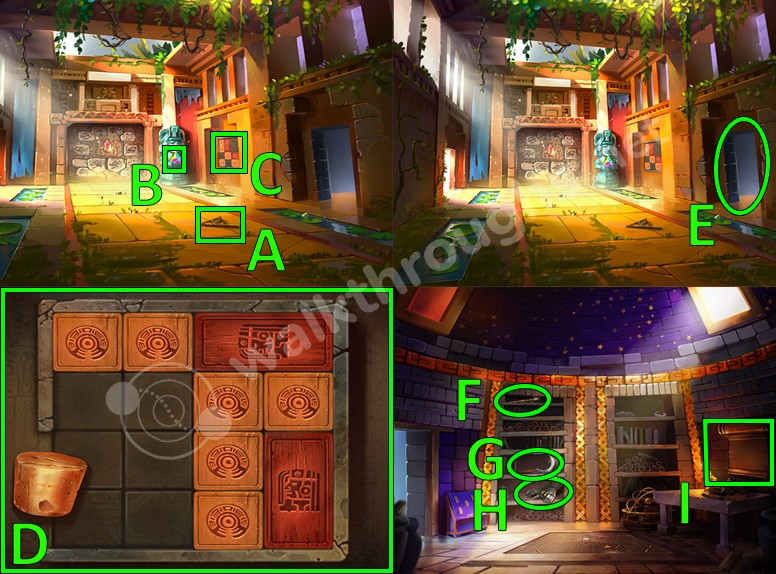
- Tap on the red doorway. (A)
- Klicken Sie auf dasRätsel. (B)
- The correct way to solve the puzzle. (C)
- Click on the blue doorway. (D)
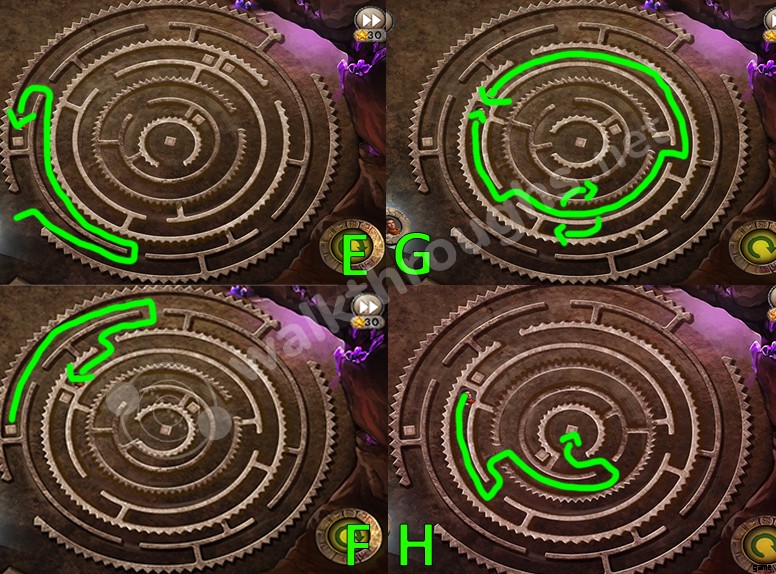
- The images show the correct path in order to progress through this maze puzzle. (E, F, G, H)
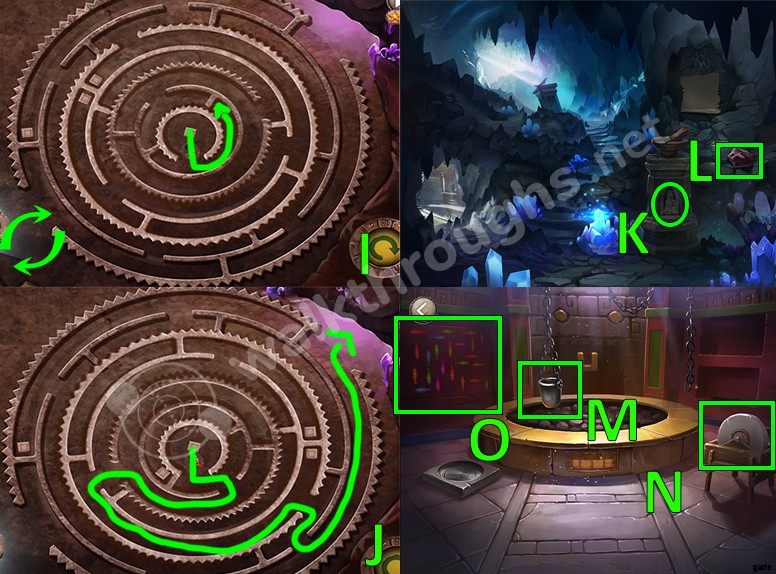
- These images show the correct final paths in order to solve the maze puzzle. (I, J)
- There is a ore hiding inside the pedestal. Sammle es ein. (K)
- Collect the chunk of obsidian. (L)
- Place the ore into the crucible. (M)
- Use the grinding stone to sharpen the chunk of obsidian. (N)
- Click on the fish on the wall. (O)
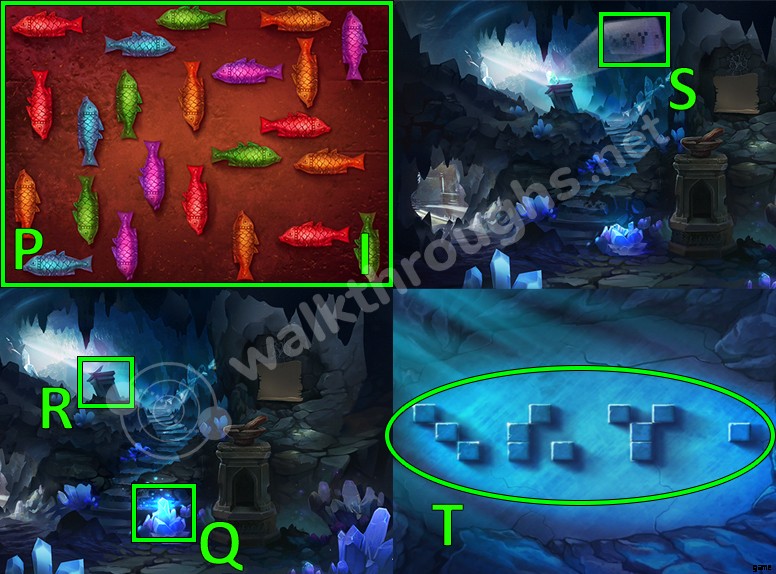
- The fish on the wall are a clue for a future puzzle. You need to figure the shape of numbers for each fish color by the direction they are facing. For the red fish, the number 5. For the yellow fish, the number 0. For the green fish, the number 9 , and for the blue fish, the number 8. These numbers will be used for the next puzzle. (P)
- Go to the crystal area wieder. Use the sharpened obsidian to get a crystal. (Q)
- Use the crystal on the pedestal to get a clue for another puzzle. (R)
- Click on the clue. (S)
- Read the clue. It will be used for the puzzle located in the smelting room. (T)
- Click on the smelting room puzzle. (U)
- Use the clue from the crystal area to solve the puzzle. (V)
- Take the melted ore. (W)
- Pour the ore into the mold auf dem Boden. Collect the shield that gets created from it. (X)
- Collect the pink flower. (J)
- Klicken Sie auf das Puzzle. (Z)
- Use the numbers from the fish on the wall um das Puzzle zu lösen. The number is 5098 . Collect the stone quills . (A1)
- Place the pink flower in the mortar and pestle to create a liquid vial. (B1)
- Add liquid vial to the parchment to get a clue for a future puzzle. (C1)
- Read the clue. We are going to use this clue for a puzzle involving stone quills. The clue means that, 1 dot means one turn clockwise, 2 dots mean two turns clockwise and three dots mean three turns clockwise. (D1)
- Click on the shields. Place the new shield with the other shield. (E1)
- Make sure you have collected all of the stone quills. (F1)
- Click on the stone quill puzzle . Use the clue from the parchment to solve the puzzle. (H1)
- Go through the unlocked entrance. (I1)
- Chapter Completed.
Chapter 7
- Collect the dial from the floor. (A)
- Collect the prism. (B)
- Click on the sliding block puzzle. (C)
- Get the cork out through the opening on the left. (D)
- Go through the doorway. (E)
- Use Bert to collect the dial. (F)
- Collect the sickle. (G)
- Collect the gloves. (H)
- Click on the parchment. (I)
- The clue is going to be used for a future puzzle. (J)
- Collect another dial. (K)
- Use the cork to stop the water from draining. (L)
- Use the gloves on the plants to find another prism. (M)
- Place the three dials you collected on the sundials. Set the sundials so they match the clue we just found on the parchment. Collect the note after matching the sundials. (N)
- Use the sickle on the banner auf der Linken. Collect the piece of banner. (O)
- Wet the piece of banner in the fountain. (P)
- Use the wet cloth to clean the dirty wall. Doing that, will allow you to read a hint for the next puzzle. You have 4 red symbols, 3 pink symbols, 1 orange and 6 blue symbols. Match the symbols to the ones on the walls with the ones in the fountain, and you will get the number 4613. Also there are 5 birds in the background, so remember these 5 numbers since they are going to be used for the next puzzle. (Q)
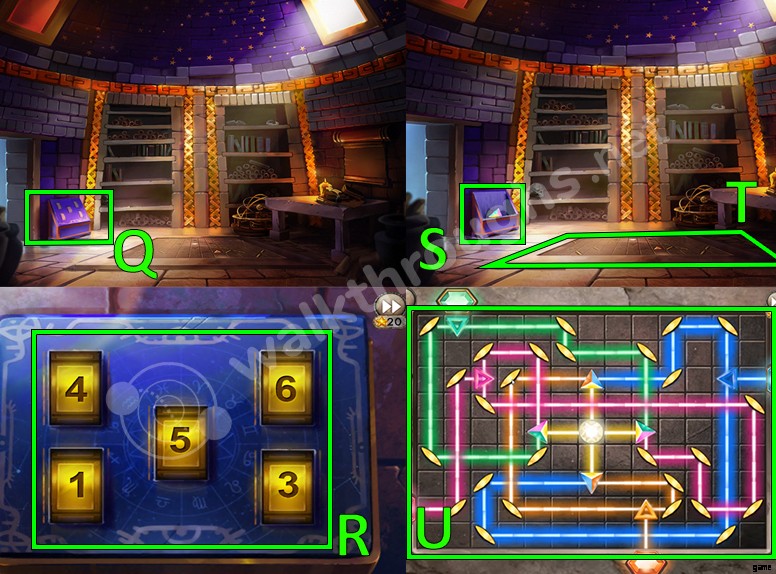
- Go through the room on the doorway auf der rechten Seite. (Q)
- Use the numbers 4, 6, 1, 3 and 5 um die Truhe zu öffnen. (R)
- Collect the prism. (S)
- Place the three prisms you collected on the light reflecting puzzle. After that, click on the puzzle. (T)
- The correct way to solve the puzzle. (U)
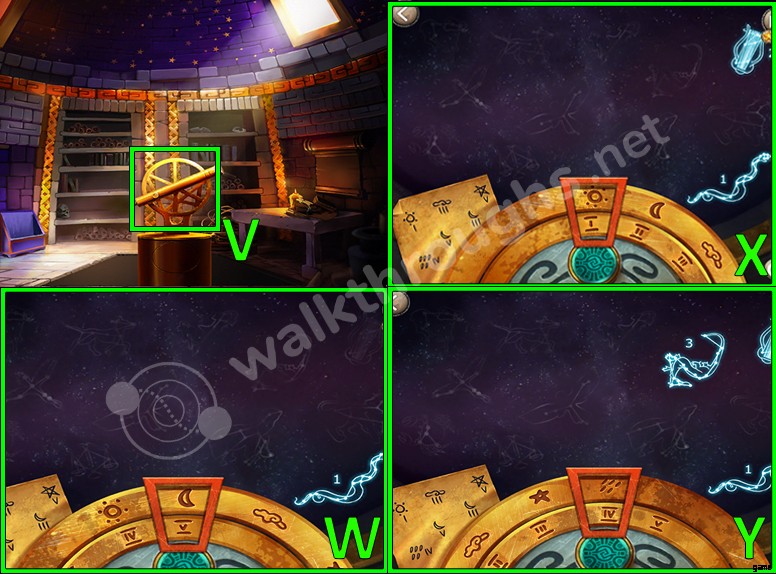
- Tap on the telescope. (V)
- Place the sundial note by the side. The image shows the first combination for the first constellation. (W)
- The image shows the second combination for the second constellation. (X)
- The image shows the third combination for the third constellation. (J)
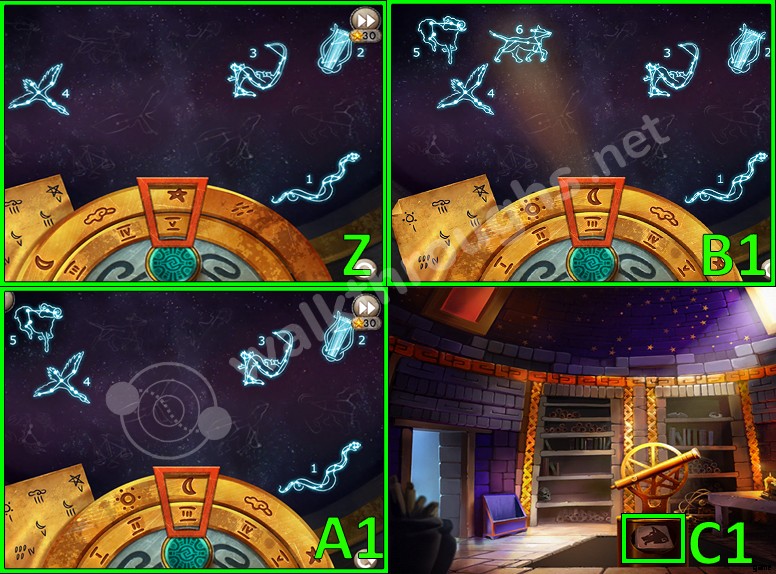
- The image shows the fourth combination for the fourth constellation. (Z)
- The image shows the fifth combination for the fifth constellation. (A1)
- The image shows the sixth combination for the sixth constellation. (B1)
- Collect the dog tile. (C1)
- Click on the tile wall. (D1)
- Place the dog tile with the other tiles. Click the tiles in order to open the entrance. (E1)
- Go through the entrance. (F1)
- Collect the stick. (G1)
- Collect the leaf. (H1)
- Collect the mallet. (I1)
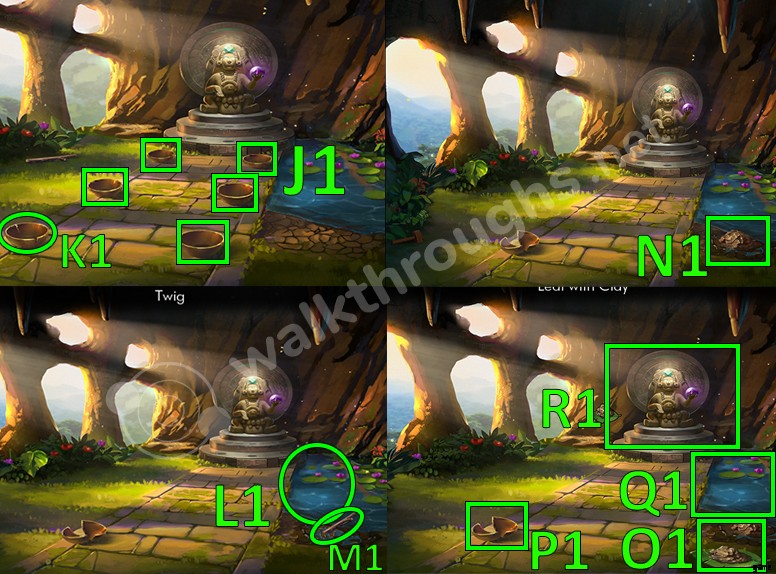
- Collect the five bowls. (J1)
- Click on the last bowl. That one breaks. (K1)
- Collect some water on one of your bowls, then pour it into the dirt. (L1)
- After that, use the stick to mix it up into clay. (M1)
- Use the leaf to collect some of the clay. (N1)
- Collect the leaf holding clay. (O1)
- Use the leaf holding clay in the broken bowl to fix it. Collect the bowl. (P1)
- Fill every bowl mit Wasser. You should have 6 bowls with water. (Q1)
- Klicken Sie auf dieStatue. (R1)
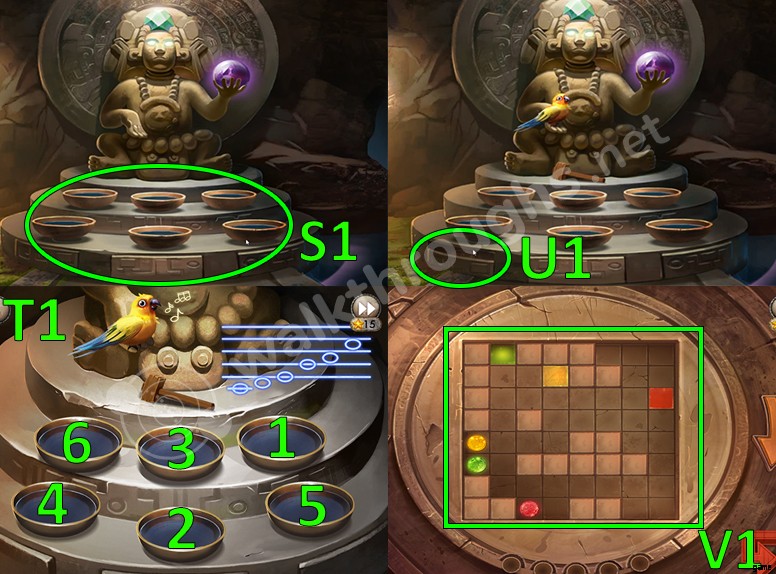
- Place the bowls on the statue. (S1)
- Place the Mallet and Bert in the statue to have him sing a tune. Hit the bowls with your mallet in the correct order as shown on the image. (T1)
- Benutze denStick to open the panel. (U1)
- To solve this puzzle. You need to turn the board in order to have the balls land in the correct matching squares. The five moves are:Right, Right, Right, Left, Left. (V1)
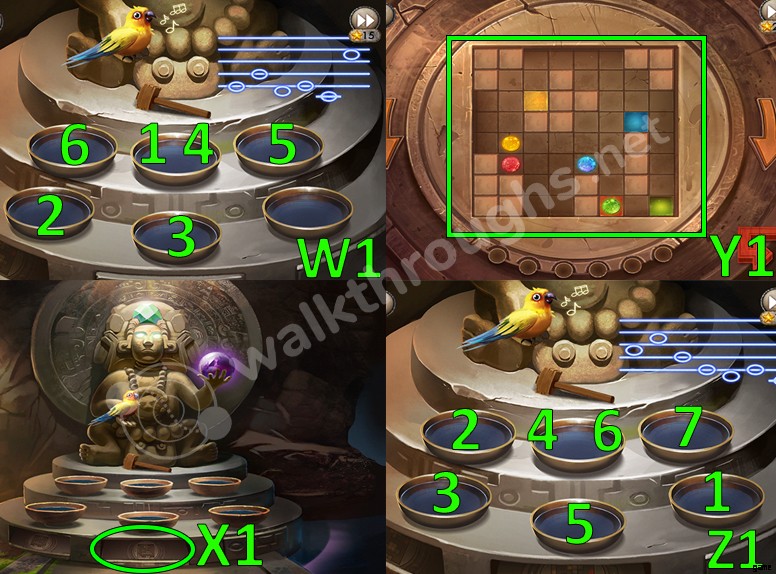
- Have Bert sing another one. Hit the bowls with the mallet in the correct order. (W1)
- Klicken Sie auf das Puzzle. (X1)
- The moves in order to solve the second puzzle are:Right, Right, Right, Right, Right, Left. (Y1)
- Have Bert sing the third and final tune. Lastly, hit the bowls with the mallet in the correct order. (Z1)
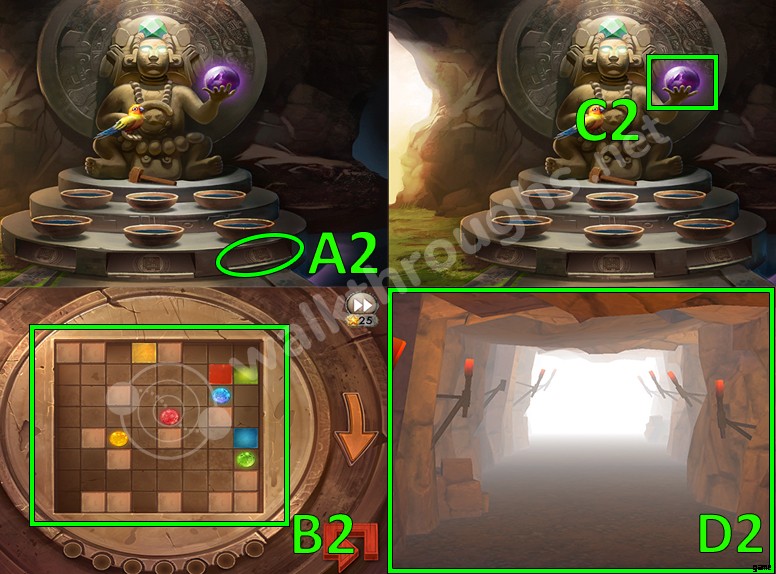
- Click on the third and final panel. (A2)
- The moves in order to solve the final puzzle are: Left, Right, Right, Right, Left. (B2)
- Collect the Elixir of Life. (C2)
- The cave is getting destroyed, so you have to escape. Swipe left and right to avoid the stalactites. (D2)
- Congrats, You completed the game!
Schlussfolgerung
Haiku Games always make escape games that are worth playing, and this is one of them! The jungle environment, the beautiful graphics and the massive amount of puzzles and riddles make it one of the best in the Adventure Escape Franchise. The beautiful ancient civilization art style , the story and the characters make it one of the best quality escape games in the market right now! You shouldn’t miss out on this one if you are looking for escape games to play!
