Einführung
Abenteuer Flucht:Asyl ist ein mysteriöser Asyl-Flucht-Klassiker, der von Haiku Games. entwickelt wurde Du spielst als Anna Sie wacht in einer gruseligen Anstalt auf und hat Angst um sich selbst, nachdem sie einige verschwommene Erinnerungen an ihre Vergangenheit hatte. Kannst du ihre Vergangenheit herausfinden und dieser gruseligen Anstalt entkommen? Wenn ja, mach dich auf komplexe Puzzles und interessante Rätsel gefasst und vor allem auf eine große Auswahl an Hinweisen und Gegenständen, die es zu finden gilt.
Komplettlösung
Kapitel 1 – Erwachen
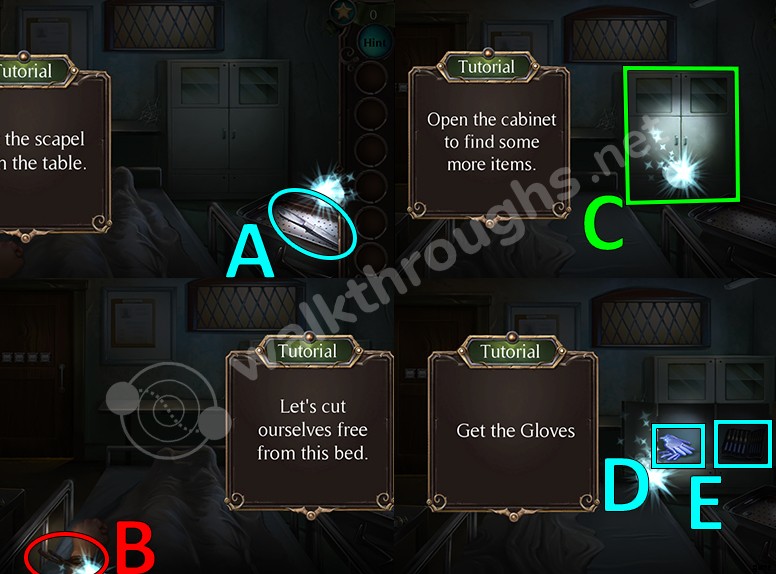
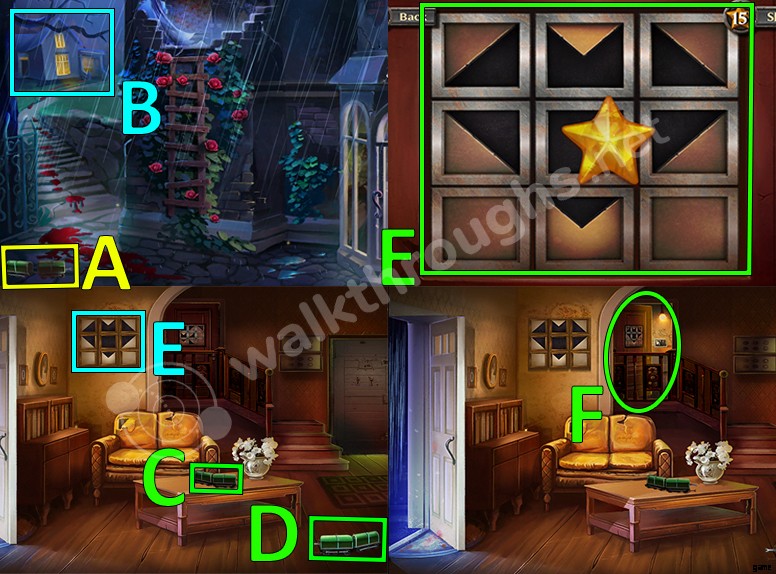
- Sammle das Skalpell. (A)
- Schneiden Sie sich aus demBett. (B)
- Öffne den Schrank. (C)
- Sammle die Handschuhe. (D)
- Sammle das Dietrich-Set. (E)
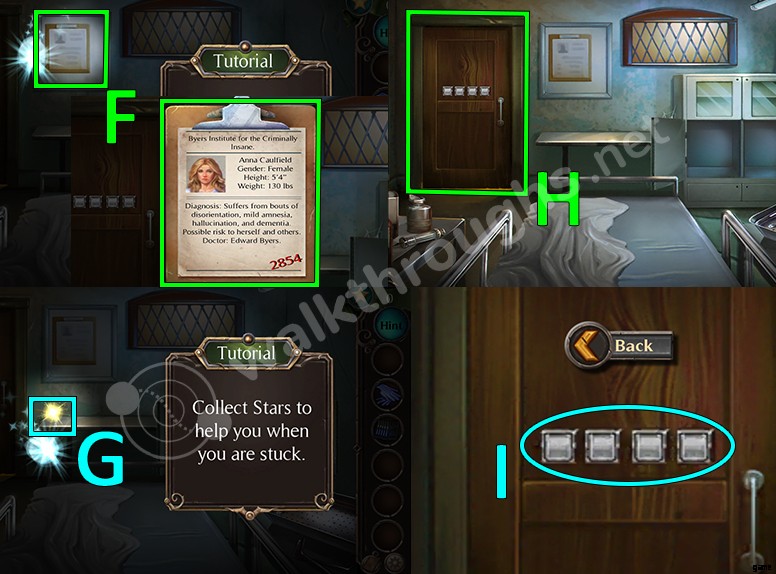
- Tippen Sie auf die Zwischenablage an der Wand, um über Anna. zu lesen Die Nummer 2854 im Brief ist ein Hinweis für das nächste Rätsel. (F)
- Sammle den Stern. (G)
- Klicke auf die Tür. (H)
- Verwenden Sie die Nummer2854 um die Tür zu entriegeln. (I)
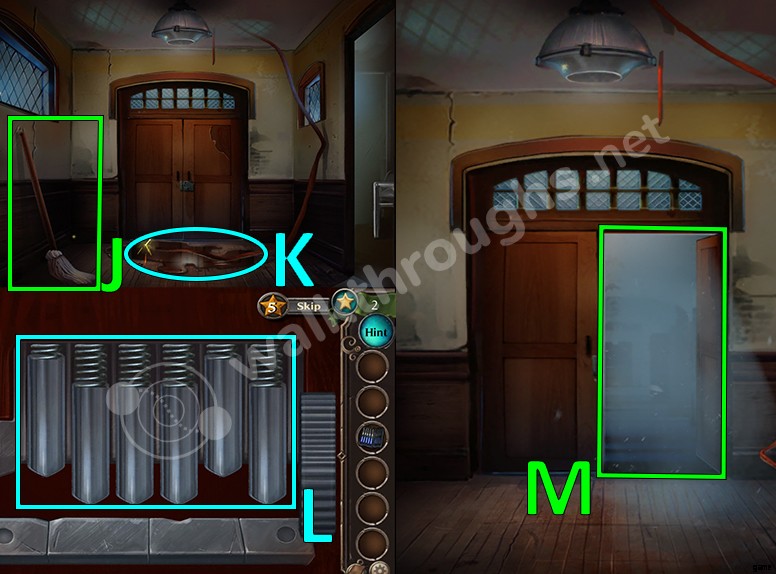
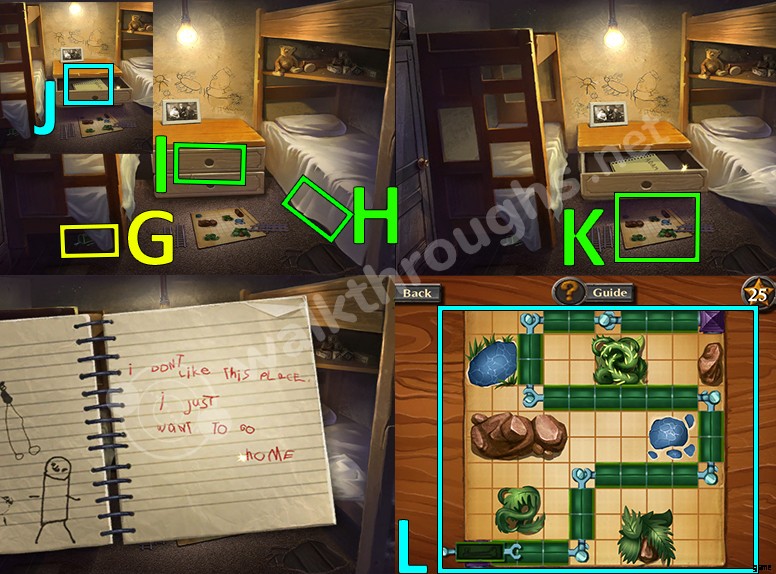
- Sammle den Mopp. (J)
- Benutze den Mopp um den nassen Boden zu räumen. Verwenden Sie danach Ihre Handschuhe um das elektrische Kabel zu reinigen aus dem Weg. (K)
- Klicke auf die Tür um das Schloss-Rätsel. anzuzeigen Verwenden Sie das Dietrich-Set um alle Fässer zu bewegen im Schließmechanismus bis sie alle in derselben Position sind (L)
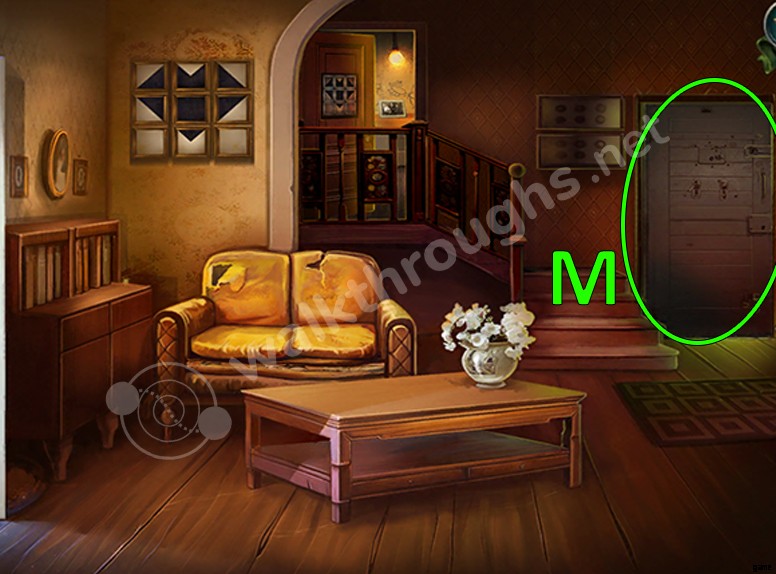
- Verlasse den Raum. (M)
Kapitel 2 – Das Institut
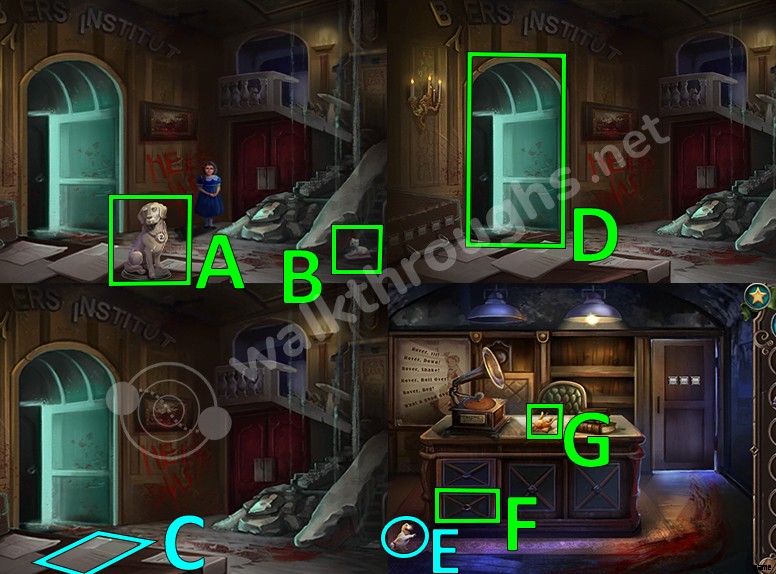
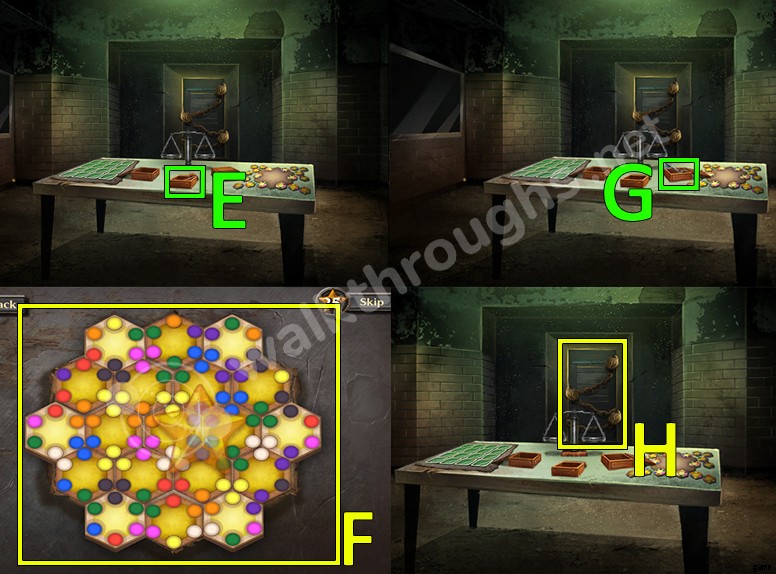
- Sammle die Hundefigur. (A)
- Sammle dieKatzenfigur. (B)
- Lies die Zeitung. (C)
- Gehe in den nächsten Raum. (D)
- Sammle die dritte Figur. (E)
- Klicken Sie auf die linke Schublade und sammle die Figur ein im Inneren. (F)
- Sammle die fünfte Figur. (G)
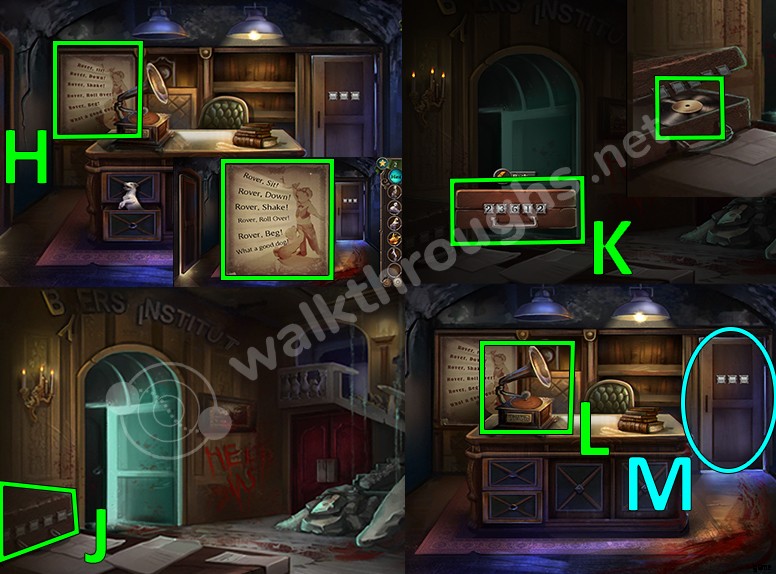
- Klicken Sie auf das Poster. (H)
- TIPP: Jede Figur hat eine Nummer angehängt an. Wenn du die Figuren kombinierst um zum Poster zu gelangen Sie erhalten die Nummer 23612.
- Gehen Sie in den Flur. Klicken Sie auf den Koffer. (J)
- Verwenden Sie die Nummer 23612 um den Koffer zu entriegeln. Sammle die Schallplatte ein im Inneren. (K)
- Gehen Sie in das Bürozimmer. Platzieren Sie die Schallplatte in den Phonographen. Nach einiger Zeit wird der Passcode angezeigt die verwendet wird, um aus dem Büroraum zu entkommen (314). (L)
- Verwenden Sie die Nummer 314 um die Tür zu entriegeln. Gehen Sie es durch. (M)
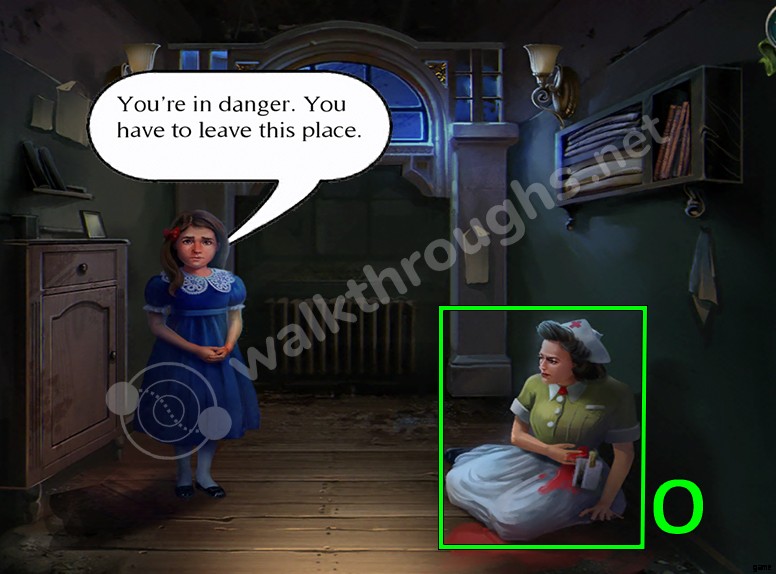
- Sammle die magnetische Schlüsselkarte von der Krankenschwester und vervollständigen Sie das Kapitel. (O)
Kapitel 3 – Die Warnung
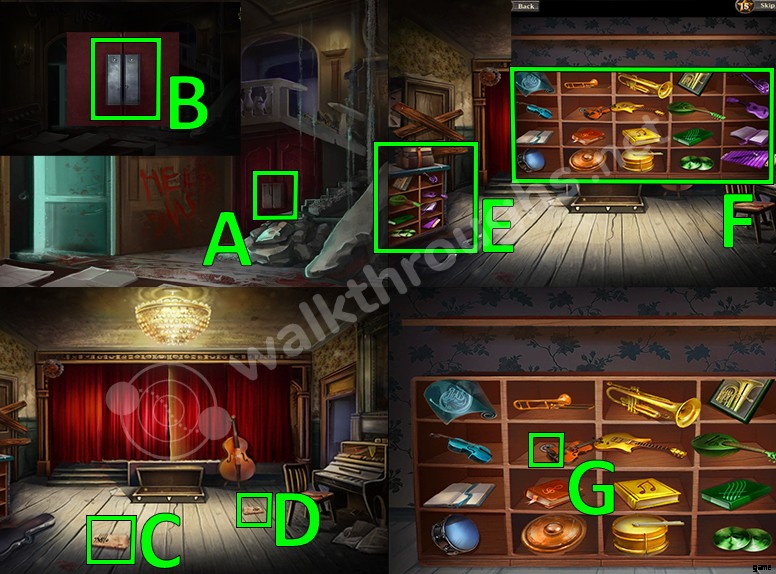
- Klicken Sie auf den Kartenleser. (A)
- Verwenden Sie die Schlüsselkarte der Krankenschwester um zum nächsten Raum zu gelangen (B)
- Sammle das Notenblatt. (C)
- Sammle das zweite Notenblatt. (D)
- Klicken Sie auf die Regale sie zu organisieren. (E)
- Die Lösung. (F)
- Nach dem Organisieren der Regale Bewege die orange Geige um ein Zahnrad zu finden Sammle es ein. (G)
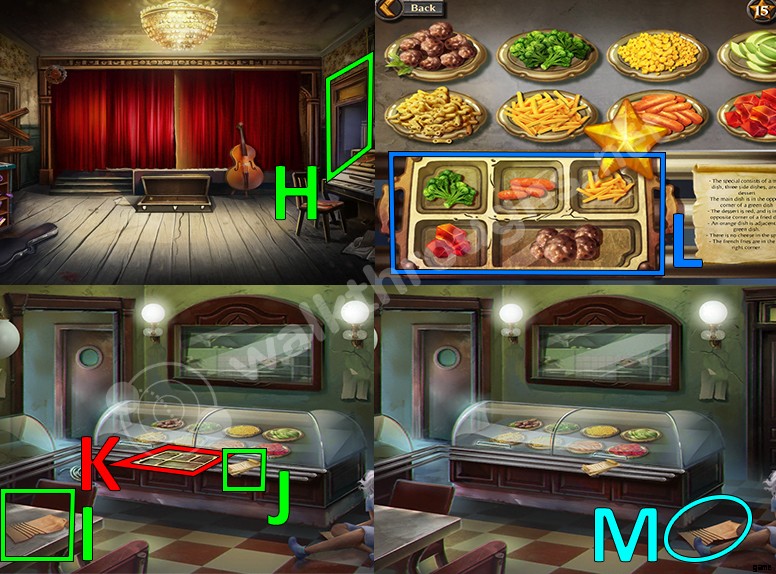
- Gehen Sie zum Essbereich. (H)
- Sammle das dritte Notenblatt. (I)
- Das Instruktionspapier hilft beim nächsten Rätsel musst du lösen. (J)
- Klicken Sie auf die Leiste. (K)
- Der richtige Weg, um dasRätsel zu lösen. (L)
- Gib das Tablett an diealte Dame. Sie bewegt sich daher und enthüllt ein viertes Notenblatt. (M)
- Sammle das Seil. (N)
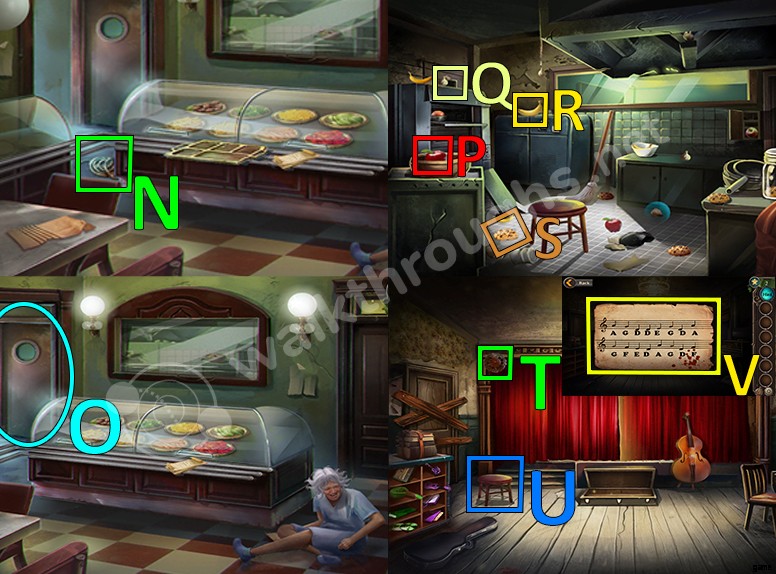
- Gehe in die Küche . (O)
- Sammle zuerst den Hocker ein befindet sich in der Küche.
- Verschiebe alle Äpfel findest du in der Schüssel. (P)
- Bewege denKnoblauch in das Knoblauchseil. (Q)
- Die Bananen kommt in die weiße Schale. (R)
- Und schließlich die Cookies kommt in den weißen Krug. (S)
- Nachdem Sie den Ort organisiert haben, 8 Notenblätter erscheinen sollten, sammeln Sie alle. Wenn Sie nicht über 12 verfügen versuchen Sie zu sehen, ob Sie Früchte übersehen haben.
- Gehen Sie in das Musikzimmer. Platziere den Hocker um das verrostete Zahnrad zu erreichen. (U)
- Wechsle das verrostete Zahnrad mit der neuen Ausrüstung Sie haben gerade gefunden. Danach wird die Bühne fixiert. (T)
- Klicken Sie auf den Notenständer auf der Bühne, um ein weiteres Puzzle zu enthüllen. Fügen Sie alle Musikstücke hinzu die Sie gerade gefunden haben, mit den vorhandenen auf dem Ständer und ordnen Sie sie neu an, um dasvollständige Notenblatt zu vervollständigen. (V)
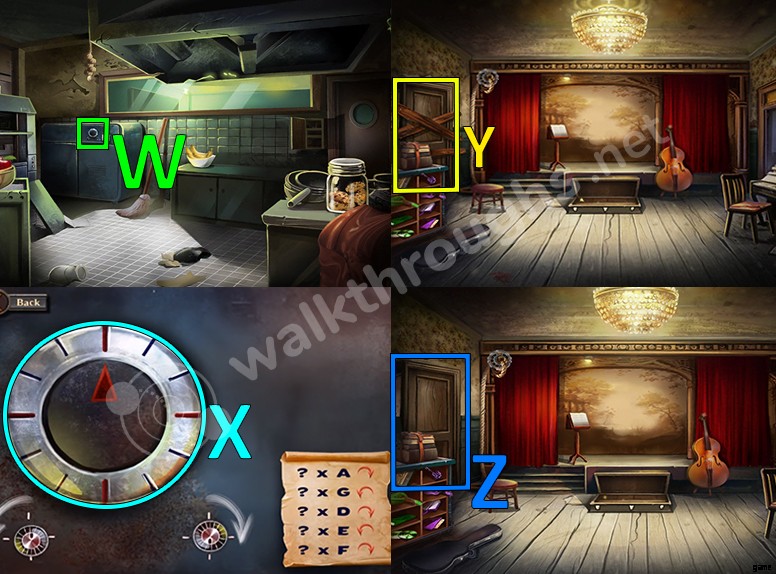
- Gehen Sie in die Küche.
- Klicken Sie auf den Tresor. Platziere das Notenblatt auf den Tresor da es ein Hinweis zum Lösen des Rätsels ist (X)
- Lösung:3 Mal im Uhrzeigersinn (A), 4 Mal gegen den Uhrzeigersinn (G), 5 Mal im Uhrzeigersinn (D), 2 Mal gegen den Uhrzeigersinn (E), 2 Mal im Uhrzeigersinn (F).
- Sammle den Hammer im Inneren. (X)
- Benutze den Hammer um die Barrieren zu zerstören die die Tür blockieren im Musikzimmer. (J)
- Verlasse den Raum. (Z)
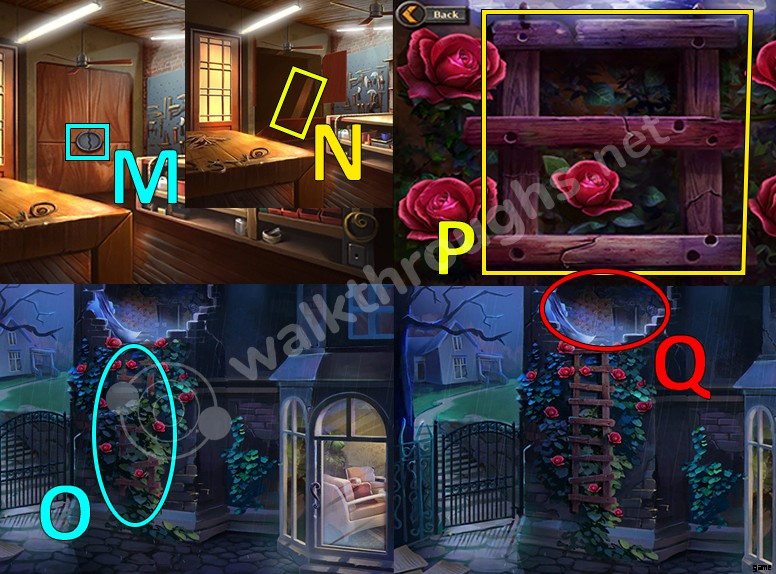
Kapitel 4 – Träume und Realität
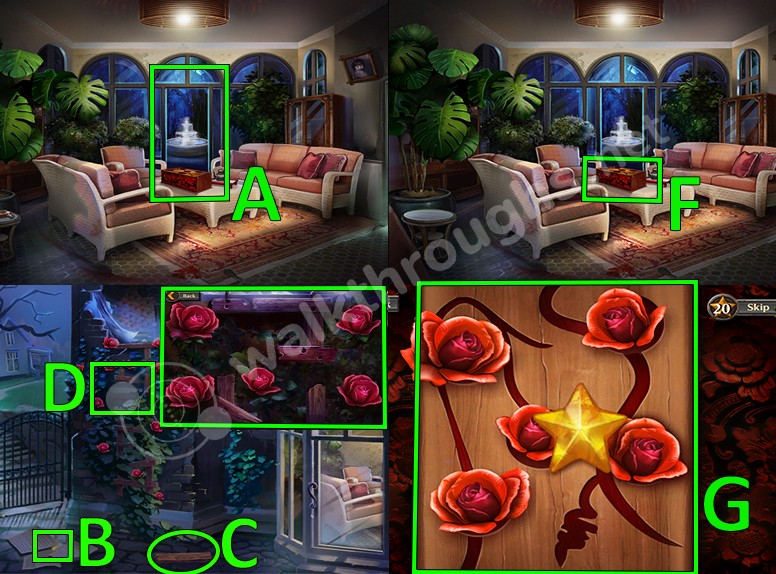
- Gehen Sie hinaus auf die Terrasse. (A)
- Sammle das Mondstück. (B)
- Sammle das Holzbrett. (C)
- Untersuche die kaputte Leiter. Denken Sie an die Position der Kletterrosen da ihre Position als Hinweis für das nächste Rätsel verwendet wird (D)
- Gehen Sie hinein wieder. Klicken Sie auf das Kästchen. (F)
- Der richtige Weg, um das Puzzle zu lösen. Sammle das zweite Mondstück nach dem Lösen des Rätsels. (G)
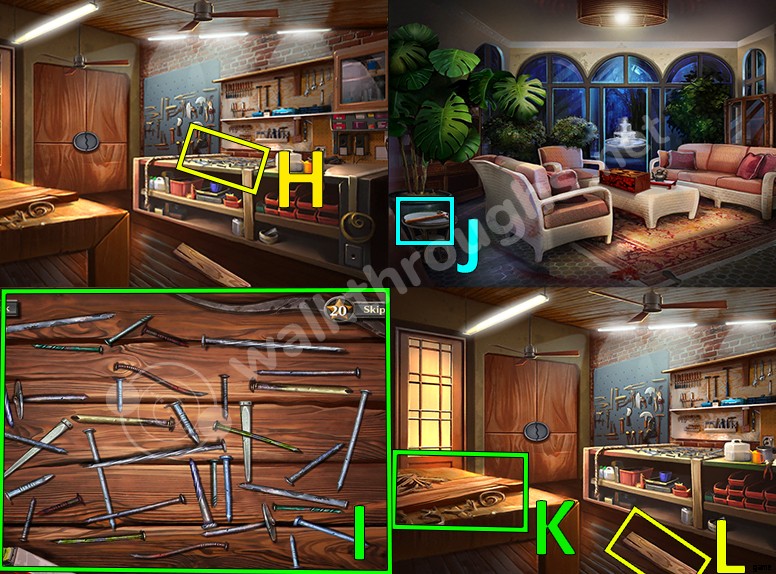
- Go to the workshop. (H)
- Click on the nails. Collect the nails by tapping them and combine all of the pairs that match. You will then collect a box of nails. (I)
- Gehen Sie ins Wohnzimmer. Collect the hammer. (J)
- Collect the second wooden plank. (K)
- Collect the third wooden plank. (L)
- Go to the workshop. Place the moon pieces on the slots located on the large door. (M)
- Collect the fourth wooden plank. (N)
- Go outside again. Zoom on the ladder. (O)
- Place the planks and the nails on the broken ladder. Benutze den Hammer um die Leiter. zu befestigen (P)
- Tap above the ladder to climb in order to complete Chapter 4. (Q)
Chapter 5 – The Mad Scientist
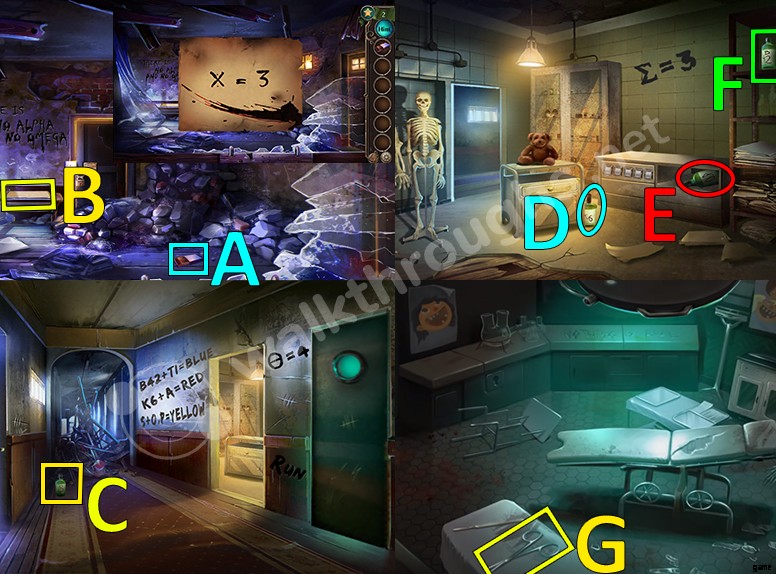
- Collect a box of matches. (A)
- Click on the letter hint. Lies es. (B)
- Go to the hallway. Collect the chemistry bottle. (C)
- Read all of the writing on the walls.
- Go to the next room. Notice the writing on the wall.
- Collect the second chemistry bottle. (D)
- Collect the third chemistry bottle. (E)
- Collect the fourth chemistry bottle. (F)
- Go to the green surgical room. Collect the scissors. (G)
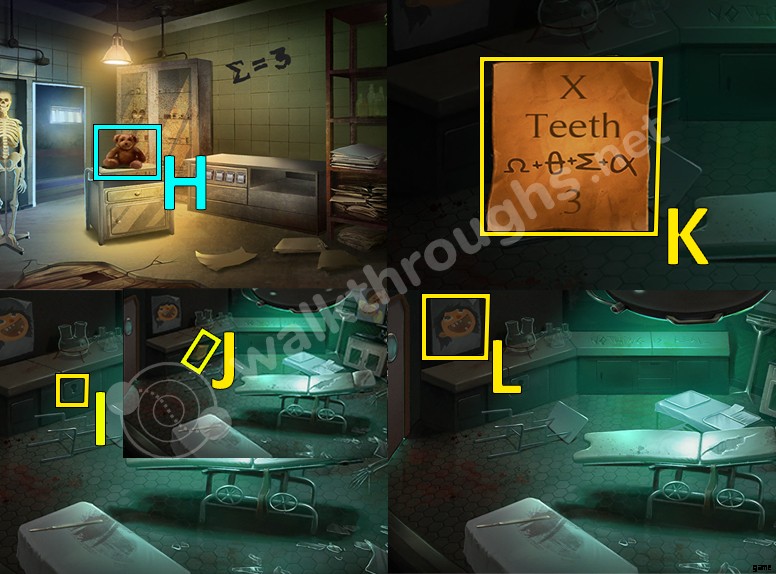
- Go to the orange room. Use the scissors on the teddy bear to cut it, you are going to find a key im Inneren. (H)
- Go to the surgery room. Use the key to open the locker. (I)
- Collect the letter inside the locker. (J)
- Read the letter. (K)
- Tap on the teeth poster an der Wand. There are 2 other ones located on the right side. (L)
- HINT: X =3 + Teeth (5 + 3 + 8 =13) + Sum of values excluding alpha and omega ( 4 + 3 =7) + 3. The result number is 31373.
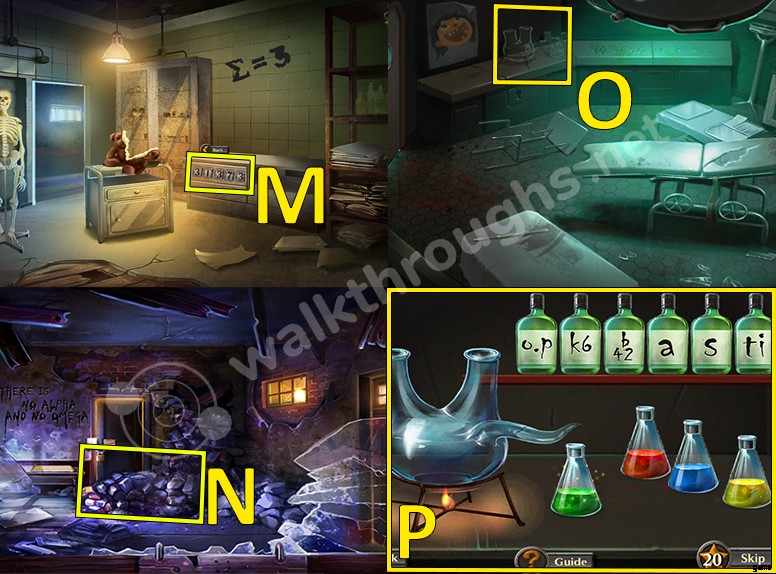
- Go to the orange room. Use the number 31373 in the combination lock. Sammle die Schaufel ein (M)
- Benutze dieSchaufel to dig through the rubble located in the starting room. Collect the fifth chemistry bottle. (N)
- Go to the surgery room. Click on the chemistry equipment. (O)
- Firstly, place all the bottles on the shelf, one is already there. There should be 6 in Summe. Use the matches you found in the beginning to light the fire under the mixing beaker. (P)
- Drag B42 and Ti into the mix to get a blue mixture.
- Drag K6 and A to get a red mixture.
- Drag S and O.P to get a yellow mixture.
- Now, mix the blue and yellow solutions to get the most important out of them all, the green acid.
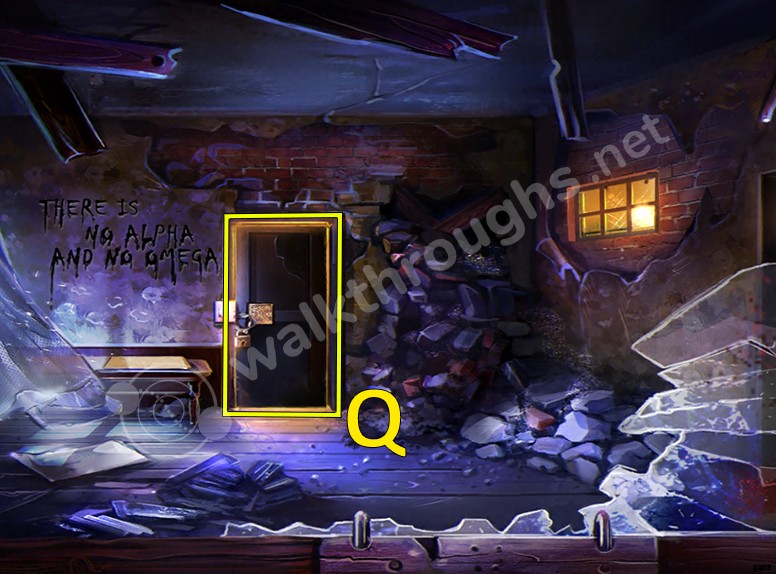
- Go to the starting room. Pour the acid into the door lock to destroy it, after that you can escape the room. (Q)
Chapter 6 – Wrath
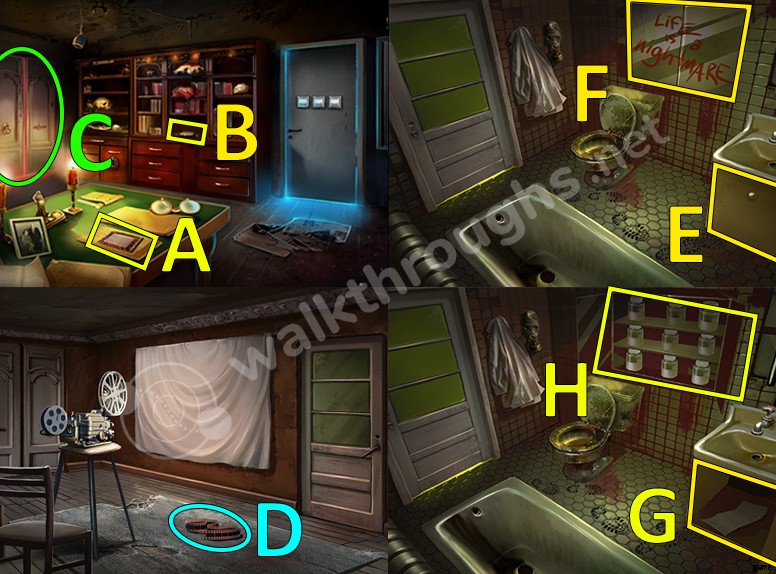
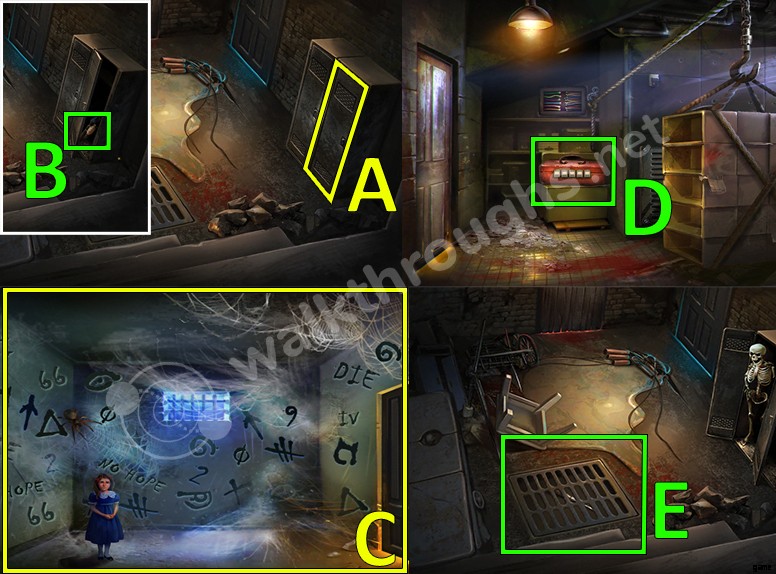
- Collect the film strip fragment. (A)
- Collect the second film strip fragment. (B)
- Gehe durch die Tür auf der Linken. (C)
- Pick up the third film strip fragment. After that, go through the door located on the right to go to the bathroom. (D)
- Open the cabinet door under the sink. (E)
- Open the mirror cabinet. (F)
- Collect the list of chemicals im Inneren. (G)
- Klicken Sie auf dasRätsel. (H)
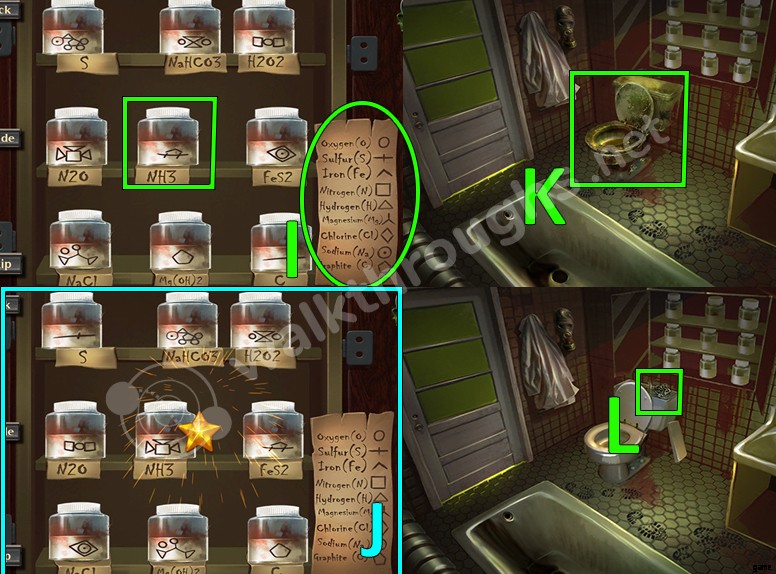
- Place the list of chemicals with the bottles that are displayed to you. You need to match the bottle labels to the chemical formulas on the shelves while using the list of chemicals. We need to get the correct NH3 bottle. (I)
- The correct way to solve the puzzle. After completing it, collect the NH3 bottle (Ammonia). (J)
- Use the bottle of ammonia to clean the toilet. (K)
- Tap on the tank um einen Schlüssel zu finden im Inneren. Collect it. (L)
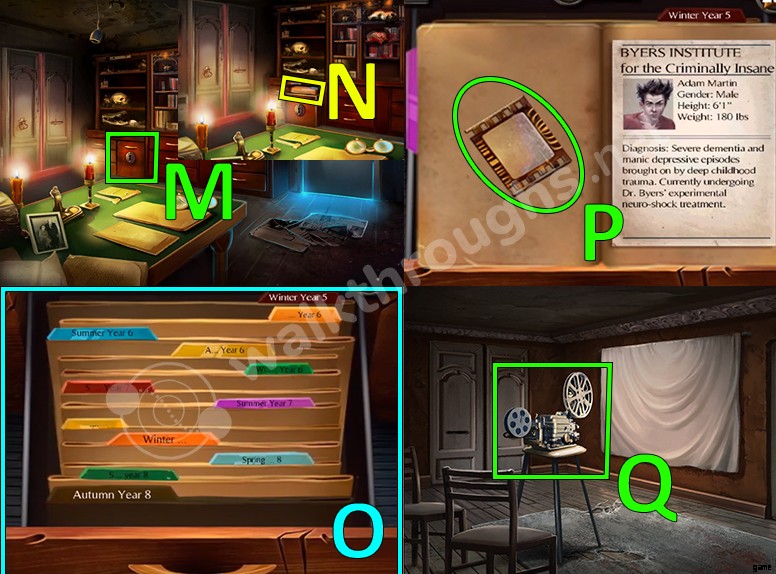
- Gehe in den ersten Raum. Verwenden Sie die Taste to unlock the cabinet drawer. (M)
- Click on the files. (N)
- The correct way to organize the files. (O)
- Collect the fourth film strip fragment. (P)
- Go to the movie projection room. Click on the projector. (Q)
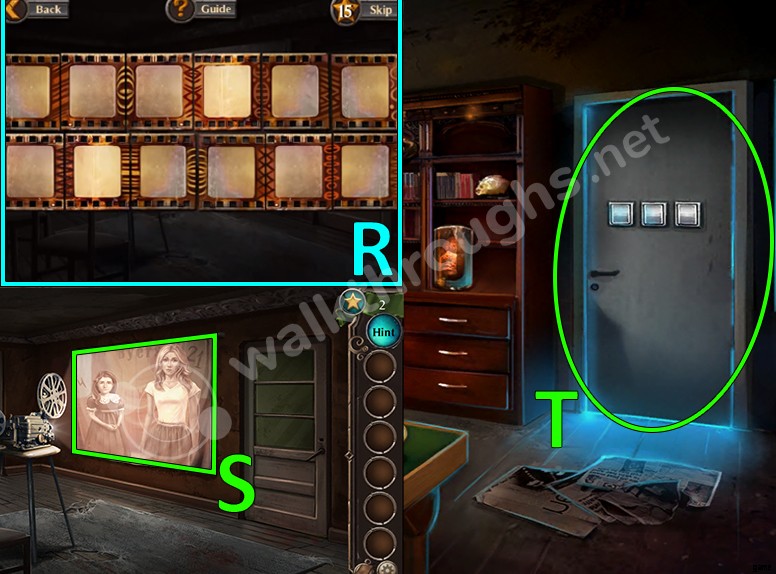
- Place all of the film strips in the projector. Each piece has shapes on each side that will match with the other piece and combine them together. Das Bild zeigt den richtigen Weg, um das Rätsel zu lösen (R)
- After completing the puzzle, a scene will be shown on the screen. See the numbers 4 and 21 on the screen? They are the numbers that will be used to escape this room. (S)
- Klicke auf die Tür. Use the number 421 um es zu entsperren. (F)
- Escape the room.
Chapter 7 – Secrets
- Collect the toy train. (A)
- Go to the house pointed on the screen. (B)
- Collect the second toy train. (C)
- Collect the third toy train. (D)
- Click on the heart pattern picture an der Wand. Tap each time until you create a black heart shape. (E)
- Geh ins Schlafzimmer. (F)
- Collect the toy train below the bed. (G)
- Collect the toy train that is below the bed on the right side of the room. (H)
- Click on the drawer. (I)
- Collect the notebook inside the drawer and read it. (J)
- Klicken Sie auf dasRätsel. (K)
- The correct way to solve the puzzle. Collect the key after completing it. (L)
- Verwenden Sie die Taste um dieTür zu entriegeln. (M)
- Escape the room.
Chapter 8 – Trial
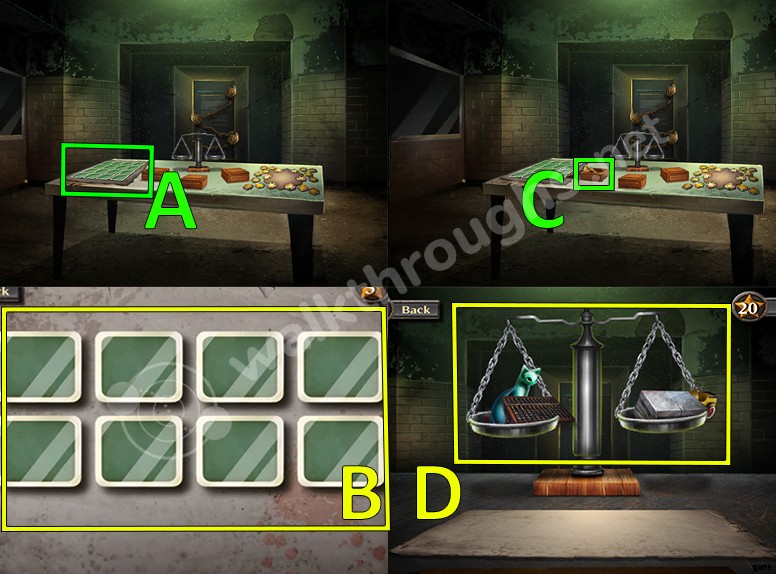
- Click on the riddle. (A)
- Solve the memory riddle. Find all of the cards that match with each other to complete the puzzle. (B)
- Collect the gold key. (C)
- Click on the scale puzzle. The image shows the correct way to solve the riddle, place all of the objects you have on the correct place to balance each side of the scale. (D)
- Collect the next key. (E)
- Klicken Sie auf das nächste Rätsel auf der rechten Seite. The pieces need to be placed in order to match the colors on each side. DasBild shows the correct way to solve the riddle. ( F)
- Collect the third and final key. (G)
- Use the three keys um dieTür zu entriegeln. (H)
- Escape the room.
Chapter 9 – Into the Nightmare
- Click on the right locker. (A)
- Collect the flamethrower. (B)
- Go through the blue room. Use the flamethrower to get rid of the spider webs. Tap to match the pairs of the words and symbols on the wall to remove them. After removing all of the pairs that match, only 5 numbers will be left, which are 2 6 9 1 and 4. These numbers will be used as a hint for the next puzzle. (C)
- Go to the next room. Click on the red toolbox. Use the number 26914 um es zu entsperren. Collect the crowbar im Inneren. (D)
- Go to the starting room and open the metal grate in the floor by using your crowbar. Collect the screwdriver im Inneren. (E)
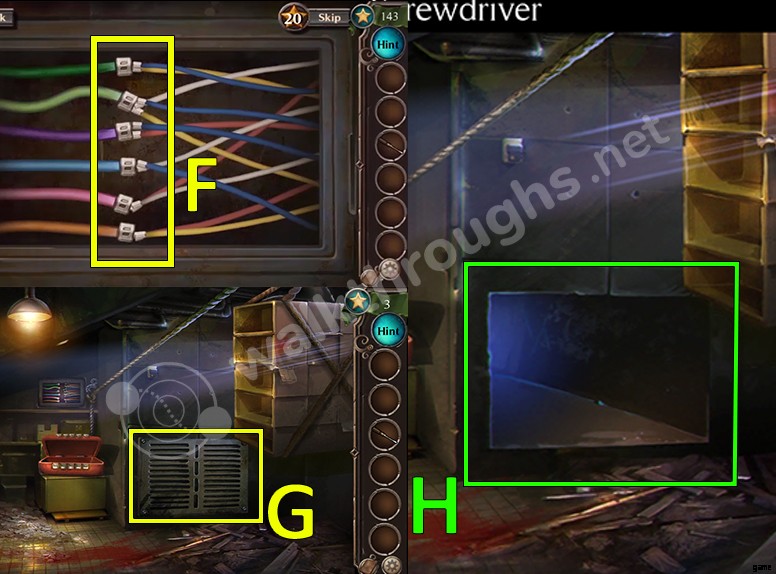
- Go to the red room and click on the coloured wires. Combine the wires on the right to make the colors auf der Linken. The image shows the correct way to solve es. (F)
- Remove the vent with your screwdriver. (G)
- Escape the room. (H)
Chapter 10 – Rebirth
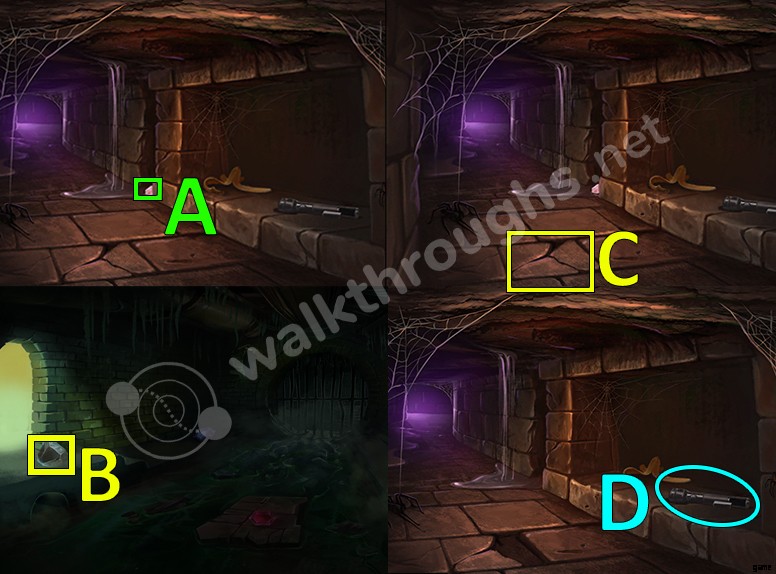
- Collect the gem. (A)
- Go to the end of the tunnel. Collect the large rock. (B)
- Use the rock on the cracked tile in order to find a battery. Sammle es ein. (C)
- Collect the flashlight. (D)
- Collect the blue rock while using your flashlight. (E)
- Collect the red rock while using your flashlight. (F)
- Collect the orange rock while using your flashlight. (G)
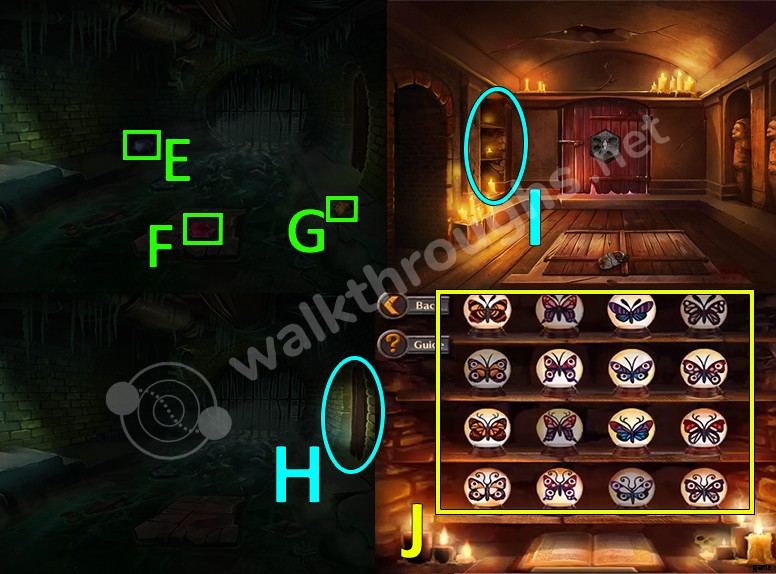
- Go to the next room. (H)
- Klicken Sie auf das Puzzle. (I)
- DasBild zeigt den richtigen Weg, um das Rätsel zu lösen Sammle den Schlüssel ein (J)
- Collect the purple rock. (K)
- Collect the green rock. (L)
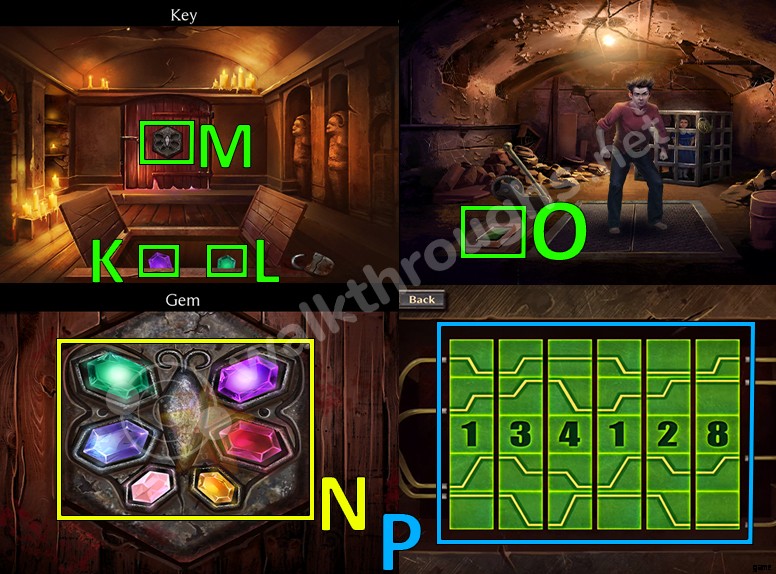
- Place all of the rocks on the slots located in the door to unlock it. Go through the door. (M)
- Klicken Sie auf dasRätsel. (O)
- Use the number 134128 to solve the puzzle. (P)

- Pull the lever to drop Adam through the trap door. (Q)
- Verwenden Sie die Taste to free the girl. (R)
- She will then give a disordered newspaper article that you need to rearrange. (S)
- The correct way to rearrange the newspaper article. (T)
- Game is completed.
Schlussfolgerung
Adventure Escape:Asylum is an amazing escape game. The vibe it gives is very intriguing. The ambient music and it’s art style are beautifully crafted and well put together. The challenging puzzles, the diary entries and movie-like writing make it a classic among the escape game community! I have played a lot of escape games and this honestly is my favorite, the story line alone makes it really exciting for me. I sincerely recommend everyone to enjoy this masterpiece, as you will not be disappointed.