Diese Anleitung bietet detaillierte und beiläufige Informationen zu allen Schaltflächen und der Benutzeroberfläche des Spiels, es sei denn, sie sind sehr offensichtlich.
Falls Sie ein neuer Spieler sind/ sich fragen, was eine Schaltfläche bewirkt oder wie man etwas findet, hoffe ich, dass es hilft Sie.
Andere Don’t Starve Together-Leitfäden:
- Anleitung zu den Charakteren.
- Wann und wie Sie Glommer finden.
- The Gorge / Quickstart and Beginners Guide.
- Neue Errungenschaften der Schlucht (Schluchtbeherrschung).
- Detaillierter Biom-Leitfaden / Wald.
- Spielanleitung:Webber.
- Spielanleitung:Wigfrid.
- Leitfaden für Twitch-Drops.
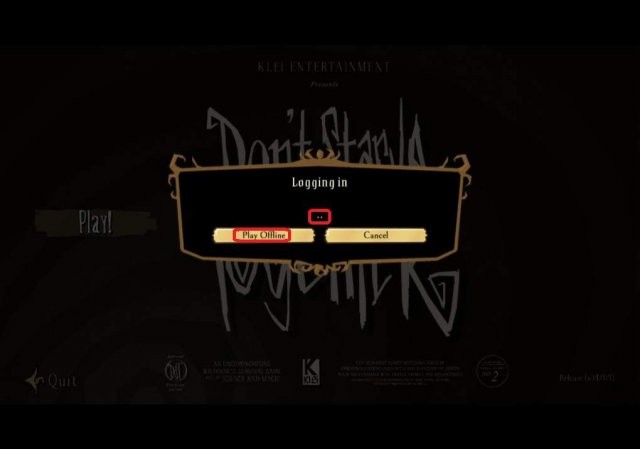
Spiel!
Nachdem Sie auf diese Schaltfläche geklickt haben, haben Sie die Möglichkeit, zwischen Offline-Spielen (durch Klicken auf die Schaltfläche „Offline spielen“ im Pop-up) oder Online (nur durch Warten) zu wählen.
Offline spielen ist nicht möglich haben Zugriff auf Skins und können anderen Servern nicht beitreten. (Offensichtlich).
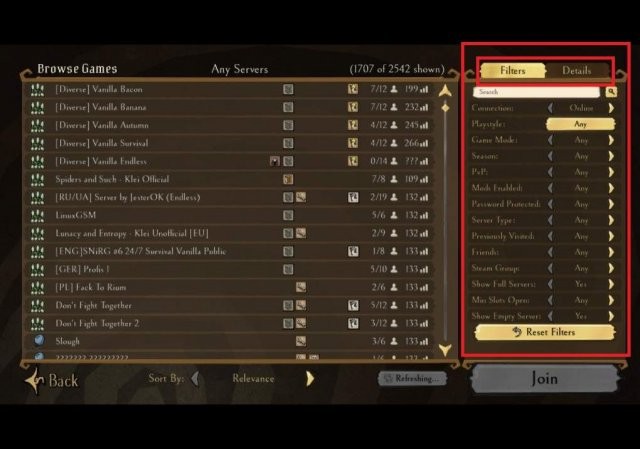
Spiele durchsuchen
Es führt Sie zur Serverliste, die zwei Registerkarten auf der rechten Seite enthält:
Filter:
- Verbindung:Um online/lokale Server zu finden.
- Spielstil:Wählen Sie, um einen bestimmten Serverstil anzuzeigen; Es gibt insgesamt 4 Stile; Sozial, kooperativ, wettbewerbsfähig und Wahnsinn. Egal? Drücken Sie auf der neuen Seite auf „Beliebig“.
- Spielmodus:Wählen Sie, ob Sie nur Survival-, Wilderness- oder Endless-Server sehen möchten.
- Saison:Zeigt die Server an, die gerade (Echtzeit) in der gewählten Saison sind.
- PvP:Spieler gegen Spieler aktiviert oder nicht.
- Mods aktiviert:Um modifizierte Server zu sehen oder nicht. (Gemoddete Server können Verzögerungen, Abstürze oder niedrige FPS verursachen)
- Passwortgeschützt:Zur Auswahl zwischen öffentlichen/privaten Servern.
- Servertypen – Gehostet:Der Server hängt davon ab, ob der Administrator spielt (Joined) oder nicht; Wenn sie aufhören, wird der Server geschlossen. Dediziert:Der Server ist nicht vom Admin abhängig, sondern von dessen Rechner. Mit hoher Wahrscheinlichkeit bleiben diese Server länger online. (Dedizierte Klei-Server haben spezielle farbige Titel vor sich.)
- Zuvor besucht:Um einen Server zu finden, auf dem Sie schon einmal gespielt haben. (Wenn die Welt auf diesem Server regeneriert oder der Server neu gestartet wird, wird der Server nicht mehr angezeigt, wenn Sie diesen Filter aktivieren)
- Freunde:Um Server anzuzeigen/nicht anzuzeigen, auf denen (derzeit) Ihre Steam-Freunde spielen.
- Steam-Gruppen:Wenn Sie Teil einer [Steam]-Gruppe sind, die mit diesem Spiel verbunden ist, können Sie diesen Filter aktivieren, um den entsprechenden Server anzuzeigen.
- (Rest ist offensichtlich)
- Durch Klicken auf „Filter zurücksetzen“ werden die Standardeinstellungen wiederhergestellt.
Einzelheiten:
Wählen Sie einen Server (einfacher Linksklick darauf) aus der Liste, um jeweils Folgendes zu sehen:
- 1. Servername,
- 2. Beschreibung des Servers, die von seinem Administrator geschrieben wurde,
- 3. Mod:Wird durch ein Schraubenschlüssel-Logo angezeigt; Es bietet Verknüpfungen zum Workshop.
- 4. Tags anzeigen:Wird durch ein Tag-Logo angezeigt; Liefert Informationen über die Sprache des Servers, ob Vote-Kick oder Höhlen aktiviert sind usw.
- 5. Welt anzeigen:Wird durch einen Globus angezeigt; Öffnet die Welteinstellungsseite, die vom Administrator bearbeitet/nicht bearbeitet wird, als er den Server erstellt hat. (Um beispielsweise zu sehen, ob Hundeangriffe aktiviert sind.)
- 6. Gruppenprofil anzeigen:Wird durch eine rote Fahne angezeigt; Es führt Sie zu Steam, zur zugehörigen Gruppenseite.
- 7. Spieler anzeigen:Wird von einem anonymen Avatar angezeigt; Um zu sehen, welche Spieler gerade auf dem Server spielen. Das Pleuel vor dem Namen des Spielers führt Sie zu seiner Profilseite bei Steam, wenn Sie darauf klicken.
- 8. Toggle Server Name:Angezeigt durch einige Sterne (*); Um den Namen des ausgewählten Servers als Sterne (*) anzuzeigen.
- 9. Das Fragezeichen vor Endless, Survival, Wilderness liefert weitere Informationen zu diesen Themen.
- 10. Jahreszeit.
- 11. Wie viele Spieltage der Server vorgerückt ist.
Um einem Server beizutreten, wählen Sie den Server mit einem Linksklick aus der Liste aus und drücken Sie dann die Schaltfläche Join. Oder doppelklicken Sie auf den Servernamen in der Liste.
Host-Spiel
Es führt Sie zu der Seite, auf der Sie Ihren eigenen Server erstellen, um online/offline, alleine/zusammen zu spielen. Auf der linken Seite haben Sie 5 Slots; Jeder von ihnen enthält eine einzigartige Welt, die Sie erstellt haben.
Um mit dem Erstellen einer Welt zu beginnen, wählen Sie zuerst einen Heimatplatz aus.
Die Welterstellungsseite enthält diese Registerkarten und Optionen.
Einstellungen:
- Wähle den Server-Spielstil.
- Öffentlich sichtbarer Servername. (Je nach Einstellungen).
- Öffentlich sichtbare Beschreibung. (Je nach Einstellungen).
- Wählen Sie, ob Sie den Server öffentlich, nur für Freunde oder nur lokal machen möchten. oder Steam-Gruppe.
- Geben Sie ein Passwort ein. (Du musst es dir nicht merken, wenn du es nicht teilst, da du World fortsetzen kannst, ohne es erneut einzugeben/ oder das Passwort später einfach löschen kannst).
Wald:
Hier können Sie die Oberwelt anpassen oder einfach als Standard belassen. Diese Einstellungen gehören zur oberen Welt, die alle Biome umfasst, aber keine Höhlen betrifft.
Höhlen:
„Höhlen hinzufügen“ erstellt eine ähnliche Seite auf der Registerkarte „Wald“, aber Sie können damit nur die Unterwelteinstellungen ändern. Um Höhlen zu aktivieren und den Server ohne Probleme (Absturz/Lag/FPS-Einbrüche) zu betreiben, benötigen Sie eine gute Menge an PC-Ressourcen und anständige Spezifikationen.
Sie können auf der gleichen Seite auf die Schaltfläche „Höhlen entfernen“ klicken deaktivieren Sie es für Ihren Server.
Zurücksetzen:
Zeigt 5 verschiedene Spieldaten an, aus denen Sie auswählen und das ausgewählte Datum laden können. Es wird zuerst nach einer Bestätigung gefragt. (J/N)
Gegenstandssammlungen
Erste Seite
- History of Travels:Zeigt alle vergangenen Ereignisse, die einst in diesem Spiel live waren, und die damit verbundenen Erfolge. Wenn Sie an einem teilgenommen haben, wird auch Ihr Fortschritt angezeigt.
- Neueste Entdeckungen:
Zeigt den letzten Gegenstand/die letzte Truhe, die Sie erhalten haben. - Spools:
Zeigt die Menge an Spool an, die Sie derzeit haben. - Oft getötet von:
Informiert darüber, bei welchem Mob/Zustand du am meisten gescheitert bist. (Es ist nicht sehr genau.) - Freundlichster Freund:
Wählt einen Benutzernamen zwischen Spielern aus, mit denen Sie am häufigsten gespielt haben, und Shows. (Es ist nicht sehr genau.)
Kuriositätenkabinett
Garderobe:Hier können Sie einen Charakter auswählen, um seine Outfits anzupassen. (Elegant survivor head items can only be found here and in Steam inventory.)
After clicking on a character, in the new page, At the right side of the screen, Above the default avatar of the character’s head, there are buttons (Filters):
A. The save Icon near the Spool image:shows the “Clothing Presets”. After customizing your looks for the current character, click on it and pick a slot to save the current set, for easy access later in the game/ fast clothing switches; You can choose (wear) a set by clicking on the green tick.
B. Head – Shows the Skins that affects character’s overall appearence, including head and hair. (Rarity:Only Elegants and Heirloom Elegants.)
C. Body – Shows outfits from all rarities that affect the body. (Sometimes they are overalls)
D. Hands – Shows gloves.
E. Legs – Shows pants.
F. Feet – Shows shoes.
The “Undo Changes” button below the character’s model, will only undo the current modifications. (It will not remove all outfits.)
You don’t need to manually change your modifications (Except when you are saving presets). If you are done customizing, click “Accept Outfit” at the left side. You may need to adjust filters again in each section.
Belongings:
Shows the Skins for tools, weapons, wearings, pets and buildings. The cart logo near the scroll, will take you to shop, and adjust the filters of it automatically, based on the item you are currently viewing.
Emotes:
These are the animations like dances that your character performs at public. (Psst! you don’t need to write a command in chat to do emotes; there is a mode for that.)
Emoticons:
These are the emojis you send at in-game chat. Can be used by writing the command that is described in the same page, or by using mods.
Portrait Frames:
Shows and selects the background image for the characters. (Select for each character, by using the arrows under the model.)
Profile Icons:
Shows and selects the tiny avatar near the background, for the characters. (Select for each character, by using the arrows under the model.)
Vignettes:
Shows and selects the images shown in all loading screens. (Apart from the one when you start the game.) Select which photos to be shown by clicking on them on the right side. Green check means it’s selected.
If more than one photos selected, game will randomly choose and show on each time.
Filters:
- Owned Filter, With Chest logo:If turned on, will show only the items you own, if turned off, will show all related and available Skin items.
- Weaveable Filter, With Spool logo:If turned on, will show the items that can be weaved using your Spools. If turned off, you will also see items that cannot be weaved by Spool.
- Survivor Filter:If enabled, will only show items that are introduced to belong to a specific character. (Which is the one you are currently modifying.)
- Sort Mode:Sorts items by:
- Owned Count:(It’s good for finding duplicates.)
- Release Date:Sorts based on item’s release date. (Good for finding event items.)
- Rarity:To find most precious items.
- Name:To find a specific item.
Buttons:
- Unravel:Takes (Deletes) the selected Item from your inventory, and gives back the mentioned amount of Spool.
- Weave:Takes mentioned amount of Spool from you, and unlocks the item.
- Con-rod:Will take you to Steam community market, associated with the selected item.
- Ensemble:If you see this button when selecting an item, it means that the item is part of a collection, that if it’s completed (Collected all related items), it will reward you with the mentioned item. To see the collection items and the reward, click on this button and read the pop-up.
Treasury
Shows Chests. (It’s often empty, unless there is an event running.)
History
Encounters:
- To find/ remember a player you’ve played with before in a server.
- “View Player” Button will lead to selected player’s Steam profile.
- “Remove Player” Will delete their history from this page.
Obituaries:
Recorded history of your fails (Deaths) with info about the server you’ve played in, the cause and in-game survival days.
Trade-Inn
The con-rod icon on the right side will take you to Steam community market, all items for DST.
Your owned trade able items is shown in the left side. You need to pick at least 6 of them, and click Trade button to receive only 1 item in higher quality. The trade is between you and the game.
(Using this trade section is not recommended.)
Redeem Codes
If you’ve purchased a If you’ve purchased a merchandise that promised an in-game code, then you should enter that code here to receive an exclusive item/ Skin.
Einkaufen
You can adjust the filters at left side.
“Buy Now” buttons will cause a Steam Transaction pop-up.
Options
Settings
Input Device:Select the device you are playing with. If a controller is connected, it will show up here.
Vibration:Enable or disable camera vibration.
Sound FX Volume:Sounds of button pressing, and all in-game action sounds. (Such as chopping a tree.)
Music Volume:Default game’s music. (Will play time to time in-game, not always.)
Ambient Volume:Background noises of birds, water, wind, etc.
Show Passwords:Whether or not to display passwords in filtered star (*) format, when creating servers, or joining one.
Auto Subscribe Mods:If enabled, will download all the related server mods that are enabled in a modded server, if you join it. Otherwise, you will need to manually download them from Steam Workshop.
Wigfrid’s Umlauts:When the character Wigfrid is quoting, and mentioning the letter O, she will mention it as Ö if the this option is enabled. Otherwise you will never see the letter Ö.
HUD Size:Determine the size of the crafting and inventory tab in-game.
Data Collection:Read the Privacy Policy for more info. By default, it’s on, otherwise, you will not be able to play online.
Screen Shake:Choose if screen shakes when giants moving nearby or the player is taking damage.
Distortion:To enable/ disable distortion of in-game animations/ images.
Bloom:To enable/ disable bloom of in-game animations/ images.
Full Screen:If enabled, has 3 sub-settings:Resolution, Display and Refresh rate.
Small Textures:It’s the quality of textures; if you have high spec PC, turn it off, otherwise, turn it on.
Notebook Mode:Another option that reduces details of some animations/ images in-game. Enable For low spec PC.
Controls
The only notable option here is the Attack and Force Attack settings. If you don’t want to press two different buttons to attack something, simply change both of these to a single button (Recommended, F). It may cause some problems (Like attacking walls when nearby) but you will get used to it eventually.
Mods
Get Mods: Shows mods that you may/ not own. Clicking on any of their names/ “More Mods” button will lead you to Steam workshop.
Server Mods: These are attached to your server/ world, and others can’t join if they didn’t subscribe to them, if enabled.
– Shows server mods that you’ve currently subscribed to.
Client Mods: These are your personal mods that you can carry to all other servers.
- Shows client mods that you’ve currently subscribed to.
- To enable/disable any of mods, check/clear the checkbox near it.
- The bolt logo under the mods name indicates if it’s configurable or not. If it contains a bolt logo, click on the mod, and then at the right side of the screen click on the bigger bolt logo to configure the mod.
- The more info button (Globe Logo) at the right side of screen, Takes you to the mod’s Steam workshop page.
- The sweep logo at left side will delete (Unsubscribe) all your mods in all sections; It will ask for confirmation first (Y/N)
- The three arrows logo near the sweep, will update all your subscribed mods. It will also ask for conformation first. (Y/N)
Main Menu
Under the Quit button, there are 4 shortcuts:
Data – Will take you to your documents – Klei – DoNotStarveTogether file at your PC. (These are backups and hosted worlds.)
Account – Will take you to Klei’s official website, to register, manage your Klei account and it’s settings.
Forum – Will take you Klei’s official forums.
Games – Will take you to Klei’s developer page at Steam.
The rest of the windows shown at right side, are updated regularly, and have different functions and shortcuts attached to them. It’s simply game’s newspaper; You can notified from here, if a new events, twitch drop, updates or sales available.