Cubeworld hat sich stark verändert. Lassen Sie sich nicht dabei erwischen, wie Sie an den alten Wegen festhalten. Es ist an der Zeit, Ihr Wissen mit diesem (letztendlich) ultimativen Leitfaden von Darkmega, Ihrem ansässigen Wissenssucher, auf den neuesten Stand zu bringen.
Cube World Guides:
- Kurzanleitung.
- Leitfaden für Anfänger 2019.
- Leitfaden zur Klassenspezialisierung.
- Fortgeschrittener Bewegungsleitfaden.
- Wie man Haustiere zähmt.
Der größte Unterschied für alte Alpha-Spieler, den Sie kennen sollten!
Der Hauptunterschied
Cubeworld ist kein Standard-RPG mit Leveln mehr! Es ist jetzt ein vollständig auf AUSRÜSTUNG basierendes Rollenspiel mit Schwerpunkt auf gestaffelter Gebietserkundung und -entdeckung.
Der Spieler ist nicht länger ein fröhlicher Abenteurer, der es liebt, Wildtiere und andere salzige Abenteurer zum Vergnügen und zum persönlichen Vorteil zu ermorden, der sich im Laufe der Zeit etwas einfallen lässt (Leveln und Auswählen/Training von Fähigkeiten).
Der Spieler ist jetzt ein bereits einigermaßen erfahrener Vertreter seines Klassentyps, der sich auf eine lebenslange Suche durch das Land begibt, um Artefakte, Macht und Ruhm zu sammeln.
Der große eklatante Unterschied, den jeder hasst
Sie haben keine XP-Leiste oder traditionelle Leveling-Mechanik mehr, keine Knackpunkte mehr in Fähigkeiten, die schließlich in der Skalierung verfallen, kein jahrelanges Herumhängen mehr mit Powerleveling, nur um große Zahlen zu sehen ... aber auch keine Richtungswahl mehr endlos dorthin gehen, um den nächsten und den nächsten Dungeon zu töten. Es ist ein bisschen dosierter als das.
Was diese Änderungen bedeuten
Anstatt nach Mord und gelegentlichen coolen Ausrüstungsgegenständen zu suchen, suchst du jetzt hauptsächlich nach Ausrüstung und allen besonderen Gegenständen, die dies fördern, normalerweise, indem du mehr Reisemöglichkeiten oder Orte mit Beute eröffnest.
Obwohl Sie sicher sind, dass Sie gegen die Wildtiere kämpfen können, damit sie glänzende (Gold und Reste) und andere Kleinigkeiten aushusten. Aber sie werden sich verteidigen, und alles, was über deiner Stufe liegt, wird dich absolut zerstören, es sei denn, du bist ähnlich ausgestattet oder wendest großzügig eine feine Mischung aus Käse und Können an.
Oh, und die meisten Beute- und Sondergegenstände sind auf das Gebiet abgestimmt, in dem sie gefunden werden. Sie verschwinden einfach oder werden so effektiv wie Tier-1-Ausrüstung, wenn Sie in verschiedene Gebiete wechseln, in die Sie sich dann wiederholen Finde Ausrüstung und Artefakte, um diesen Ort von seinen Reichtümern zu befreien, und gehe erneut weiter. Mehr zu diesem Fortschritt später.
Denken Sie darüber nach
Im Grunde wagst du Abenteuer in einem Gebiet und tust all die Dinge und holst dir coole Ausrüstung, dann bringst du diese coole Ausrüstung an einen neuen Ort, wo sie zu deinem „New Game Plus“-Kit wird, das herabgestuft wird, um die Illusion eines härteren zu haben Bereich, in dem Sie jetzt wesentlich mehr Ausrüstung finden werden, die die gleiche Leistung wie der neue Bereich hat.
Betrachten Sie es so, wenn es den Übergang erleichtert. Es ist eher ein nahtloser Level-Scaling-Kreis als eine Linie zum Himmel, wo Ihnen schließlich nichts mehr im Weg steht, außer Wolken und hohen Erwartungen. Aber es kann sich so anfühlen, sobald Sie ein High-Tier-Kit haben und das aktuelle Gebiet mit einem Klick räumen können, und es kann sich ebenso demotivierend anfühlen, tolle Ausrüstung zu finden, nur um sie herunterzufahren, weil Sie das Gebiet verlassen haben, in dem sie gefunden oder erstellt wurde.
Jedes Biom für sich ist im Grunde genommen ein kleines, in sich geschlossenes Questland oder eine Mikrowelt, die alle miteinander verbunden sind und zwischen denen Sie nahtlos per Adler oder Land / Meer reisen können.
Du wirst nicht mehr zu einem überwältigten, mordhungrigen Kraftpaket, das schließlich alles auf deinem Weg verzehrt und schließlich keine Befriedigung mehr mit weltlicher Beute verspürt, weil du zu viel davon aufgesammelt hast oder in vollständiger legendärer oder gottähnlicher Kleidung ausgestattet bist. Denn jetzt können Sie es zumindest für den Verkauf bereithalten, und einige seltene Gegenstände können bis zu einem gewissen Grad über die Grenze hinweg funktionieren. Gold hat schließlich auch einen gewissen Nutzen.
Wähle deinen Charakter! [Schurke]
Das erste, was Sie tun, ist ziemlich einfach, aber die große Frage ist, welche Klasse sollte ich sein? So viel kommt auf einen Spielstil an. Beginnen wir also ganz oben und besorgen Sie sich einen Kurs, der Ihnen Spaß macht.
Attentäter
Surprise Initiation Damage Dealer.
[Du beginnst als dieser Typ, wenn du einen Schurken auswählst, kannst aber in einer Stadt zu einem Ninja wechseln.]
Dein Shift ist eine Stealth-Bewegungsfähigkeit, benutze Stealth, um allmählich transparent zu werden und Mana zu generieren, während du herumschleichst. Stealth, wenn es näher an der Volllast ist, verbessert auch Ihre Chance, kritische Treffer zu erzielen und massiven Schaden zu verursachen! Stealthing reduziert auch die Aggro-Rate auf Null, wenn sie voll ist, und das Bewegen mit Schleichgeschwindigkeit im Gegensatz zum alten Spiel reduziert sie nicht, solange Sie Ihre Schleichtaste gedrückt halten. Beachten Sie, dass das Verstecken in schattigen Bereichen einen schnelleren Aufbau ermöglicht. Tarnen und weiter von Feinden entfernt zu sein, kann es dir auch ermöglichen, die Aggro mit ihnen schneller zu brechen, damit sie sich zurücksetzen, damit du dich wieder an sie heranschleichen und ihnen unheimliche schlechte Zeiten bescheren kannst.
Das Halten der Umschalttaste und das Rechtsklicken wird abgefangen, was 25 Ausdauer verbraucht, damit Sie sprinten können, bevor Ihr Rechtsklick herauskommt. Zielt auf den Cursor/den Feind darunter. Verwendet es nicht bei voller Ladung, es verwendet tatsächlich nur den Rechtsklick beim Aufprall oder am Ende des Strichs, den Sie haben, also erfordert es tatsächlich ein wenig Mana, um es zu verwenden. Verwenden Sie es, um aus der Tarnung herauszuspringen und Leute zu Boden zu bringen, um einen Kampf zu eröffnen.
Ihr R, Tarnung faltet sich mit einer Abklingzeit von 40 Sekunden für 20 Sekunden darin ein und Sie werden ständig vollständig getarnt, selbst wenn Sie sich bewegen und angreifen. Du weisst, was das bedeutet? Einfache Beute, die immer Mana erzeugt, mehr Stiche für massiveren Schaden und die Fähigkeit, sich mit voller Geschwindigkeit zu bewegen und trotzdem Stealth-Vorteile zu haben.
Der mittlere Klick ohne Eingabe verbraucht Ihre gesamte Ausdauer, um eine Phiole mit Gift zu werfen. Es geht in die Luft, dann dreht es sich irgendwie herum und knallt in den Bereich, auf den Sie zielten. Es vergiftet Feinde, wodurch sie im Laufe der Zeit Schadensspitzen und konstanten Schaden erleiden, wenn sie auf dem Giftbereich stehen. Verwenden Sie es heimlich hinter einem Feind, wenn Sie im Begriff sind, sich zu engagieren. Wirf einfach die Phiole, dann platze sie mit einem nahen und persönlichen Rechtsklick-Angriff, wenn sie herunterkommt, und geh einfach in die Stadt, während du mit deinem R unsichtbar bist. Sollte die meiste Zeit ausreichen.
Seien Sie vorsichtig, wenn Sie sie nicht zu Boden bringen, denn die volle Ausdaueranzeige bedeutet, dass Sie eine Weile nicht würfeln müssen, wenn Sie erwischt werden oder aus dem magischen Laserstrahl / Tornado herauskommen müssen, der Sie treffen wird. Es verlangsamt Sie auch etwa eine Sekunde lang, wenn Sie es verwenden, daher ist es nicht das Beste, um mitten im Kampf verwendet zu werden, es sei denn, ein Freund hat die Hitze oder Sie haben den Feind gerade frisch niedergeschlagen und möchten einen einwerfen etwas mehr Schaden.
Ninja
Nerfed und überarbeitet. Schneller und agiler Nahkampf+Fernkampf-Hybridschadensverursacher und Distraktor. Kein kritischer Spammer mehr. aber immer noch Hits wie ein Truck.
Im Gegensatz zu Cubeworld Alpha hat der Ninja keine Tarnung mehr. Stattdessen ist er ein flinker Junge.
Wenn Sie die Schicht gedrückt halten, erhalten Sie einen Sprint, mit dem Sie im Grunde so schnell rennen können, als wären Sie auf einem Pferd, auf Kosten eines konstanten Ausdauerverlusts. Wenn Sie beim Sprinten springen, können Sie einen Front-Flip-Sprung machen, der ungefähr doppelt so hoch ist, sodass Sie leicht hohe Hindernisse überspringen und einige Klippen erklimmen können. Kostet 25 Ausdauer.
Halten Sie die Umschalttaste gedrückt und greifen Sie stattdessen an, um Ihren Nahkampf in einen Shuriken-Wurf umzuwandeln. Der Shuriken-Schaden skaliert mit dem Waffenschaden und verursacht normalerweise viel mehr als Ihr normaler Angriff beim Aufprall. Es kostet 25 Ausdauer pro geworfenem Shuriken. Verwenden Sie sie, um Kämpfe aus der Ferne zu eröffnen, und wenn der Feind dann in der Nähe ist, rennen Sie entweder weg und springen Sie über ein Hindernis und setzen Sie die Shuriken fort, oder verwandeln Sie sich in einen Nahkampf, indem Sie das Mana verwenden, das Sie durch die Shuriken-Angriffe erhalten hätten. JA, Sie erzeugen Mana sowohl mit Nahkampf- als auch mit Shuriken-Schlägen. Du kannst sie auch ziemlich weit schießen, also ist es ziemlich gut, aber sie schweben und haben etwas Flugzeit, also ziele gut.
Shift und Maus zwei ist immer noch dein Abfangen, hol dir etwas Mana von Shuriken-Würfen und benutze es, um Feinde zu Boden zu bringen, die zu nahe oder zu nahe kommen, um Feinde zu unterbrechen, die Specials angreifen, oder diese lästigen Magier niederzuschlagen, die dich absolut ermorden werden, bis du sie mit Shuriken überschüttest oder Ködern Sie sie in der Nähe, indem Sie die Sichtlinie unterbrechen ...
Apropos Shurikenhagel, dein R ist Ninjutsu! Für eine Abklingzeit von 60 Sekunden bei Verwendung wandelt es Ihren Nahkampfangriff in kostenlose, schneller schießende Shurikenwürfe um und Ihren Rechtsklick standardmäßig in Abfangen (kein Ausdauerverbrauch). Es dauert 20 Sekunden und ist Ihre Hauptmethode, um den Tag zu ruinieren. Gehen Sie auf Reichweite, schalten Sie Ninjutsu ein, spritzen Sie sie mit Sternen ab, und wenn sie sich nähern, rollen Sie ihre Angriffe durch und kontern Sie mit Abfangen, um sie niederzuschlagen und weiter zu schießen. Du kannst Mobs, die ein oder zwei Stufen höher sind als du, leicht ausschalten, indem du einfach einen Sturm von Shuriken von einem sicheren Standpunkt aus sprechen lässt.
Der Ninja behält immer noch seine Fähigkeit, Schaden beim Rollen auszuweichen, um einen Partikeleffekt-Buff zu erhalten. Dieser Buff lässt deinen nächsten Rechtsklick oder verstärkten Rechtsklick abfangen, um automatisch einen kritischen Treffer zu erzielen. Sie können auch welche erhalten, wenn Sie eine aufgeladene Fähigkeit unterbrechen oder einen Feind mitten in einem Angriff niederschlagen. Aber bei diesem Teil bin ich mir unsicher. Aber der Nahkampf läuft im Grunde darauf hinaus, Angriffen auszuweichen, um kostenloses Burst-Mana und Ihre Partikel zu erhalten, ein paar Treffer zu schleichen, um die Leiste zu füllen (oder mehr Bewegungen nacheinander auszuweichen), sie sie mit massiven kritischen Treffern und ein paar frechen Ninja-Sternen wegzublasen sie immer wieder auf ihr ♥ zu setzen.
Hier ist ein Video von Colde Blauth auf YouTube, das die Fähigkeiten des Schurken visuell zeigt!
Wähle deinen Charakter! [Waldläufer]
Scharfschütze
Stealth- und Ausweich-basierter Langstrecken-Burst-Schaden.
[Du beginnst als diese Klasse, wenn du Ranger auswählst! In einer Stadt zum Späher wechseln]
Im Grunde ein Assassine mit großer Reichweite.
Schleichen Sie mit der Verschiebung herum, ähnlich wie der Attentäter, greifen Sie an oder lassen Sie ihn los, um ihn zu Fall zu bringen. Schleichen Sie, um präventiv Mana aufzubauen, und erzielen Sie ein paar schmackhafte kritische Treffer. Bumm, Kopfschuss! (Es gibt keinen Kopfschuss. Betrachten Sie es einfach als einen kritischen Treffer).
Das Aufladen Ihres Rechtsklick-Angriffs baut auch Tarnung auf. Versuchen Sie, die Tarnung die ganze Zeit zumindest ein wenig aufrechtzuerhalten, damit Sie eine Chance auf kritische Treffer haben und kostenlos Mana generieren, bevor Sie aus der Ferne die Hölle regnen lassen. Ich meine wirklich weit. Sie wollen nicht, dass Feinde zu Ihnen kommen. Versuchen Sie, sie mit kritischen Scharfschützen und aufgeladenen Schüssen so oft wie möglich auf ihrem ♥ zu halten.
Der Sniper erhält außerdem zusätzliches Angriffstempo, je mehr Angriffe hintereinander Sie landen, wodurch Sie standardmäßig Feinde mit Pfeilfeuer aus der Ferne abspritzen können, wenn es darauf ankommt, nur auf Ihr Ziel zu schießen.
Ihr Tap-Mittelklick ohne Eingabe lässt Sie mit ziemlicher Geschwindigkeit rückwärts zur Kamera springen, verbraucht sofort Ihre Ausdauerleiste, lädt aber auch Stealth vollständig auf. Verwenden Sie es, um Ihre Tarnung hoch zu halten und kleine Vorsprünge hochzuklappen oder über Lücken zu springen, um Ihre Feinde zu juken und zu besiegen. Verwenden Sie es an der Spitze eines Sprungs oder zielen Sie nach unten, um den Winkel zu wählen.
Versuchen Sie, nicht zu rollen, denn je mehr Rollen Sie verwenden, desto länger müssen Sie auf die Ausdauer warten, um Ihren Backflip zu verwenden. Natürlich ist das leichter gesagt als getan, wenn es darum geht, Bosse mit Fernkampfangriffen oder Nahkampfgegner schneller zu bekämpfen als Sie in Ihrem Grill.
Ihr R ist ein Schattenklon-Begleiter, der Ihnen etwa 20 Sekunden lang folgt. Sie sehen genauso aus wie du, aber schattig und mit Ninja-Schattenpartikeln und schießen und schießen, wohin du schaust, aber sie wird manchmal von dir getrennt, wenn du einen Rückzug machst. Sie würden hoffen, dass sie in der Lage wäre, Aggro zu sammeln, aber die Art und Weise, wie Aggro in diesem Spiel funktioniert, ist, dass sie einfach das Erste sind, was sie trifft, es sei denn, jemand leitet sie mit einem Knockdown um und sie verlieren den Überblick.
Sie verursachen auch nur einen Prozentsatz deines Schadens, also ist es nicht so, als würdest du deinen Output verdoppeln, aber die kritischen Treffer tun trotzdem sicher weh.
Scout
Schnell, knifflig, das geht nicht. Zerstörer des Tages des Nahkampffeindes.
Der Scout erhält die gleiche Fähigkeit, bei Schichtbewegungen zu sprinten wie der Ninja. Es hat auch den Front-Flip-Sprung, um Hindernisse zu erklimmen und auszuweichen, ohne hinterhältig zu sein.
Dein stationärer Mittelklick, anstatt dich selbst zu begrüßen, jage deine Feinde! Es ist eine schnelle, leicht schwache, aber anständige Chance auf einen Roundhouse-Kick, der Feinde zurückfliegen lässt, unabhängig davon, ob er sie niedergeschlagen hat oder nicht. Es verbraucht 50 Ausdauer, aber Sie können es immer wieder verwenden. Der ultimative Dickmove, wenn er verwendet wird, um Feinde von dir wegzustoßen, wenn sie gerade 10 Sekunden damit verbracht haben, eine Klippe hinaufzuklettern.
Und jetzt der Grund, warum du die Tage der Nahkampffeinde ruinierst.
Ihr R platziert ein großes kreisförmiges Treibsandfalle-Feld an Ihrer Position. Etwa 15-20 Sekunden lang sitzt dieser herum und alle Feinde, die versuchen, hindurchzugehen, werden meistens gestoppt und scheinen ein wenig darin zu versinken. Keine schöne Zeit für sie. Denn in dieser Zeit kannst du sie mit Schaden überschütten und es wirkt so, als hättest du deine Combo bereits gebaut! Das ist richtig, Feinde, die in diesem Ding stecken, haben eine reduzierte Verteidigung, was bedeutet, dass Sie sogar Feinde höherer Stufen ohne allzu große Probleme durchdringen können. Natürlich müssen Sie immer noch den Schaden verursachen, um ihre Gesundheit zu verringern, aber zumindest ihre Rüstung wird Sie nicht dazu bringen, buchstäblich nichts zu verursachen. Sie können es auch absetzen und stehen lassen, also können Sie sagen, ködern Sie eine Gruppe von Magiern oder Waldläufern hinein und schießen Sie trotzdem weiter von außerhalb der Reichweite, mit der die KI tatsächlich angreift. Achten Sie einfach auf die Zeitüberschreitung, damit Sie wissen, wann Sie in Deckung gehen müssen, bevor die Laser zu fliegen beginnen.
Anstatt natürliche Angriffsgeschwindigkeit mit Combo zu gewinnen, löst der Ranger zufällig einen Buff aus, der dir rosa Partikel gibt, mit denen du sofort einen Rechtsklick-Angriff aufladen kannst. Sie möchten dies im Allgemeinen für maximale Wirkung oder fast vollständig verwenden, und es löst ziemlich oft aus, und da Ihre Power-Schüsse neben dem Tritt eine weitere Möglichkeit sind, Feinde niederzuschlagen, sind Sie goldrichtig. Fangen Sie einfach weiter, treten Sie, schießen Sie, schießen Sie härter und seien Sie im Allgemeinen schwer zu erreichen.
Hier ist ein Video von Colde Blauth auf YouTube, das die Fähigkeiten der Ranger visuell zeigt!
Wähle deinen Charakter! [Krieger]
Berserker
Melee Brawler und „Damage tank“. Knockdown-Spezialist.
[Du spawnst zuerst als dieser Typ]
Der Berserker ist ein Nahkämpfer, der an Angriffsgeschwindigkeit gewinnt, je mehr Treffer er landet. Auf diese Weise können Sie nicht nur den rohen Schaden, den der Combo-Zähler verursacht, erhöhen, sondern den Gesamtschaden schneller als ein Verteidiger, da Sie immer schneller treffen. Sie beginnen mit einer schweren Waffe, die eine Weile braucht, um zu schwingen, aber hart trifft und eine 3-Treffer-Kombination hat. Ein Abwärtsschwung, der eine Sekunde dauert, ein Stoß für weniger Schaden als ein Aufwärtsschwung, der die Chance auf einen KO hat. Aber ich schlage vor, zwei Einhänder oder Schild und Schwert zu verwenden, da sie schneller treffen und so Ihre Angriffsgeschwindigkeit schneller erhöhen.
Das Halten der Umschalttaste ist Ihr Spin-Angriff. Es blockiert Angriffe durch eine Blockanzeige, die sich allmählich ständig füllt, wenn Sie den Block nicht aktiv mit einem Schild halten (der mit dem Aufladen Ihres Rechtsklicks verbunden ist), und ermöglicht es Ihnen, Feinden in Ihrer Umgebung konstanten Schaden zuzufügen. Es ist großartig, um Combos aufzubauen oder um in einen Kampf zu „rennen“, um anfängliche Angriffe zu blockieren, und es dezimiert Feinde, die schwächer sind als Sie, sodass Sie sie einsammeln und schnell für das Farmen von Ausrüstung niederschießen können.
Wenn Sie springen, während Sie den Spin halten, machen Sie einen lustigen kleinen Helikopter-Spin-Slash in die Luft, der ungefähr so hoch geht wie der Flip-Jump des Scouts oder Ninjas. Er wird immer noch Feinde auf seinem Weg nach oben und unten treffen und kann an seinem Höhepunkt abgebrochen werden mit ein aufgeladener Angriff oder eine andere Form der Unterbrechung, wie die Verwendung Ihres Ulti.
Der mittlere Klick ist Ihr springendes Grundpfund. Dies kann und wird normalerweise Feinde niederschlagen, auf denen es landet, die nicht KO-immun oder auf einem superhohen Level sind oder ihre eigene Verteidigungsbewegung ausführen, die es schafft, alles zu blockieren. Es verursacht auch massiven Schaden, verbraucht aber Ihre gesamte Ausdauer. Das heißt, Sie können nicht rollen, nachdem Sie es verwendet haben. Passen Sie also auf, dass Sie es nicht verfehlen, oder Sie sind für ein bisschen weit offen, ohne Ausdauer, um sich wegzudrehen oder zu rollen.
Dein Ultimate ist die Mutter aller Falcon-Faustschläge. Es ist ein schneller Langstrecken-Sprint mit einer riesigen Faust am Ende, die großen Schaden verursacht und Feinde hoch in den Himmel schickt und sie niederschlägt. Es ist gut, um sich sowohl zu lösen als auch zu engagieren. Aber weil sie an dem Punkt gestartet werden, an dem Sie sie treffen, versuchen Sie, die Entfernung zu lernen und sie so zu platzieren, dass sie landet und Sie sich irgendwo in der Nähe befinden, wenn Sie sie als Öffner verwenden, da sie zu dem Zeitpunkt, an dem sie vom Schlag in den Weltraum herunterkommen, herunterkommen wird nicht mehr lange fassungslos sein. Sie können es auch abbrechen, wenn Sie nicht die gesamte Strecke mit einer gut getimten Rolle oder durch Aufladen Ihres Rechtsklicks fliegen möchten. Sie können es für rohen Schaden, Tränkeunterbrechung, Crowd-Smashing oder das Verlassen von dort mit einer Abklingzeit von 20 Sekunden verwenden. Es ist ziemlich gut.
Manchmal hörst du beim Verursachen von Schaden einen plötzlichen Soundeffekt und wirst rot. Das nenne ich gerne „die Sauce“, aber es ähnelt wahrscheinlich eher einem Kampfwut-Buff. Was es tut, ist, dass es Ihnen bei einem Angriff das Leben stehlen lässt, Ihre aufgeladenen Angriffe fast sofort aufladen und den eingehenden Schaden, den Sie für scheinbar 6-8 Sekunden erleiden, erheblich reduziert, unsicher, aber Sie können auch eine gewisse Angriffsgeschwindigkeit erhalten, nicht sicher. Ja, Sie können den Buff erneut procieren, um ihn aufzufrischen, während er aufgesogen ist. Sobald du also diesen Buff aktivierst, steigst du direkt ein und bekämpfst so viele Feinde, wie du bewältigen kannst, und stelle sicher, dass du so viele von ihnen wie möglich triffst, um von all dem Lebensraub zu profitieren, den du bekommst, der direkt auf dem basiert Höhe des Schadens, den Sie wiederum austeilen. Dies schließt eine fast vollständige Heilung von einem gut platzierten Bodenschlag in einer Bindung ein.
Der Berserker leidet anfangs vielleicht etwas mehr als dein Schurke, Waldläufer oder Magier. Angesichts der Tatsache, dass Sie in der Lage sein müssen, dort hineinzukommen, um Schaden zu verursachen, um „gefeuert“ zu werden, aber ihm fehlen so viele der Fernkampf- oder Überraschungs- / Fertigkeitsvorteile anderer Klassen für Käsemobs, die außerhalb seiner Liga sind, als ob er in Reichweite wäre anzugreifen, sie sind in Reichweite, um dich anzugreifen. Wählen Sie Ihre Kämpfe also sorgfältig aus und ziehen Sie die Verwendung eines Schilds in Betracht, damit Sie die zusätzliche Ebene der Verwendung Ihres Angriffsangriffs zum Blockieren von Angriffen erhalten können, zumindest zunächst, bis Sie eine gewisse Überlebensfähigkeit erreichen, dann können Sie zu einigen Doppelschwertern wechseln und sich einfach darauf verlassen, Kampfwut zu bekommen aktiviert, um gleichzeitig zu leben, zu tanken und zu töten, während Sie eine lustige Zeit haben. Ein Faustschlag und ein Spinjump über das nächste Hindernis und ein Trank funktionieren auch.
Verteidiger
Der einzige Unterschied zum Verteidiger besteht hauptsächlich darin, dass Sie statt Angriffsgeschwindigkeit pro Treffer einige Bonus-HP und die Fähigkeit erhalten, mit jedem Waffensatz, Doppelschwert oder großen Waffe zu blocken. Der Spezialangriff für die große Waffe ist auch etwas anders. Das Blocken von Angriffen hat den Vorteil, dass Ihr aufgeladener Angriff schneller aufgeladen wird, aber es scheint kein zusätzliches Mana zu geben, wie es früher in der Alpha der Fall war. Sie könnten auch einen härteren Block haben? Unsicher, wie sie das sagen sollen, sollten sie ehrlich sagen, ob Wollay liest.
Der Verteidiger kann immer noch die Soßenkampfwut aktivieren, um Lebensraub, praktisch sofortige Angriffsangriffe und erhöhten Widerstand zu erhalten. Obwohl es etwas schwieriger zu sein scheint, es zum Auslösen zu bringen, es sei denn, ich hatte einfach nur Pech.
Anstelle von Rock Fist erhalten Sie jedoch Heroic Shout. Nein, es ist nicht fus-ro-dah. Es handelt sich um eine Verspottung mit Wirkungsbereich, die Feinde innerhalb der natürlichen Aggro-Reichweite zu Ihnen zieht, anstatt wohin sie gehen, und sie verspottet rot glühen lässt. Es hat auch den unmerklichen Effekt, dass Sie Ihre Gesundheit in Blöcken pro Sekunde für etwa 10 Sekunden regenerieren. Dies kann mit der Sauce gestapelt werden, um Ihnen eine wirklich gute Überlebensfähigkeit zu verleihen, wenn Sie alle Ihre Werkzeuge einsetzen und nicht zu viel abbeißen.
Hier ist ein Video von Colde Blauth auf YouTube, das die Fähigkeiten der Krieger visuell zeigt!
Wähle deinen Charakter! [Magier]
Feuermagier
Fernkampf-DPS, Knockdown-Spezialist, Artillerie.
[Du fängst so an, wenn du spawnst!]
Magier. ♥ Zauberer und dergleichen. Überwältigt wie Feinde, sicher auch in den Händen eines Spielers ähnlich stark. Als Erstes ist jedoch ein ziemlich großer Unterschied zu erwähnen, wenn es um Magier geht. Anstatt Mana bei Angriffen oder durch andere Mittel wie Stealth/Evasion zu generieren, erzeugen Magier Mana relativ schnell im Laufe der Zeit bis zum Maximum von 100. Ihr Mana wird für Ihre verschiedenen Zaubersprüche offensichtlich in unterschiedlichen Mengen verwendet, einschließlich Ihres Rechtsklick-Angriffs, der 30 davon verbraucht. Andere Fähigkeiten unterscheiden sich leicht.
Das Passiv des Feuermagiers ermöglicht es ihm, bei Treffern glühende Feuerpartikel über sich zu gewinnen, ähnlich den rosa Partikeln des Spähers, die es dem Magier ermöglichen, Ihren Rechtsklick sofort auszuführen. Dabei wird auch kein Mana verbraucht. Ziemlich praktisch, wenn Sie es zum Proc bringen können, da Sie zuerst Ihren Rechtsklick verwenden, um den Schläger niederzuschlagen, einige normale Treffer verwenden, um ihn hoffentlich zwischendurch wieder auszulösen, dann Ihre Ladung halten und einen anderen Knockdown verwenden, wenn Sie möchten, und ihn dann verwenden, wann immer Sie möchten müssen sie mit unterschiedlicher Effektivität sofort wieder auf ihr ♥ werfen.
Wenn du als Magier die Umschalttaste gedrückt hältst, kannst du schweben/schweben. Das Schweben hebt die gesamte aufgebaute Fallstrecke auf und hält Sie kurz in der Luft, bevor Sie wieder auf den Boden schweben. Um sich relativ waagerecht zu halten, können Sie den Schwebeeffekt erneut anwenden, wenn Sie wieder ein wenig Fallgeschwindigkeit aufnehmen, um sich wieder zu schweben. Ein weiterer Trick, den Sie anwenden können, ist zu springen und dann sofort auf dem Weg nach oben vom Sprung zu wechseln, um sich in die Luft zu schleudern. Wenn Sie es richtig gemacht haben, können Sie sich sehr leicht in Bäume stürzen, um sich vor Nahkampffeinden in Sicherheit zu bringen, und relativ leicht Klippen erklimmen, da das Schweben völlig frei zu sein scheint. Ziemlich gut.
Shift+Linksklick ist eine Feuerexplosion für etwa 50 Mana. Es ist ein kugelförmiger Wurf, der über und unter Ihnen auftrifft und relativ schnell herauskommt. Es verursacht geringen Schaden und stößt Feinde zurück. Nicht annähernd so effektiv wie der schmalere Tritt des Scouts, aber er hat auch eine gute Chance, ihn niederzuschlagen.
Mittelklick ohne Eingabe erfordert volles Mana, ist aber ein Teleport im mittleren Bereich, um sich Plätze zu verschaffen. Es dauert einen Moment, bis es herauskommt, also warte nicht zu lange, wenn du es zum Ausweichen verwendest.
Schließlich ist Ihr Ultimate Fire-Raketen. Dadurch wird eine Salve aus 4 großen Feuerbällen ausgelöst, die kurz darauf am Zielort niedergehen. Sie schlagen in einem wirklich großen Gebiet wirklich hart zu und ruinieren im Allgemeinen Tage und verursachen Knockdowns.
Wenn die KI jemals beschließt, dies auf Sie anzuwenden, normalerweise von einem Boss, können Sie sich meistens von Ihrem ♥ verabschieden, wenn es Ihrem Ausrüstungsrang entspricht oder niedriger ist. Wenn Sie es kommen sehen, rollen Sie, als ob Ihr Leben davon abhängt.
Das Tolle an all diesen Sachen, die Mana verwenden, ist, dass Magier ihre Ausdauer nicht für andere Dinge brauchen, also kann sie vollständig verwendet werden, um so viel auszuweichen, wie Sie wollen, entweder um Feinde zu umrunden, während Sie auf Mana warten, wenn Feinde in der Nähe sind.
Wassermagier
Der Heiler, der auch ♥ kicken und tanken kann.
Wassermagier brauchen wahrscheinlich keine Einführung für Alpha-Spieler, sie waren so ziemlich die erste Wahl für Magier und als OP, da ihre Ausrüstung es ihnen ermöglicht, praktisch auf das Heilen von Gegenständen zu verzichten, indem sie durch Angriffe und mit Spezialfähigkeiten heilen.
Der Schaden von Wassermagiern entsteht dadurch, dass sie Feinde mit Wassermagie mit immer größerer Geschwindigkeit abspritzen. Je mehr Treffer in einer Sequenz, desto schneller schießen Sie bis zum Maximum, im Wesentlichen wie Sniper und Berserker, aber mit Fernkampf und Spritzigkeit.
Apropos Spritzer, der Schadensradius der Angriffe von Wassermagiern, wenn sie auf Gelände treffen, wird in blau blinkenden Wasserpfützen hervorgehoben, die einige Sekunden lang bestehen bleiben. Verbündete, die in diesen Pfützen stehen, werden allmählich geheilt … und aus irgendeinem Grund stapeln sie sich. Das heißt, wenn Sie Feinde schneller genug abspritzen können, können Sie so viele Pfützen auf dem Boden aufbauen, dass Sie zu einem Schadenstank werden können, indem Sie stillstehen und wegschießen, während Sie in Ihren eigenen Pfützen stehen, die entstehen, während Sie einen jetzt sehr verwirrten Feind erschießen, der es versucht verzweifelt, dich zu ermorden.
Teleport ist immer noch intakt und Shift ist immer noch Hover, aber anstelle von Explosionen bei Shift + Linksklick haben Sie Wasserdampfstrudel, oder wie sie „heilende Ströme“ genannt werden. Ein Linksklick fokussiert es auf und um dich herum und heilt schnell. Während der Rechtsklick es auf Ihren Cursor fokussiert, können Sie andere in Reichweite schnell heilen, wie die gute Unterstützung, die Sie sind. Dies verbraucht schnell Mana, um eine der beiden Versionen zu wirken.
Statt Hölle zu regnen setzt dein Ultimate hübsche Wasserblasen um dich herum frei. Es gibt ungefähr 6 von ihnen und sie fungieren als eine Art klebrige Fernmine. Sie haften an Feinden, die über sie rennen, und dann können Sie später explodieren, indem Sie Ihre Magie auf den in der Blase stecken gebliebenen Feind oder nur auf die Blasen auf dem Boden feuern. Dies führt dazu, dass die Blasen platzen und Ihre heilenden Pfützen überall hinterlassen und pro Blase ordentlich Schaden anrichten, was in einem wirklich großen Schwall des Untergangs gipfelt.
Hier ist ein Video von Colde Blauth auf YouTube, das die Fähigkeiten des Magiers visuell zeigt!
Anfang
Nun, hier sind Sie, ein brandneues Biom voller Quests und Dinge, die es zu finden gilt. Du solltest in einem Schrein des Lebens in der Nähe einer Stadt spawnen.
Schreine des Lebens
Schreine des Lebens sind Engelsstatuen in kleinen weißen Schreinen, die sowohl Respawn-Punkte als auch Schnellreisepunkte sind, wenn sie freigeschaltet und aktiviert werden. Sie wissen, dass sie aktiviert sind, weil sie Licht ausstrahlen. Wenn Sie einen in freier Wildbahn finden, wird er normalerweise nicht aktiviert. Drücken Sie E neben einem, das nicht aktiv ist, um ein kleines Flötenlied zu spielen, das es einschaltet. Dies macht es zu Ihrem aktuellen Spawnpunkt und öffnet es für Reisen. Wenn Sie zu einem Schrein reisen, wird dieser gleichzeitig als Respawn markiert.
Starter-Kit
Nun, Sie wollen wahrscheinlich raus und anfangen zu morden. Aber Sie sollten etwas bemerken. Drücke standardmäßig B, deine Inventartaste.
In deinem Inventar hast du 3 Waffensätze für deine aktuelle Klasse. Wählen Sie diejenige aus, von der Sie denken, dass sie cooler für Sie ist. Jeder Waffentyp hat einen anderen Verwendungsstil und Rechtsklick-Angriff. Ich erzähle später von Waffen. Aber einige andere Sachen, die man zuerst beachten sollte…
Achte auf deine Statistiken und vergleiche sie mit denen deines Gegners
Überprüfen Sie links auf Ihrem Bildschirm Ihr Inventar. Auf einen Blick können Sie erkennen, welche Art von Feinden Sie angreifen sollten, basierend auf Ihrem Sterne-Ranking für Rüstung und Waffen. Ein Gegner, der höher ist als dein Ausrüstungslevel, wird dich schnell zerstören, während ein Gegner mit zwei Leveln dich wahrscheinlich bei einer Berührung auslöschen wird, es sei denn, du wendest Käse an und erhältst einen hohen Combo-Zähler, um deinen Schaden zu erhöhen, indem du gut im Spiel bist.
Wenn Sie in einiger Entfernung mit der Maus über Feinde fahren, werden Sie ihre Namensfarbe bemerken. Weiß, Grün, Blau, Lila, Gold. Bekämpfe Feinde auf deinem oder einem höheren Level. Aber Schaden ist König. Wenn Sie Glück haben und einen guten waffenbasierten Drop erhalten, sind Sie auf dem besten Weg, eine einfachere Zeit zu haben, da Waffen auch Gesundheit bieten, um Ihren Status zu verbessern, sodass Sie nicht so schnell zerstört werden und mehr Zeit haben Benutze deine bessere Ausrüstung, um die besseren Mobs zu bekämpfen.
Du kannst auch im Optionsmenü ein Sterne-Rangsystem aktivieren, damit es einfacher ist, die einzelnen Stufen zu erkennen.
Erhalte ein paar Quests
Sprechen Sie mit Leuten in der Stadt und hoffen Sie, Quest-Dings zu erhalten, die interessante Bereiche im Biom aufdecken, um auf Quests zu gehen. Die meisten werden zufällige Scherze haben, aber einige werden dir von Orten erzählen, an denen jemand möglicherweise von bösen Mobs festgehalten wird, oder von Orten, an die sie sich erinnern, dass sie spezielle Schlüsselgegenstände gesehen haben, die du beim Durchqueren oder Sammeln von Beute benötigst.
Plündere alle Dinge! Kapitalismus, ho!
Sammle alle Bastelmatten und Gegenstände wie Pilze, Zitronen, Sträucher, Baumwolle usw., die du finden kannst. Sie können verkauft werden, sodass du stattdessen ein super einfaches Kit kaufen kannst, um dich ein bisschen stärker zu machen, oder Gegenstände wie Tiernahrung oder Trankflaschen im Gemischtwarenladen kaufen kannst.
Geld kann auch verwendet werden, um Flugpunkte rund um das Biom (oder zu anderen Biomen, wenn Sie dies wünschen!) Zu kaufen, die Sie beim Flight Master Eagle Guy normalerweise in der Mitte der Stadt verwenden können. Sobald Sie sie gekauft haben, können Sie sie immer wieder verwenden und sind eine gute Möglichkeit, an verschiedene Orte zu gelangen, um nach Schreinen zu suchen oder Ihren Zielen oder Sehenswürdigkeiten näher zu kommen.
Planen Sie einen Kurs
Überprüfen Sie Ihre Karte mit M und vergrößern und verkleinern Sie sie mit dem Mausrad. Auf der Karte können Sie normalerweise ziemlich offensichtliche Orientierungspunkte wie Krater, dunkle Wälder, verzauberte Wälder, Friedhöfe, Städte und andere Dinge sehen.
Wiederbelebungsschreine sehen auf der Karte aus der Ferne normalerweise wie kleine weiße Würfel aus, während etwas in einer anderen Farbe, wie eine Ansammlung brauner Gebäude, ein einsamer grauer Schrein, ein goldener Turm, ein runder Sockel mit Säulen, alles Orte sind, nach denen Sie Ausschau halten sollten.

Wenn Sie vollständig hineinzoomen, können Sie Objekte klarer sehen. Wenn sie also auffallen oder verdächtig aussehen, sieh sie dir genauer an.
Sie können Points of Interest mit einem Fingertipp auf die mittlere Maustaste markieren. Mit Rechtsklick schwenken, mit Links drehen/umsehen. Von Ihnen erstellte Points of Interest sind auf Ihrer Minikarte zu sehen, wenn Sie sie verkleinern, sodass Sie eine Überschrift finden, wohin Sie gehen müssen.
Am Anfang ist es normalerweise eine gute Idee, nicht zu versuchen, etwas zu Hartes zu ermorden, ohne einen Schrein in der Nähe zu haben, der dich nicht den ganzen Weg zurück zu deinem Ausgangspunkt zurückwirft.
Tag, Nacht, Monster-Respawn und Lager
Die Zeit in der Würfelwelt ist ziemlich lang und die Nächte werden verdammt dunkel. Perfekt für Ranger und Attentäter. Aber es macht Lichtquellen wie Lagerfeuer oder andere Abenteurer oder einige Mobs, die Laternen hervorbringen, leichter zu sehen.
Normalerweise möchten Sie tagsüber Abenteuer erleben, dann zurück in die Stadt gehen und das Gasthaus nutzen, um es wieder in den Morgen zu bringen, wenn es anfängt, zu dunkel zu werden, um etwas zu sehen. Alternativ, wenn Sie das nicht tun möchten, schlafen Sie in einem Schlafsack, der normalerweise in der Nähe und in der Nähe von Lagern auftaucht, um Ihre Gesundheit allmählich zu regenerieren und den Zeitfluss zu beschleunigen.
Die Nacht ist großartig, um einfach abzuhängen und die Karte genau zu prüfen, bevor Sie in den Tag wechseln. Aber manchmal kann es als Stealth-Charakter von Vorteil sein, es dunkel zu halten. Wisse nur, je näher es Mitternacht wird, desto dunkler wird es. Normalerweise sind etwa 1-2 Stunden auf der anderen Seite zu dunkel, um damit zu arbeiten, aber 3 ist anständig für die Sichtbarkeit, während Sie sich trotzdem tarnen und im Allgemeinen länger tarnen können.
Immer wenn es 00:00 Uhr wird, werden auch die Mobs, die nicht Teil von Dungeons-Quests sind, respawnen, sodass Sie ihre Beute weiter farmen können. Auch Handwerksmatten in der Wildnis scheinen ebenfalls neu gespawnt zu werden.
Würfel der Wildnis
Denken Sie daran, wo sich die Handwerksmatten befinden, die Sie finden. Sie können an diese Orte zurückkehren, um sie zu bewirtschaften und zu sammeln, um sie zu verkaufen oder Waffen zu verbessern/herzustellen.
Dazu gehören auch Dinge wie Apfelbäume, die eine wunderbare Quelle für kostenlose Heilung außerhalb des Kampfes sind, und andere Trankmatten, die zur Herstellung von Stärkungstränken verwendet werden können, um Ihnen einen etwas größeren Vorteil gegenüber Feinden zu verschaffen, vorausgesetzt, Sie kaufen und füllen eine Portion von Flaschen aus dem Gemischtwarenladen.
Vorsicht bei Fremden
Was sich von Tag zu Tag ändert, sind andere Wanderer und Entdecker. However it can sometimes be hard to tell if they’re friend or foe, and the last thing you want is to walk up to some people wanting to talk then instantly get hitscan lasered back to your shrine. So just like mobs, mouse over them first.
You’ll usually show name rarity colors and stars if you have the setting on which lets you know they’re hostile. Otherwise they should have a light blue name above them and wave when you get within chatting distance. Adventurers are another good source of quest and location data.
Lightsouls
The game can get pretty hard if you’re not kitted out for the content, but fear not, you can always try again or come back later, death doesn’t have a drawback. Just travel time and a critical hit to the pride or a cargoship full of salt depending on how you went out.
Find yourself a friend
The general store usually sells a pet food item a day very cheaply and sooner or later you’ll also have them drop as loot also.
Having a pet gives a slightly extra source of DPS, potentially a distraction once aggro can be shifted properly and sometimes something cute to follow you around if you get the right food.
Eventually a set of Reins key item can be found in each biome that lets you ride your pet to gain increased speed which is WONDERFUL for people who need to keep at a range or need to get some distance to get healed. Don’t worry if the pet goes down. It’ll respawn after a short time close to you.
Your pet will also try to fight whatever you initially try to fight, but if you want it to come to you so you can say, make a quick getaway with the reins hit T to blow your trusty pet whistle and call them back to you. If they’re considerably far away they’ll be teleported.
Weapons and You [Basics and Warrior]
Each class, as I mentioned in the above section spawns with a set of 3 weapons for your testing pleasure. Each has some positive and negative things to them to be aware of that I’ll cover now when it comes to checking your favorite.
Basics
Unarmed
For everyone if you’re using singlehanded weapon but don’t equip a weapon in your main hand (the slot that you equip to when you left click) you’ll instead have unarmed strikes, except for the mage, who’s unarmed works just like a very low powered bracelet set. The rightclick is a short range roundhouse kick. But you typically don’t ever want to be unarmed.
Combo Counter
A Hit chain counter is visible near your cursor when attacking enemies. As this climbs to a maximum value (usually around 20-30 depending on class) you’ll build damage. The combo counter will gain an exclamation mark and turn bright blue when it’s fully charged so you know you’ve capped out on damage and or attack speed gains etc.
The damage gained from gaining combo feels like a form of armor ignore. Building your combo sufficiently will usually allow damage to start creeping through even tougher enemies, such as fighting rocklings with a freshly spawned fire mage.
EG:At first your shots will be doing close to nothing with some minor damage and having knockdown potential on rightclick. But as the hits climb your damage will go up until at full chain you can seem to damage them normally, even if you’re still only doing around 12 or so damage a shot and 50 a charge shot with your tiny fireballs.
Missing any attacks or specials with clear hitbox (wiffed ground pound or shuriken for example) will immediately drop your counter to zero and you’ll lose the penetration gained from the counter. It also means say goodbye to your attack speed gains for water mage, berserker and Sniper. You CAN however transfer your attacks between any targets as long as you keep dealing damage and not missing your clicks as the combo will also expire after what feels like 5 seconds. So feel free to roll around and mix and match your attacks as long as you land them.
Warrior Weapon Analysis
Great Mace, Sword, Axe
When you first pop in, this is what you’ll be holding. At first, it’s like a tree trunk, but you can get better weapons but all in this class work the same. Holding it requires two hands, but normally they deal damage which is better than having a sword and shield or dual one handers.
The great weapons have a three hit combo which works differently than most other weapon types. Their big drawback is how slow you go when using them. It takes a little bit for you to roll up a strike which brings the weapon down overhead directly infront of you. The second hit is a jab with the weapon in it’s down state which comes out a lot quicker but causes less damage. While the third strike is special. You flick the weapon back up and over your head behind you after a similar delay to the first attack. The third strike is unique is that what the weapon has in slowness, it makes up for in free stuns! The third strike has an alright chance to flick the enemy and stun them if you can land it.
Berserkers when charging their rightclick charge up an angry overhead swing that brings it immediately down infront of you when released dealing big damage with good stun potential. Because of charge attacks and their inherent speed due to their attack time being charge related you can use these relatively quick overhead bashes to bring out some quick damage and build some quick combo.
But if used with a Defender, you’ll instead take a defensive stance which allows you to block even with this big two hander due to defender’s passive. When released it’s instead a sideways swipe that deals good damage and hits in an wider area and is typically quicker than your normal big beefy overhead swing. Due to gaining mana on damage block it’s also a good way to quickly deal some hits to build combo and attempt to get sauced up War fury to proc quickly making twohanders a bit more redeemable early on in their hands.
Being a big tough guy weapon it deals big tough guy damage, but I tend to find it’s slowness of reaching it’s third strike before you’re actually dead tends to hold it back early game. But later when you’re surviving more hits and dealing overall more damage it becomes an oppressive weapon that can bring the pain and knockdowns quickly, and provides good scaling to your special moves due to it’s big damage, and good life return while mad, provided you can use it.
Single Mace, Sword, Axe and/or Shield
There are two ways you can generally wield these. You can take two at the same time to improve your damage, or you can use it with a shield which is classified as a type of “weapon” due to how it influences your charge attack and given that the character bashes with it.
Having both onehanded weapons allows you to swing both one after another, being a fast set of weapons this can allow you to build up combo stacks quickly which means faster chances of proccing Fury and more combo counter so your attacks pierce through as your damage will typically be lower per hit. For Berzerker, it also means quicker gains in attack speed and so more damage output.
As mentioned, because of damage being lower sometimes for tougher enemies above your tier you need to build some combo before the damage starts punching through a bit better.
Berserker can’t block with dual handers so you have to rely solely on attacking quickly to get fury as fast as possible. When using your rightclick it uses a dualbladed spin attack which moves you forward slightly. This hits multiple times and can hit multiple enemies. At low charge you won’t get too much damage but a few quick spins after a single hit to get mana can quickly build some combo without eating into stamina to spin attack, and despite being low uncharged and hence low damage if you’re lucky you might just get a knockdown here and there while trying to proc your fury and build hits with this.
As before, A Defender using dual weapons can actually still block, and they still have the spin attack, so due to not attacking as fast the spin attack is a good bet to try to gain fury procs quick to sustain you in the fight along with the ability to block and gaining mana and charge power per blocked attack these spin attacks make for great counter attacks which can knockdown enemies if they inadvertently charge you up too much.
If you instead choose to use a shield with your one hander your berserker will now be able to block naturally without having to rely on the hold shift spin attack. Naturally your defender though will just have an even tougher guard as you’re now using a shield, a tool for actually blocking.
Having a shield on changes your rightclick special to a quick “out of shield” spin swipe with your weapon. The effect is misleading in that the area of effect isn’t as big as the air swipe makes it out to be as you still have to be within attack range to land it. However, it can hit in an area and knocks down fairly reliably even half mana. Because of blocking you can instantly charge the attack without waiting by blocking an attack while holding rightclick! Defender gaining mana on block also further improves this allowing you to almost constantly swipe with fairly damaging and quickly charging small area attacks for applying damage, knockdown, combo counter and fury proc chances.
Personal Favorite
Sword and Shield, because of strong counterattack play with defender and extra layer of survivability especially for early berserker. Occasionally play around with twohander or dual once some gear is gotten.
Weapons and You [Rogue]
The rough has three types of weapons. All of them hit quickly and have rightclick attacks which come out immediately when used and can be bolstered with the use of Intercept to make you zoom at your enemy from afar before using it.
Fists
Fists attack very quickly, however what you’ll also quickly notice is the lack of damage until some combo builds. it also has a very high combo capacity to max out being 50 due to how fast they hit. Unless you’re causing some crits it won’t hit very hard.
The rightclick attack is a roundhouse kick. The damage is quite low and so is the chance of knockdown respectively if used when mana is low. but above 50% is when you start getting some alright to relatively kickass damage out of the hit. 100% mana and some crits from stealth or ninja evasion proc? It might just sting a bit.
Daggers
They’re in a similar bag to fists. They’re pointy and attack like a flurry, but deal not amazing damage until you really start drilling it in at which time it’ll start rocketing. But they have an added benefit that the fists don’t. Daggers when you land your rightclick they also poison the enemy! This buff lasts around 5 ticks over 5 seconds and can stack with more rightclick applications.
From some minor testing the damage appears to be based on the original damage your rightclick attack did when it landed. So once more, try to have atleast 50% before going for it. This is usually easy when combined with easy stealth mana, or a few shots from shurikens into intercept. A crit is what you want, cause if that crit goes off, they’re gonna melt, because not only will it hit for the initial strike, it’ll change that damage into that strength per tick. So store up that ninja crit, or stealth up and deliver some enemies the cure for wellness. Or if you just want to be silly, land a hit then poison them over and over and watch them turn bright green for ♥ and giggles.
Something to note with both fists and the daggers the weapon that is in your righthand (left click to equip!) is the style of attack animation and rightclick attack it will use. So if you want poison, put a dagger in the right and fist in the right. Instead of punching you’ll be thrusting as if stabbing with your claw/brass knuckle fist and poisoning with it using the dagger rightclick attack. Where-as if you use a fist on right and a dagger on left you’ll kinda awkwardly try to punch the enemy to death with the hilt/side of the blade of the dagger and will instead roundhouse kick (no roundhouse poison. :<).
Longsword
A crowd personal favorite and go-to for rogue. It’s got the damage and strikes wide. Generally, unless you’re playing with some hit and run poison tactics this is where you wanna be weapon wise. It attacks a touch slower and so has a lower max required combo of 30 before it caps out. But even for attacking standards it’s still quite fast cause it’s rogue, the fast guys.
The rightclick strike is a lunging stab which deals 4-5 hits of damage which can very quickly build said combo, you can also kinda sweep it around at enemies ahead of you. If you crit at lower power or even naturally at higher power you’ll most likely knock stuff down.
Usually providing the best total damage this converts well into shuriken/poison vial toss overall damage and most later long swords just look really cool.
Personal Favorite
Typically longsword to start and as a main-stay. But if I get good daggers I don’t mind them.
Weapons and You [Rangers]
Rangers are blessed with… well… Range! Their three selections of equipment are the Bow, Crossbow and Boomerang.
Bow
Projectiles from the bow are fired towards the cursor and travel in a soft gravity arc. With skill, you can shoot stuff from all the way to the view distance if you care to, most cases, further the better so you’ve got longer time for sniper to spin up to practically become a minigun, or ranger to proc a bunch of free rightclick charges.
The Rightclick of the bow is a volley of four arrows. These are fired with stronger velocity and are less affected by gravity. You can sweep the shots to spray around an area, and they have minor splash damage on impact. So a cluster of enemies can all be stunned and damaged simultaneously.
Being a rapid fire volley you can actually spam it at low charge to gain combo if you’re so inclined since the bow has a 30 hit combo to build before it peaks. Spamming rightclick for combo is particularly useful to build your attack speed rate or to get your damage up quicker off a downed enemy who won’t dodge too much.
Crossbow
Crossbow follows a similar deal with the bow. Arc-able projectiles, solid damage per shot. Ideal pick for sniper cause it usually has higher damage but random loot is random, so not always but it tends to be.
It’s rightclick charge shot is a single charged bolt with energy swirling around it. It deals big damage, but just like bow you can rapidly click rightclick to fire dud projectiles even without mana to build combo the cheesy way since it’ll fire them as fast as you can rightclick. Just don’t do yourself an RSI (repetitive strain injury). I tend to favor crossbow with sniper due to the single shot being ideal for watching those massive crits fly and high knockdown power from full charge due to the high damage connected to it.
It has a similarly big 30 hit combo to be built for it to get maximum spin up and damage penetration.
Bumerang
The Boomerang is an unique weapon in that it’s one of the only weapons that you can control around and redirect during it’s default attack rather than firing straight projectiles or casting area of effects. The boomerang throw sticks to the position under your cursor be it the ground infront of you spinning to hit a few enemies, or the enemy’s face that you tossed it at.
It tends to cause more hits of damage the closer the enemy is as the time that it stays out is on a timer. It also follows the mouse around but still will get foiled by a lack of line of sight. These damage ticks are generally weak but they stack up… and more often than not, they need to be stacked up to deal considerable damage unless you over level your enemy. That’s not to say it’s a weak weapon. It’s just got a slow start up at 80 hits maximum combo… Yeah…
At first you’ll notice it has maximum range, although it’s fairly reasonable for most peoples uses, but as I mentioned you get maximum hits the closer the enemy is. From simply nicking them for one or two ticks at max range, to a whole slew of 7 or 8 hits at practically face range. You can also toss the boomerang quickly and still have it continue spinning after cancelling into a dodge roll if an enemy is sticking to you, so it has that going for it as being a highly versatile outplay weapon provided you can get it to deal damage.
The Rightclick charge attack is a dual boomerang toss. Your character whips out a second boomerang while seething with rage (anger charging shakes) and lobs them one after another extending the amount of hits by a bit under double and dealing overall more damage per hit if close to max.
Charged up it has good knockdown potential PROVIDED that the hits are dealing damage. So if you can deal atleast a bit of damage at close range you’ll have a good chance at knocking down. Where as fully charged and with some combo in it to really drive in the damage it’ll more than likely knock something over when the second boomerang slams into them.
It’s probably not something you want to use on sniper, although maybe with all those crits I’ll eat my words? I didn’t actually try it. But holy ♥ does it mop up on a scout!
You know how the quicksand trap causes the enemy’s resistance and armor to be stripped while they’re drowning? Well… get ready to deal some TERRIBLE-TERRIBLE DAMAGE at any level. The ability for the multihits to work even on stronger enemies caught in a trap ruin just about anything’s day who is unfortunate to be swimming around in it.
Personal Recommendation
Bow or Crossbow at first for damage and knockdowns. But if going to be using scout, give boomerang a shot, especially if you can loot a better one.
Weapons and You [Mages]
Mages use semi-typical spell casting apparatus to bring big pain and heavy rain on enemies. Some weapons are easier to use in some situations than others though. As I might’ve mentioned in the mage section all your rightclick specials consumes 30 mana which regenerates rapidly when not in use.
Just remember, as water mages spin up a lot of their cast times and recoils will diminish as the combo climbs to maximum. And in the case of fire mages having your special particles makes a rightclick cast come out instantly without any charge time and not consume mana.
Mitarbeiter
The weapon you start with. The primary attack of the staff creates a small tornado at the location of your mouse. It takes close to a second to charge up and spins in place once active. It has a maximum range that while not restrictive isn’t super ideal either given the keep back nature of the mage (unless you’re heal cheesing at face range with water mage). The multihit nature of the tornado tends to help fire mage proc a crapload of fire buffs too for instant rightclicks.
Speaking of which, the rightclick is a much BIGGER tornado also at your mouse point which hits for longer and harder and can knockdown albeit semi-unreliably. Sometimes it might ko straight off, sometimes it takes a few ticks sometimes you’ll be praying for a ko to save yourself but it doesn’t happen. :V This big tornado hits a fairly decent area but it takes around twice as long to channel up.
In both cases once the tornado is set it’ll continue to spin in the spot it was left. It can’t be moved around anymore. The multi-hit nature of the tornado causes it to have a 50 hit max combo to build before peaking. However it’s rather lenient in that as long as a single hit of the entire hit streak of the tornado lands it’ll continue it. So you can be a little inaccurate as long as you don’t flat out wiff.
However the tornados have a fairly large drawback in that they don’t continue to spin after you roll. you must stay in your cast animation for it to continue damaging. This wouldn’t be a big issue if the enemies wouldn’t make a B-line for you.
I’d suggest mostly using the staff with friends, so a melee/dodgy friend can take the heat and you can support them by having them pull the enemies into your tornados for free damage, but can’t recommend using it solo.
Wand
The wand used to be a spray of projectiles, but since beta is now a thing it got updated to be practically a beam sniper… yeah. It’s a twohanded weapon seemingly wielded in one hand with each shot taking maybe half a second to charge and then it fires a pinpoint beam that penetrates in a line. Keep in mind it’s not infinite range, but it’s range is usually sufficiently far and it’s completely hit scan. Only a single hit despite looking like it can be moved around though and thats on the first moment it comes out so aim well.
The rightclick takes a further second to charge then produces a much thicker damage over time laser beam that can comb through multiple enemies and hits a wider area for a total of around 10-12 hits. This is kinda amazing since the wand only needs a 20 hit combo to peak in damage.
However it has a couple of fairly glaring draw backs. The hitscan nature can sometimes have issue with close by tiered terrain and small targets who hide within them making you sometimes catch the edge of terrain you didn’t want to hit and lose your combo. The giant laser also needs to hit CONTINUOUSLY to actually count. If even a single damage proc hits the terrain without hitting an enemy first it will ruin your entire combo! D:this includes if the enemy dies from the hit and then the last hit phases through the dead body before you can redirect it on another foe.
If you think your laser is gonna over do it or you’re running out of targets or just want to stop lasering consider rolling to animation/action cancel. Obviously the big laser also won’t continue if you roll, so you’ll waste mana and damage in a fight that requires you to evade close range if you don’t have an escape and an unsteady/unreliable aim due to close range panic can ruin your combo and hence your damage if facing tougher enemies you need the combo strength to cut through.
Still it’s considered one of the better weapons to use. Although the time between each laser tap makes fire mage attack procs a little iffy to acquire cause of it’s slow shots.
Bracelets
Large circular bracelets over your hands which amplify mage’s unarmed fire balls with some oomph. bracelets let you fire alternating long range fire/water balls. They’re projectiles and have no gravity and will just keep on flying allowing you to snipe at ranges similar to shooting with your ranger shots. They’re the quickest to fire firing almost immediately.
The rightclick is a single much larger fireball which splashes in an area. It needs to hit directly to count towards combo but will hit a small area when it explodes and causes knockdowns quite reliably because of it’s single strong shot nature. It also only takes half of charging to come out so you can easily evade an attack and stun in between enemy attacks giving you some breathing room and if you want to burst something down you can release multiple of them one after another quite quickly.
The combo counter is fairly quick at 20 hits just like the wand. Nothing much else to them. Just small and large projectiles much more suited for action combat rather than long range combat. Combat mage as it were. Ironically the nature of the projectiles makes bracer mages easier to deal with as AIs than any of the others with their hit scan perfect aim bull. :V
A drawback could probably be the need to get two of them to have both your shots deal same or similar reliable damage. As having one purple and one green just like any other weapon that requires two is that only your every other hit will deal good damage.
Personal Favorite
Bracelets for reliable stuns, long range shots with no gravity and quicker up takes allowing you to manage close fights easier. You also become a machinegun with water mage. Wand if I have something better or feel cheesy. Staff never unless it’s just really good. Might try it if I ever do multiplayer though.
Picking Up the Pace
Here’s a healthy helping of more tips for you to use to get going into the game and some stuff thats worth being aware of.
Hunt lore Pieces
Lore are usually on stone tablets, in small self contained crypts or in ruins. Usually they’re similarly curious little structures visible from orbital map view when you zoom in. A grey set of stone circles, a weird white colored spire of rocks, a tiny grey structure, a slightly larger thing looking like a respawn structure, all potential spots to pick up a piece of procedurally generated lore you can use to think up a story about the various generated clans and factions. Lore pieces also have a big hand in revealing the location of the artifacts that the game uses to level you up.
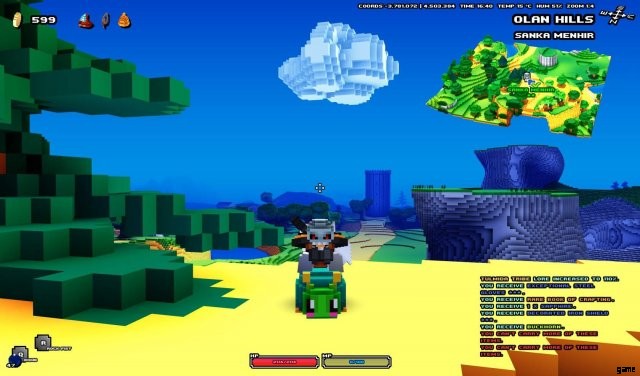
Those who bear their name
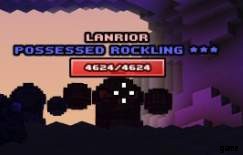
Sometimes you might run into larger mobs with colored names hanging out with their smaller counter parts. These are procedurally generated world bosses. At base they’re souped up boss versions of their original mob and can be anything from a white tier lowly king of seagulls, to a massive gold tier alpha of the alpha dogs. As seen here, they can also be “possessed” which improves their stats and lethality. The possessed stat can also appear on other normal mobs to the same effect, but thats another effect for another tip for later.
These random bosses also sometimes come with one or two special moves they might randomly throw out. Stuff like warrior ground stomps, fire mage missiles or even weirder stuff like summoning zombies or weaker copies of themselves to slowing lava traps or channeled explosions. Don’t get caught out. One moment you can be fighting them quite decently then one of these moves comes out of left field and melts you…
The great thing about them though is that they’re a great source of randomly generated loot, usually dropping items which are a tier higher than themselves as a reward (or equivalent if they’re already gold tier). Since they respawn the next day keep in mind where they spawn early and if they’re too strong note them down to fight later when you get tougher.
Eagle air drops and fast travel
At the town you can find a person called a “Flight master” hanging out next to a giant eagle on a perch. These guy when talked to opens the map and reveals points on the map represented as large “+” symbols. These are flight points.
Most flight points within your biome and those just over are normally 100 gold a piece. You can buy these flight points which permanently unlocks them for free super fast transit to again at any time. Once you reach the point the eagle will drop you off high in the sky and provide you with a free glider even when you don’t have it allowing you to reach nearby areas easily.
JUST. DON’T. HIT. E. IF. YOU. DON’T. HAVE. DAS. GLIDER. ALREADY. You will not be able to re-open your glider cause you don’t actually have one and will fall to your death like a dumbass if you do it too high. Unless of course you just float down with mage, cause mage traversal op. But anyone else will hit the ground and cease to exist quite literally on impact.
As you accrue gold if you’re not saving up for hopeful items or supplies consider using a flight point to get you across the map and closer to key objectives like traversal or questing items that you can tackle or areas of interest so you can unlock the shrines nearby to get to later.
Grab traversal kit when you can
If you manage to get clued in by an npc on the location of a traversal item like the glider, boat or reins, consider going to collect them to make getting around in your current biome easier. The boat is really fast, and having a pet you can ride around is both good for exploration and in combat escapes.
The glider could take some getting used to, as you need a sufficiently high area to jump off. Normally a tree won’t do but once you get into the air you’re a bit more fine.
Simply hold forward in the direction you want to be traveling. At first you’ll most likely start to dip into a downwards trajectory. Hold space to pull up and consume stamina to swoop yourself upwards. Do this usually in chunks of a quarter and a bit of stamina and then do it again once you start going down again and stamina begins regenning to keep yourself afloat. Just careful of smacking into solid surfaces from too high or near enemies as you’ll stun yourself temporarily on a bad landing.
Treasure any + gear that you find
It’s a part of the game design that could be improved, hopefully in time, but when you cross the boundary to a new area all your equipment will become nullified. Maybe through some kind of differences in mana or some kind of magic seal or peculiarity in the world this effectively renders the gear similar in power to starting equipment and negates it’s tier color. Crossing back into the original location will reactivate the gear back to it’s former glory.
How do you get around this? You hope to get lucky and find equipment with a + attached to it. Plus gear is special in that it stays active when within the borders of adjacent lands to the one it was found in giving you a leg up on combat and equipment in your next area’s exploration.
Don’t let go of them if they’re useful to you, keep them and use them to bolster your exploration into neighboring zones in search of more adventure, different scenery, pets, artifacts and general adventure.
Where’d my stuff go?
Each area also has it’s own armor and weapons equipment tab that is switched to when you cross the border usually that can be switched between in any location. It might look like all your other armor and weapon stuff was tossed out, but it’s actually safely still in the other inventory of the previous map you can switch to.
To that point, it’s probably a decent idea to consider entering a new region from the air by eagle closest to it’s regional village so that you can have a safe location to fly in and acquire quests and such.
In much the same way traversal items and key items like gliders, reins, boats, spirit bells etc will also disappear and have to be reacquired. It’s kinda unfortunate but thats the way it works I guess…
I need healing!
The only classes that can really self heal are warriors and water mages. Any other class would need to rely on a water mage or the defender’s shout for healing or use the variety of healing items required. Remember that potions can be chugged on the move while food items are consumed sitting down over a longer duration. It’s probably pretty clear, but eat your food items while out and about out of combat but switch to your potions before a fight. Don’t accidentally try to have food while fighting like I used to do cause I’d forget to switch my quck tab.
Cartography Quickly
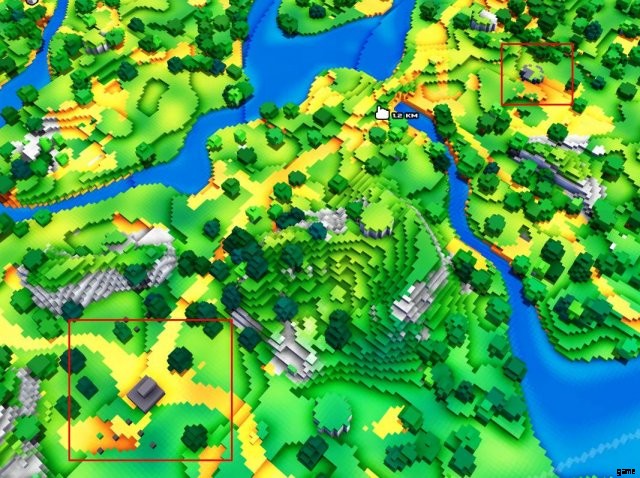
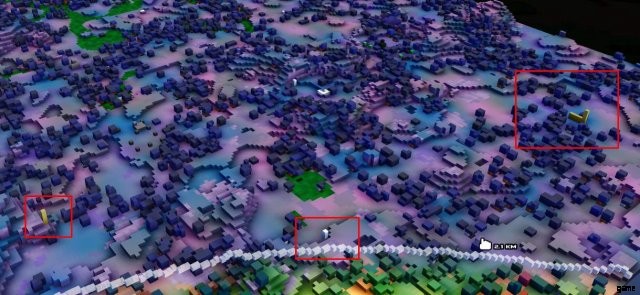
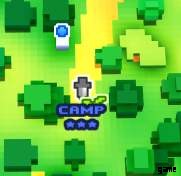
This is gonna get screenshot heavy. But heres a whole bunch of sights from orbital view that you can use to eyeball points of interest at a glance without having them be marked by npcs for you. Some are obvious, some curious. Few different biome types most from relatively zoomed out but some locational special features or types of places can show up just about anywhere.
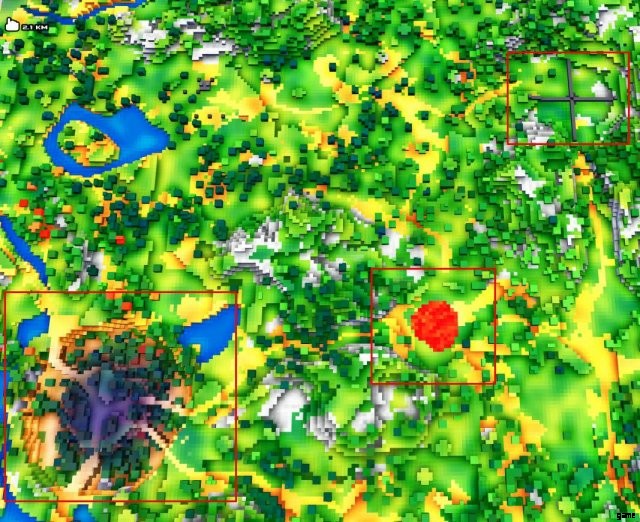
Here you can notice the discoloration of a dark forest. A lava lake, which is out of place in a land of green pastures and water. Also a mana pump, a place where the steel legion is draining mana from the surrounding biome to fuel their machines. dazu später mehr.
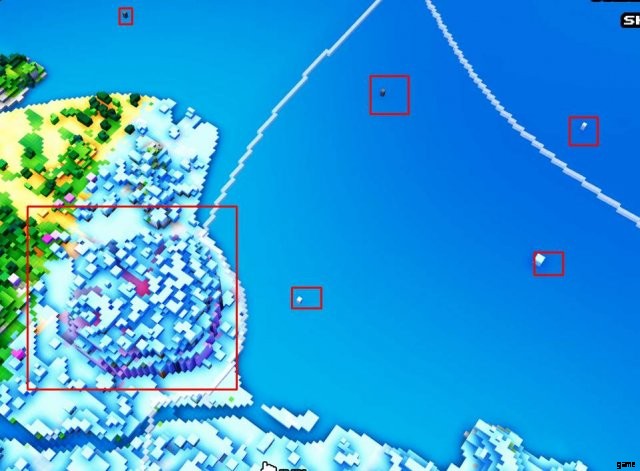
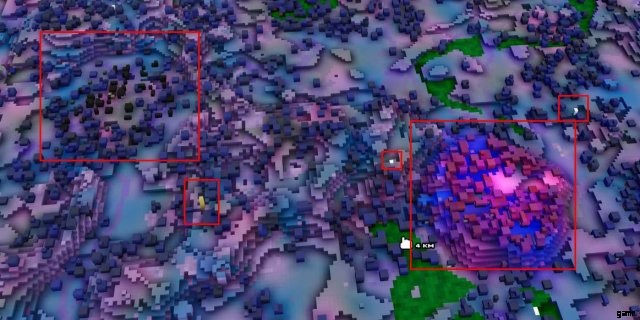
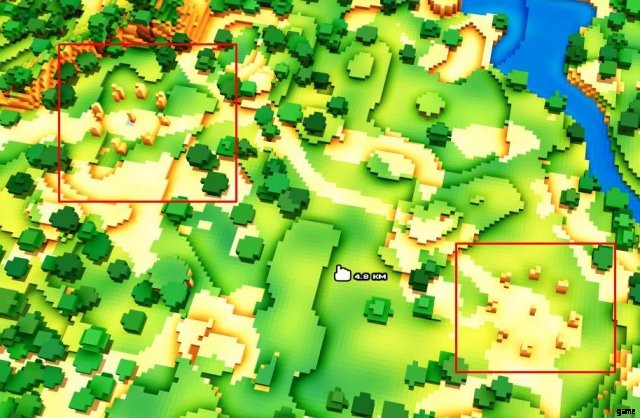
Here we can see a large chunk of raised terrain and several small dotting structures out on the water. White dots can be lore or respawn points. The grey ones, potentially towers containing unlockable loot or lore or even a little sky altar.
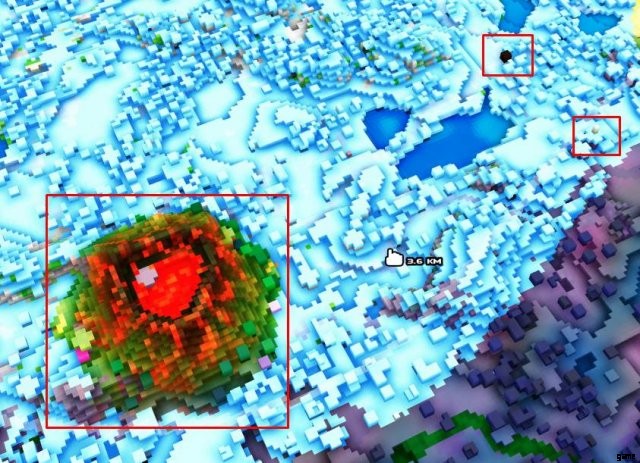
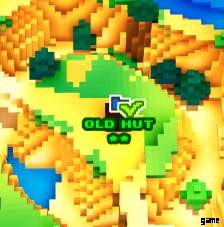
Big volcano with what seems to be a lore structure floating off it’s coast. Theres also a large grey cube from this far away that could be a lone crypt or old hut by the lake and a large cube on top of a mesa thats probably a piece of lore structure or a life shrine.
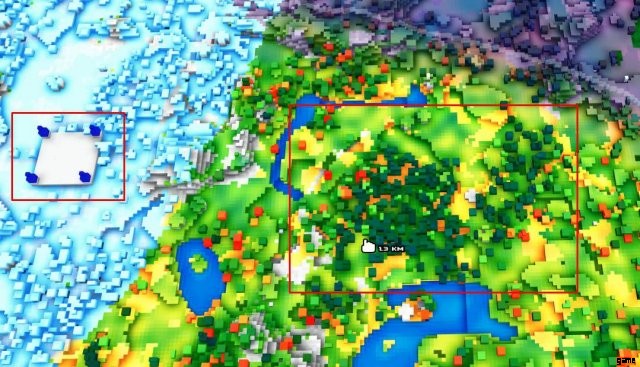
Up close here we can see one of our small tiny white structures turned into what appears to be an altar or maybe sky island access point. while the other one with it’s open sides is most likely a life shrine in the next biome over.
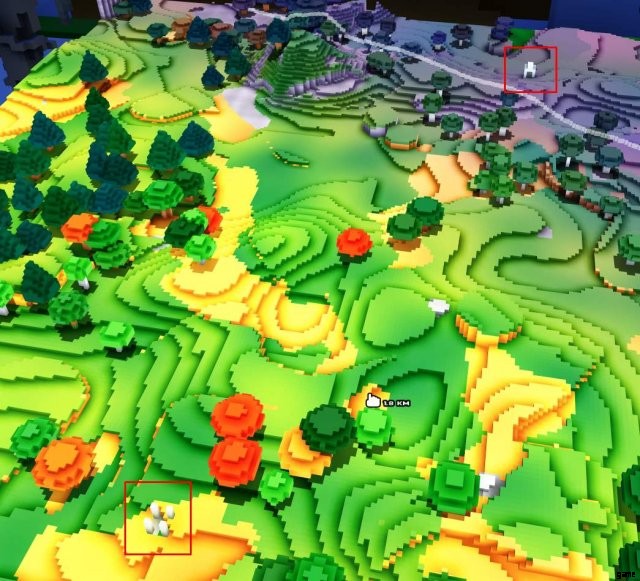
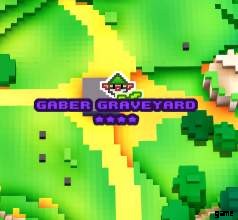
Here we have what appears to be an overgrown lore structure pillar and a graveyard/crypt access point. Graveyards can sometimes be just top side, containing anything from a combat encounter to a captured npcs, but sometimes they can be access points to catacombs down below which are a type of super dungeon that contain an artifact.
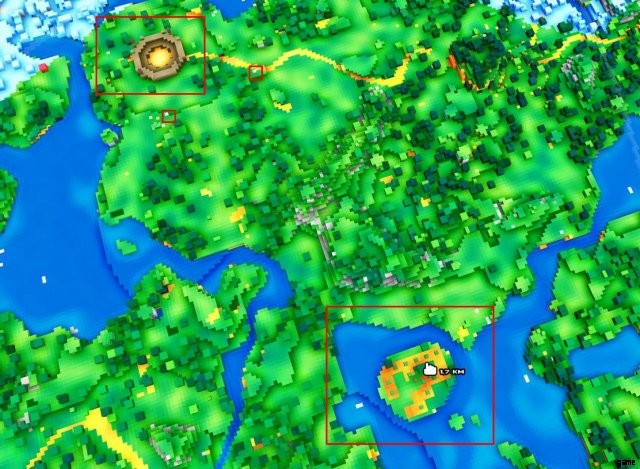
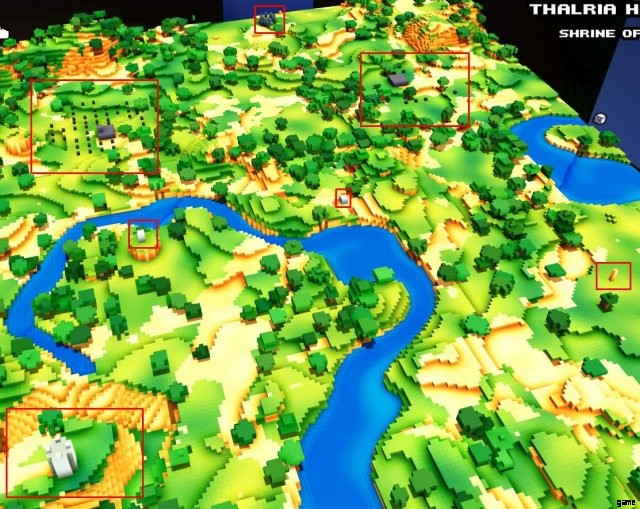
Here’s an lighter colored forest within a dark forest overall biome, probably an enchanted grove of some kind. Theres also a golden tower, a form of locked up loot structure that could require a special key item or mechanic to be used to get in. Also a village, but at this distance it could also be some ruins as the builds look very similar from this far away and village colors could be different in this biome.
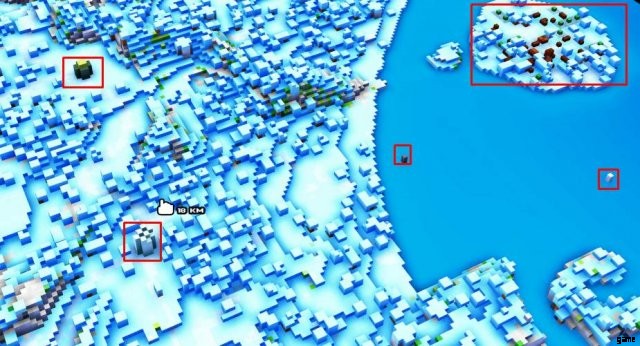
Here we’ve got an Arena, these provide you with what is essentially a boss rush from easy to godlike hard that you can use to get good equipment from both the bosses and it’s completion. Theres also what is probably a farm on a lake island nearby and a few white cubes of interest.
Here we have a dense cluster of trees which could be a grove or small forest of some kind and a castle in the biome over.
Castles tend to be really easy to see and tend to be big dungeons also containing an artifact.
A bit closer in, here we’ve got a white cube of interest, a loot tower and what appears to be the entrance hall to a “vault” another type of underground dungeon. note the difference of the long section after the tower.
also closer in, here we’ve got some stonehenge looking places with spire like rocks the color of the biomes rocks or terrain. These would probably be rings of power, which have a boss guarding an unlit flame holder. Beat the boss who can vary in strength to get the item to light it which provides a slight power boost within the biome it’s attached to.
Here we have a few things. What appears to be a large mesa could possibly be an unroofed wizard tower. A pair of crypts or graveyards, a loot tower, a couple different cubes of interest and a dark grey lore henge in the distance.
More crummy wizards probably, and a town on an island plus two different cubes of interest. One is probably lore related or a grey colored sky island access point.
Get the idea? Theres are others that are less obvious, like large hills, or a cluster of close together mesas that can form an “insert name here” rocks zone. But this should give you an idea on what to look out for. Just if you find an area, survey it for enemies, you don’t want to use all that time getting there and get smashed by some overpowered enemies. Be sure to try to find a nearby respawn shrine before doing anything silly. Frustration is killer.
Key Items and You
Whats all this about loot dungeons, artifacts and key items? Well, they’re special items you can collect along your travels through a biome that aide you in busting into dungeons fully or looting certain structures. Often you can get clued into their location by npcs in your starting village or npcs out in the world who’re willing to talk.

Traversal Kit
Hang glider: I mentioned it before but it’s a glider best used from high locations to keep you in the air and make you go slightly faster. As you hold forward to keep straight as you dip down pull up with space bar and stamina consumption periodically to keep yourself up. you also get to use it temporarily for free when a travel master hawk drops you off at your location.
Boat: Use it on water to make yourself go really fast and not sink. The boat is nice in that once you set a direction you’ll keep sailing that way. Got a lot of ocean surrounding your starting area? Find the boat and if theres much interesting stuff out there go for a leisurely sail in that general direction while perusing your map during the trip. Just don’t cross the boundary or it’ll evaporate out from under you cause of peculiar region locking game mechanics.
Reins: Wonderful riding apparatus to allow you to go fast across the land by using a suitable pet as a mount. I particularly like my caterpillar. (so damn cute)
Simply hit T as if calling your pet but when you’re right next to it and you’ll hop on. Some pets can’t be ridden at a fast rate though. Usually discernible by if you can pick them up at close range with E.
Climbing Spikes: (the last item in the set I showed) Not super required, but these allow you to nullify all costs to climbing around on surfaces allowing you to quite easily climb out of dark pits in dungeons that you survived falls or up and around edges without worrying about falling.
Key Items
Sky flute: The sky flute allows you access to sky islands. Use it near the little structure of a bird surrounded by pillars and you’ll play a little tune, then suddenly a flock of blue birds will come and levitate you up to the floating island. If you go up, I suggest you have a hang glider, jump into water or teleport back down from the nearest respawner… or… y’know… float down… as mage…
Divine harp: The harp allows you to unlock golden doors. Usually blocking access within dungeons or walling off loot inside loot towers. Simply approach and use the prompt to play a little tune that opens the gate. They look gold and shiney almost with an eye kind of motif in the center.
Spirit bell: The spirit bell once again, is used to access areas walled off. In this case, it’s metal grated portcullises. They’re usually silvery and reflective to tell you that they’re the type. When you play it you’ll be “transported to the spirit realm”, which makes you turn transparent like a ghost and able to simply phase through doors of this type for around 45 seconds. During this time the music will get spooky and an eerie fog will close in around you and the colors of the surrounding area will look different.
I’ve heard mention that being in spirit world mode is a good way to enable yourself to see easier at night due to the change in color hue and overlay effects. If you ever want to play or use any of your key items manually you can do so from your inventory. The Bell is typically the only one that still does anything as the harp and flute require certain objects to be nearby.
The Treasure Spirit: Finally this little blue raindrop spirit allows you to easily search for loot hidden around a biome. Sometimes loot can just be hidden in little caves, underground in burried shrines under breakable terrain on top of Mesas inside hollow logs and all sorts of places.
If you’re within a decent distance from an item lying around to be discovered the treasure spirit will pop out of you and start hovering around you acting like a compass. Running towards the spirit will take you in the direction of the item in question letting you find stuff ranging from simple (and salty) bags of gold to rare/epic/legendary loot that adapts to your class when you pick it up. Quite useful if found early while a lot of exploration is needed, but I don’t think I’ve ever had someone point me in it’s direction, so it’s a little random to find him.
A Questing We Shall Go!
There are numerous quests and locations you can find scattered around the world either by running into them or being told they’re there. Here’s a quick run down of the types I’ve found and their effects on the world around you, if any.
Combat encounter:These are simple fight mission encounters with a faction or group of enemies. It can range anywhere from a group of necromancers raising or empowered some undead. A bunch of guys and their boss hanging out or some enemies with a captive in the area all the way up to a full blown warzone of paladins fighting unholy pact legions or druids of mana being assaulted by the steel empire.
Simply fight the small fry and kill the boss, or in some cases hunt down and destroy spawning structures like mini demon portals or mana generators set up by the opposing faction that will naturally be hostile towards you.
Crafting Kit encounters are similar to a combat encounter but they can involved bosses or captured npcs but they reward a book of crafting based on the level. These unlock crafting recipes that you can make for yourself. I honestly can’t suggest crafting, but collect them and check what they have, you might get lucky and have a piece of plus gear you could flat out craft to keep you set for later biomes.
A supplier gnome has been captured by unsavoury mobs and enemies and is probably being stewed alive or kept for experimentation or something in the general area. Find and defeat the enemies and he’ll go free, providing you with some loot while also upgrading the inventory of village armor and weapon shops based on the number of freed gnomes. There is usually 4 of them to an area.
Shops resupply every day reset, so check the shops regularly, they can actually sell that shiny plus gear you so desire in their stocks some time.

A mage tower is a tower inhabited by a mage watching over a magical crystal of some kind. There can sometimes be multiple of them in an area. Being a MAGE tower the boss is always a mage, so they can be rough fights. But both the boss and the crystal will drop loot when destroyed and breaking all crystals in the biome will break the spell on blue forcefield doors you otherwise wouldn’t be able to get through. They’re basically mini and very vertical dungeons.
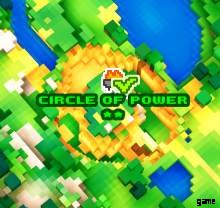
A circle of power is like a little stonehenge of pointy spires. Within the area will usually be a lore piece or two, a boss watching over the area, and a large unlit brazier. Defeating the boss will drop “eternal embers” which allows you to ignite the brazier which improves your “power” throughout the region. I’m not sure what that entails, probably some small stat boosts, but it appears in the top left buff bar when completed.
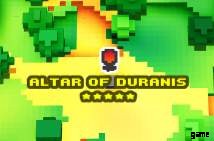
Demon Portals are bad news because around the biome you’ll see mobs who are big, red and possessed, more often than not they’re also bosses I’ve noticed. Possesed mobs and bosses are overall a portion stronger than normal which can cause troubles especially when it comes to large grand bosses at skull encounter zones, mage towers or in arenas or dungeons. Sometimes they even possess villagers in the town who will attack you and probably force you to murder them. They will respawn with the day mobs, but will remain possessed and hostile until the portal is busted.
When you get there some Cult of doom enemies will be channeling energy to keep a demon portal active. It’ll have a lot of HP and defeating the humanoid enemies there channeling into it will reduce it’s health (and it probably heals as they channel into it? so theres that). The portal constantly spits out imps who’ll try to murder you but the aim is to just smash the portal closing it stopping magical invisible demons from possessing creatures, bosses and characters around the biome.
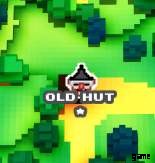
This is a witch boss. Sometimes you’ll come across a town where all the people in it are turned to stone and you can’t speak or interact with them. This is unfortunate and usually means theres a witch hiding out in a hut or location somewhere that you’ll need to murder to cancel the curse and bring everyone back to living again.
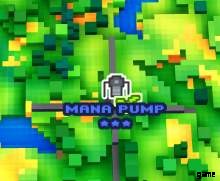
A Mana Pump built by the steel legion to extract and refine mana from the environment to power their machines and technology.

If you notice an icon that looks like this in your buff bar it means you’re under the effects of “Mana absorption”. Mana absorption isn’t a massive deal but there can be multiples of them. Mana absorption slightly slows the rate at which you build mana from your attacks to power your rightclick attacks and pumps are culprit.
To break them you need to find the 4 arms of the pump structure and defeat the boss guard patrolling around it’s mana inducer. This generator structure becomes vulnerable when they’re killed and must be smashed. When all inducers are smashed the big officer of the installation will appear in the central platform where the pump itself is and be ready for a fight. Smash him too then smash the pump to get sweet loot and turn down the mana absorption effects in the biome.
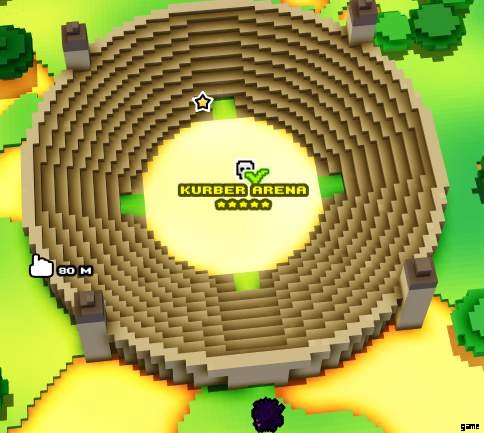
This Skull icon means there is some kind of boss encounter at this location. Usually a grand boss like a yeti, mammoth or saurian… Even a giant enemy crab!
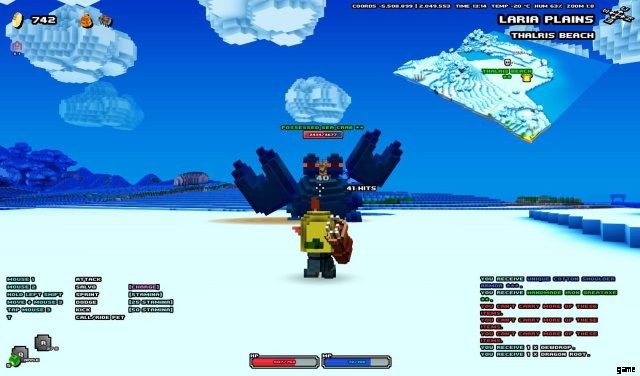
This boss will probably absolutely smash you if you’re unkitted. They can be a rough time. Especially from arenas where you have to go through 3 rounds of other bosses before the big guy is let loose on you. But the loot is nice, and like world bosses even after you beat them I think they should respawn with the day.
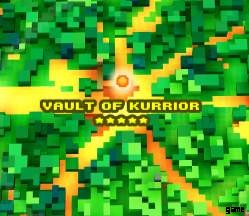
Cue up your favorite dungeon diving music. This glowy icon when revealed is normally your ultimate goal in the region. Finding a special artifact mentioned in the lore of the biome that you’ve been exploring. You can of course, stumble across the dungeon itself before it’s even revealed, but sometimes you’ll need the key items from last section to fully crack into them. Usually littered with parkour traps, enemies, bosses all varying anywhere from green to yellow and of varying lengths.
Cracking in and getting the relic affords you a level up and a small boost to one of your traversal skills which stack and stack to buggery and beyond as you collect more and show off who’s the best artifact hunter.
Hopefully one day they’ll have a much better use… We can always dream… but for now, it’s just bragging rights mostly and satisfaction of beating an area. Although keep in mind there can be more than a single relic in any given biome. Search well, and hoard all of them.
Gameplay Tips and Tricks
If you’ve gotten this far through my guide and indepth ramblings here is where you’ll my best tip, and maybe a few more if I get some questions that I can answer!
Early Morning Double Dip
This is a tip for farming loot and materials for whatever you need quickly. I hope you’ve been marking all the locations of bosses and clusters or good materials you need like gems and metal! Cause you know how mobs and resource respawn at 12 AM? Well at the town you can reset the day for 10 pieces of gold at the inn every day between 18:00 in the evening and 6:00 in the morning. The effect this has is effectively setting it to 7 AM bright and early so you have daylight and resetting the world.
See where this is going? Essentially At 12 you go for a round trip of all your favorite resource points, bosses and respawning encounters across the world to farm your loot. Then, before 6 AM hits, go back to town and pay to stay at the inn. The world will get reset to 7 AM again and you can do another round in quick succession for more success. This is great for gathering materials which you can only find a few of usually like gems, silver, gold and of course the bosses (or all mobs really) and their drops.
If it’s just way too dark, like i mentioned in key items see if having the spirit bell active helps at all, or sleep in a bed in villages or sleeping bags generated in camps to restore health and hurry the clock along till it lightens up a bit.
Volcano Panic, Icy Blues and Toxic Greens
There are a few drink items you can make in your recipes called lemonade, hot chocolate and green smoothie. These items are used to save you from environmental effects. Lemonade shields you from hot damage like the lava in volcanos where sometimes key items can be spawned forcing you to toast yourself… Hot chocolate would stop you becoming an icy pole if you take a swim in a cold biome. While the water in dark forests seems quite sickly and probably poisons you, so if I’m correct (I’ve never actually gone into one yet) the green smoothie probably helps with that.
- Ice cubes apparently spawn under the water in ice biomes.
- Cocoa beans feel like they’d spawn in some kind of tropical jungle region. Same with the bananas.
- Kale appears in some farms occasionally.
- The General store sells sugar cubes.
- Lemons spawn fallen from trees just like apples.