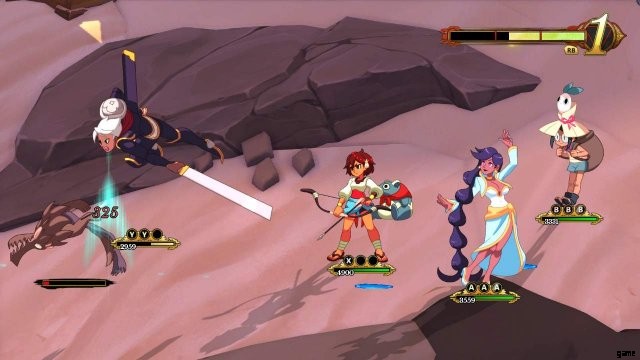
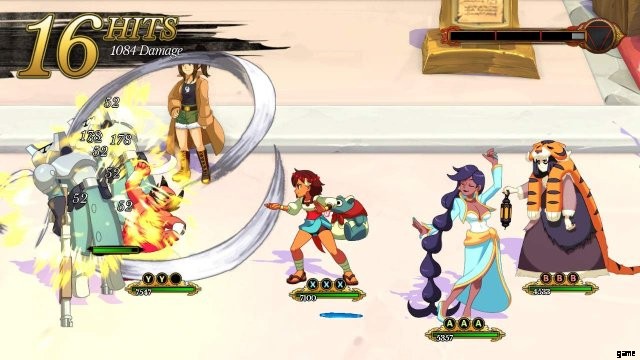
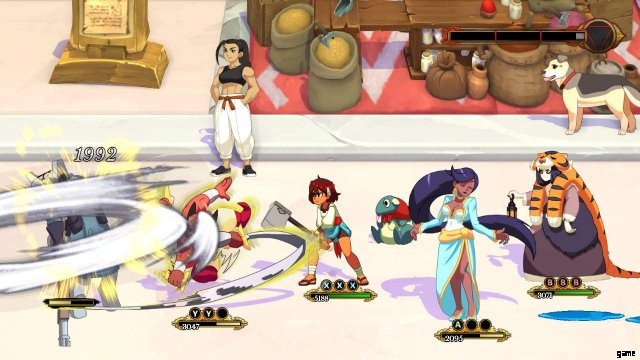
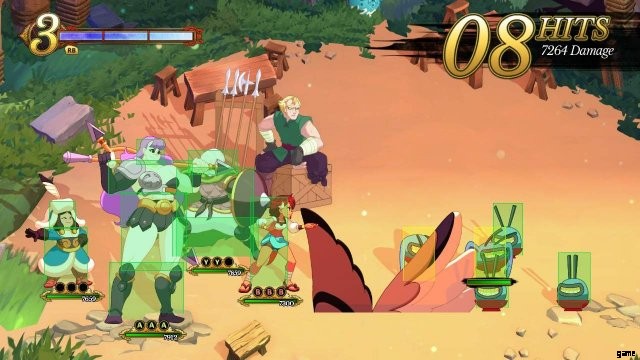
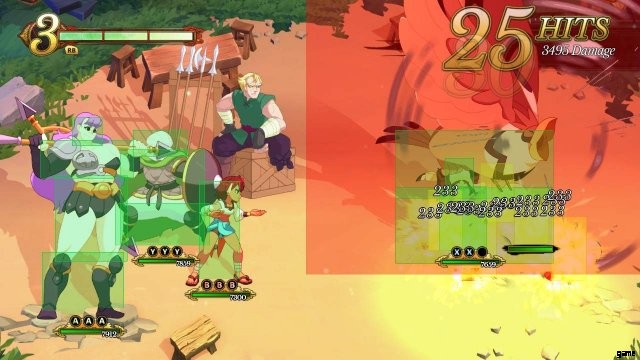
Dokumentation der Bewegungen und Verwendungen für alle Charaktere.
Einleitung
Dieser Leitfaden ist für alle gedacht, die Schwierigkeiten haben zu verstehen, wie bestimmte Bewegungen funktionieren, oder einfach nur herausfinden möchten, welcher Charakter was tut. Ich habe versucht, die Beschreibungen so klar wie möglich zu machen, damit jeder sie verstehen kann. Die Charaktere werden nach der Reihenfolge der Freischaltung aufgelistet.
Ich bin hinausgegangen und habe für jeden Charakter Folgendes aufgelistet:
Statistiken
- Gesundheit, Angriff und Geschwindigkeit.
Rollen
- Wofür der Charakter hauptsächlich verwendet wird (z. B. Heiler, AoE-Angriffe usw.).
Empfohlene Position
- In welcher Position in der Partei der Charakter am besten funktioniert.
Verschiebeliste
Eine einfache Liste der Attacken eines Charakters.
- Normal – Der Angriff, der ausgeführt wird, wenn die Angriffstaste des Charakters gedrückt wird.
- Runter – Der Angriff, der ausgeführt wird, wenn die Angriffstaste des Charakters gedrückt wird, während die Abwärtstaste gedrückt gehalten wird.
- Nach oben – Der Angriff, der ausgeführt wird, wenn die Angriffstaste des Charakters gedrückt wird, während die Aufwärtstaste gedrückt oder für Controller gedrückt gehalten wird.
- Spezial (1 Balken) – Der Angriff, der ausgeführt wird, wenn die Fokustaste gedrückt gehalten und die Angriffstaste des Charakters einmal gedrückt wird.
- Spezial (2 Balken) – Der Angriff, der ausgeführt wird, wenn die Fokustaste gedrückt gehalten und die Angriffstaste des Charakters zweimal gedrückt wird.
- Spezial (3 Balken) – Der Angriff, der ausgeführt wird, wenn die Fokustaste gedrückt gehalten und die Angriffstaste des Charakters dreimal gedrückt wird.
- In der Luft – Wenn ein Angriff Ziele in der Luft treffen kann.
- Bereich – Die Angriffsrichtung. Dies bestimmt die Richtung, in der Feinde ausgerichtet sein müssen, um gleichzeitig getroffen zu werden.
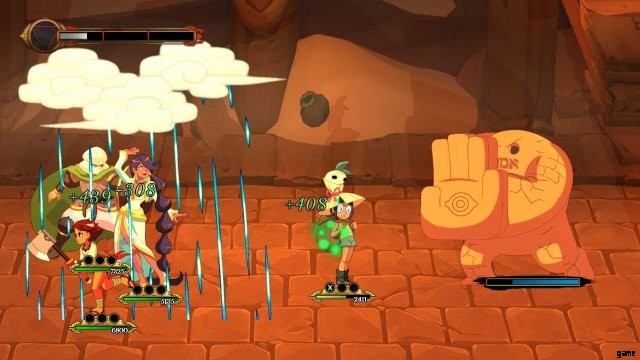
- Iddhi generiert – Die Menge an Iddhi, die durch einen Angriff erzeugt wird. Dokumentiert den ersten Angriff und den Folgeangriff, falls unterschiedlich.
Nutzung verschieben
Eine detaillierte Beschreibung jeder Bewegung.
Grundlegendes Gameplay
Wie ich den Charakter verwende. Wahrscheinlich der eigensinnigste Teil dieses Leitfadens, aber ich habe versucht, ihn so sachlich wie möglich zu halten.
Kombinationen
Alle möglichen Kombinationen, die ich beim Schreiben dieses Leitfadens gefunden habe.
Offensichtlich ist dieses Spiel gerade herausgekommen. Ich habe noch nicht alle Charaktere freigeschaltet und habe auch keine Zeit, mich in einem Rutsch durch dieses Spiel zu pflügen.
Einige Begriffe definieren
Ich verwende einige Begriffe, die für manche Menschen verwirrend sein könnten. Das bezieht sich hauptsächlich darauf, wie ich die Rolle eines Charakters definiere.
Bereich
Die Richtung, in die sich die Hitbox eines Angriffs bewegt. Sie können entweder horizontal oder vertikal sein.
- Horizontal
Die Richtung der meisten Angriffe. Die Hitbox des Angriffs bewegt sich von rechts nach links und beschädigt alle horizontal ausgerichteten Ziele. Paradebeispiele sind Anjas normaler Folgeangriff, Phoebes normaler Angriff und Tungars Spezialangriffe 1&2.
- Vertikal

Die Richtung der meisten AoE-Angriffe. Die Hitbox des Angriffs erstreckt sich vom Charakter nach oben und unten und beschädigt alle Ziele, die vertikal ausgerichtet sind. Die meisten Angriffe, die einen vertikalen Bereich betreffen, haben auch einen großen horizontalen Bereich. Paradebeispiele sind Dhars normaler Angriff, Razmis 3. Superkraft und Anjas 3. normaler Folgeangriff.
Unterstützung
Jeder Charakter, dessen Gimmick darauf angewiesen ist, andere Gruppenmitglieder zu unterstützen, anstatt anzugreifen.
AoE-Schaden
Einfach ausgedrückt fügen sie mit einem Angriff mehreren Gegnern Schaden zu. Beispiele sind Dhars Spezialangriffe und Zebeis Up-Angriff.
Explosionsschaden
Charaktere, die Schaden in großen "Chucks" verursachen, anstatt ständig schnelle Angriffe durchzuführen. Ein hervorragendes Beispiel ist, wie Dhars Down-Angriff ihn Angriffe speichern lässt, um Angriffe mit hohem Schaden zu verstärken.
Position
Ich verwende die „Face The Enemy“-Formation, wodurch meine Gruppe immer gleich ausgerichtet ist. Vorderseite ist Vorderseite, Rückseite ist Rückseite und oben und unten sind „Seiten“.

Die vier Grundstatistiken
Jeder Charakter hat ein Gleichgewicht von drei Statistiken:Gesundheit, Angriff und Geschwindigkeit. Diese drei Werte sind so ausbalanciert, dass jeder Charakter im Gleichgewicht bleibt.
Zum Beispiel haben Razmi und Phoebe zwar hohe Angriffswerte, aber ihre Geschwindigkeit ist so gut wie null.
Gesundheit
Die Gesundheit bestimmt, wie viel Gesundheit ein Charakter hat. Typischerweise haben Charaktere mit Heilfähigkeiten eine geringere Gesundheit.
Angriff
Der Grundschaden, den die Angriffe eines Charakters haben. Charaktere mit hohen Angriffswerten können Schaden in die Tausende austeilen, allerdings mit langen Wiederaufladezeiten dazwischen.
Geschwindigkeit
Wie schnell sich die Angriffsladungen eines Charakters aufladen. Charaktere mit einem höheren Geschwindigkeitswert können Angriffe schnell spammen.
Basis Iddhi
Jeder Charakter erzeugt eine kleine Menge Iddhi, wenn er einen Angriff startet. Charaktere mit höheren Angriffswerten haben normalerweise ein niedrigeres Basis-Iddhi.
Angriff gegen Geschwindigkeit
Die eine Sache, nach der alle in den Kommentaren immer wieder fragen. Sicher, einige Charaktere haben einen höheren Angriff, aber diejenigen mit höherer Geschwindigkeit können auch genauso viel Schaden verursachen. Charaktere wie Yan können tatsächlich einen höheren Schadensausstoß haben als Phoebe und Razmi, weil sich ihre Angriffe einfach so schnell wieder aufladen. Ganz zu schweigen davon, dass Charaktere mit höherer Geschwindigkeit Iddhi schneller erzeugen als langsamere, schlagkräftigere Charaktere.
Iddhi-Gebäude
Oben auf dem Kampfbildschirm finden Sie die Iddhi-Anzeige. Sie können die Anzeige füllen, indem Sie Angriffe ausführen. Sobald ein Balken gefüllt ist, können Sie den Spezialangriff eines Charakters verwenden. Jeder Charakter hat drei Spezialangriffe, wobei jeder Angriff 1-3 Balken kostet.
Infos zum Bau von Iddhi
- Alle Angriffe erzeugen bei Aktivierung eine Basismenge an Iddhi. Alle Berechnungen berücksichtigen dies.
- Die Menge an erzeugtem Basis-Iddhi ist charakterabhängig. Es wird auf der Seite des Charakters aufgeführt.
- Folgeangriffe erzeugen normalerweise ein zusätzliches (1) Iddhi. Dies wird in der Bewegungsliste eines Charakters angezeigt.
- Spezialbewegungen erzeugen kein Iddhi.
- Schaden wird bei der Iddhi-Erzeugung nicht berücksichtigt. Die Erzeugung wird durch den Angriff und die Anzahl der getroffenen Ziele bestimmt.
- Das Durchbrechen der Abwehr eines abgeschirmten Ziels erzeugt 30 zusätzliche Iddhi.
- Das Angreifen abgeschirmter Ziele erzeugt 50 % weniger Iddhi.
- Jedes Ziel, das in die Luft geschleudert und dann in der Luft getroffen wird, erzeugt 3-5 zusätzliche Iddhi.
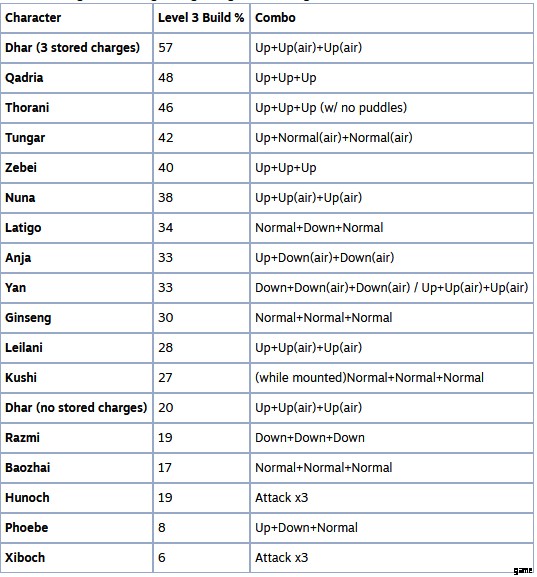
Iddhi-Build-Diagramme
Die folgenden Diagramme messen ungefähr, wie viel Iddhi aus einer einzigen Kombination mit einem Charakter generiert werden kann. Alle Berechnungen wurden in der Trainingsarena durchgeführt, gegen Einzelscheiben- und 5-Schuss-Übungen.
- (air) bedeutet, dass ein Ziel getroffen werden soll, während es noch in der Luft ist.
- Alle Angriffe von Qadria beinhalten den Bonus-Folgeangriff.
Während dies nur auf Angriffsstufe drei gemessen wird, habe ich festgestellt, dass die Ranglisten auf den Stufen 4 und 5 fast gleich bleiben. Sehen Sie im Abschnitt eines Charakters nach, wie viel Iddhi pro Angriff erzeugt wird.
Dies hilft Ihnen, eine allgemeine Rangfolge dessen zu verstehen, welche Charaktere beim Bauen von Iddhi anständig sind. Kombiniere dies mit der Geschwindigkeit jedes Charakters, um zu verstehen, wie schnell jeder Charakter Iddhi bauen kann.
Einzelziel-Iddhi-Generierung (Stufe 3)
Gemessen an einem einzelnen großen unbewachten Ziel.
Crowd Iddhi Generation (Stufe 3)
Gemessen an 5 regulären Zielen.

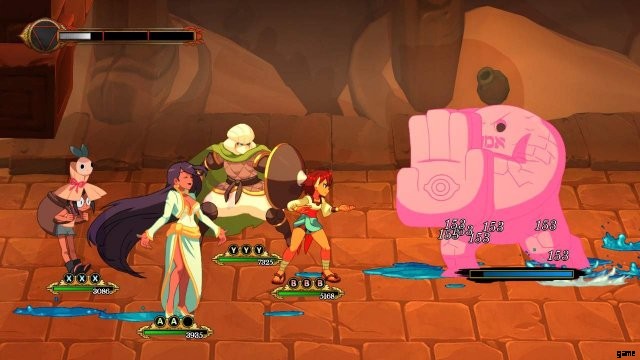
Ajna
Ajnas Angriffe ändern sich im Laufe des Spiels. Ich werde jetzt die grundlegende Bewegungsliste erstellen und warten, bis alle Freischaltungen alles dokumentiert haben.
Neueste Waffenfreischaltung zum Zeitpunkt des Schreibens:Spear.
Angriffslevel zum Zeitpunkt des Schreibens:5.
Statistiken
- Gesundheit – 3 Sterne
- Angriff – 3 Sterne
- Geschwindigkeit – 3 Sterne
Rollen
- Primär:Schaden
- Sekundarstufe:Gemischt
Empfohlene Position
Beliebig.
Verschiebeliste
Anja hat zwei Zuglisten, da Anja viele Folgeangriffe hat, die unabhängig von ihrem ersten Angriff sind. Einige Folgeangriffe haben zusätzliche Folgeangriffe. Sie sind im Combos-Abschnitt dokumentiert.
Erster Angriff
Normal
Anja schlägt das Ziel.
- In der Luft:Nein
- Bereich:Horizontal – Klein
Ersetzt durch Axt.
Nach unten
Anja geht in die Hocke und sticht ins Ziel.
- In der Luft:Nein
- Bereich:Horizontal – Klein
Benötigt Axt.
Hoch (unbewaffnet)
Anja führt einen Spinning Kick aus, der Ziele in einem weiten Bereich trifft.
- In der Luft:Nein
- Bereich:Horizontal – Mittel
Benötigt Axt.
Hoch (Axt)
Anja geht in die Hocke und schießt mit ihrer Axt auf die Zielscheibe.
- In der Luft:Nein
- Bereich:Horizontal – Mittel
Benötigt Axt.
Spezial (1 Balken)
Anja führt eine Reihe von Handflächenschlägen auf das Ziel aus, die mit einem Axthieb enden.
- In der Luft:Nein
- Bereich:Horizontal – Klein, Vertikal – Mittel
Benötigt Axt.
Spezial (2 Balken)
Anja führt eine Reihe von Handflächenschlägen auf das Ziel aus, die mit zwei Axtschlägen enden.
- In der Luft:Nein
- Bereich:Horizontal – Klein, Vertikal – Mittel
Benötigt Axt.
Spezial (3 Balken)
Anja bündelt ihre Energie in einen Strahl, der über das Feld schießt.
- In der Luft:Ja
- Bereich:Horizontal – Extrem
Folgeangriffe
Normal
Anja schlägt das Ziel mit ihrem Speer nieder.
- In der Luft:Nein
- Bereich:Horizontal – Mittel
Benötigt Speer.
Nach unten
Anja hieb mit ihrer Axt zweimal auf die Zielscheibe.
- In der Luft:Nein
- Bereich:Horizontal – Mittel
Benötigt Speer.
Nach oben
Anja schießt mit ihrem Bogen auf das Ziel.
- In der Luft:Ja
- Bereich:Horizontal – Klein
Verbeugung erforderlich.
Kombinationen
Einfaches Hacken
- Jeder nicht spezielle Angriff
- Jeder Folgeangriff
- Normaler Angriff
Anja wird das Ziel mit ihrer Axt hacken. Eine Kuriosität, da sie ihren Speer nicht wie bei ihrem normalen normalen Folgeangriff herauszieht. Dieser Angriff hat eine mittelgroße vertikale Hitbox.
Sprengschuss
- Jeder nicht spezielle Angriff
- Angriff nach oben
- Angriff nach unten
Anja wird mit ihrem Bogen auf das Ziel schießen und dann jubeln, wenn der Pfeil explodiert. Dieser Angriff hat eine kleine horizontale Hitbox.
Dhar

Statistiken
- Gesundheit – 3 Sterne
- Angriff – 3+ Sterne
- Geschwindigkeit – 1+ Stern
Rollen
- Primär: AoE-Schaden
- Sekundarstufe: Burst-Schaden
Empfohlene Position
Vorderseite oder Seiten.
Verschiebeliste
Nutzung verschieben
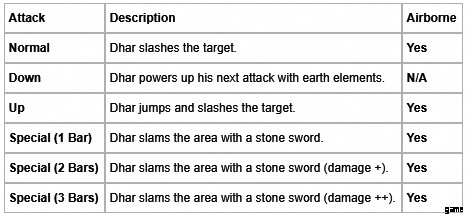
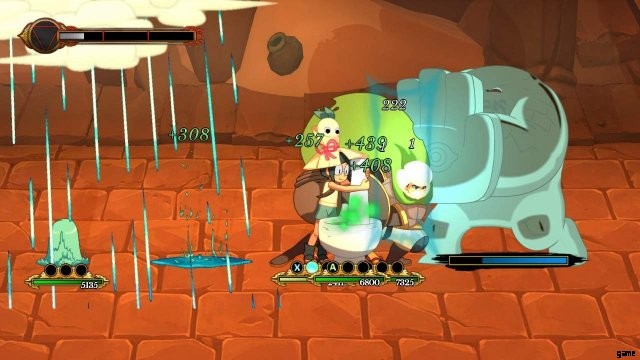
Neutraler Angriff:Geerdeter Hieb
Dhar schlägt auf das Ziel ein. Dies trifft mehrere Ziele, wenn sie nahe genug sind, was fast immer der Fall ist. Dieser Angriff kann schnell hintereinander entweder mit einem anderen neutralen Angriff oder Up-Angriffen kombiniert werden, verursacht jedoch keinen zusätzlichen Schaden. Dieser Angriff profitiert von Dhars Down-Angriff.
Bild 1 ist ein nicht verstärkter Angriff. Bild 2 zeigt einen verstärkten Angriff.
Down Attack:Earthen Fury

Dhar speichert einen Angriff, um einen anderen Angriff zu verstärken. Sie können anhand der Menge an Steinen, die Dhar umkreisen, abschätzen, wie viel Energie Sie gespeichert haben. Jeder Angriff verbraucht eine Ladung der gespeicherten Energie.
So interagiert es mit Dhars Angriffen:
- Neutral: Angriff trifft viermal für jedes getroffene Ziel (ausgenommen fliegende Ziele)
- Nach oben: Angriff trifft zweimal.
- Spezial: Tut nichts.
Seltsamerweise scheinen Dhars normale und spezielle Angriffe nicht richtig zu funktionieren, wenn sie auf Feinde in der Luft angewendet werden. Die Ladung wird verbraucht, aber der Schaden bleibt derselbe wie bei einem normalen Angriff. Ich konnte beim Schreiben auch keinen Unterschied im Schaden von verstärkten Spezialangriffen feststellen. Es ist entweder verwanzt oder hat einen bestimmten Auslöser.
Angriff nach oben:Stalaktitenspitze
Dhar jumps into the air and slashes at the target. This attack does not hit multiple targets, despite how it looks. This is an easy way to bring airborne targets down into melee range.
Picture 1 is a non-boosted attack. Picture 2 shows a boosted attack.
Special Attack (1 Bar):Groundpound
Dhar slams the field with a giant stone sword, hitting everything in the area. This includes airborne foes.
Special Attack (2 Bars):Earthbreaker
Dhar slams the field with a giant stone sword, hitting everything in the area. This includes airborne foes. This does around 60%-70% more damage than special attack 1.
Special Attack (3 Bars):Terraquake
Dhar slams the field with a giant stone sword, hitting everything in the area. This includes airborne foes. This does around 60%-70% more damage than special attack 2.
Basic Gameplay
Dhar is great because he can deal out high single-target damage and has AoE attacks that can hit a lot of targets at once. He even has an up attack that works on the first attack looking at you, Anja. He’s a flexible damage character that can work well in a variety or situations.
Dhar’s only minor drawback is that he does need to charge up before he can deal some solid damage. This is minor mainly because of how fast his attacks recharge. For being listed as a 1.5 speed, he attacks recharge at a rate closer to that of a 2 or 2.5 speed.
Combos
Basic Combo
- Down Attack.
- Down Attack (skip if attack level is lower than 4).
- Normal attack.
- Normal attack.
Use this when you just need to deal damage. Boosting Dhar’s normal attack will make it hit four times. Adding in the fact that it is almost guaranteed to hit all targets on the field, you can deal out a lot of damage quickly with this combo.
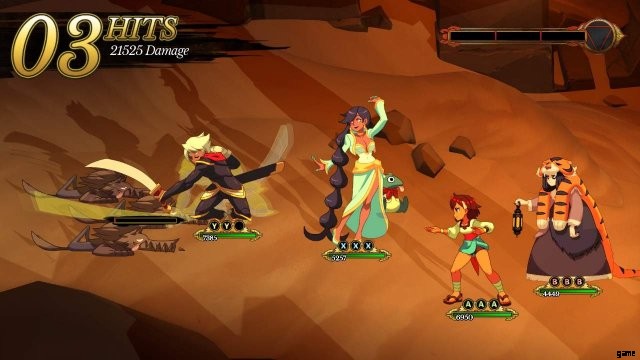
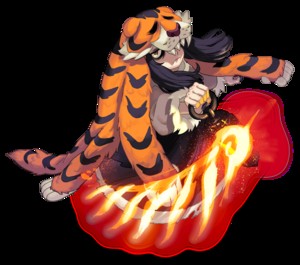
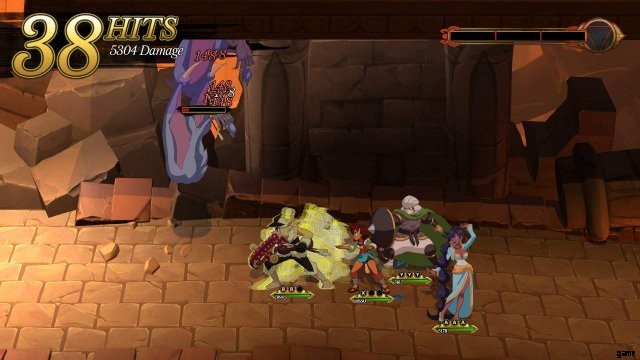
Razmi (&Bom)
Stats
- Health 0+ stars
- Attack 4 stars
- Speed 0+ stars
Roles
- Primary: AoE damage
- Secondary: Healing
Recommended Position
The back.
Can be moved to the sides if another character needs to be in back.
Move List
Move Usage
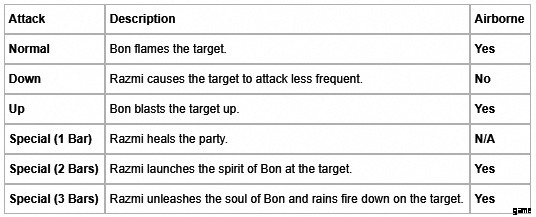
Neutral Attack:Bon
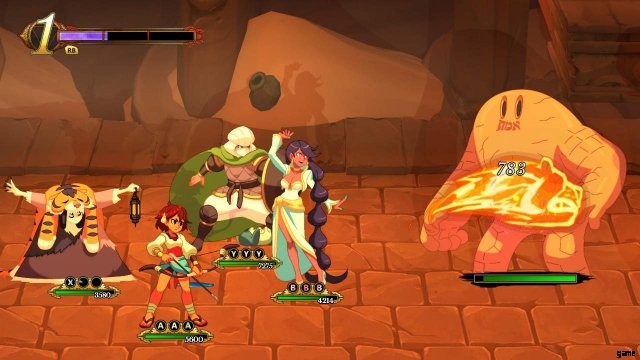
Bon flames a target for a good amount of damage. The attack can hit airborne targets.
Down Attack:Glare
Razmi curses the target, causing them to have a longer wait between attacks. From what I was able to measure, each curse level causes the target to attack ~33% slower, up to 100% slower at level 3. You can tell what level curse a target has by how dark it is shaded.
Pictures show the color difference between a level 1 and level 3 glare.
Up Attack:Pounce
Bon launches upwards from the ground to the target. This means that if you target an airborne target with foes below it, it will hit both. It does slightly less damage than her Normal attack.
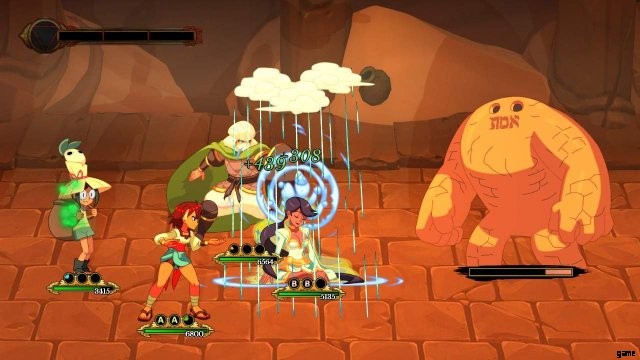
Special Attack (1 Bar):Calming Aura
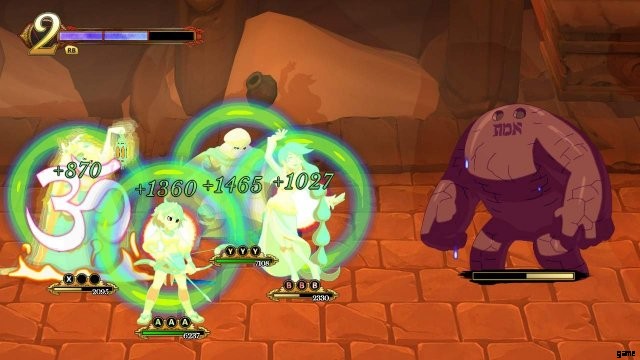
Razmi heals the party for a large amount of health. Use this when you’re in trouble. If you’re using Razmi as your main healer, you’ll be using this a lot.
Special Attack (2 Bars):Vengeful Spirit
Razmi launches Bon forward across the field, hitting everything in his path. This attack is devastating against large groups of foes. It also knocks down airborne foes.
Special Attack (3 Bars):Hellfire
Razmi calls in an orbital strike unleashes Bon, having him rain down fire on the target’s side of the field causing massive damage. Like special attack 2, this hits everything, but does more damage and looks insane. For those that can never have enough fire.
Basic Gameplay
Razmi excels at dealing with large groups of foes. Special attacks 2 &3 can hit multiple foes read:everything at once, and up attack can as well to a lesser degree. She can even heal a good amount of health for just one bar too, making her a good all-around character. I am unsure yet if Razmi works well enough as a lone healer (she’s probably fine).
Glare works best for bosses, or targets that already have long waits between attacks.
Razmi’s major drawback is her small health pool. You’ll need to watch her health closely to know when to drop some healing.
She also has one of the lowest speeds of all the characters. Her attacks can take a long time to recharge if you blow them all at once. This also makes comboing harder.
Razmi’s minor drawback is that she doesn’t become powerful until you get three meter charges. Having your only source of healing eat the entire meter is a pain, and not to mention that you don’t get her devastating AoE attacks. She becomes much better later on.
Also note that because Razmi lacks a downward attack, she can not break guarded targets.
Combos
Unsure. With her slow speed, most of the time you’ll be saving Razmi’s attacks for when you’re able to use her special. Her up attack works well with other party members, but the recharge on her attacks makes comboing with her a pain.
Zebei
Stats
- Health 1+ stars
- Attack 2 stars
- Speed 4 stars
Roles
- Primary: Airborne target damage
- Secondary: Burst damage
Recommended Position
The back.
Can be moved to the sides if another character needs to be in back.
Move List
Move Usage
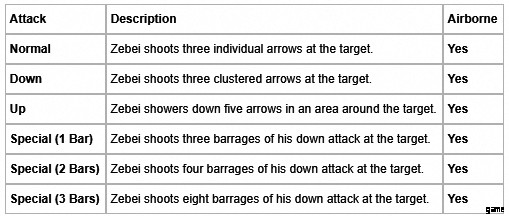
Normal Attack:Straight Shot
Zebei shoots three individual arrows at the target. These arrows do moderate damage. This attack very rarely hits multiple targets.
Down Attack:Cluster Shot
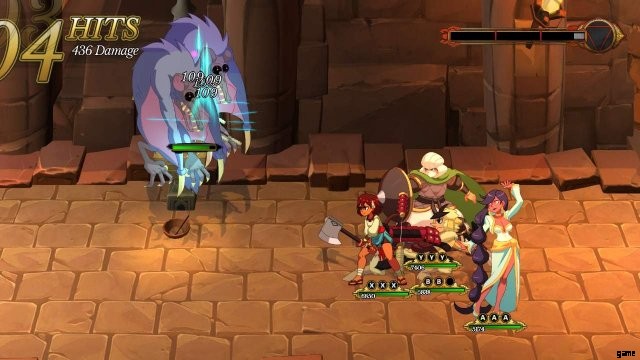
Zebei shoots three clustered arrows at the target. These arrows do slightly less damage than the normal attack. However, there’s a high chance that the attack will hit targets that are clustered together.
Picture 2 shows two targets being hit at once.
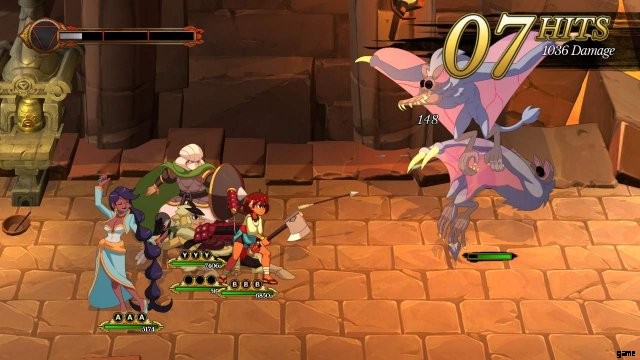
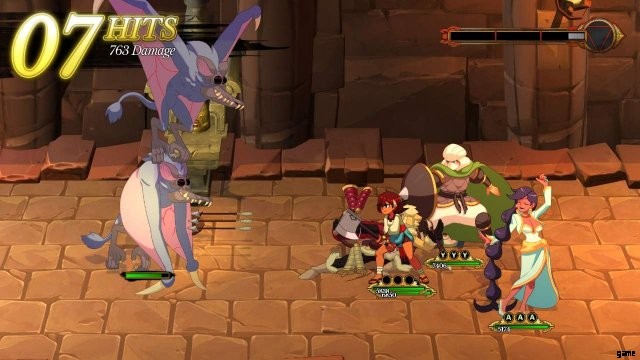
Up Attack:Spread Shot
Zebei shoots six arrows downward at the target. These arrows do slightly more damage than the normal attack. The main feature of this attack is how the arrows spread across the enemy’s side of the field. If an arrow collides with a foe’s hitbox, it will do damage well duh, that’s how games work. It can potentially lead to some arrows not hitting anything due to the spread.
Do note that an arrow can only hit one target. Once it collides with something (terrain or foe), it will not deal damage anymore.
Picture 1 shows how arrows can miss the targets due to the spread (the bat higher up can also evade the shot).
Picture 2 shows the shot angle of the attack.
Special Attack (1 Bar):Arrow Hail
Zebei shoots three barrages of his down attack at the target. The arrow cluster contains 5 arrows, for a total of 15 arrows shot.
Special Attack (2 Bars):Arrow Blizzard
Zebei shoots four barrages of his down attack at the target. The arrow cluster contains 5 arrows, for a total of 20 arrows shot.
Special Attack (3 Bars):Arrow Avalanche
Zebei shoots eight barrages of his down attack at the target. The arrow cluster contains 5 arrows, for a total of 40 arrows shot.
Basic Gameplay
The main use I find for Zebei is to deal with airborne targets. All of Zebei’s attacks will hit airborne targets without fail, allowing you to set up combos with ground based party members who can’t reach those targets. Use the normal attack to down lone targets, and the down or up attack to down multiple targets.
Zebei’s minor drawback is the simplicity of his kit. There’s not much potential to branch out and set up fancy combos that I’ve found yet. I find that it’s more efficient to only bring him out when I know I have to deal with airborne foes, as there are better options for facing only ground foes.
Combos
These combos focus on damage to airborne targets.
Icicle Shower
- Down Attack
- Up Attack
- Up Attack
(Attack with melee party members)
This combo is mainly here to help set up attacks for your other party members. Use down attack to knock down the airborne target(s), then follow up with up attacks to pelt everything on the ground. You can then use other party members to combo off of the downed target(s).
Thorani

Stats
- Health 1 star
- Attack 1+ stars
- Speed 3 stars
Roles
- Primary: Healer
- Secondary: AoE Damage
Recommended Position
- Front for ground battles.
- Sides if there are airborne enemies.
- Avoid the back.
Move List
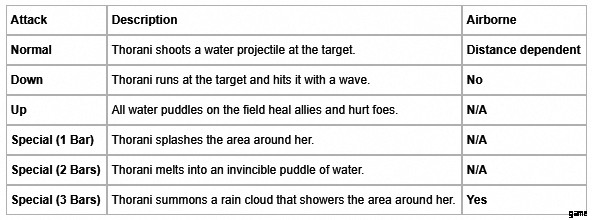
Move Usage
Normal Attack:Water Blast
Thorani shoots a single water projectile at the target. The puddles will form around your target and directly behind Thorani. Usually, one attack will create one puddle at the target and one behind you. I recommend using this move when you want to have an even spread of puddles around the field. This can hit airborne targets if there is enough distance between Thorani and the target.
Picture shows puddle distribution after three normal attacks.
Down Attack:Water Wave
Thorani runs up to the target and hits it with a wave of water. The vast majority of puddles will form around the target, with a few forming between the target and Thorani’s position in the party. Use this move when you want to surround the opponent’s side of the field with puddles.
Picture shows puddle distribution after five down attacks.
Up Attack:Sparkling Water

Thorani activates all puddles on the field, causing them to have two effects:
- Heal Allies
Any ally that touches a puddle (or is already touching a puddle) will instantly be healed for a decent amount of health. Most of the puddles that you’ll be using for healing will be near the party. However, you can activate Thorani’s up attack while another character is attacking a foe surrounded by puddles to heal that character while dealing damage to the foe. - Harm Foes
Any foe that touched a puddle will take a moderate amount of damage. While the primary focus of this attack is to heal allies, this is also a good way to deal out some aoe damage across the entire field.
Pictures show both functions of the up attack.
Special Attack (1 Bar):Drizzle
Thorani shakes her hair and surrounds the area around her with puddles. This move is best used when you need to dish out a lot of healing. The best position to use this attack from is the front, as it covers the area where almost all movement will be happening (from both allies and foes). Using it in another position could create puddles that would never be touched.
Special Attack (2 Bars):Melt Away
Thorani melts away into a puddle of water, removing her from the field. She can not be targeted or damaged, and reappears about 5-7 seconds after the attack is used. The puddle automatically activates, letting you position a healing/damage puddle anywhere.
Special Attack (3 Bars):Rain Shower
Thorani summons a rain could for ~10 seconds that acts as a mobile active puddle. This means that any ally that moves past her (or is next to her) will be healed, and any foe that runs past her (or attacks her) will suffer damage. The damage and healing is reapplied once every second.
Once again, having Thorani in the front position will benefit you the most as everyone (friend or foe alike) must move past her to attack (excluding ranged attacks). Use this move as a better alternative to her 1 bar special, as it can output more healing than regular puddles can.
Basic Gameplay
Thorani excels at healing characters that are constantly attacking/moving. Therefore, she’s best for players that like to attack with characters continuously instead of attacking with every character all at once.
For a focus on healing:
- Have Thorani attack first.
- Use her normal attack, as the puddles land inside your party as well as in front of any foe you attacked.
- Remember to save your last attack to activate your puddles, so you can heal any ally about to attack.
- Use Special attack 1 for a quick burst of healing around the party.
- Use Special attack 3 for massive amounts of healing.
For a focus on damage:
- Use her down attack, as the puddles land mainly around the foe(s) you attack.
- Use special attack 1 to create a damage zone around the party.
Thorani’s main drawback is that she is an indirect healer. You have to plan on where your puddles will land and where your characters are moving in order to heal them.
Also note that because Thorani lacks a up attack, she can not break guarded targets.
Combos
These combos focus less of damage and more on healing.
Raging Stream
- Down Attack
- Normal Attack
(Attack with melee party members)
(While party members are attacking) Up Attack
This will heal all the characters that are attacking the target, while also dealing a small amount of damage. I recommend using this as your main form of attack, as it gives your party a constant source of healing.
Alternatively, you can replace your third attack with a normal attack if you don’t need to heal your party at the moment.
Pure Waters
- Down Attack
- Special attack 2
(Attack with melee party members)
By activating special attack 2 after using down attack, you can leave a large permanent puddle that can be used by other characters while they attack for easy healing. This also damages foes touching it.
Showers of Life
Special Attack 3
- (Have every party member attack with their close range attack) + Down Attack
- (Space out the attacks so every party member remains close to the target for as long as possible)
- (Use as many attacks as possible)
Use this when you need to heal every party member at once with no failure or puddle movement. By timing your attacks right, you can have your whole party run past Thorani first for 1 heal, then have her join the rest of the party at the target to constantly be healing them. Space out your attacks so you can hold your characters next to Thorani as long as possible. Since Thorani will be down one attack from activating the special attack, she will run back first. Use this to then heal your party as they run back into their positions.
This combo is slightly spotty, as the healing is only triggered once per second. This is more of a guaranteed way to heal the whole party or just use Ginseng.
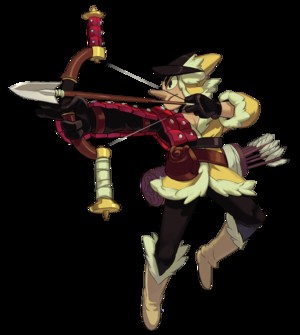
Qadira

Roles
- Primary:Damage
- Secondary:–
Recommended Position
- Any.
Move Usage
Neutral Attack:Shield Smash
- Qadira runs at the target and smashes into it. Since the hitbox for this attack is active untill the frame that she leans into her shield, you can usualy hit the enemy behind your target if you wait long enough.
- The follow up for this attack will have Qadira extend her shield out a bit farther as she bashes the target. This must be executed before she returns to her default animation.
- Both of these attacks will push the target back. Useful for trying to position targets.
- I personally use this attack when I want to focus on damage.
Down Attack:Sliding Uppercut

- Qadira slides along the ground into the target. This slide will actually send her behind the target.
- The follow up for this attack will have Qadira perform an uppercut on the target, launching it into the air. This must be executed before she fully stands up.
- Since the slide will send Qadira behind the target, the attack is very useful for pushing a target closer to the party. Follow up with a few normal attacks to knock it closer.
Up Attack:Skyward Smash
- Qadira runs up to the target and bashes it into the air. She’ll jump up with the target.
- The follow up for this attack will have Qadira slam the target back into the ground. This must be executed before she lands on the ground.
- I personally use this attack when I want to generate iddhi, as airborne targets generate more iddhi.
Special Attack (1 Bar):Saharan Smash
- Qadira rushes at the target and repeatedly slams into it. This will push the target quite far. This version hits 6 times.
- All of Qadira’s supers excel at pushing the target either closer or away from the party.
Special Attack (2 Bars):Unrelenting Force
- Qadira rushes at the target and repeatedly slams into it. This will push the target quite far. This version hits 9 times.
Special Attack (3 Bars):Shieldmaiden’s Charge

- Qadira rushes at the target and repeatedly slams into it. This will push the target quite far. This version hits 15 times.
Basic Gameplay
- Qadira is one of the best iddhi generating characters in the game, when you string together her Up attacks. She also deals a solid amount of damage, and her speed is very manageable despite being a 1 speed character.
- She’s a solid choice to have in your party.
Combos
- For iddhi generation, use a string of Up attacks. The bonus generated from hitting airborne targets is one of the highest in the game.
- For damage, use a string of Neutral attacks. Her Neutral attacks have the highest damage of all her non-special attacks.
Tungar

Roles
- Primary:Damage
- Secondary:AoE Damage
Recommended Position
- Any.
Move Usage
Neutral Attack:Turban Slash
- Tungar runs up and performs a single slash at the target. This attack does not have a follow up attack.
Down Attack:1,001 Slashes
- Tungar runs up to the target and slashes around the entire area multiple times. This will hit all foes in the area, including airborne foes.
- One thing to note is that the meter build for this attack is low. Use this attack when you want to spread damage around.
Up Attack:Roundabout Slash

- Tungar runs up and slashes a target twice. The first slash swings long and low, and does moderate damage. With the second slash, Tungar whips his blade back at an upwards angle and knocks the target(s) upwards and towards the party. This attack happens about 0.3 seconds after the first slash. This attack can connect with targets that are halfway off of the ground.
- The important thing to remember about this attack is that it should not be spammed. Since the second slash keeps the target off of the ground, an Up attack executed directly after the first attack will not connect on the first hit. The second slash will still connect, but you will loose some damage since half of the attack didn’t connect.
Use this attack when you want to drag a target close to the party. See the combos section for characters that could benefit from this.
Picture shows just how close a target can be brought to the party.
Special Attack (1 Bar):Swordsman’s Spin

- Tungar runs up and slashes a target for good damage. This can hit multiple targets, but they need to be horizontally aligned. That means that the easiest way to line up targets is to wait for a target to attack, then use the Special attack as it runs in front of another target. This can be hard to achieve.
Special Attack (2 Bars):Sundown Spin
- The same as Special attack 1, but does ~90% more damage. The same targeting principles apply.
Special Attack (3 Bars):Sandstorm of Slashes
Tungar launches his blade out and swirls it around the entire field, dealing high damage. There are a few aspects of this attack to note:
- The damage for this attack is not calculated until Tungar ends his attack. Hits will register, but the damage will not be delt until the very end.
- The initial thrust of the blade does not deal damage.
Basic Gameplay
While that game only tells you about Tungar’s Down attack, Tungar only has two reliable AoE attacks. All his other attacks require the targets to be carefully aligned to hit multiple targets. His basic attacks also don’t have any follow up attacks, which makes him slightly weaker than other heavy damage dealers.
I honestly don’t know why Tungar would be a prefered choice. I would pick Dhar or Razmi over him, as both offer better flexibility in attack choices and better damage potential.
Combos
Into the Fire
- Up Attack.
- Wait for target to hit the ground.
- Repeat until target lands within the party.
- Follow up with one of these attacks:
- Ginseng’s Special 3
Allows the healing effect of the attack to hit the entire party with no movement. - Thorani’s Puddles
Bringing the target closer to the party lets Thorani’s attacks create puddles inside the party. Use this for better healing.
Avoid using Razmi’s Special 3 with this, as it’s more effective to use her Down attack to achieve the same effect. Thorani’s Special 3 could also be used, but I believe that there are better uses for that many special meters.
Kushi &Altun
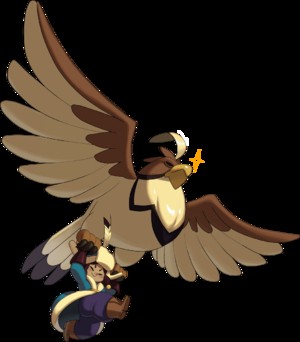
Roles
- Primary:Damage
- Secondary:AoE Damage
Recommended Position
- Sides.
Move Usage
Unmounted
Neutral Attack:Protector’s Punch
Kushi runs up and punches the target. This attack can be followed up with additional Neutral attacks to extend the horizontal range of the attack.
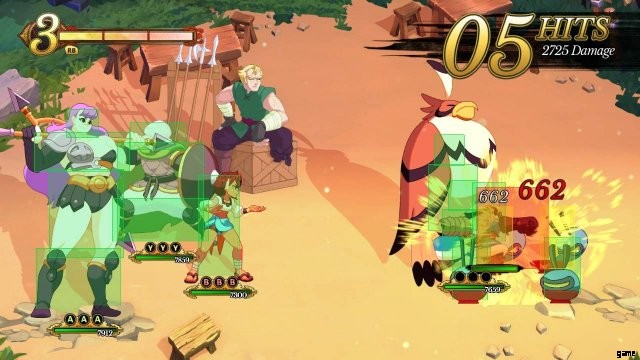
Down Attack:Dotterel Dive
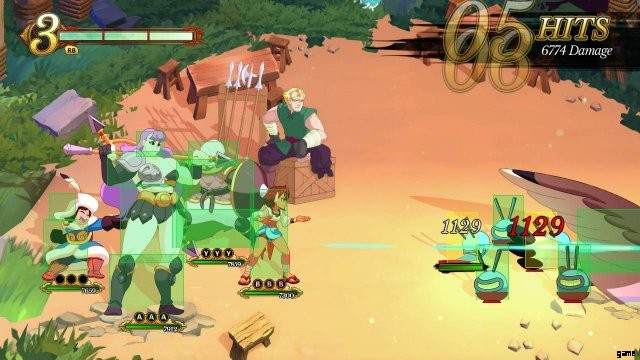
Kushi sends forth Altun, who then dive bombs the area around the target. The horizontal range of this target is entirely dependent on where Kushi is standing. If you use this attack after using a Neutral attack, there is a chance you could miss targets directly behind you see picture 2).
The optimal usage of this attack is to target the foe in the front of the field while standing with the party. This ensures that you will receive the most damage from the attack.
This attack can be followed up with additional Down attacks to have Altun dive bomb the target again. Note that Altun will aim for the current position of the target.
It also looks great when you align Altun just right.
Up Attack:Mount
Kushi jumps up and grabs onto Altun’s talons. This has two effects:
- Changes attack mode
You’re attacks are replaced with different attacks while flying. - Disables Blocking
When riding Altun, Kushi is unable to block. This can be dangerous if Kushi is at low health, or if you are fighting a foe with high damage attacks. Being hit while flying will dismount you from Altun.
Mounted
Neutral Attack:Harrier Howl
Altun flies up to the target and screeches, hitting everything in a large range both horizontally and vertically. This attack should be prioritized if there are a large amount of foes on the field.
Down Attack:Unmount

Kushi drops back down to the ground. This has two effects:
- Changes attack mode
You’re attacks are replaced with different attacks while on the ground. - Enables Blocking
You are able to block again once on the ground. You can even have Altun sent out and you will still be able to block.
Up Attack:Soaring Smash
Altun soars high into the sky, removing Kushi from the field. After ~7 seconds Altun will smash into the target, dealing good damage to all targets in a large area.
The special aspect to this attack is how it can be powered up depending on the amount of attacks remaining when Up attack is executed.
Basic Gameplay
So the first thing you’ll notice about Kushi is that she lacks Special attacks. I believe this is simply due to the fact that she already has a second set of attacks, and also because her Mounted Up attack is like a mini-special attack. This only hinders her slightly, as most of her moves already have a good damage output.
Another drawback is that she can not block while flying. Flying lets you perform two of your most damaging attacks, so you will be flying quite often. Being attacked while flying will also dismount you, which will waste an attack to remount Altun. You can avoid being knocked off if the foe’s attack does not extend high up enough to hit Kushi (credit:glovetheglove). This is also why you should keep Kushi on the side of the party, as long horizontal attacks down the middle of the party will hit both the front and back.
You should bring Kushi into battle for when you will be dealing with multiple foes. Out of her 3 AoE attacks, two of them have a large horizontal and vertical range that can deal high damage.