
Eine Anleitung zu allen Karten und zum Freischalten aller Galerieeinträge.
Komplettlösung (enthält Spoiler)
Prolog und Tag 1
Bis zu Tag 2 kannst du eigentlich nicht viel falsch machen:
- Halte gegen die Banditen entweder 15 Runden durch oder verliere.
- Begeben Sie sich durch den Borak Ridge, vorbei an der Gnath River Bridge und durch die Marlbara-Wüste.
- Erledige in der Stadt an jedem Ort alle verfügbaren Dinge, um den nächsten Ort freizuschalten.
Gemeinsame Route
- Sprich zu Beginn von Tag 2 mit Cless und Salman.
- Geh zum Hafen und hol dir dein Geld vom Mann im blauen Turban zurück.
- Gehen Sie in die Kirche, um sich eine Szene mit Cless anzusehen.
- Geh zum Hauptplatz der Sklaven und sprich mit dem Käufer.
- Gehen Sie zur Bühne in der Hauptstraße und sehen Sie sich den Tanz an.
- Geh zur Silver Goblet Bar und sprich mit dem Barkeeper.
- Finde und rede mit Zahadola in Qanat B2.
- Gehen Sie zur Dawn Shephard Bar.
- Holen Sie Wein vom Barkeeper.
- Sprich mit dem Schweigsamen.
- Sprich mit Slave Broker Batil (optional:Wetten auf Exhibitionisten und eine H-Szene).
- Exotische Tänze und Prostitution sind jetzt freigeschaltet.
- Wenn Sie Lunas Jungfräulichkeit verkaufen, erhalten Sie sofort 200.000, sodass Sie nicht auf andere Weise Geld verdienen müssen.
- Geh zum Hafen und sprich mit dem Grim Sailor.
- Geh zurück in die Dawn Shephard Bar.
- Wette und gewinne so oft du kannst (strebe 80-100.000 an).
Mache andere Jobs, um den Rest des Geldes zu verdienen (Arena / Tanz / Jagd / Prostitution).
- Nachdem er genug Geld gesammelt hat, wird Batil dich bitten, ihm einen Hinweis zu geben.
- Verlasse die Stadt in die Balsa-Wildnis und finde den Ort des Hinterhalts im nördlichen Bereich.
- Bring den Hinweis zurück zu Batil und kehre dann zu Salmans Haus zurück.
- Säubere die Saphir-Ruinen mit Cless und Salman.
- Betritt den unterirdischen Markt und stelle dich Rahad auf B4.
- Hinweis:Wenn Sie den Untergrundmarkt nicht vor dem Ende von Tag 8 betreten, ist das Spiel vorbei.
Chaosroute
- Besiege die Choker Guard auf B6.
- Hole Lunas Sachen aus dem Lagerraum auf B5 zurück.
- Besiege Rahad auf B4 (Verlust ist Gameover).
- Gehen Sie zur Silver Goblet Bar in der Main Street und fragen Sie den Barkeeper nach Cless.
- Geh zur Kirche und breche mit Airis Hilfe in den Keller B1 der Kirche ein.
Rechtsweg
- Geh zum Hafen und rede mit der frommen Jugend.
- Geh zur Silver Goblet Bar in der Main Street und rede mit dem Trunkenbold.
- Geh zu Qanat B2 und rede mit Big G.
- Geh zu Qanat B3 und finde Cless.
- Gehen Sie weiter in den Kirchenkeller B4.
Tanzen – So maximieren Sie die Publikumsgröße, Hype und Tipps
Ein Tanz besteht aus 7 Bewegungen. Beim 4. und 6. Zug wird das Publikum immer verlangen, dass Luna sich auszieht.
Zielgruppengröße
- Vor 14:30 Uhr:10–27 Uhr
- Zwischen 14:30 und 17:00 Uhr:20–35 Uhr
- Zwischen 17:00 und 19:30 Uhr:50-70
- Zwischen 19:30 und 20:00 Uhr:20–35 Uhr
Airi kommentiert:
- 0-14:„Heute sind nicht viele Leute im Publikum.“
- 15-24:„Ich denke, das ist passabel?“
- 25-44:„Eine durchschnittlich große Menge.“
- 45-64:„Die Menge ist ziemlich groß.“
- 65+:„Hier sind so viele Leute!“
Hype
Anfänglicher Hype:halbe Zuschauerzahl +10. Jede Runde wird es um 4 erhöht.
Auf das Publikum reagieren
- Wenn Sie mit dem richtigen Zug reagieren, werden der Hype und die Tipps zunehmen.
- Die Trinkgelder werden um das 3-5-fache des Hypes × (1+Erfahrung) + 6-8-mal das Publikum erhöht.
- Hype wird um 4-6 erhöht.
Tänzel herum
– Gott, deine T*ts sind die besten. Schüttle sie für mich! Die Augen des Publikums folgen meiner Brust.
– Ich halte das nicht aus! Schütteln Sie die Ware!
Beuge dich nach vorne
– Mann, sie spritzt aus diesem Outfit. Dieser BH ist im Grunde ein String. Ich kann ihre Brustwarzen praktisch sehen!
– Das ist es, gib uns einen guten Blick auf deine T*ts!
Hüften schütteln
– Hehe, jetzt ist sie eine gute Tänzerin. Ich wünschte, ich könnte mir einfach das *ss schnappen und direkt hineinpflügen.
- Das ist es! Drehen Sie Ihr *ss in diese Richtung und schütteln Sie es!
Beine spreizen
– Oi, spreiz deine Beine! Ich möchte einen guten Blick auf Ihren Schritt!
– Oi, spreiz deine Beine! Zeig uns, was da oben ist … Hehe!
Strippen
Strippen erhöht den Hype und die Trinkgelder erheblich.
BH:
- Die Trinkgelder werden um 7–10 × Hype × (1+Erfahrung) + 12–20 × Publikum erhöht, +1000, wenn es verlangt wurde.
- Hype wird um 4-6 erhöht, +6 wenn es verlangt wurde.
Höschen:
- Tips is increased by 9-14×hype×(1+experience) + 20-26×audience, +2000 if it was demanded.
- Hype is increased by 4-6, +10 if it was demanded.
End
- At the end you’ll get a final tip of hype×5×(audience/10)+1000. This is increased by 20% if you danced 5× before, or by 44% if you danced 15× before.
- After the 4th dance you’ll get the title “Novice Dancer”.
- After the 7th dance you’ll learn the passive skill Dancer’s Footwork.
- After the 15th dance you’ll get the title “Popular Dancer”.
Prostitution – How to Get the Perfect Price
- Wait for a customer – Price ranges.
- Well-Dressed Merchant:15,000 to 20,000, +3000 if they recognize you.
- Middle-aged Citizen:13,000 to 17,000, +3000 if they recognize you.
- Young Traveler A (f*ck in alley):10,000 to 15,000, +3000 if they recognize you.
- Young Traveler B (blowj*b):5,000 to 8,000.
- Man with Bulging Eyes:4,000 to 18,000.
- +3000 if done prostitution at least 20 times (times Luna sold her body in sexual encounters window).
Note that before 2.30 pm and after 8pm there’s a 25% chance to get no customer.
Approach someone – Price ranges
- Middle-aged Citizen:8,000 to 12,000
- Young Traveler A (f*ck in alley):8000 to 10,000
- Sharp-eyed Man:4000 to 6000
- Heavily Bearded Man:4000 to 6000
- Young Traveler B (blowj*b):4000 to 7000
- +2000 if done prostitution 10-19 times
- +4000 if done prostitution at least 20 times
Responses
- “He looks about uncomforable”:too high by 1000 or 2000.
- “He asks you to lower your price”:too high by 3000, 4000 or 5000.
- “He shakes his head”:too high by 6000 or 7000.
- “The moment he hears your price, he shakes his head.”:too high by 8000 or more
- “He seems satisfied with your price.”:too low by 1000 or 2000.
- “He nods with a smile”:too low by 3000, 4000 or 5000.
- “Surprised, he instantly agrees.”:too low by 6000 or 7000.
- “He asks you to repeate the price”:too low by 8000 or more.
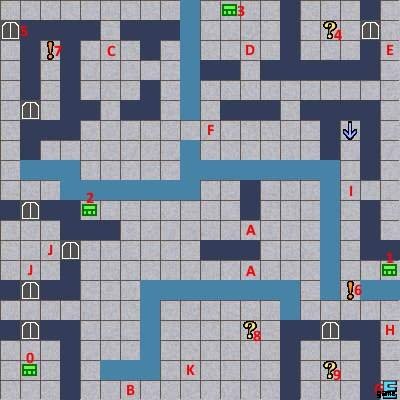
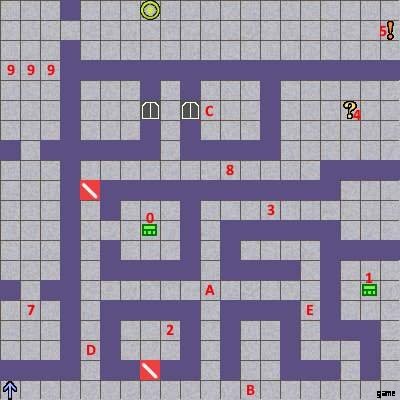
Borak Ridge
Enemies
- Grey Wolf (HP:110, weak to Fire)
- Weak Goblin (HP:100, weak to Fire, defeat in 3 turns or reinforcements appear, after 6 turns r*pe will start)
- Tough Goblin (HP:120, weak to Fire)
West
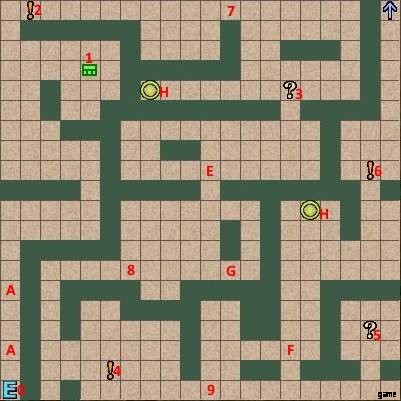
- 0 Exit (not functional)
- 1 Heal Drop (HP+120)
- 2 Grey Wolf (tutorial)
- 3 Weak Goblin
- 4 Sign about goblins
- 5 Heal Drop Tree
- 6 4×Tough Goblin (gameover)
- 7 Clear Drop (Recover status debuffs)
- 8 Weak Goblin Ambush, learn Vigilance (can’t be surprised)
- 9 Grey Wolf (level-up battle)
- A Dungeon movement explanation
- E Grey Wolf
- F Weak Goblin
- G Grey Wolf
- H HP and MP fully restored
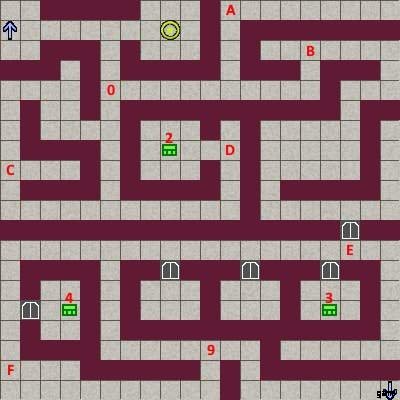
East
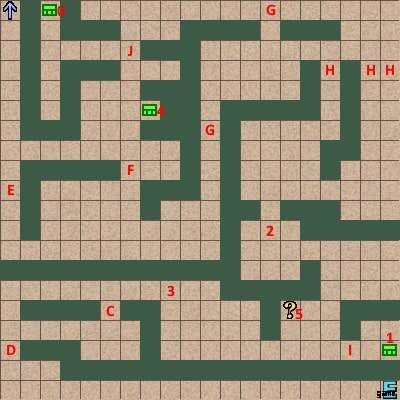
- 0 Chest:Small Mana Ring (MaxMP+1)
- 1 Chest:Wind Sprite Staff (ATK+20 M-ATK+10 M-DEF+35
) - 2 Jill scene “Torture at the Enemy Base”
- 3 4×Tough Goblin (gameover)
- 4 Chest:Heal Drop
- 5 Heal Drop Tree
- C 3×Weak Goblin
- D 2×Tough Goblin (gameover)
- E Grey Wolf
- F 2×Tough Goblin (gameover)
- G 3×Weak Goblin
- H Grey Wolf
- I Grey Wolf
- J Weak Goblin
Gnath River
Either bribe the guard, or defeat the Kraken (HP:500, weak to lightning / wind. Use magic arrow to escape the tentacles)
Marlbara Desert
Enemies
- Scorpion (HP:150, poison attack)
- Ghurab (HP:100, weak to lightning)
- Sand Worm (HP:500, weak to water. Use lightning on self to get rid of small worms)
- Zahaf Scorpion (HP:160, poison attack)
- Slave Hunter (HP:430, counter attack)
West
- 0 Merchant (advice on Sand Worms)
- 1 Chest:Mana Drop (Recover 5 MP)
- 2 Chest:Clear Drop
- 3 Chest:Farih’almashi (+20 HP and +1 MP for every 5 steps, surrounding squares guarded by Sand Worms)
- 4 Chest:Heal Bottle (+250 HP, surrounding squares guarded by Sand Worms)
- 5 Chest:Heal Drop
- 6 Quicksand
- A Scorpion
- B Ghurab
- C 2×Ghurab
- D Scorpion
- E Scorpion, Ghurab
- F 2×Scorpion
- I Zahaf Scorpion
East
- 0 Chest:Travel Boots (AGI +20)
- 1 Chest:Mana Drop
- 2 Chest:2000 Dinar
- 3 Chest:Clear Drop
- 4 Heal Bottle
- 5 Heal Drop Tree
- 6 Shortcut
- 7 2×Ghurab, Scorpion
- 8 Sand Worm
- 9 3×Slave Hunter
- A Ghurab
- B 2×Scorpion
- C 3×Ghurab
- D 2×Scorpion, 2×Ghurab
- E 3×Scorpion
- F Quicksand
- G Quicksand
- H Quicksand
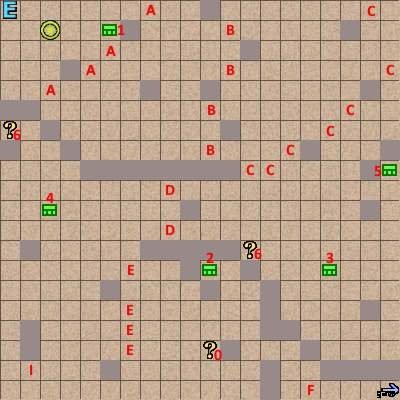
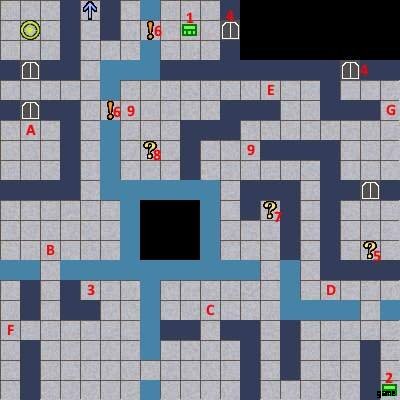
Qanat
Enemies
- Scorpion (HP:150, poison attack)
- Green Slime (HP:400, DEF:250, weak to fire)
- Farasha (HP:190, weak to fire, paralysis attack)
- Viper (HP:270)
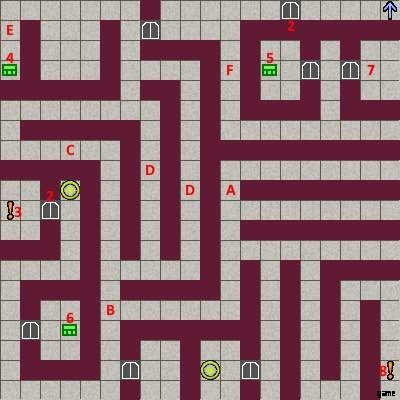
B1
- 0 Chest:Void Emblem (Negates equipment effects during battle)
- 1 Chest:Awareness Amulet (Blocks sleep and confusion)
- 2 Chest:Heal Drop
- 3 Chest:Heal Bottle
- 4 Switch, opens 6
- 5 Rock Door
- 6 Drawbridge
- 7 Airi event, unlocks 5
- 8 Man
- 9 Man
- A Farasha
- B Scorpion
- C 2×Farasha
- D 2×Viper, Farasha
- E 2×Farasha, Scorpion
- F Viper, Farasha
- G Exit
- H Airi event
- I Green Slime
- J Green Slime
- K Life Seed (Revive and recover 40% of HP)
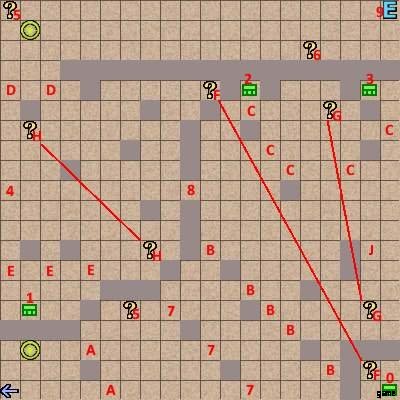
B2
- 1 Chest:Water Guardian (Airi:ATK +34 DEF+18
) - 2 Chest: Heal Bottle
- 3 Ground: Mana Bottle
- 4 Locked Door
- 5 Big G chat
- 6 ! Drawbridge
- 7 Switch (opens 6)
- 8 Zahadola event
- 9 Farasha, 2×Viper, Scorpion
- A Viper
- B Scorpion, Viper
- C 2×Farasha
- D Green Slime
- E 2×Viper
- F Viper, Farasha
- G 2×Farasha
B3
Balsa Wilds
Enemies
- Alwald (HP:250, weak to fire, poison attack, paralysis attack, 250 D)
- Giant Snail (HP:410, weak to wind, physical counterattack, 220 D)
- Black Wolf (HP:360, 300 D, 55% Black Fur)
- Mirror Egg (HP:200, magic reflect, 100 D, 15% Reflect Ring)
- Mandragora (HP:1300, weak to fire, poison attack, 5000 D)
South
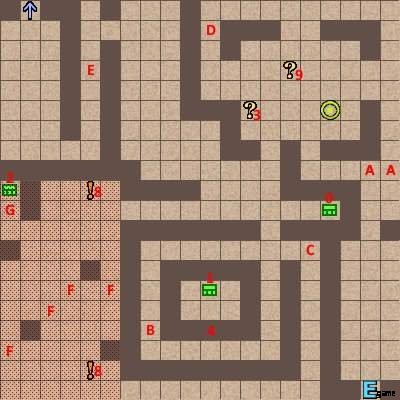
- 0 Chest:Heal Bottle
- 1 Chest:Life Elixir (+10 Max HP)
- 2 Chest:Spirit Pill (0 MP consumtion for 3 rounds)
- 3 ? Heal Drop Tree
- 4 Shortcut
- 8 ! Monster Warning
- 9 ? Man taking 10 Black Wolf pelts for Hunter’s Mark (Raises drop rate slightly)
- A Alwald
- B Giant Snail
- C Giant Snail, Alwald
- D Black Wolf
- E Black Wolf
- F Black Wolf
- G 2×Alwald
North
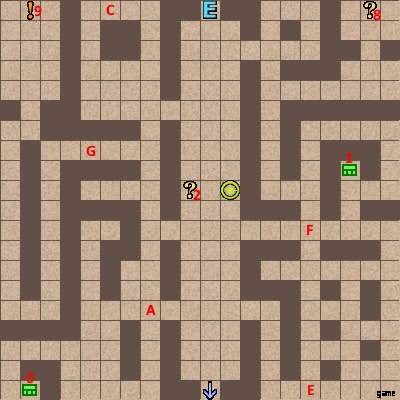
- 0 Chest:Heal Bottle
- 1 Chest:Clear Drop
- 2 ? Heal Drop Tree
- 8 ? Sealed Pot
- 9 ! Ambush area
- A Mirror Egg
- C Giant Snail
- E Black Wolf
- F Black Wolf
- G Giant Snail, Mirror Egg
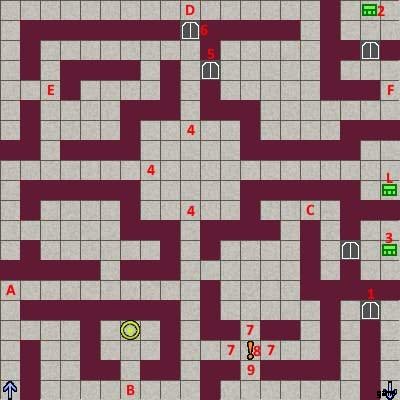
Sapphire Ruins
Enemies
- Green Slime, Farasha, Viper, Mirror Egg
- Wisp (HP:100, DEF:250, weak to dark, no physical attack)
- Mummy (HP:400, weak to fire, undead, 100 D)
- Creeping Coin (HP:50, ATK:215, weak to lightning, floating, 2000 D)
- Bandit Boss (HP:350, 1000 D)
- Underling 1 (HP:270, 750 D)
- Underling 2 (HP:180, 750 D)
- Machine Golem (HP:1200, weak to lightning, magic counterattack, 2500 D)
B1
- 0 Chest:Cursed Choker (Reverse stat boosts and debuffs)
- 1 Chest:25,000 Dinar
- 2 Chest:Empty
- 3 ? Remains of a fire
- 4 ? Caved in staircase
- 5 Ground:Life Seed
- 6 ! Switch (opens wall near 9)
- 7 ? Strange wall
- 9 2×Wisp, Viper
- A 3×Viper
- B Wisp, Farasha
- C Wisp
- D Wisp, Viper
- E Viper, Wisp, Farasha
- F Creeping Coin
- G ! Elevator pipes
- H ? Elevator Cless dialog
- I ? Elevator Salman dialog
- J ! Elevator
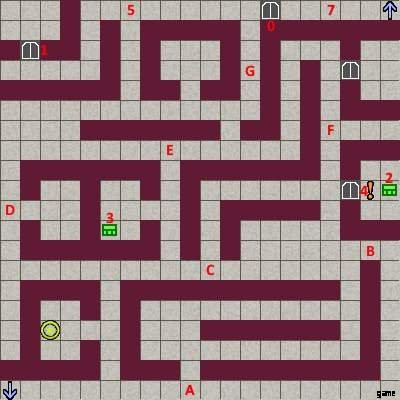
B2
- 0 ! Teleport Trap
- 1 ! Luna switch
- 2 ? Caved in staircase
- 3 ? Broken down door
- 4 ! Cless switch
- 5 Reunited
- 6 Chest:Empty
- 7 Chest:Flare Javelin (ATK+40
Additional Damage(S)) - 8 Green Slime
- 9 Bandit Boss, Underling 1, Underling 2
- A Wisp
- B Green Slime
- C Wisp
- D Mummy, Wisp
- E Wisp, Mummy
- F Mummy
- G 2×Mummy, Farasha
- J Chest:Fire Staff (ATK+47 M-ATK+8
+Additional Damage(S)) - K 3×Mummy
- L Ground:Heal Bottle
B3
- 0 Chest:Life Seed
- 1 Chest:Lucky Ring (LCK+10)
- 2 Ground:Life Elixir (+10 Max HP)
- 3 All walls unlocked
- 4 Professor Salman
- 5 ! Elevator
- 7 Archive room
- 8 Wisp, Mummy, Mirror Egg
- 9 Machine Golem
- A Wisp, Mirror Egg, Farasha
- B Mirror Egg
- C Creeping Coin
- D Mirror Egg, Mummy
- E 2×Mummy, Wisp
Underground Market
Enemies
- Crimson Elite (HP:300)
- Choker Guard (HP:1300, physical counterattack, 10% Life Elixir)
- Rahad 1 (HP:1600, skill counterattack, 10,000 D, 100% Yaqut (-1MP cost of Shortcut 1 (Fixed in battle)))
- Rahad 2 (HP:2100, skill counterattack, 10,000 D, 100% Yaqut (-1MP cost of Shortcut 1 (Fixed in battle)))
- Shadow Eater (HP:1100, weak to earth, magic counterattack, 2500 D, 5% Mana Crystal)
B3
- 0 Hint
- 2 Chest:Mana Bottle
- 3 Chest:Heal Bottle
- 4 Chest:Heal Bottle
- 9 Crimson Elite
- A Crimson Elite
- B Crimson Elite
- C Crimson Elite
- D Crimson Elite
- E Crimson Elite
- F Crimson Elite
B4
- 1 Locked Door
- 2 Chest:Yaqut (-1MP cost of Shortcut 1)
- 3 Chest:Unlimited Heal &Mana Bottles
- 4 Rahad
- 5 Oneway Door (east to west)
- 6 Oneway Door (north to south)
- 8 Airi (chaos route)
- A Crimson Elite
- B Crimson Elite
- C 2×Crimson Elite
- D Crimson Elite
- E Crimson Elite
- F 2×Crimson Elite
- L Chest:Life Elixir
B5
- 0 Locked Door
- 1 Storage Room
- 2 Chest:Mana Drain (Enemies M-ATK restores MP)
- 3 Chest:Heal Bottle
- 4 ! Shadow Eater
- 5 3×Crimson Elite
- 7 Crimson Elite
- A 2×Crimson Elite
- B 2×Crimson Elite
- C 2×Crimson Elite
- D Crimson Elite
- E Crimson Elite
- F 2×Crimson Elite
- G 2×Crimson Elite
B6
- 2 Locked Door
- 3 Choker Guard
- 4 Chest:Mermaid Tears (Revive and recover 100% HP)
- 5 Chest:Heal Bottle
- 6 Chest:Unlimited Heal Drops
- 7 Crimson Elite with Jail Key (unlocks 2)
- 8 Luna’s Cell
- A Crimson Elite
- B Crimson Elite
- C Crimson Elite
- D Crimson Elite
- E Crimson Elite
- F Crimson Elite
Church Basement
Enemies
- Believer (HP:550, weak to wind, 750 D, 30% Heal Bottle)
- Evil Book (HP:370, weak to fire/holy, 660 D)
- Skull Fencer (HP:1500, weak to holy, physical counterattack, HIT+, undead, 5000 D, 10% 2257)
- Bishop (HP:2300, 15,000 D)
Luna – Main Scenario
Prologue:Survived 15 Turns
- Use the ceremonial spear to survive for 15 turns.
- Lust Worm Progress +1%
Prologue:Defeated
- Number of Sexual Encounters +1
- Times Penetrated +1
- Times Ejaculated Inside Of +1
- Number of Times F*cked (Humans) +1
- Lust Worm Progress +5%
Chaos Route:Defeated – Became a Slave
- Lose in Underground Market
- Number of Sexual Encounters +1
- Times Penetrated +1
- Times Ejaculated Inside Of +1
- Number of Times F*cked (Humans) +1
- Lust Worm Progress +1%
Chaos Route:Sex Slave (Playable)
- Number of Sexual Encounters +5
- Times Penetrated +5
- Times Ejaculated Inside Of +5
- Number of Times F*cked (Humans) +5
- Lust Worm Progress +2%
Reunion with Airi
- Number of Sexual Encounters +100
- Times Penetrated +30
- Times Ejaculated Inside Of +30
- Number of Blowj*bs +30
- Number of Times F*cked (Humans) +30
- Number of Times F*cked (Monsters) +5
- Lust Worm Progress +10%
Sex Slave End
- Reply “…” to Airi
- Game Over
Luna – Town Events
Lust Worm Progression
- Progression 1
- Progression 2
- Lust Worm 100%
Dancing
- Lust Worm (0~49%)
- Lust Worm Progress +1%
- Lust Worm (80%~)
Drunk Gangr*pe
- Main Street – Silver Goblet Bar – Boorish men
- Number of Sexual Encounters +1
- Times Penetrated +3
- Times Ejaculated Inside Of +3
- Number of Times F*cked (Humans) +3
- Lust Worm Progress +5%
Deals with the Old Beggar
- Main Gate – Reward the Old Beggar for giving information
- Normal Equipment
- Damaged Equipment
- Number of Sexual Encounters +1
- Number of Times F*cked (Humans) +1
- Lust Worm Progress +1%
- Tights
- Damaged Tights
- Naked
Bishop’s Hypnotism
- Church – Ask the bishop to help you with the Lust Worm.
- First time
- Lust Worm Progress +1%
- Second time
- Lust Worm Progress +1%
- Third time
- Fourth time
- Game Over
Arena Defeat:Orc
- Number of Sexual Encounters +1
- Times Penetrated +1
- Times Ejaculated Inside Of +1
- Number of Times F*cked (Monsters) +1
- Lust Worm Progress +1%
A Bet with an Information Broker
Dawn Shepherd Bar – Keep Betting
Deals with the Pimp
- Wh*re District – Register as a prostitute
- Virgin
- Experienced
Virgin Prostitution – A Millionaire’s Toy
- Number of Sexual Encounters +1
- Times Penetrated +1
- Times Ejaculated Inside Of +1
- Number of Blowj*bs +1
- Number of Times F*cked (Humans) +1
- Lust Worm Progress +7%
Prostitution – All Events
The ‘2’ events are with Lust Worm Progress at 80% or higher
- First Prostitution
- Well-dressed Merchant
- Well-dressed Merchant2
- Middle-aged Citizen
- Middle-aged Citizen2
- Young Traveler A
- Young Traveler A2
- Young Traveler B
- Young Traveler B2
- Man with Bulging Eyes
- Man with Bulging Eyes2
- Sharp-eyed Man
- Sharp-eyed Man2
- Bearded Man
- Bearded Man2
Luna – Field Map
Defeated by Goblins (F*ck and Chuck)
- Number of Sexual Encounters +1
- Times Penetrated +1
- Times Ejaculated Inside Of +1
- Number of Times F*cked (Monsters) +1
- Lust Worm Progress +1%
Defeated by Goblins (Taken to Nest)
- Lose to Tough Goblins.
- Game Over
Bridge Guard Blowj*b
- Convince the Gnath River bridge guard to let you pass
- Number of Sexual Encounters +1
- Number of Blowj*bs +1
- Number of Times F*cked (Humans) +1
- Lust Worm Progress +1%
Defeated by Kraken
- Swim across Gnath River
- Number of Sexual Encounters +1
- Times Penetrated +1
- Times Ejaculated Inside Of +1
- Number of Times F*cked (Monsters) +1
- Lust Worm Progress +1%
Defeated by Sand Worms
- Number of Sexual Encounters +1
- Times Penetrated +1
- Times Ejaculated Inside Of +1
- Number of Times F*cked (Monsters) +1
- Lust Worm Progress +1%
Defeated by Slave Hunter, Slave Market
- Game Over
Defeated by Mandragora
- Game Over
Jill
Torture at the Enemy Base
- Borak Ridge East (14,12)
Whipping Girl
- After day 2
Aphrodisiac Training 1
- After day 3
Aphrodisiac Training 2
- After day 4
Virginity Auction
- After day 5
My Days as a Sex Slave
- After day 6
Fall into Corruption
- After day 7
Tentacle Broodmare
- After Underground Market
Reunion with Luna, as a Slave
- Follows scene Sex Slave End
- Game Over
Master’s Sex Slave
- After day 8
- Game Over
Cless
Defeated by Slime
- While playing as Cless in the Sapphire Ruins, get defeated by a Slime.
Raiders Gang Bang
- While playing as Cless in the Sapphire Ruins, get defeated by the Raiders.
- Game Over
Small Hand Devil Tickling
Defeated by Believers – Intense Drilling
Trap Room – Sleeping Gas
Defeated by Brainwashed Luna
Defeated by Bishop – Brainwashed Sex Slave
The Mirror World (Playable Replay Mode)
The Mirror World:Low Sanity Events
The Disgraced Saint
Defeated by Id, Possessed
Airi
Alley F*ck
- Visit the back alley in the wh*re district.
Dancer on the Stage
- Watch Airi’s performance on the Main Street Stage.
Tentacle Lover
- Event in Qanat B1
I Wanna Help Lunie
Torturing the Torturers
Reverse R*pe
Defeated by the Collar Keeper
Blowj*b from Hell
Caught by Pursuers