Dieser Leitfaden zielt darauf ab, den allgemeinen Ablauf einer Kampfbegegnung zu skizzieren und wie man sie kompetent angeht. Wir werden die verschiedenen Phasen durchgehen, die im Kampf vorkommen, und wie man sie angemessen spielt. Außerdem gehen wir darauf ein, wie bestimmte Feindtypen diese Phasen umgehen und wie man auf diese Feinde reagiert.
Arten von Einheiten
Bevor wir uns mit dem befassen, was Sie über den Kampfablauf wissen müssen, ist es wichtig, dass Sie die Arten von Charakteren kennen, die sowohl Ihnen als auch dem gegnerischen Team zur Verfügung stehen. Es gibt 4 Haupttypen von Einheiten im Spiel. Natürlich wird es einige Feinde geben, insbesondere Bosse, die von diesen Standardklassifizierungen abweichen. Zusätzlich neigen Einheiten dazu, in einem Spektrum zu existieren. Diese 4 Haupttypen sind Schläger, Bogenschützen, Magier und Unterstützer.
Bruiser sind Ihre generischen Nahkampfeinheiten, die über eine starke Mobilität, eine sehr starke Verteidigung und ein starkes Nahkampfschadenspotenzial verfügen. Bogenschützen haben in der Regel eine märchenhafte Verteidigung, durchschnittliche Bewegung und ein solides Schadenspotenzial auf Distanz. Magier sind in Bezug auf Feinde im Allgemeinen Eliten. Sie können auf große Entfernung guten Schaden anrichten, guten Schaden auf kurze Distanz, haben eine schlechte Verteidigung und sehr starke Rückzugsmöglichkeiten in Bezug auf die Mobilität. Was Supporter betrifft, so gibt es nur sehr wenige Feinde, die auch nur teilweise als Supporter klassifiziert werden können. Diese Feinde sind in der Regel Magier, die zufällig über ein paar Unterstützungszauber verfügen.
Die überwiegende Mehrheit der Feinde, denen Sie gegenüberstehen, bewegt sich tendenziell in einem Spektrum zwischen Schlägern und Bogenschützen. Im Allgemeinen sind feindliche Schläger reine Schläger, die keine Fernkampffähigkeit haben. Feindliche Bogenschützen tendieren eher zu einer Mischung aus Bogenschützen und Schlägern. Sie werden im Allgemeinen versuchen, sich wie reine Bogenschützen zu verhalten, aber sie können in einem Nahkampf gut genug abschneiden, wenn es nötig ist.
Nun, für spielbare Klassen kann ich sie am besten mit dieser Tabelle beschreiben:Ich werde hier ein wenig auf jede Klassenrolle einzeln eingehen.
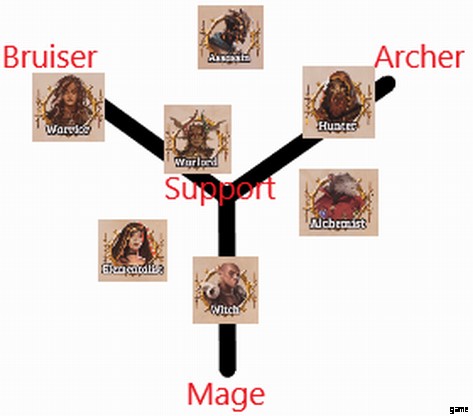
Alchemist: In erster Linie ein Bogenschütze, aber er kann ein wenig Unterstützung leisten. Außerdem spielt er eher wie ein Bogenschützen-Magier-Hybrid als ein reiner Bogenschütze. Aufgrund ihrer Kartenauswahl-Mechanik können sie sehr unvorhersehbar sein und können von Runde zu Runde willkürlich durch das Spektrum springen. Einfach die volatilste Klasse. Sie können zufällig etwas Unterstützung von ihrer Kartenmechanik bieten und einige ihrer Klassenkarten können ein wenig geringfügige Unterstützung bieten.
Attentäter: Reiner Hybrid zwischen einem Schläger und einem Bogenschützen. Kann als reiner Schläger oder als reiner Bogenschütze gespielt werden, obwohl sie am besten als Hybrid gespielt werden, der beide Stile nutzt. Attentäter neigen dazu, außerhalb der Reichweite des Feindes herumzuhängen und Pot Shots auf sie zu werfen, bis sie sicher herbeistürmen können, um zu töten. Dann entfesseln sie ihre respektable Nahkampf-Suite, gefolgt von einem schnellen Rückzug, um nicht für ihre erbärmliche Verteidigung bestraft zu werden, und wiederholen dann den Zyklus. Obwohl ich den Attentäter weit entfernt vom Unterstützungszentrum der Tabelle platziert habe, bedeutet dies nicht, dass seine Unterstützungskarten schlecht sind. Kein blendender Blitz und keine Rauchbombe können genau die Art von Nutzen bieten, die Ihre Gruppe benötigt, wenn das Szenario angemessen ist.
Elementarmagier: Eine Generalistenklasse mit einem kleinen Fokus auf AoE-Magieangriffe und einem Hauptfokus auf Generalismus mittlerer Reichweite. Die Elementarmagierin scheint sich zunächst auf Aoe-Magieschaden zu konzentrieren, aber je nachdem, was Sie mit ihr machen möchten, kann sie sich in verschiedene Rollen entwickeln, darunter die oben erwähnte Aoe-Magierin sowie eine globale Unterstützung mit ihren Erdzaubern und sogar eine Prellung, wenn Sie sie darauf spezialisieren Dinge wie auslaugender Schlag, obwohl ihre Verteidigung nicht solide genug ist, um sie zu einem echten Zerstörer zu machen.
Jäger: The hunter generally plays like a true archer who wants to keep a bit of distance between himself and enemies units. Some of his shots provide a little bit of utility however his primary focus is damage. He happens to be the best option for a summoner build though this is a very specific build.
Warlord: The warlords class cards are built purely towards support. Her equipment slots though push her very hard toward the bruiser role. As a result she tends to start as a pure support who slowly evolves into a hybrid support/bruiser due to her strong defensive capability combined with her easy access to heavy weapons. Generally she plays as a weak bruiser with solid support capabilities.
Warrior: The most pure bruiser. The warrior is an armored tank with very good mobility and strong melee attacks. As a trade off she has absolutely no ranged damage and very minimal support. The support she does have though is very worth while. She will pretty much always either be setting up to engage the enemy head on or taking part in a melee brawl.
Witch: The witch functions as a long range mage who transitions into a debuff based support. His early game is comparable to that of the alchemist, however as he slots in more and more of his advanced class cards he becomes better and better at supporting his allies not through direct support but rather by crippling enemies in a multitude of ways. He generally wants to spend time at mid range from enemies, just out of reach until he needs to contribute to a defensive formation. Against bosses and elites who like to bury themselves in corners where they can’t be surrounded by you’re whole party he will generally be the party member that stays out of the melee. I strongly advise against pairing him with an elementalist. Pick one or the other.
The Start of the Fight
As a general rule enemy melee attackers won’t be able to fully engage with you until their second turn. As a result this means in most encounters the entire first round will be a preparation period. Generally in the first round you will want to be taking potshots at the enemy with ranged attacks. Additionally you’ll want to be repositioning your heroes depending on their classes.
There tend to be two options for positioning on the first round. If you’re team is dead set on kiting the enemies as long as possible to inflict maximum ranged damage you’ll want to create as much distance as possible. If you’re team is more well rounded and the enemy team is a fairly average set up with primarily melee fighters you’ll want to take the strongest defensive formation you can get early. If you’re fighting a weird boss who wants to kite your party you need to rush it down with your entire party.
The best advice I can give here is unless you’re fighting a boss who’s weak to melee combos you want to avoid a melee brawl for as long as possible. This allows you to get get a good number of ranged pot shots onto the enemies as well as enabling you to get a good number of powers online before the real fight starts. If you’re trying to get powers online and the enemy has a lot of ranged attackers the best approach is to take the best best cover you can from the ranged enemies and if it’s not enough you should block your more vulnerable classes with classes who can block the damage easily.
In general it is super important you DO NOT let one of your heroes get isolated against multiple melee attackers. Even very tanky classes like the warrior will get torn to shreds if you let them fight multiple enemies at the same time alone. Never put any of your heroes in a situation where they can get surrounded by multiple enemies with no nearby supporting heroes because the ai will immediately corner them and tear them to shreds if you give them the opportunity to do so.
On the first round you can generally sit back and set up while waiting for the enemy team to approach you. If it’s feasible take your time to set up powers and take shots with ranged attacks. Generally on normal fights you want to kite the enemy melee gang bang for as long as possible. Once You suspect a large scale melee engagement will you need to proceed to the next phase of combat which is…
How to Play the Brawl
The most important thing about large scale melees you need to understand is how combo attack work. If you don’t understand the rules behind combo attacks you are screwed from the start in both your offensive and defensive plays. Fortunately the rules are extremely simple. Units can generally only combo attack off melee attacks and they can’t ever combo attack if they’re touching more than one enemy unit. With these rules in mind let’s loom at some important configurations for all out melees.
The most important aspect of these scenarios is ensuring that none of your heroes get surrounded. We’ll go over a few ways to achieve this goal assuming all of your heroes are in the formation.
Firstly we have the generic line formation:

This is good strategy if either you have no terrain to work with and no other options for defending from a head on assault OR the enemy fighters have ways to get behind your formation. Generally this formation should only be used as a last resort when you’re getting overwhelmed and you need to defend the member in the middle of the lines.
Next we have the choke formation:
If the terrain allows for it this is a very potent formation. At first glance this seems like a good way to trick the enemy into getting killed one by one however the AI is smart enough to not fall into this trap. They will generally mirror your formation while taking ranged shots at you and attempt to send other units to flank you if their numbers are large enough. As a result this is a strong formation for postponing the inevitable brawl.
Finally we have the triangle formation:
This ones kind of a last resort. If you know you’re gonna get surrounded and there’s not a whole lot you can do to prevent it without serious losses. This tends to be a temporary set up that will move back into one of the prior two formations after you know how the enemy is attempting to surround you and you can quickly take out on of the antagonists. This formation is very useful against harpies. Generally you want to do this against walls in such a way that your tankiest hero should be at the most vulnerable corner of the triangle.