Dieser Leitfaden ist eine Sammlung grundlegender Informationen, allgemeiner Ratschläge und einiger Profi-Tipps. Es ist für neue Spieler und auch für alte Spieler gedacht, die seit Mai 2019 nicht mehr gespielt haben, als der Van und Truck nicht mehr sofort verfügbar waren.
Nützliche Hinweise und Tipps
Schlüsselkonzepte und Funktionen
In dieser Anleitung erfahren Sie, wie Sie überleben und genug Geld verdienen, um in angemessener Zeit ein cooles Satsuma herzustellen. Es ist sowohl für neue Spieler als auch für diejenigen, die das Spiel seit etwa einem Jahr nicht mehr gespielt haben und in der Zwischenzeit durch die Änderungen verloren gegangen sind.
- In diesem Leitfaden wird davon ausgegangen, dass Sie die folgenden Dinge wissen. Wenn Sie das noch nicht wussten, ziehen Sie diese Spoiler nicht in Betracht, denn bis Sie diese Dinge verstanden haben, haben Sie keine Hoffnung, irgendwo im Spiel voranzukommen.
- Es gibt keinen „richtigen“ Weg, MSC zu spielen. Sie müssen das Satsuma-Kit eigentlich nie anfassen, um immer noch eine gute Zeit zu haben und das ländliche Finnland von 1995 zu genießen. Wenn Sie sich entscheiden, den Satsuma zu bauen, können Sie ihn zu einem Street Rod, einem Rally Racer, einem Drag Racer oder was auch immer Sie wollen, machen und nach Belieben hin und her wechseln, solange Sie das Geld haben. Sie können ein guter, fleißiger Mensch oder ein Betrunkener sein. Sie können ein Zuhause haben oder auf der Straße leben. Was auch immer Sie als angenehm empfinden, innerhalb der Grenzen, die das ländliche Finnland von 1995 bietet.
- Es gibt 1 Speicherplatz. Wenn Sie Ihre Spielstände nicht manuell an einen sicheren Ort kopieren, wird der vorherige Spielstand beim Starten eines neuen Spiels überschrieben.
- Kein Schnellspeichern. Gespeichert werden kann nur bei Toiletten/Plumpsklos, von denen es nur wenige auf der Karte verstreut gibt. Seltsamerweise verringert dies NICHT Ihre Notwendigkeit, Ihre Blase zu entleeren. Aber was noch wichtiger ist, es bedeutet, dass Sie manchmal viel Gameplay durchmachen und zwischen den Möglichkeiten zum Speichern Risiken eingehen müssen.
- Speichern bringt das Spiel auch ins Hauptmenü zurück. Wenn Sie das Spiel fortsetzen, ist die Spielzeit um 1-2 Stunden vorgerückt. Da verschiedene NPCs und Events nur zu bestimmten Tageszeiten verfügbar sind, kann dies das Einhalten von Terminen erschweren. Daher müssen Sie manchmal längere Zeit ohne Speichern auskommen, um Zeit in der Spielwelt zu sparen.
- Permadeath ist standardmäßig aktiviert (wird am unteren Rand des Führerscheins umgeschaltet, wenn ein neues Spiel gestartet wird). Wenn Sie damit sterben, fangen Sie von vorne an (obwohl Ihr vorheriger Charakter einen Grabstein in der Kirche bekommt). Außerdem sind einige Errungenschaften nur mit aktiviertem Permadeath verfügbar. Sterben ohne Permadeath ist (ohne Cheats) oft fast genauso schmerzhaft wie mit, was den Genesungsprozess betrifft. Also versuche nicht zu sterben. Es wird so oder so scheiße.
- Es gibt unzählige Arten zu sterben. Sie können viele vermeiden, indem Sie kein rücksichtsloser, betrunkener Idiot sind, egal wie sehr das Spiel Sie in Versuchung führt. Einige Möglichkeiten, selbst wenn Sie vorsichtig sind, sind einfach BAM!, Sie sind tot (z. B. wenn Sie einen rücksichtslosen, betrunkenen KI-Idioten frontal an einem unübersichtlichen Hügel oder an einer Ecke treffen). Andere können (meistens) durch ein angemessenes Risikomanagement abgewehrt werden. Aber das Entscheidende ist, erwarte zu sterben und rege dich nicht auf, wenn es passiert. Lernen Sie aus Ihren Fehlern (falls Sie einen gemacht haben) oder verfluchen Sie das unbeständige Schicksal und machen Sie weiter, so gut Sie können.
- Es gibt Überlebensaspekte:Sie müssen Lebensmittel kaufen (und verbrauchen), Rechnungen bezahlen, Ihr Haus nicht niederbrennen usw. Dies erfordert Geld, das zu beschaffen erfordert Kraftstoff (der Geld erfordert) und Zeit. Es bringt Sie auch auf die gefährlichen Straßen, auf denen Sie die ganze Zeit Gefahr laufen, zu sterben. Und das alles ohne die enorme Menge an zusätzlichem Geld, die Sie benötigen, um eine anständige Satsuma zu bauen.
- Es gibt eine völlig optionale Geschichte, die ein Liebesinteresse für den Spielercharakter beinhaltet. Ohne die Details zu verderben, verstehen Sie, dass Ihr Spiel danach beendet wird, obwohl Sie dafür eine Errungenschaft erhalten. Also, wenn Sie diesen Erfolg wollen, dann machen Sie es. Schieben Sie es andernfalls auf, bis Sie alles andere getan haben, was Sie mit Ihrem aktuellen Spielstand tun möchten.
- Du kannst nicht alle Erfolge in einem einzigen Durchgang erhalten. Viele müssen auf dumme Weise getötet werden und sind nur in Permadeath-Spielen verfügbar.
- Haben Sie keine Angst, Mods zu verwenden oder sogar zu „cheaten“. MSC ist schließlich ein Early-Access-Spiel, also gibt es Fehler. Selbst wenn du Permadeath spielst und die Konsequenzen akzeptierst, wird es Zeiten geben, in denen ein Bug dich tötet (oder auf andere Weise total abspritzt), im Gegensatz zu deiner eigenen Dummheit. Haben Sie also die Fähigkeit, sich von solchen Dingen zu erholen. Später in diesem Handbuch findest du eine Liste empfohlener Mods, von denen die ersten speziell für solche Instanzen vorhanden sind.
Nachdem dies gesagt ist, weiter mit den Empfehlungen für den Einstieg.
Wichtige Gesundheits- und Sicherheitstipps und andere nützliche Leckerbissen
Hier sind einige Dinge, die neue Spieler und zurückkehrende alte Spieler wissen müssen, um am Leben zu bleiben und/oder die Folgen des Todes zu vermeiden.
Tod betrügen mit Alt-F4
Ob Sie Permadeath haben oder nicht, Sterben ist scheiße. Glücklicherweise können Sie mit ALT-F4 dem Tod ein Schnippchen schlagen. Du weißt, wann du stirbst, weil der Bildschirm mit Blut bedeckt ist und du anfängst zu schreien. Dies dauert ein paar Sekunden. Wenn Sie während dieser Zeit ALT-F4 drücken, verlassen Sie das Spiel und können von Ihrem letzten Spielstand neu laden. Hier muss man bei der Auslosung aber schnell sein. Wenn das Wort „Sparen“ oder die Zeitung, die Ihren Tod anzeigt, jemals auf dem Bildschirm erscheint, sind Sie zu spät und müssen die Konsequenzen tragen.
Angesichts des starken Anreizes, selten zu speichern, um das Tageslicht im Spiel nicht zu verschwenden, führt die Verwendung von ALT-F4 oft dazu, dass Sie den größten Teil der Arbeit eines Tages verlieren. Aber das ist besser, als von vorne anzufangen oder vom Friedhof nach Hause zu kommen und all deine verstreuten Besitztümer einzusammeln.
Ai-Rallyeautos
Es gibt jetzt 9 KI-Rallyeautos, die das Rennen sowohl Samstag als auch Sonntag von 10:00 bis 18:00 Uhr bestreiten. Diese Typen sind wie Pena, nur viel schlimmer:Es gibt mehr von ihnen, sie sind viel schneller und sie werden dich ohne zu zögern überfahren. Fahren Sie während der Rennzeiten nur mit dem Traktor oder LKW auf unbefestigten Straßen und überlegen Sie es sich zweimal, bevor Sie das überhaupt versuchen. Daher ist für den größten Teil des Wochenendes die einzige sichere Möglichkeit, das Haus zu verlassen, das Boot.
Also ist das Erledigen von Jobs am Wochenende weitgehend ausgefallen. Sie können diese Zeit jedoch nutzen, um an den sozialen Aspekten des MSC-Nachtlebens (Pub, Tanzpavillon, Ventti) teilzunehmen, in der Inselsauna Stress abzubauen oder am Satsuma zu arbeiten.
Hinweis:Ebenfalls neu ist, dass während der Rennzeiten die Rallye live im Fernsehen (auf dem Standard-Startkanal) übertragen wird, sodass Sie den KI-Fahrern beim Absturz zusehen können.
Der Helm
Sie haben jetzt einen Motorradhelm. Es beginnt auf dem Schreibtisch neben Ihrem Spiel. Setzen Sie es auf, indem Sie darauf fokussieren und F drücken. Nehmen Sie es ab, indem Sie gerade nach unten schauen und F drücken.
Es gibt eine Reihe grundlegender Dinge, die Sie über den Helm wissen sollten:
- Der Betrieb des Jonnez ohne Helm an einer Polizeikontrolle führt zu einer Geldstrafe.
- Muss beim Betreten des Rallye-Rennens den Helm tragen.
- Darf nicht essen, trinken oder rauchen, während man den Helm trägt.
- Helm kann neu lackiert werden.
- Macht das Schrotten eines beliebigen Fahrzeugs etwas überlebensfähiger.
Aber das Wichtigste am Helm ist, dass er Sie vor Bienen in den Augen schützt, einer neuen Art zu sterben. Wenn Sie ein Fahrzeug mit hoher Geschwindigkeit ohne Gesichtsschutz fahren, besteht im Grunde jetzt die Möglichkeit, dass Sie aus heiterem Himmel sterben, wenn Sie von einer Biene ins Auge getroffen werden. Dies gilt nicht nur für den Jonnez, sondern für jedes Fahrzeug ohne Windschutzscheibe. Beim Boot ist das jedoch kein Problem und es ist schwierig, den Gifu schnell genug zu bekommen, um sich darüber Gedanken zu machen.
Begrenzter Vorrat in Teimo's Store
Teimos Laden wird jetzt nur noch einmal pro Woche aufgefüllt, anstatt jedes Mal, wenn Sie das Spiel laden. IOW, wenn du am Montag die ganze Wurst kaufst, ist am Dienstag immer noch keine Wurst im Laden.
Die Auffüllung erfolgt um 0001 Donnerstagmorgen. Befindet sich der Spieler jedoch zu diesem Zeitpunkt in der Nähe des Ladens, findet keine Auffüllung statt. Wenn der Spieler nach Mittwochabend um 22:00 Uhr im Abstellraum des Ladens speichert, wird der Laden aufgrund des Zeitvorsprungs nicht aufgefüllt, sodass der Spieler um Mitternacht wieder im Laden ist. Daher ist es am besten, Mittwochabend nicht in die Stadt zu gehen.
Brenn dein Haus nicht nieder
Es gibt viele Möglichkeiten, wie Sie versehentlich Ihr Haus niederbrennen können. Neben dem Offensichtlichen (Anzünden von Feuer und Feuerwerk in unserer Nähe des Hauses) kann auch die Verwendung eines der elektrischen Geräte im Haus ein Feuer auslösen. Gehen Sie daher sicherheitshalber wie folgt vor:
- Bewegen Sie den tragbaren Grill und das Feuerfass weit weg von Ihrem Haus zur vorderen Hecke. Kochen Sie auf dem Grill, nicht auf dem Herd oder der Kaffeemaschine.
- Lassen Sie den Fernseher nicht zu lange eingeschaltet.
- Verwenden Sie nicht die Elektrosauna. Wenn Sie eine Sauna nutzen möchten, nutzen Sie den Holzofen am Inselhäuschen.
Kostenlose Sachen
Nein, keine Fahrzeuge oder deren Teile. Sehen Sie ein Wiki für, wo sie sind. Ich spreche von Statusänderungen im Zusammenhang mit dem Überleben der Spieler, die noch wichtiger sind.
- Kostenlose Getränke: Neben der alten Küchenspüle gibt es jetzt neue handgepumpte Wasserbrunnen, die auf der Karte verstreut sind:Jokkes Haus, Spukhaus, Ventti-Haus, Omas Haus und das nördliche Ende des Erdbeerkomplexes.
- Kostenloses Essen: Fische fangen, kochen und essen. Außerdem einen Elch töten (am besten mit Gifu jagen) und das Fleisch kochen. Sofort oder es verrottet. Also den tragbaren Grill dabei haben.
- Erhöhung der kostenlosen Ermüdung: Schalten Sie nachts den Fernseher ein. Alle Stationen sind aus der Luft und ein Testmuster wird angezeigt. Wenn Sie darauf starren, steigt Ihre Ermüdung schnell an. Sehr nützlich, wenn Jokke um 0200 anruft und Sie wieder ins Bett gehen möchten. Etwa 1/2 Ermüdungsbalken lässt Sie bis etwa 0600-0700 schlafen.
- Kostenlose Verringerung der Ermüdung: Trinken Sie so viel Sie wollen von Omas Kaffee. Nur erhältlich bei der Lieferung von Lebensmitteln bei schönem Wetter bei Oma. IOW, woanders auf der Karte kann es regnen, aber dort, wo sie lebt, muss die Sonne scheinen.
- Kostenloser Stressabbau: Auf der Insel abhängen, duschen, Feuerholz hacken und Omas Kaffee trinken.
Alternative Verkehrsmittel
Sollten Sie sich auf den asphaltierten Straßen wiederfinden, können Sie mit dem Bus fahren. Setzen Sie sich einfach an eine Bushaltestelle und irgendwann kommt der Bus. Bezahlen Sie das Ticket und steigen Sie an der Haltestelle aus, die Ihrem Zielort am nächsten liegt. Besser als Gehen.
Auf den unbefestigten Straßen können Sie per Anhalter fahren und sich von Pena mitnehmen lassen, Ihrer betrunkenen, mörderischen Cousine, die das kleine grüne Auto fährt, das Sie häufig umbringt. Das ist gratis. Achten Sie darauf, Ihren Sicherheitsgurt anzulegen. Du kannst auch einen Erfolg bekommen, wenn du ihn ausschaltest, aber sei bereit zu sterben, wenn du es tust.
Nehmen wir also an, Sie sind in einem Nicht-Permadeath-Spiel gestorben und finden sich auf dem Friedhof wieder. Gehen Sie zur Haltestelle des Stadtbusses. Fahren Sie mit dem Bus bis zur Haltestelle in der SE-Ecke der Karte, nur S von der unbefestigten Kreuzung. Gehen Sie zur unbefestigten Kreuzung. Trampen Sie mit Pena, die Sie nach Hause bringt. Hoffentlich, bevor Sie verhungern, verdursten oder gestresst sind.
Weitere Informationen
Dieser Leitfaden greift nur die Höhepunkte wichtiger Konzepte auf, ohne ins Detail zu gehen. Wenn Sie detailliertere Informationen wünschen, sehen Sie sich die vielen Wikis (offiziell, halboffiziell und reddit) sowie YouTube an. Bitte beachten Sie, dass alle Ratschläge von vor Ende 2019 wahrscheinlich veraltet sind, also überprüfen Sie das Datum.
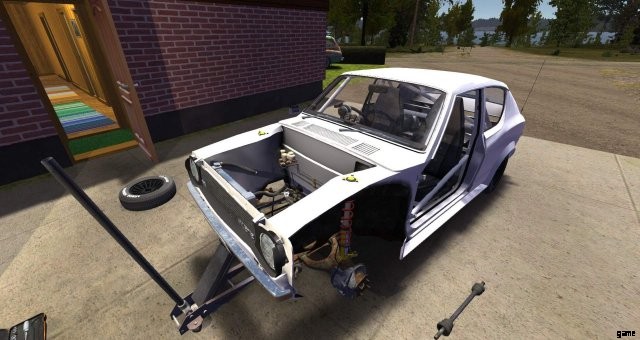
Wann man das Satsuma baut und wofür es gut ist
Wann man den Satsuma baut
Hier sind 3 Hauptaspekte zu beachten:
- Das erste oder dritte Mal, wenn Sie den Satsuma bauen, selbst wenn er mit Tutorials und einer praktischen Anleitung auf der Flagge in der Garage ausgestattet ist, wird es viel Spielzeit und geistige Anstrengung erfordern. Der Verlust dieser Investition ist ein Hauptgrund, Permadeath auszuschalten. Aber je mehr Sie das Auto bauen, desto mehr merken Sie es sich und desto schneller arbeiten Sie, sodass diese Anfangsinvestition mit der Lernkurve erheblich abnimmt, wodurch Permadeath weniger beängstigend wird.
- Viele wichtige Teile des Satsuma (hauptsächlich im Motor, einige im Getriebe) nutzen sich durch Gebrauch und Missbrauch ab, und die Teile, mit denen Sie beginnen müssen, sind bereits am Ende. Wenn Sie das Auto damit bauen, wird es fast sofort kaputt gehen und Sie müssen es zum Wiederaufbau wieder zerlegen. OTOH, Sie können das Auto mit brandneuen Verschleißteilen von Fleetari bauen, aber das komplette Set kostet etwa 7084 Mk.
- Das erste Mal den Satsuma gebaut zu bekommen, ist, obwohl ein großer Haken des Spiels und ein großes persönliches Ziel neuer Spieler, wirklich nur der wahre Anfang, nicht das Ende. Das wahre Fleisch des Spiels ist, was Sie damit machen, sobald es läuft.
Meine Empfehlungen lauten also wie folgt:
Erste paar „Durchspiele“
Hier ist Ihr Ziel einfach, die Lernkurve beim Bau des Satsuma hinunterzurutschen und während Ihrer Einkaufsbummel und Gelegenheitsjobs viele Lektionen über das Überleben auf den finnischen Straßen zu lernen. Du versuchst nicht wirklich, signifikante Fortschritte im Spiel zu machen, du lernst nur, wie man es spielt. Schützen Sie also Ihre Zeitinvestition, indem Sie Permadeath ausschalten und das Auto mit den beschissenen Startteilen bauen. Lassen Sie es sogar registrieren (vorausgesetzt, es fällt unterwegs nicht aus). Dann hör auf und fang von vorne an, denn du hast ein beschissenes Auto und dir werden viele Dinge in der Spielwelt aufgefallen sein, die du hättest besser machen können.
Weitere Durchspiele
Sobald Sie sich mit der Satsuma-Konstruktion, der allgemeinen Spielmechanik, der Karte vertraut gemacht haben, die wichtigen NPCs kennengelernt haben usw., können Sie das Spiel jetzt richtig spielen, als wären Sie ein echter finnischer Redneck, der in die Welt hineingeboren wurde Spielwelt, Schraubenschlüssel drehen und fast 2 Jahrzehnte lang auf sehr schlechten Straßen blöd schnell fahren. Jetzt können Sie Permadeath wieder einschalten und nicht mit dem Bau des Satsuma beginnen, bis Sie genug Geld haben, um alle Verschleißteile zu ersetzen (und vielleicht einige der Aftermarket-Teile zu bekommen, die bei Ihrer Fahrzeuginspektion nicht durchfallen). Zu diesem Zeitpunkt wird es Sie nicht mehr so sehr stören, den Baufortschritt von Satsuma durch einen vorzeitigen Tod zu verlieren, da Sie jetzt gut darin sind, und es weniger als Schmerz empfinden, als sich von einem nicht dauerhaften Tod zu erholen.
Zweck des Satsuma
Jedes Fahrzeug, das der Spieler in MSC fahren kann, hat einen bestimmten Zweck und ist für andere Jobs nicht so toll. Der Satsuma ist insofern einzigartig, als Sie ihn so konfigurieren können, dass er 1 von 3 verschiedenen Zwecken dient, und mit genügend Geld zwischen diesen Versionen hin und her wechseln können. Diese Versionen sind:
- Street Rod: Essentially the default as you must initially build a street-legal vehicle to pass inspection. Cannot enter the rally. A pimped version of this is the only way to catch the girl of your dreams (which ends the game). In the meantime, you have a light utility vehicle that’s more fun but less-capable than either the van or the Ruscko, but you can sleep in the back seat so don’t have to get home before you die of exhaustion.
- Rallycar: Start with a street-legal, registered Satsuma then apply a bunch of expensive aftermarket parts to make it rally-legal, and a few more to make it faster, then go court death and bankruptcy competing in the weekend rally races. Otherwise, as a utility vehicle, you gain cargo space but lose the built-in bed, and the girl is not impressed.
- Dragster: Specialized to accelerate as quickly as possible in a straight line on pavement so not much good for anything else, like driving anywhere in Finland other than on a runway. However, it has the most cargo space due to being stripped down as much as possible to minimize weight. You CAN drag race in the other versions but won’t do as well as a specialized dragster.
Note, however, that the Satsuma is also unique in that everything on it can be damaged from wrecks or hard use, and wearable parts continually die slowly from just regular use. Thus, using the Satsuma for a utility vehicle saps its lifeforce, leading to increased maintenance costs and the time sunk in repairing/servicing its problems. It’s thus best to limit use of the Satsuma to pursuing one of the above goals unless money and doing repairs don’t bother you.
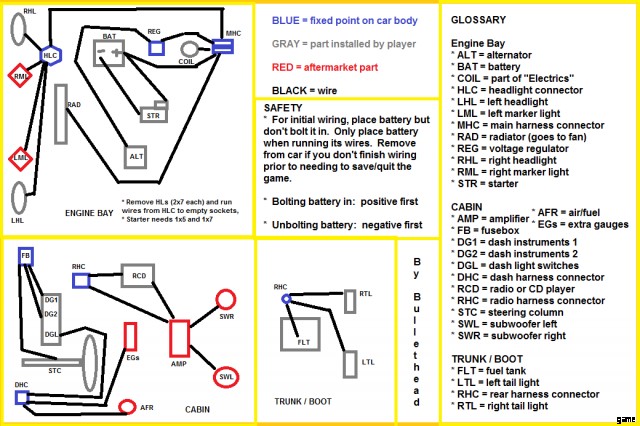
Useful Flags
Below are a couple of flags. One for building the car, one a wiring diagram. The car-building one I have modified heavily from an obsolete version. The wiring diagram is my own creation.
Other Vehicles and Their Uses
Besides the Satsuma, the player either begins with or can acquire a number of vehicles, each of which is useful in 1 or more ways in accomplishing the main goals of staying alive, making money, and getting the Satsuma into shape to accomplish one of the main game goals. These are:
- Jonnez ES “moped” (actually a minibike as it as no pedals): Available from the start. Cheapest vehicle to operate as it can circumnavigate the whole map on about 1/8 of a tank Runs on 2-cycle fuel. Unique in that you can pick it up and stow it inside larger vehicles, so you can use it to get home after staging the other vehicle away from home, then getting back to it when needed. Reasonably fast but can’t carry passengers and, unless you have the “Carry More” mod, you can only bring 1 item with you on a trip. Thus, without this mod, it’s pretty useless except to get home after staging a vehicle elsewhere, to get to the never-to-be-sufficiently-damned strawberry field, or to deliver adverts for Teimo or Fleetari. With the “Carry More” mod, however, it’s quite useful as a grocery-getter, bringing supplies to Grandma, picking up Satsuma parts from around the map, and making low-volume kilju runs (either delivering to Jokke or picking up the empty bottles at the landfill).
- Boat: Available from the start. Runs on 2-cycle fuel. Only way to get to the island where the kilju bucket, fish trap, camera, coffee pot, camera, wood-fired sauna, and fireworks are. Also allows direct trips from home to the dance pavilion and ventti house. Not much good for anything else at present You can, for example, toss the Jonnez in the boat and sail to the town, then use the Jonnez to move purchases from the store to the boat but this often doesn’t end well due to the Jonnez being a bit glitchy when put in other vehicles.
- Kekmet Tractor: Available from start. Burns diesel or fuel oil, reasonable fuel efficiency for a heavy vehicle. Only vehicle that can pull the firewood trailer, which can also be used for carrying wrecked vehicles (including the Satsuma), lots of groceries/kilju bottles, or large car parts. Has front forks that can upright overturned vehicles or put them in the trailer. Can tow junk cars to Fleetari for money but is slower at this than the Gifu truck. Essentially indestructible unless overturned.
- Hayasiko Van: Initially owned by your uncle and only available occasionally for short-term loan after playing the game a while. Eventually, however, you get it for keeps (see the Uncle section). Burns diesel or fuel oil but as you’ll frequently be on the policed roads, you should only run diesel. Good fuel efficiency–can circumnavigate the map on 1/8 of a tank. Can carry the most stuff and also 1 passenger but limited to 80kmph on the blacktop or you’ll get a speeding ticket. Can easily carry the Satsuma rear seat or the sketchy sofa found at the landfill so you can have a bed wherever you roam. Also good for high-volume kilju runs. Nice to have but, if you’ve got the “Carry More” mod, you won’t really miss it if you were used to having it from the start in earlier versions of the game.
- Gifu Sewage Truck: Initially owned by your Uncle and only available after he loses his license (see the Uncle section). Burns diesel or fuel oil but diesel recommended or your uncle will have to sell it, depriving you of it. High operating cost due to large fuel tank and burning nearly 1/2 of it circumnavigating the map. Indestructible (except for the windshield) unless overturned so fear no wrecks, which can be useful for meeting your girlfriend. Only vehicle that can suck septic tanks, which is a highly profitable job. Can also tow junk cars to Fleetari faster than the Kekmet. Has built-in sleeper cab and 1 passenger seat but otherwise not much cargo capacity–the Jonnez will fit inside but complains the whole trip.
- Ruscko: Can be acquired by theft or by gambling. Must be de-wasped prior to use. Burns gasoline. Has passenger seat. Not quite as much cargo space and rather worse performance than the van but you can sleep in the back without furniture. If you can’t get the van early enough to suit your needs, consider stealing this. Otherwise, not very useful, more a prestige item. And it looks like crap unless you use mods to pimp it.
- Other Vehicles: You can briefly come into control of various NPC-driven vehicles if you dispose of their drivers. However, these vehicles never pass into your permanent ownership and respawn with their resurrected NPC drivers when you save/quit/reload.
Your Uncle and Getting His Vehicles (minor spoilers)
The big change introduced in the late-2019 updates is that the van and sewage truck are no longer available from the start. This forces you to make due for some time with the Jonnez and tractor (and, optionally, steal the Ruscko). However, this is really not that big a deal–you’ll find you really don’t need the vehicles that much in the early going and you’ll get your hands on them soon enough anyway.
Borrowing the Van (minor spoilers throughout)
You can only get your uncle’s vehicles (van and truck) by talking to your uncle. He lives in the house between yours and the woodshed so you’ll be walking by his house frequently to chop firewood. However, when you start a new game and for an indefinite time thereafter, he’s not home, but he’s left you a present on the table behind his house.
Note:Your in-game actions affect how fast uncle-related events happen. See timing section below for details on that.
You can tell when your uncle finally comes home because the blue van will be parked behind his house (you can see this from your back porch so keep an eye out if you’re not chopping wood right then). He will also only be home that briefly and will then be gone again for some time, so if you need to use the van, ACT NOW. Knock on his back door repeatedly until he answers. He will give you the van keys and you can now run that major errand you’ve been needing the van for. Be sure to bring the van back to uncle’s house. Also, it will need fuel.
Once you have the van keys, you can simply borrow it again next time it’s there without knocking on the door. You will likely go through this sporadic, temporary borrowing process 2 or 3 times before you get the van for keeps.
Note:Borrowing the van is like being Cinderella–you have to get it back to your uncle pretty quickly, and you can’t sleep, save, or walk too far away from it, or it will despawn and leave you stranded.
Permanent Ownership of Van and Truck (minor spoilers throughout)
Eventually on your way to or from the woodshed, you’ll find uncle sitting at the table behind his house with a partial case of beer. The van will not be present. If you sit and have a beer with him, he’ll tell you his driver’s license has been revoked so he no longer needs his vehicles. They are now yours. You already have the van keys and uncle will tell you the truck keys are on the rack in the hall of his house. Now all you have to do is find the van and truck.
Both vehicles are in the town of Peräjärvi.
- Truck location:sewage treatment plant.
- Van location:next to closed shop adjacent to vehicle inspection shop.
Go to Peräjärvi on the Jonnez. Drive the truck to Teimo’s and park it behind the fuel pumps to be ready for the septic tank job. Refuel it now if possible. Throw the Jonnez in the van, refuel the van if possible, and drive home (doing any errands along the way). Herzlichen Glückwunsch! Now you have all the main vehicles. And you no longer have to talk to your uncle again, although he’ll still be there at the table and you still get free beer by sitting with him.
The Timing of Uncle-Related Events (all spoiler)
Your uncle first appears within a random time (1.5 to 3 gameplay hours) after you install 1 of 3 things on the Satsuma:
- Driver’s seat; or
- Engine Block; or
- Both trailing arms.
If you do none of these, he seems to appear anyway, after some further random time. Subsequent appearances also seem to be variable.
Teimo’s Store and Fleetari’s Shop
It’s important to understand the key differences between the 2 vendors, Teimo and Fleetari.
Teimo
Main purpose
Sells consumables for both vehicles (fuel, other fluids, batteries, oil filters, spark plugs, belts) and the player (food and drink, charcoal, mosquito repellant, etc.). Off-the-shelf items restock weekly but he never runs out of fuel.
Mail Order Parts
On your workbench your garage is a catalog of aftermarket Satsuma parts. When you complete an order form, you get an envelope which you must place in the mailbox next to Teimo’s shop door. A few days later, Teimo will call saying your order came in. He’ll call multiple times if you don’t pick it up right away. Go inside to pay for them, then pick the parts up outside.
Note:You can place the order before you have the money to pay for the parts because you don’t pay until the parts arrive a day or 2 later.
Social Aspects
At 2000, Teimo closes his store and opens the Pub Nappo next door. There, you can get drunk with the locals.
There are slot machines in both the store and the pub. You can also buy lottery tickets in the store.
Fleetari
Main Purpose
Performs major vehicle services (new tires, body repair, gear ratio change, repainting, etc). Also sells new replacement parts.
Note:Everything at Fleetari’s is cash in advance (the opposite of ordering parts from Teimo). If the service will take some time, you pay up front.
Servicing Whole Satsuma
This is for things like new paint, installing a roll cage, changing gear ratios, repairing body work, etc. Park in front of the shop, go in, select what you want from the catalog, and pay up front. Fleetari will loan you the Ferndale to get home. He will then call when the Satsuma is ready. You’d best get there quickly, returning the Ferndale, or Bad Things may happen.
Buying New Wearable Parts
First, make sure the part you want is not installed on the Satsuma (either it never has been, you’ve removed it, or it came off in a wreck). You do not need to bring the part to Fleetari. As long as it’s not on the Satsuma, a new version will appear on the shelf. Take the part from the shelf and move it to righthand part of Fleetari’s counter. Then click the cash register to pay for it.
Doing this deletes the old part from the world and the only one left is the new one you just bought. Now you have to carry the new part to the Satsuma to install it. This is the only Fleetari transaction where you get immediate results. The new parts are yours as soon as you pay for them. No waiting.
Getting Tires and Repairing Parts
To get tires, put the rims (which might already have tires on them) on the counter, then select the type of tire from the catalog on Fleetari’s desk. Pay the price and come back to pick them up once Fleetari says they’re done.
You can do the same thing to repair wearable parts. However, this is not at all recommended because repaired parts only get about 50% health, whereas new parts are (not quite) 100%.
Where’d All My Money Go? (Aka Expenses)
You Need Income!
You start the game with 3000mk (and 10-30% more in your present). This will barely cover your basic survival needs for a week or so, let alone get the Satsuma in basic working order, much less modified and pimped. Finland is an expensive place to live.
Cost of Living
- Bills: Every week, you have to pay bills for home electricity and telephone, which add up to about 300mk/week depending on use. These bills come on different days of the week so check your mailbox every time you pass it. Failure to pay bills will result in those services being cut off.
- Bodily Needs: Plan on 1 pack of sausage/day and 1 case of beer/week. That adds up to about 350mk/week. You can reduce the beer usage somewhat by drinking free water at home or from a few wells scattered about the map, but you’ll still drink a lot of beer just to survive.
- Fuel: You have to drive a lot to do the jobs to make the money to pay your bills and feed your body, plus make weekly supply runs to the store. This means you burn a lot of fuel. Expect to spend 300-500mk/week on fuel (mostly diesel) at the beginning when you just have the boat, Jonnez, and Kekmet. This increases as you get more vehicles (especially the Gifu).
So, your basic living expenses are going to be anywhere from 1000-1500mk/week. And if you can’t meet them, you starve in a dark house. MSC hates folks who don’t work.
Cost of Satsuma
You have quite a few options here and it quickly adds up, so it’s best to take this in stages:
Street-Legal with Original, Worn-out Parts (not recommended)
This is the bare minimum just to get the car assembled and inspected. But it won’t run very well. Get tires by dropping rims off with Fleetari. Other parts and fluids from Tiemo’s store.
- New road tires:(Standard 1750mk or Gommer Gobra 2110mk).
- Alternator belt:295mk.
- Motor Oil x2:298mk.
- Brake/Clutch Fluid x3:105mk.
- Coolant x2:490mk.
- New battery:495mk <– old battery is dead, just burn it.
- New oil filter:59mk <– old oil filter is junk, just burn it.
- Spark plugs:99mk.
Total:3591mk or 3951mk depending on tires, and it will just break down immediately.
Street-Legal with New Wearable Parts:(highly recommended)
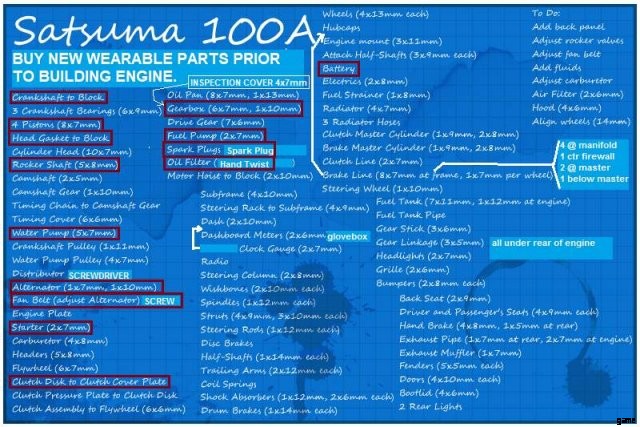
Before assembling any of the engine, go to Fleetari’s and buy every part on the shelf except the block and oil pan. The block and oil pan don’t wear out (although you can break them in wrecks or through engine abuse), so you don’t need them now. IOW, you need to buy:water pump, alternator, starter, 4x pistons, crankshaft, head gasket, rocker shaft, gearbox, fuel pump, and clutch disc.
- Sub-total for all new wearable parts:7084mk.
- Total (including parts, fluids, and tires in #1):10675mk or 11035mk depending on tires:
Street-Legal Aftermarket Parts (highly recommended)
The following parts will pass vehicle inspection and improve your experience by making your car faster, more reliable, and easier to tune. Thus, I recommend installing them in the initial build:
- Racing radiator:1215mk <– much better than stock radiator (but might prevent GT achievement).
- Fuel Mixture Gauge:549mk <– really helps tuning carburetor.
- Extra Gagues:299mk <– helps you spot engine trouble before major damage occurs.
- Twin Carburetor 1750mk <– improves speed and required for GT Restoration achievement.
- Subtotal for aftermarket parts:3813mk.
- Subtotal for new wearable parts:7084mk.
- Subtotal for basic required parts and fluids:3591mk or 3951mk.
Grand Total for Good Satsuma Build:14488mk or 14848mk
Throw in 20L of gasoline in the jerrycan just to get to the inspection shop, and the 325km inspection fee, and call it an even 15,000mk.
Going Further
So, for 15K mk you get a basic, street-legal Satsuma. Expect to spend about that much again turning into an effective racecar, and you can spend even more adding cosmetic features. And after all that, the car will still look like a rust-bucket. To fix that, you need a new paintjob, which will cost 11K-21K mk by itself.
And this is not even considering repairs to damage from wrecks and the inevitable need to replace the wearable parts. Basically, the Satsuma is a money pit. But that’s the basic trope of the game. You spend all this time and money fixing the car, the you wreck it and have to do it again, at great expense. It’s a pastime for those who enjoy doing this sort of thing.
Every Day I’m Hustlin’ Hustlin’ (aka Making Money)
So, you need 1000-1500mk/week just to survive and get around, and you need an extra 15,000mk to get a reliable, basic, street-legal, Satsuma (and a lot more for racing parts, pimping, normal wear and tear, and the inevitable crash damage repairs). Fortunately, this money isn’t that hard to come by if you’re willing to work.
Starting Income Opportunities
At the start of the game, you have the following main ways of making money. None of them are particularly profitable or pleasant by default, but the mods I recommended above really alter the balance. So I explain them with and without mods.
Firewood
This is a great job. It pays 3200mk and the trip is relatively short even in the slow tractor. Plus, chopping the wood eliminates stress so you don’t need to smoke as much. Problem is, by default it’s only available every 8 hours of playing time, which is about 1 week in the game world (1 real life hour is about 1 day in the game). Luckily, there’s the “Firewood Job Cooldown” mod, which lets you reduce the delay between jobs down to 1 real hour if desired. Understand this IS summer so firewood demand is low, but speeding this up to twice a week makes the early game suck a lot less.
Kilju
To make kilju, you need the bucket (from the lake cabin sauna room), 6 bags of sugar, 1 box of yeast, and 30L of water. To sell kilju, you must put it in empty fruit concentrate jugs and take them to Jokke. Then you retrieve the empty jugs at the landfill. Wiederholen. Each batch fills 20 jugs and requires about 2.5 real hours to make. You can make about 3200mk profit per batch and can ultimately produce 2 batches per week if you have 20 jugs. But you can only get 6 jugs per week at the store, which means making 2 or 3 delivery/retrieval trips per batch, which limits you to 1 batch/week for the 1st few game weeks. Still, good and easy money even to start with.
Problem is, you need a way to carry all those jugs at once. Without the van and without mods, your only options are the stolen Ruscko or the tractor’s wagon, both of which are relatively slow and burn a lot of fuel. With the “Carry More” mod, you can use the Jonnez to carry up to 10 (or 11) jugs at once, which will cover the 1st couple weeks of the game when you have at most 12 jugs. After that, you should have the van available at least periodically.
Towing Junk Cars to Fleetari
There are 4 junked car bodies scattered around the map. Prior to mid-2019, there were only 3 and they were always in the same places. Since then, they can be in any of a couple dozen places randomly chosen each new game. If you manage to drag them to Fleetari (using either the Kekmet or the Gifu), he’ll pay you from 1200-4500mk each. Thus, you can expect to get about 10K mk in total from this (less lots of diesel fuel and time), but each is a 1-time job.
Without mods, you’ll have to spend a lot of time looking for the wrecks, and will need to look everywhere, including in old, boarded-up barns. If you have MSCEditor, however, you can use its map function to show you where they are. Most will be far from Fleetari’s and moving them is slow, so depending on luck of the draw, this may or may not be worth the trouble. Or it may be better to wait until you have the Gifu instead of using the Kekmet, at least for certain wrecks.
Note:the 4th car is a GT Satsuma. Beside it will be the GT Console part, required if you want to get the GT Restoration achievement for building your own Satsuma.
Picking Strawberries
This job totally sucks and, if you use a few mods (“Carry More” and/or “Firewood Job Cooldown”), you can avoid it completely. Without mods, this job exists to give you a (marginally) productive way to spend your downtime between firewood and kiju jobs.
This monotonous job requires you to go to the strawberry field, grab an empty box, take it to the 1st bush, pick 1 strawberry at a time, drop it in the box, repeat until the bush is empty. Move the box to the next bush and repeat. It takes (slightly less than) 4 bushes to fill one box. Then throw the full box onto the stack of full boxes and take 40mk from cash box on the table. Pick up another empty box, go back to the 1st bush still having berries, repeat.
At first, it takes geologic time to pick berries but you develop a skill for it the more you pick, so eventually it only takes an annoying long time per box. There are 120 bushes (the 1st 3 rows of the field) you can pick between field resets (happens when you save) so that’s 30 boxes @ 40mk each =1200mk, plus a 1200mk bonus for getting them all in 1 go (and not wasting any berries). Problem is, until you do this A LOT, your low skill means you can’t fill but a few boxes per day, so you get only a few hundred mk per day of mind-numbing, soul-crushing monotony. Still, that’s more than you’ll make that day building the Satsuma, watching TV, or taking a sauna.
Other, Minor Things
Grandma will call about once a week wanting various food items delivered. This can include grilled fish so be sure to grab the fish trap from the island while getting the kilju bucket. She doesn’t pay with noticeable money (<100mk/trip) but provides a lot of lore and unlimited free coffee. Her coffee is special in not affecting your bladder much. Really useful for adjusting your fatigue level for free. However, she always wants more than 1 item, so you can’t use the Jonnez for this unless you have the “Carry More” mod.
Then there’s Jokke, who frequently calls you at 0200 wanting a ride home from the Peräjärvi bus stop, even before you have a passenger-carrying vehicle. So, until you have either the van, the Ruscko, or the Satsuma, all this does is throw off your day/night cycle for no purpose. But, if you do have a way to drive him home, he’ll pay you about 150mk.
Early Game Bottom Line
So, all in all, early in the game you can count on income as follows:
- 2x loads of firewood =6400mk.
- 1 batch of kilju =3200mk.
So you end up with a net income (after cost of living and fuel) of about 8000mk/week (with maybe a few windfalls from towing convenient wrecks). IOW, by the end of 1 week, you should be able to afford all the new wearable engine parts. In another week, you can afford the tires, fluids, and other consumables. And in the 3rd week, you should be able to get all the recommended aftermarket parts.
Later Income
All that really changes later in the game is that you have uncle’s van (for high-volume Kilju runs) and the sewage truck. The sewage truck opens up the septic tank job, which will net you about 3800mk for 2 days’ work once a week if you stay on the dirt roads, burn fuel oil, and only make the trip when all 5 tanks need pumping.
So, basically, once you have the van and the truck, you can set the firewood cooldown back to default. This leaves you with the following income:
- 2 days spent pumping septic tanks =3800mk.
- 1 load of firewood =3100mk (net).
- 2 batches of kilju =4100mk net.
So, it won’t take long to accumulate the wealth you need to build upgrade and/or repair the Satsuma however you want or need to.
Suggested Starting Strategy
OK, now that you understand the salient points of what’s in the world, what they cost, and how to make money with the tools provided, we can finally get on with strategic advice for getting off to a good start in a new game under the current rules (early 2020).
This advice assumes the following things:
- You’ve read the above sections of this guide or acquired that info elsewhere, so you know what to expect from the world.
- You have wikis and other sources of info available for all the detailed “how-to” instructions to accomplish specific tasks.
- You’ve tinkered with building the Satsuma a few times already in failed er, I mean practice saves, so you’re reasonably proficient at that and/or have proper tutorials available.
- You have my recommended mods installed to make your life a bit easier (do a mod-free game only when you’re really good at MSC).
- You intend to build the 15K basic Satsuma with all new wearable parts and the recommended street-legal aftermarket parts, so construction of the engine will be delayed until you can afford the new parts.
The First Day
Your life begins at 1400 so your #1 priority is to get to the store ASAP to stock up on supplies before it closes for the night. Your #2 priority is getting the kilju bucket and fish trap from the island. Because I’m assuming you have “Carry More”, you have 2 options:1) drive the Jonnez to the store tonight and visit the island tomorrow, or 2) put the Jonnez in the boat, sail to town, use the Jonnez to move groceries from store to boat, and also visit the island as you pass by coming or going. The boat option is rather risky. First, the Jonnez might glitch overboard and be lost. Second, you’ll be coming home in the dark, making it hard to find your home dock unless you’re really familiar with the map. So, I recommend driving the Jonnez to town (you get an achievement for this) and dealing with the island tomorrow.
Note:If you don’t have “Carry More”, then you’re only viable option is to drive the tractor to town (but you get an achievement for this, too).
So, put on your helmet, jump on the Jonnez, and head to the woodshed to grab the diesel jerrycan. The gasoline jerrycan can wait–you don’t need it until you’ve got the Satsuma completely built (or are stealing the Ruscko). Then hustle to the store. Fill the diesel jerrycan and pay for it before doing anything else. Now buy 1 pack of cigarettes, all the sausage packs, all the sugar, all the juice concentrate, 1 yeast, 2 milk, 3 coffee, 2x 2-cycle fuel, 2 charcoal, and 4 cases of beer. Perhaps some spraypaint in colors you like, if you’ve into that. You will now have 1 grocery sack and 9 things that don’t fit in sacks (diesel, 2-cycle, charcoal, and beer), for a total of 10 objects, the max you can carry with “Carry More”. Load up and head back home.
Upon return, check your mailbox and for uncle’s van just to get in the habit (nothing to see yet, just get in the habit). Then drop the diesel at the woodshed then pile your other loot in convenient places around the outside of your house (nothing needs refrigeration). Set the coffee, 3 sausage, 3 sugar, and the milk aside (for Grandma’s future orders). Drink the fruit concentrate and carry the resulting empty bottles, the remaining 6 sugar, and the yeast into the sauna (for later kilju production). Hit F on the cigarettes to have the pack on you when needed for stress relief.
And then be sure to install the trailing arms on the Satsuma body. This will start the random countdown to get your uncle to appear the 1st time. Then attend your physical needs, take a shower, and save/exit the game.
While outside the game, fire up MSCEditor to see where the junk cars and GT parts are on the map. This allows you to plan trips to acquire them, if any look doable with your current means. Write the locations down and restart the game. Then immediately go to bed because you’re still tired.
The Second Day
You have 2 main tasks for today:raiding the island and filling the trailer with firewood. The order in which you do these depends on whether Jokke woke you up at 0200 during the previous night. If he did, either stare at the TV to get sleepy and go back to bed, or chop firewood first so the sun will be up by the time you’re done. This makes it easier to navigate the boat. If Jokke didn’t call, go to the island first thing in the morning.
Either way, immediately upon your return from the island, set the fish trap beside the dock. Then take the bucket inside and mix up a batch of kilju in the shower. While you’re home today, expect a phone call from the firewood guy. Depending on your level of fatigue when you get the call, you can probably deliver the firewood this same day, too. If not, consider drinking coffee. But in general, you should be able to do all these things:chop and deliver the wood, raid the island, and start the kilju. You might even be able to get a second load of firewood chopped before it’s too dark to see.
Thereafter
Every few days (depending on your “Firewood Job Cooldown” setting), you’ll deliver firewood. Every few days, you’ll have a batch of kilju complete, which you must deliver and then go to the landfill to reclaim the empty jugs. You will also periodically need to deliver groceries to Grandma. Make resupply runs (like to refill the diesel can) to the store as needed.
What About the Satsuma?
Apart from the vital step of installing the trailing arms to meet Uncle, remember that any time spent on the Satsuma is non-profit. Concentrate on getting the 7084mk needed for all new parts. You can, however, build the suspension and interior if you have some spare time with nothing else to do.
Mainly though, you’ll need to collect the rims. The stock ones are in the haunted mansion and the GT ones are in a barn near the Ventti house. You’ll need to make a trip out there to get them, so you Fleetari can be putting tires on them (which takes a day or so).
(Re)-Building the Engine
You need to replace a total of 13 parts, which is more than you can carry with “Carry More” if you buy them all at once. If you don’t have the van or Ruscko, and don’t want to risk them falling out of the tractor’s trailer, you’ll have to make at least 2 trips. Fortunately, you don’t need all the parts at once and buying them in batches lets you get started sooner, before you have the money for all of them.
To even get started on the engine, you need the following 7 parts all at once:crankshaft, 4x pistons, head gasket, and rocker shaft (total 3369mk). So that’s half the number and half the money. Then, when you have the rest of the money, go back and the rest of the parts.
General Advice
Make the most efficient use of your time, remembering that every time you save and reload, you lose hours of gametime. This is sometimes useful to get your day/night cycle back on track after Jokke hoses it, but in general you want to avoid this due to its impact on you getting to time-sensitive destinations before they close.
The best overall strategy is to plan your moves carefully. If you need to go to the store, maybe go in the tractor to snag a junk car on the way home, perhaps visiting Grandma and picking up empties at the dump along the way, too. Every game is different for many reasons so there’s real way to do a walkthrough for it. Just have fun and don’t die.