
Anleitung zum Kämpfen und Schlagen des Black Rabite auf Hard (mit Analyse der Fähigkeiten jedes Charakters).
Einführung
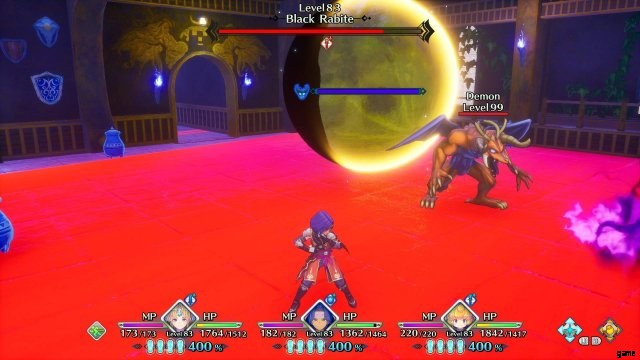
Der Schwarze Rabite ist ein optionaler Boss, dem Sie gegen Ende des letzten Dungeons vor dem letzten Bosskampf begegnen können (welcher Dungeon davon abhängt, wer Ihr Hauptcharakter ist). Dies ist ein schwieriger Kampf, und das Spiel warnt Sie mit zwei Aufforderungen, bevor Sie ihn bekämpfen, sodass Sie umkehren und sich richtig aufstellen können, bevor Sie sich diesem niedlichen und gefährlichen Tier stellen.
Wenn Sie mit dem originalen, von Fans übersetzten Seiken Densetsu 3 für das SNES vertraut sind, werden Sie vielleicht feststellen, dass der Schwarze Rabite in den meisten Aspekten in diesem Spiel etwas einfacher ist (heilt sich nicht direkt selbst und kontert Ihre Zauber nicht / Class Strikes mit viel Schaden), obwohl es jetzt sowohl von dunklen als auch von hellen Elementen geheilt wird (also denke nicht, dass Lumina Sabre hier helfen wird).
In meinem Durchspiel hatte ich Hawkeye (Ninja Master), Riesz (Starlancer) und Charlotte (Sage) und habe den Black Rabit auf Hard leicht besiegt, aber ich werde Informationen über andere Charaktere und Klassen eintragen, wenn ich mehr spiele / mehr recherchiere . Ich verweise auf die Leitfäden von Panda-senpai für Informationen zu den Charakteren/Klassen, die ich nicht gespielt habe.
Einige Hinweise zum Lesen dieses Handbuchs:
- Ab hier kürze ich Black Rabite mit BR ab.
- Wenn ich auf die Fähigkeit eines Charakters verweise, sage ich normalerweise [Name der Fähigkeit] ([Statistik] [erforderliche Trainingspunkte]). Zum Beispiel hat Duran Provozieren (GLÜCK 4).
- Ich verwende den Begriff „Fokuscharakter“ für einen primären Schadensverursacher, den Sie in diesem Kampf kontrollieren, und „Unterstützungscharakter“ für ein von der KI kontrolliertes Gruppenmitglied, dessen Pflicht es ist, ihn zu behalten Du lebst.
Wo man den schwarzen Rabiten findet
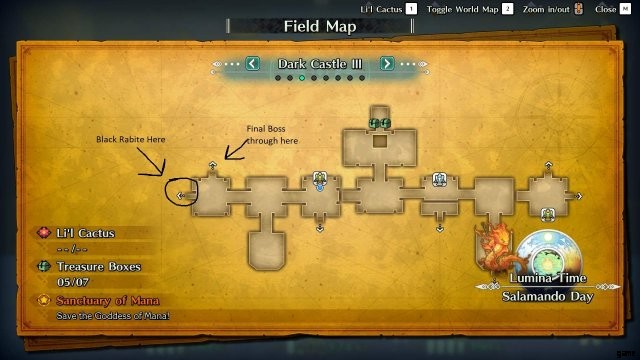
BR befindet sich in der Nähe des vorletzten Bosses jeder Handlung im letzten Dungeon. Wenn du ihn beim Durchspielen verpasst hast, mach dir keine Sorgen, denn du kannst jederzeit zurückgehen und gegen ihn kämpfen.
Beim Durchspielen von Hawk/Riesz findest du BR in Dark Castle.
Für den Duran/Angela-Durchlauf warte, bis ich dort ankomme, um den Screenshot zu sehen.
—
Für den Kevin/Charlotte-Durchlauf warte, bis ich dort ankomme, um den Screenshot zu sehen.
—
Nachdem du den letzten Dungeon gemeistert hast, findest du am Eingang zum Dungeon eine Rabite-Statue, die dich direkt vor den BR-Kampf teleportiert.
Bringen Sie für Hawk/Riesz Flammie zur Night Cavern, und Sie werden Folgendes sehen:

Für den Duran/Angela-Durchlauf warte, bis ich dort ankomme, um den Screenshot zu sehen.
—
Für den Kevin/Charlotte-Durchlauf warte, bis ich dort ankomme, um den Screenshot zu sehen.
—
Taktik
Hilfreiche Tipps:
- Verhindere, dass BR kanalisierte Zaubersprüche abschließt.
- Vermeiden Sie Jumbonk, Dark Force, Dark Rain und Stone Cloud, die Sie wahrscheinlich töten / versteinern werden. Die anderen Angriffe tun weh, aber das sind die gefährlichsten.
- Entferne Dark Sabre (Stardust Herb oder einen anderen Sabre-Zauber) von deinem/n Angreifer(n).
- Töte die beschworenen Dämonen.
- Überlebe, während du die Gesundheit von BR verringerst.
- Stell dich hinter BR und greife mit kritischen Treffern an.
- Du kannst Klassenschläge, Riesz’ Beschwörung und Angelas Nicht-Elementar-Zauber verwenden, um für kurze Zeit unverwundbar durch BRs Angriffe zu werden.
- Stellen Sie sicher, dass Sie BR festhalten (klicken Sie mit dem rechten Joystick), um ihn im Auge zu behalten, während er sich teleportiert und herumspringt.
Wann immer BR anfängt, einen seiner drei Zauber zu kanalisieren (Sie können es daran erkennen, dass ein bis vier Kanalisierungsknoten mit lila Gesundheitsbalken erscheinen), priorisieren Sie die Zerstörung jedes der Knoten gegenüber allem anderen.
Der erste kanalisierte Zauber ist nicht allzu schmerzhaft. Sie möchten es nach Möglichkeit immer noch loswerden, aber es ist unwahrscheinlich, dass es Sie bei voller Gesundheit umbringt.
Der zweite kanalisierte Zauber (der Riesenmond) ist der gefährlichste und lässt Ihre Gruppe mit weniger als 20 Gesundheit zurück (er scheint die Verteidigung zu ignorieren). Wenn BR dies mit Eye Beam weiterverfolgt, könnte es ein komplettes Party-Wipe sein.
Der dritte kanalisierte Zauber scheint selbst nicht so viel Schaden zu verursachen (vielleicht verringert sich der Schaden basierend auf der Anzahl der Knoten, die Sie töten können), aber die vier Knoten sind Miniatur-BRs, die mehrere seiner Angriffe verwenden können (wie der gefährliche Jumbonk ). Seien Sie vorsichtig, wenn Sie sie töten.


Wenn es einen Dämon gibt, töte ihn, damit du nicht die zusätzliche Schadensquelle hast, die Chaos für die KI verursacht. Zwischen den Beschwörungen ist genug Zeit, dass du wahrscheinlich nicht mehreren Dämonen gleichzeitig begegnen wirst, aber es ist möglich.
Barrage Sting hinterlässt eine lange, schädliche Ranke, die Sie ins Wanken bringen kann, wenn Sie hindurchgehen. Beachten Sie, dass es sowohl von BR als auch von seinen Dämonen gecastet wird.


Dark Force und Black Rain treffen beide mehrfach in großen AoEs. Wenn Sie anvisiert werden, bewegen Sie sich weiter, bis Sie sehen, dass der Zielkreis Ihnen nicht mehr folgt, und weichen Sie dann sofort aus.


Jumbonk ist wahrscheinlich sein schlagkräftigster Angriff. Vollständig gestärkt, überheilt und in meiner 4. Klasse bekam ich immer noch 1 Schuss davon.

Steinwolke ist gefährlich, weil sie dich versteinern kann, und nicht wegen des Schadens, den sie verursacht. Er scheint dies oft direkt nach Lava Wave zu wirken.


Evil Gate verursacht etwas Schaden, aber keine bedrohliche Menge. Achte nur darauf, auszuweichen oder einen CS zu verwenden, und nutze die Tatsache, dass BR während des Angriffs vorübergehend aufhört, sich zu bewegen.

Endless Chomp verursacht geringen Schaden, also sollten Sie riskieren, BR anzugreifen, wenn er versucht, Ihre Verbündeten zu fressen – Sie könnten getroffen werden, aber es wird Sie nicht töten. Machen Sie sich nicht die Mühe, ein CS zu verwenden, um dem auszuweichen.

Eye Beam fügt nicht viel Schaden zu, trifft aber das gesamte Feld. Stelle sicher, dass du springst (nutze deine schwachen Angriffe in der Luft, um deinen Sprung zu verlängern, wenn du Probleme mit dem Timing hast) oder benutze einen CS, um auszuweichen.

Lava Wave fügt etwas Schaden zu und kann Sie verbrennen, was Ihre Sicht einschränkt – was von lästig bis tödlich reichen kann, je nachdem, wie gut Sie seine Angriffe lesen können. Die übrig gebliebene Lava verursacht etwas Schaden, scheint dich aber nicht zu erschüttern.


Lucent Beam ist eine Serie von 3 aufeinanderfolgenden Linienangriffen. Wenn er auf einen Ihrer Verbündeten zielt, können Sie ihn frei angreifen. Wenn er auf dich zielt, solltest du allen drei Angriffen ausweichen.


Psychic Blast und Supersonic verursachen einigen Schaden in einem Bereich, aber Sie sollten Zeit haben, einfach davonzulaufen.


- Während des Kampfes wechselt BR regelmäßig zwischen den Modi Normal, Schwer und Zauber.
- Der harte Modus gibt ihm Rüstung, Angriff und Verteidigung.
- Der Zaubermodus gibt ihm Magic Atk/Def Up.
- Ich glaube nicht, dass der normale Modus irgendetwas bewirkt.
Abgesehen von diesen Tipps denke ich, dass die größte Schwierigkeit in diesem Kampf darin besteht, eine richtige Strategie zu entwickeln – schauen Sie sich dazu die Abschnitte für jeden Charakter an, um zu sehen, welche Fähigkeiten nützlich sind und welche Rollen sie in Ihrer Gruppe einnehmen können.
Allgemeine Strategie / Fähigkeiten / Gegenstände
Das größte Problem bei meinen ersten Kämpfen gegen BR war die Tatsache, dass die KI scheinbar nicht in der Lage ist, BRs Angriffe sowohl anzugreifen als auch ihnen auszuweichen.
Irgendwann wurde mir klar, dass sie viel waren, wenn Sie die Taktiken der KI (auf der Seite "Strategie") auf "Ausschließlich schützen" eingestellt hatten besser darin, zu überleben, während er immer noch bestimmte Unterstützungsbewegungen verwendet (Stat-Boosts, Heilendes Licht und Funkelnder Regen).
Da das Überleben der KI so stark zunahm, sobald sie aufhörte anzugreifen, habe ich Enigma (Hawk LUCK 2) auf meinem Focus verwendet, damit ich nicht so viel Zeit damit verbringen musste, Angriffen auszuweichen, die nicht auf mich gerichtet waren. Andere Fähigkeiten wie Wächter (Duran L-L STA 27) könnten ähnlich funktionieren, um die Aufmerksamkeit wieder auf bestimmte Gruppenmitglieder zu lenken.
Wenn Sie eine Gruppe mit mehreren Charakteren leiten, die entweder die Rolle „Focus“ (primärer DPS) oder „Support“ übernehmen könnten (z. B. Light Duran und Light Kevin), und die Charaktere wechseln, während der andere passiv die CS-Anzeige füllt, vergewissern Sie sich um die KI aller dreiteiligen Mitglieder auf „Ausschließlich schützen“ zu setzen.
Im Allgemeinen solltest du Fähigkeiten auswählen, die A) die Heilung erhöhen, B) die Verteidigung erhöhen, C) die CS-Anzeige deines Fokus auffüllen und D) den Schaden deines Fokus erhöhen.
Ich stellte fest, dass ich normalerweise die schlimmsten Zauber (wie Schwarzer Regen) vermeiden konnte, aber dass die KIs immer noch gelegentlich stecken blieben und starben, also geben Sie Ihren Unterstützern das Zubehör, um Licht- und Dunkelschaden zu halbieren. Ich denke, Black Rain und Evil Gate töten eher einen Supporter als Flash oder Light Beam, also gib das Dark-Accessoire deinem primären Heiler.
Nützliche Gegenstände (beachten Sie, dass einige von Zaubersprüchen repliziert werden, sodass Sie sie nicht benötigen, wenn Sie Zugriff auf den Zauberspruch haben):
- Schokolade / Honigelixier / Kartoffelöl – zur Notheilung. Wenn Sie Healing Light+ auf einem Support haben, müssen Sie wahrscheinlich nur ein oder zwei Item-Slots dafür reservieren.
- Feen-Walnuss – um MP wiederherzustellen.
- Heilkräuter-/Marmpotoöl – zum Entfernen von Burn, Moogle, Shrink und Petrification. Wenn Ihre Party Twinkle Light+ hat, möchten Sie wahrscheinlich nur das Marmpoto-Öl.
- Sternenstaubkraut – um Dark Saber zu entfernen (was deine Angriffe BR heilen lässt). Da BR alle Elemente entweder zurücksetzt, ignoriert oder absorbiert, möchten Sie nicht gezwungen sein, auf ein Elementarsäbel zurückzugreifen, um weiterhin Schaden zu verursachen.
- Mondmünze (?) – Ich kann nicht sagen, ob Mondmünzen tatsächlich bei BR funktionieren, aber wenn sie es tun, wird es hilfreich sein, seine maximalen HP zu verringern, um den Kampf zu verkürzen.
- Chobin-Öl / Tonnenöl / Dryade-Symbol – Verschiedene Unterstützungsgegenstände, um deine Überlebensfähigkeit zu erhöhen.
- Tezla-Öl – Erhöht die Rate, mit der sich Ihre CS-Anzeige füllt, was hilfreich sein kann, wenn Sie nicht über eine Reihe von Fähigkeiten verfügen, um dies für Sie zu tun.
- Schattenauge oder Bienenauge + Geisterauge + Batmo-Auge – Senken Sie die Werte von BR, um sowohl mehr Schaden zu verursachen als auch weniger zu nehmen. Diese laufen mit der Zeit ab und BR bufft sich gelegentlich während seiner Moduswechsel, also stelle sicher, dass du einen vollen Stack (oder Dark Hawk) hast.
- Bulette-Schuppe + Sahagin-Chip + Drake-Schuppe – Erhöhen Sie die Offensive und Defensive Ihres Teams. Du wirst diese während des Kampfes wahrscheinlich mehrmals anwenden müssen, was Light Riesz zu einer viel ansprechenderen Option macht.
Duran Licht-Licht (Paladin)
Licht-Licht (Paladin):
- Seine gesperrte Fähigkeit reduziert den erlittenen Licht/Dunkel-Schaden (obwohl ich nicht sicher bin, ob das nur für ihn gilt oder ob es für die ganze Gruppe gilt), was anscheinend die Hauptelemente sind, die ich durch BR erlitten habe.
- Zwischen Zugriff auf einen Schild und hohe STA und SPRT kann er wahrscheinlich genug Treffer landen, sodass Sie die KI auf einer Einstellung belassen können, die ihm tatsächlich erlaubt, anzugreifen, anstatt nur Unterstützung zu leisten.
- Rüstung brechen (STR 4) ist eine Kettenfähigkeit, mit der dein Fokus die gepanzerte Form von BR überwinden kann, obwohl es einfach genug sein sollte, normale Methoden zu durchbrechen.
- Wache (STA 27) sieht so aus, als würde es dem Party-Tank besser helfen, wenn Sie einen der kanalisierten Zauber von BR nicht stoppen, vorausgesetzt, dass es für Zauberschaden / für Angriffe funktioniert, die die gesamte Gruppe treffen. Wenn es so funktioniert, wie ich denke, dann würde es ihn zu einer großartigen Unterstützung machen – zwischen „Wache“ und „Provoke“ (GLÜCK 4) sollte der größte Teil des Schadens auf ihn zukommen. Das sollte etwas für die Tatsache ausgleichen, dass der Paladin nur Heillicht für einzelne Ziele hat.
- Auto-HP Heal II (INT 21) und Heal (INT 27) sind zwei Kettenfähigkeiten, die deinem matschigsten Charakter mehr Durchhaltevermögen im Kampf verleihen können. Oder er, wenn Sie Provoke (GLÜCK 4) verwenden
- Damage CS Boost III (SPRT 27) kann einigen helfen, seine CS-Anzeige zu füllen, besonders wenn Sie eine Gruppe mit zwei Fokus/Unterstützungs-Hybriden führen, zwischen denen Sie während des Kampfes wechseln, da sich seine Anzeige selbst dann füllen lässt er greift nicht an.
- Lucky Break (GLÜCK 2) sollte dir helfen, Stunlocks durch bestimmte gefährliche Zauber zu vermeiden, um entweder weiter zu kämpfen oder (für die KI) weiter zu heilen.
- Überleben (GLÜCK 12) ist eine Kettenfähigkeit, um deinem matschigsten Charakter zu helfen. Oder ihn, wenn Sie ihn angreifen und provozieren möchten.
- Heilung (GLÜCK 27) ist eine der vielen Fähigkeiten im Spiel, der ich der aufgeführten Beschreibung nicht traue. Ich denke, dass es nur Statusbeschwerden bei Duran heilen würde, wenn er heilt, nicht bei dem Charakter, den er tatsächlich heilt (basierend auf einigen Experimenten mit Safeguard (Charlotte Light LUCK 9), die gezeigt haben, dass es nur ihre Statistik-Debuffs entfernt). (Könnte das jemand bestätigen oder dementieren?)
- Miracle (LUCK 27) will help to keep Duran alive in some of the nastier situations, as long as you’re able to keep his HP moderately topped off.
Focus Rating: 7/10 – He’s Duran, he bashes things in the face with a sword.
Support Rating: 7/10 – Guard + Provoke + Heal + Lucky Break + Survive + Miracle allow him to both draw aggro away from your Focus (enabling easier crits from back attacks), and Healing Light gives him something to do beyond just dodge all day.
Final Thoughts :The Paladin is the perfect image of a hybrid Focus/Support. Pair him with another hybrid Focus/Support and you can swap between the two as their CS gauges fill from their passive abilities.
As I said above, he should be able to shrug off a fair amount of abuse, so the AI should be able to fight as him pretty decently.
Compared to the Lord (a very similar class), the Paladin’s main draws are Guard, Heal, and Miracle, which effectively reduces the total damage taken by allies, and allows single-target heals to be worthwhile.
It looks like it would work well when paired with Charlotte (Recovery Break (INT 21) also effectively increases the party’s max HP), one of Kevin’s Light classes (which can also heal), and/or Ton Oils or whichever of Hawkeye’s Light classes gets the spell to increase max HP).
Duran Light-Dark (Lord)
Light-Dark (Liege/Lord):
- His Locked Ability increases healing, which can make him a primary healer, particularly with Healing Light+ and Twinkle Rain. Additionally, Heal Upgrade (INT 27) helps him survive (from the description, I think it only applies to healing he receives, not how much he heals others).
- Between access to a shield and high STA and SPRT, he can probably tank enough hits that you can leave the AI on a setting that actually allows him to attack, rather than just provide support – and while he does trade some of the Paladin’s defenses for more attack, I think the Lord should be able to stand his own ground as the AI.
- Break Armor (STR 4) is a chain ability that lets your Focus get through BR’s armored form, although it should be easy enough to break through normal methods.
- Attack Boost All II (STR 21) and Defense Boost All (STA 27) help your whole party.
- Heal CS Boost II (SPRT 27) can help some to fill his CS gauge, particularly if you’re running a party with two Focus/Support hybrids that you swap between during the fight, as it lets his gauge fill even if he’s not attacking.
- Provoke (LUCK 4) lets him draw aggro to himself, enabling crits from your Focus. As I said above, he’s got enough tankiness that he should be able to take that while still attacking and be golden.
- Lucky Break (LUCK 2) should help you avoid stunlocks from certain dangerous spells, to either keep on fighting or (for the AI) to keep healing.
- Survive (LUCK 12) is a chain ability to help out your squishiest character. Or him, if you have him set to attack and give him Provoke.
- Critical Smash II (LUCK 21) is a chain ability that gives some debuffs to your main Focus’s crits (which shouldn’t be him, because he’s well suited to using Guard to draw aggro). Sadly, its spell damage that is the bigger issue with BR (except for his body slam, but that’s likely to 1-hit KO you regardless), but he does have some attacks that this helps with.
- Cure (LUCK 27) is one of the many abilities in the game that I don’t trust the listed description of. I think that it would only cure status ailments on Duran when he heals, not on the entire party (based on some experimentation with Safeguard (Charlotte Light LUCK 9) that showed that it only removes her stat debuffs).
Focus Rating: 7.5/10 – He’s Duran, he bashes things in the face with a sword, but doesn’t have anything fancy to contribute. Slightly stronger than the Paladin.
Support Rating: 9/10 – Provoke + Lucky Break + Survive + Attack Boost All II + Defense Boost ALL + Heal Upgrade allow him to both draw aggro away from your Focus (enabling easier crits from back attacks), and Healing Light+ and Twinkle Rain make him a full healer, while Critical Smash II can be put on another character to provide some debuffs to crits.
Final Thoughts :The Lord is the perfect image of a hybrid Focus/Support. Pair him with another hybrid Focus/Support and you can swap between the two as their CS gauges fill from their passive abilities.
As I said above, he should be able to shrug off a fair amount of abuse, so the AI should be able to fight as him pretty decently.
Compared to the Paladin, the Lord’s main draws are Healing Light+, Twinkle Rain, Attack Boost ALL II, and Defense Boost ALL. It looks like the Lord could either serve as your only needed healer (with fewer synergies than the Paladin has) alongside a pure Focus or a hybrid Focus/Support.
Duran Dark-Dark (Swordmaster)
Dark-Light (Edelfrei / Swordmaster):
- His locked ability says “Weapon efficiency increased by 15%”, which sounds like it simply makes him deal more damage with attacks. Helpful!
- He gets Stone/Lightning/Ice/Flame Saber+, which you can use to overwrite Dark saber when BR casts it on you (for 50% damage, instead of -100%) if you don’t want to use / run out of Stardust Herbs. He also has Leaf and Moon Saber, which aren’t useful vs BR (he’s immune), but maybe they’re worth it against the summoned demons? (Probably not)
- Counter (STR 2) helps him fill the Focus role better.
- Break Armor (STR 4) is a chain ability that lets your Focus get through BR’s armored form, although it should be easy enough to break through normal methods.
- Lucky Break (LUCK 2) should help you avoid stunlocks from certain dangerous spells to keep on fighting.
- Provoke (LUCK 4) is helpful if you want a second Focus to deal more crits, but Duran’s Dark classes might not have the defenses to take the hits this will cause while still fighting. It works much better on his Light classes.
- Guard Saber (INT 12) is a chain ability with a confusing description (“Opponent’s saber magic and corresponding elemental damage decreased by 15%”). Does that mean that the character with this ability takes 15% less elemental damage (from spells and sabers)? Does it mean that the entire party gets that benefit? Does it only reduce spell damage taken if the enemy has a saber cast on them? (Could someone provide some info on what this actually does?)
- Attack Saber (STR 9) and Attack Saber II (STR 21) offset the penalty of using his elemental sabers to overwrite Dark saber when BR casts it on him, but I think you’ll still be doing a little less than full damage (just Attack Saber II makes you do about 75% of normal damage, I haven’t tested with both). Fraction (INT 21) is a chain ability that has to do something, and the description (“Damage to enemy with moderate Elemental Resistance increased by 150%”) makes it sound like it increases elemental damage to either neutral targets (in which case, it’s not helpful here) or resistant targets (like BR). If it works with resistant targets, then these three ability combined should give something like +20% to +50% damage with an elemental saber, compared to normal attacks. (Could someone let me know if they figure out what this actually does?)
- Concentrate (LUCK 21) and Flourish (LUCK 27) can help his damage. But since you still need to hit the target from behind to get a crit (could someone correct me if I’m wrong on this?), these are only moderate damage buffs. Since Flourish is a Chain ability, it could work if you had a second Focus to take advantage of the increased crit rate provided by Provoke on Duran.
- Offensive Stance (STR 27) is either really good or really bad, depending on a variety of factors that I’d have to test with to determine (Does it lower just DEF, or also MDEF? Can he still survive a hit from various spells with this on?, etc)
- Broken Lines (LUCK 9) helps up your damage if you don’t have Dark Riesz / Dark Hawkeye / the correct item to cause a Defense debuff.
Focus Rating: 8.5/10 to 10/10 – He’s Duran, he bashes things in the face with a sword. He doesn’t have enough ways to fill his CS gauge or quickly eliminate summoned demons for me to rank him at a 9 (see the notes below about potential things that might change that).
Support Rating: 0/10 to 7/10 – There are enough factors about the Swordmaster that I’m not confident on the workings of that you’ll need to read my caveats below.
*Note:His Support Rating might be higher (+5/10 or so) if the combination of Attack Saber I &II + Fraction actually increases damage dealt above base damage. That would also increase his Focus Rating by +1/10, as it would allow him to constantly have Ice Saber up to quickly cut down the demons.
*Note:His Support Rating might be higher if Guard Saber works to protect one character (+1/10) or the whole party (+2/10) against BR’s spells.
*Note:His Focus Rating would be higher (+0.5/10) if Offensive Stance gives him enough of a boost in physical damage (without making him too flimsy) to make a noticeable difference in the fight.
Final Thoughts :His ratings fluctuate a lot, based on how little I currently understand about how the Swordmaster’s abilities work. Hopefully, someone can fill in some gaps.
Compared to the Duelist, the Swordmaster’s main draws for the BR fight are (assuming the Attack Saber I &II + Fraction combo works well) the ability to use elemental sabers for increased damage. It doesn’t appear that BR puts Dark Saber on your whole team, so the difference between Swordmaster’s multi-target and the Duelist’s single-target versions doesn’t seem particularly relevant.
Pairing the Swordmaster with Dark Hawkeye lets Hawkeye take advantage of Duran’s Provoke and Enigma (LUCK 2) + Flourish to get easy, high-damage crits. Hawkeye fills the gaps in the Swordmaster’s worst-case suite by using Water Diversion to kill the demons in 2 casts (which comes out pretty fast), and debuffing BR the whole fight.
If the Swordmaster’s full support suite works, then pairing him with any Focus or hybrid Focus/Support would make the fight go by pretty dang fast.
Duran Dark-Dark (Duelist)
Dark-Dark (Duelist):
- His Locked Ability increased his Attack after defeating an enemy, which should work nicely with the demons BR summons. It’s really good if this stacks with Attack buffs from Light Riesz / items, but still OK otherwise. The Duelist also has a higher STR than the Swordmaster, but I’m not sure who deals more damage per hit between their raw stats, Locked Abilities, and class equipment.
- He gets Stone/Lightning/Ice/Flame Saber, which you can use to overwrite Dark saber when BR casts it on you (for 50% damage, instead of -100%) if you don’t want to use / run out of Stardust Herbs.
- Counter (STR 2) helps him fill the Focus role better.
- Break Armor (STR 4) is a chain ability that lets your Focus get through BR’s armored form, although it should be easy enough to break through normal methods.
- Lucky Break (LUCK 2) should help you avoid stunlocks from certain dangerous spells to keep on fighting.
- Provoke (LUCK 4) is helpful if you want a second Focus to deal more crits, but Duran’s Dark classes might not have the defenses to take the hits this will cause while still fighting. It works much better on his Light classes.
- Guard Saber (INT 12) is a chain ability with a confusing description (“Opponent’s saber magic and corresponding elemental damage decreased by 15%”). Does that mean that the character with this ability takes 15% less elemental damage (from spells and sabers)? Does it mean that the entire party gets that benefit? Does it only reduce spell damage taken if the enemy has a saber cast on them? (Could someone provide some info on what this actually does?)
- Attack Saber (STR 9) offsets the penalty of using a saber somewhat, but wit
- Attack Saber (STR 9) somewhat offsets the penalty of using his elemental sabers to overwrite Dark saber when BR casts it on him, but you’ll still be doing a little less than full damage (I think it comes out to about 65%, but I’ve only tested with Charlotte’s Attack Saber II (Light-either STR 27)). Fraction (INT 21) is a chain ability that has to do something, and the description (“Damage to enemy with moderate Elemental Resistance increased by 150%”) makes it sound like it increases elemental damage to either neutral targets (in which case, it’s not helpful here) or resistant targets (like BR). If it works with resistant targets, then these two ability combined should give something like in the range of -10% to +15% damage with an elemental saber, compared to normal attacks. (Could someone let me know if they figure out what this actually does?)
- Broken Lines (LUCK 9) helps up your damage if you don’t have Dark Riesz / Dark Hawkeye / the correct item to cause a Defense debuff.
- Wound (STR 21) is a risky tradeoff, but probably works in your favor if you have a good healer (or two). Assuming, of course, that there isn’t some stupid interaction with his tier 4 power attack (the basic combo you get when unlocking his 3rd class) making multiple attacks that each cost 5% of your HP. (Could anyone clarify how this works?)
- Rage (STR 27) means that you’ll be dealing max damage by the end of the fight.
- Victory Heal II (STA 27) gives the Duelist the ability to heal a sizeable 20% HP each time he kills a demon, which might allow you to go without a healer altogether (granted, your allies will die, but eh. Embrace the dark side.), or make up for the extra damage he’s causing himself with Wound.
- Flourish (LUCK 21) is a chain ability that would let a second Focus to take advantage of the increased crit rate provided by Provoke on Duran. Or slap it on the Duelist (without Provoke) and try to use normal maneuvering to get crits.
- Forsake II (LUCK 27) gives the Duelist an impressive 20% chance to take 0 damage from any source. Helpful!
Focus Rating: 9/10 – He’s Duran, he bashes things in the face with a sword. Wound and Rage might actually bump his damage up enough that he can quickly dispatch the summoned demons, (which is my criteria for a 9/10 Focus Rating), while Victory Heal II and Forsake should help make up for the extra damage he’s causing himself (alongside your government sanctioned healer, of course).
Support Rating: 1/10 to 3/10 – If Guard Saber works to reduce damage taken from BR’s spells, then he can help protect someone else a little (giving +2/10). Otherwise, having Provoke lets another Focus get some more crits, so he’s not absolutely worthless at supporting your party. Just… mostly worthless.
Final Thoughts: The Duelist looks to be a melee power-house. He’ll deal damage fine, and actually has some good self-healing / damage avoidance.
Compared to the Swordmaster, the Duelist’s main draws for the BR fight are Wound, Victory Heal II, Forsake II, and (if it works for BR’s magic) Guard Saber II on himself. Unlike the Swordmaster, there isn’t an interpretation of Attack Saber that makes it work with Fraction to be better
Pairing the Duelist with Dark Hawkeye lets Hawkeye take advantage of Duran’s Provoke and Enigma (LUCK 2) + Flourish to get easy, high-damage crits. Hawkeye fills the gaps in the Duelist’s suite by using Water Diversion to kill the demons in 2 casts (which comes out pretty fast), and debuffing BR the whole fight.
Angela Light-Light (Grand Diviner)
Light-Light (Grand Diviner):
- Her 2nd class’s locked ability is of questionable utility in this fight, and her 3rd does nothing.
- Magic Recoil (STR 4) give a higher chance to stun enemies with spells. I don’t know if that works on BR, but it could help with the demons.
- Spell Guard (STA 6) makes you take less damage if you get hit while casting.
- Cast Resist I and II (STA 12 and 27) give a combined 50% damage reduction when casting. Which might mean she takes 50% less damage from all spells, or it might mean she takes 50% less damage while she is casting. I’m not really certain.
- Limit Break I and II (INT 4 and 27) give her a combined +30% damage (or +25% for just Limit Break II).
- Doppelganger (INT 33) is less powerful than the Archmage’s Glitter Dust (INT 33).
- Move MP Saver (SPRT 12) reduces her mana cost by 30%, which combines with some combination of Reclaim I and II (STR 6 and 12) to let her use power attacks to recover a lot of MP rather than relying entirely on Faerie Walnuts. Bless (LUCK 9) also works, but has diminishing returns with Move MP Saver.
- Elemental Reduction (SPRT 27) says “Opponent’s elemental damage decreased by 20%”, which should apply to most damage you take from BR.
- Enigma (LUCK 4) means that the enemies will target her less, giving you more time to cast spells, and an easier time getting back attacks to crit with. Offense and defense in one package! Combine with Provoke (LUCK 4) on Duran to double that effectiveness (probably).
- Pinpoint II (LUCK 27) gives her a good crit chance, which combines with Enigma for better damage.
Focus Rating: 5/10 – She can kill the demons easily, but will likely go through a decent number of Faerie Walnuts even with all of her MP reduction abilities, or will have to spend a good chunk of time spamming power attacks just to cast more spells.
Support Rating: 4/10 to 6/10 – She doesn’t have anything to give under AI control, but you can always cast her spells from the menu while controlling your Focus character to either kill of the summoned demons, or to just aid in your BR smackdown (although that does get into a bit of a micromanagement headache). If Elemental Reduction actually reduces the damage BR does with his spells to your entire party (rather than just her), that bumps her up to a 6/10.
Final Thoughts: This is just not the class to fight BR. Anything in here that is good is done better by either the Archmage or the Magus, unless Elemental Reduction applies to the whole party. Out of the context of fighting BR, this is a good class, though. At the very least, it’ll make getting to BR pretty easy.
Compared to the Archmage, the Grand Diviner’s main draws for the BR fight are Elemental Reduction and Pinpoint II – although the extra crit chance probably won’t add up to the same amount of damage the Archmage gets from Judge (STR 27).
Angela Light-Dark (Archmage)
Light-Dark (Archmage):
- Both her 2nd and 3rd class’s Locked Abilities aren’t particularly helpful during the fight, but will occasionally make one spell deal more damage if you’re casting spells from full MP, or give you back a chunk of MP if you almost die. If only the two abilities had any synergy…
- Magic Recoil (STR 4) give a higher chance to stun enemies with spells. I don’t know if that works on BR, but it could help with the demons.
- Judge (STR 27) is a chain ability that gives +20% damage to boss monsters, like BR.
- Spell Guard (STA 6) makes you take less damage if you get hit while casting.
- Cast Resist I and II (STA 12 and 27) give a combined 50% damage reduction when casting. Which might mean she takes 50% less damage from all spells, or it might mean she takes 50% less damage while she is casting. I’m not really certain.
- Limit Break I and II (INT 4 and 27) give her a combined +30% damage (or +25% for just Limit Break II).
- Glitter Dust (INT 33) deals non-elemental damage, which should actually hurt BR. It might even interrupt BR’s spells (other than the channeled spells).
- Move MP Saver I and II (SPRT 12 and 27) reduces her mana cost by 70%, which combines with some combination of Reclaim I and II (STR 6 and 12) to let her use power attacks to recover MP rather than Faerie Walnuts, potentially letting you go into battle with a different item. Bless (LUCK 9) also works, but has diminishing returns with Move MP Saver.
- Magic Armor (LUCK 2) gives her a 15% chance to avoid most of what BR throws at her.
- Enigma (LUCK 4) means that the enemies will target her less, giving you more time to cast spells, and an easier time getting back attacks to crit with. Offense and defense in one package! Combine with Provoke (LUCK 4) on Duran to double that effectiveness (probably).
Focus Rating: 7/10 – She has enough MP reductions that she should actually be able to cast Glitter Dust a bunch, and can easily kill the demons with Spike Freeze (INT 21).
Support Rating: 4/10 – If you leave her on “Exclusively Protect”, you can just have her fire off a spell whenever you need to kill a demon. Otherwise, she doesn’t provide any support.
Final Thoughts: This is the most mana efficient of Angela’s classes, meaning that it should be the least headache to pilot through the fight. It’ll serve you well in getting to BR, as well. She still probably isn’t as useful as a Focus character as a Duran or Hawkeye would be.
Compared to the Grand Diviner, the main draws for the BR fight are Move MP Save II, Glitter Dust, and Judge.
Angela Dark-Light (Rune Seer)
Dark-Light (Rune Seer):
- Her Locked Ability gives her a 30% chance to avoid status effects, which is helpful in this fight (unlike most of her other class’s Locked Abilities).
- She doesn’t have a non-elemental spell, and I’m pretty sure that BR is immune to status effects, so you don’t have much going for you here.
- Magic Recoil (STR 4) give a higher chance to stun enemies with spells. I don’t know if that works on BR, but it could help with the demons.
- Cheat (STR 27) increases damage by 20% if she’s over level 87.
- Total Resistance (STA 27) is a chain ability that makes one character immune to status effects. Give this to someone with Twinkle Rain, since she already has 30% resistance.
- Limit Break (INT 4) increased magic damage slightly.
- Special Effect II (INT 27) deals 40% more damage to enemies with status effects. However, BR seems to be immune to them. If he wasn’t, you’d want to combine this with something like the chain ability Toxic (Hawk INT 4) that lets you poison enemies with power attacks.
- Magic Armor (LUCK 2) gives her a 15% chance to avoid most of what BR throws at her.
- Enigma (LUCK 4) means that the enemies will target her less, giving you more time to cast spells, and an easier time getting back attacks to crit with. Offense and defense in one package! Combine with Provoke (LUCK 4) on Duran to double that effectiveness (probably).
Focus Rating: 2/10 – She doesn’t have any non-elemental spells, and most of her damage buffs don’t apply to BR.
Support Rating: 4/10 – If you leave her on “Exclusively Protect”, you can just have her fire off a spell whenever you need to kill a demon. Otherwise, she doesn’t provide any support.
Final Thoughts: This is just not the class to fight BR. Anything in here that is good is done better by one of her other classes.
Angela Dark-Dark (Magus)
Dark-Dark (Magus):
- Her Locked ability increases Magic attack by 20% for a while if an ally faints, which is, again, helpful, but not proactive.
- Magic Recoil (STR 4) give a higher chance to stun enemies with spells. I don’t know if that works on BR, but it could help with the demons.
- Spell Resistance (STA 27) keeps you from getting stunned out of casting (most of the time).
- Limit Break (INT 4) increased magic damage slightly.
- Wound Magic All (INT 27) increases her spell damage by 60-90% (depending on if it counts her as an ally) for 2% of each ally’s HP. Combined with a Healing Light+ healer, that’s some decent damage.
- Ancient Curse (INT 33) is Pwr 600, the strongest spell available to her, and is non-elemental, too.
- Damage MP Boost (SPRT 27) recovers 2% MP when you take damage. Helpful, but it won’t replace your need for Faerie Walnuts.
- Magic Armor I and II (LUCK 2 and 27) combine for 45% chance to ignore BR’s spells!
- Enigma (LUCK 4) means that the enemies will target her less, giving you more time to cast spells, and an easier time getting back attacks to crit with. Offense and defense in one package! Combine with Provoke (LUCK 4) on Duran to double that effectiveness (probably).
Focus Rating: 6/10 – Her spells are going to eat a fair chunk of mana, and they’re going to hurt her a bit, but they’re the strongest of anything Angela has.
Support Rating: 4/10 – If you leave her on “Exclusively Protect”, you can just have her fire off a spell whenever you need to kill a demon (just make sure to take off Wound Magic and Wound Magic All to keep her from being an HP drain). Otherwise, she doesn’t provide any support.
Kevin (W.I.P.)
—
Charlotte (W.I.P.)
—
Hawkeye (W.I.P.)
—
Riesz Light-Light (Vanadis)
Light-Light (Vanadis):
- Her 2nd class’s Locked Ability gives 1% to CS gauge each time she hits with a normal attack, which is useful if she’s your Focus, but the 3rd class’s Locked Ability doesn’t help here.
- Counter (STR 4) buffs your strength by 10% (which stacks with buff spells) for a while after you get hit, which means it should be active the whole fight.
- Attack Boost All (STR 12) gives your party 3% increased attack, which could add up. If you’re using her as support, she probably has the slots to take advantage of this.
- Light of Guidance (STR 27) gives +7% attack to all allies while they’re above 50% HP (or maybe while Riesz is above 50% HP, it’s not clear from the ability). Regardless of how this works, it’ll be active most of the fight, unless you’re losing badly.
- Interception (STA 4) reduces the damage BR does when targeting the player by 5%. Probably not enough to matter, since BR’s dangerous attacks are either doing way too much damage, or are stunlocking you.
- Light of Refuge (STA 33) gives +7% defence to all allies while they’re above 50% HP (or maye while Riesz is above 50% HP, it’s not clear from the ability). The fact that it turns off once you start taking damage makes it a little less reliable, but you should use it anyways.
- Stat Boost (INT 9) gives 8% increased stat boosts. Since this buffs Offense and Defense for the whole party, it’s useful to have.
- Freya (INT 21) is basically an AOE CS as a move. It’s non-elemental, which is great, and it can probably cause BR to cancel some of it’s attacks/spells, just like CS’s do.
- Auto-HP Heal All (INT 27) restores 1% HP to each ally every 10 seconds. That sounds like such a slow recovery rate that I can’t see the point of it.
- Payback (SPRT 4) gives you 2% CS each time you get hit. Probably not enough to matter.
- Protection / Mental Boost / Strengthen (SPRT 9) let you buff one ally at a time. You’ll need to cast it 9 times at the start of the fight, and another 3 times each time you have to use a Stardust Herb to remove Dark Saber. That sounds terrible, but if the AI is set to “Exclusively Protect”, it’ll save you the headache of applying those buffs.
- Damage CS Boost III (SPRT 21) gives 7% to the CS gauge each time she takes damage. That’s a good chunk, but would be better if she had Provoke (Duran LUCK 2), in order to serve as a hybrid Focus/Support you switch to in order to unleash a heavy CS every now and then.
- Oracle (SPRT 27) increases all stats when you use a CS, which is great if she’s your focus. Or redundant, if it doesn’t stack with the normal buffs she can give.
- Forsake (LUCK 2) ignores damage 5% of the time. More helpful than Interception.
- Pinpoint (LUCK 4) is a chain ability that increases one character’s crit chance by 10%, which might be consistent enough with Provoke (Duran LUCK 2) and/or Enigma (Hawk/Angela LUCK 2), if you give it to the Enigma-bearer.
- Magic Smash (LUCK 9) is a chain ability that gives crits 30% chance to reduce Magic Attack and Magic Defense. Give it to the same person as Pinpoint, and now you don’t have to worry about Sahagin Scales to lower BR’s damage potential.
- Bountiful (LUCK 12) increases healing item’s effectiveness by 20%, which can help with Poto Oil and Chocolate if you’re relying on those rather than someone with Healing Light+.
- Extra Potent (LUCK 21) is a chain ability that reads “Also gain the status increase effect yourself”. If it wasn’t a chain ability, I’d be confident in saying that it means that Riesz applies any buff to herself, regardless of who she casts it on. As a chain ability, I’m suddenly hesitant about what it actually does, and I don’t know if the AI would intelligently utilize this ability if you use it. (Could someone help me understand what this actually does?)
- Random Buff (LUCK 27) reads “Randomized status effect when stat is increased with move”. I briefly played with this (on an alternate save file) and couldn’t figure out what it’s actually doing. (Could someone help me understand what this actually does?)
Focus Rating: 5/10 – She doesn’t have anything in particular here that makes her a good Focus, but Magic Smash makes whoever your Focus character is better. I actually down-rated her from a 7/10 to a 5/10 simply because, as your Focus, you’d have to manually cast all of the 7 – 9 single-target buffs every so often just to keep them active, since they have an expiration timer.
Support Rating: 8/10 – She provides a lot of support from the buffs, and the AI should be pretty good about keeping them active (although you might need to toss her some Faerie Walnuts to keep her mana up).
Final Thoughts: I’m trying to think of something good to say about the Vanadis, but I can’t. Everything I want from it is handled so much more elegantly in the Starlancer.
Compared to the Starlancer, the Vanadis’ main draws are Damage CS Boost III, Oracle and Random Buff. If you weren’t required to spend so much time casting buffs and keeping them active, this would help make the Vanadis a hybrid Focus/Support. But the combination of single-target buffs and the fact that they expire just sinks that ship.
Riesz Light-Dark (Starlancer)
Light-Dark:
- Her 2nd class’s Locked Ability gives 1% to CS gauge each time she hits with a normal attack, which is useful if she’s your Focus. Her 3rd class’s Locked Ability makes her buffs last until you have to use a Stardust Herb, which is nice – but would be MUCH more useful on the Vanadis, and apply some kind of balance (cast 3x the spells at the start, but never have to reapply them vs being able to apply buffs quickly but needing to reapply them). It confuses me, like many other things when comparing the two classes, but I’ll stop editorializing (unless someone can give me a good reason for why this is, in which case I’ll give you lots of internet points and eat my crow – and no, I don’t think having an AOE CS is a good reason; in fact, that feels misplaced to me as well, since it implies that the Vanadis is better against multiple opponents, which would make sense to apply to the class with the speedy buff application. Ok, now I’ll stop rambling. But I shudder to think what I’ll say in the Final Thoughts below..).
- Counter (STR 4) buffs your strength by 10% (which stacks with buff spells) for a while after you get hit, which means it should be active the whole fight.
- Attack Boost All I &II (STR 12 and 27) gives your party a combined 10% increased attack without any preconditions, which helps your Focus do more damage. If you’re using her as support, she probably has the slots to take advantage of this.
- Interception (STA 4) reduces the damage BR does when targeting the player by 5%. Probably not enough to matter, since BR’s dangerous attacks are either doing way too much damage, or are stunlocking you.
- Defense Boost All (STA 27) increases all allies’ defense by 7%, without any preconditions.
- Stat Boost (INT 9) gives 8% increased stat boosts. Since this buffs Offense and Defense for the whole party, it’s useful to have.
- Seraph (INT 21) is basically an AOE CS as a move. It’s non-elemental, which is great, and it can probably cause BR to cancel some of it’s attacks/spells, just like CS’s do.
- MGC Boost All (INT 27) increases your party’s magic damage by 5%. Useful if you’re casting her summon or using Angela / Hawk.
- Payback (SPRT 4) gives you 2% CS each time you get hit. Probably not enough to matter.
- Protection+ / Mental Boost+ / Strengthen+ (SPRT 21) are the reason you picked Light Riesz to start with. They apply to the whole party at once, and never expire – so they only need to be recast if you use a Stardust Herb to remove Dark Saber.
- MGC DEF Boost All (SPRT 27) Increases all allies’ magic defense by 5%.
- Forsake (LUCK 2) ignores damage 5% of the time. More helpful than Interception.
- Pinpoint (LUCK 4) is a chain ability that increases one character’s crit chance by 10%, which might be consistent enough with Provoke (Duran LUCK 2) and/or Enigma (Hawk/Angela LUCK 2), if you give it to the Enigma-bearer.
- Magic Smash (LUCK 9) is a chain ability that gives crits 30% chance to reduce Magic Attack and Magic Defense. Give it to the same person as Pinpoint, and now you don’t have to worry about Sahagin Scales to lower BR’s damage potential.
- Bountiful (LUCK 12) increases healing item’s effectiveness by 20%, which can help with Poto Oil and Chocolate if you’re relying on those rather than someone with Healing Light+.
- Good Luck (LUCK 21) has a 30% chance of a buff increasing a stat by +15%. Which is one of the many things that’s weird about this class, ‘cause you’d think the thing that happens sometimes when you cast a buff would be on the class that’s casting lots more buffs… But otherwise, sure, if you have room, use it. I don’t have any idea how to tell if it’s working or not.
Focus Rating: 7/10 – She has nothing particularly noteworthy to add here, other than her decent attack (particularly once buffed). She isn’t tough enough to let the AI attack with her, but she’ll be fine if you’re controlling her yourself.
Support Rating: 8/10 – She provides a lot of support from the buffs, and the AI is pretty good about keeping them active, for when you have to wipe them to remove Dark Saber.
Final Thoughts: This is a great class, and provides a lot of power, either as a Focus or a Support.
Compared to the Vanadis, the Starlancer has everything going for her, other than the lack of a full-screen CS (which isn’t too big a problem, since she still has summons, and hers doesn’t delete your XP and lucre). Starlancer buffs only need to be cast once per fight, rather than 3 times every time they expire. Attack Boost All II and Defense Boost All don’t turn off when you take damage, unlike the Vanadis version, and the Starlancer has the MGC Boost All and MGC DEF Boost All, which Vanadis lacks entirely. Starlancer also has a chance to have better buffs (Good Luck) and to reflect debuffs which would wipe your buffs (Down Side), both of which the Vanadis compensates for with the poor-man’s version of multi-target buffs (Extra Potent) and whatever the heck Random Buff is supposed to do.
Riesz Dark-Dark (Fenrir Knight)
Dark-Dark (Fenrir Knight):
- Her 2nd class’s Locked Ability is irrelevant to the BR fight, while her 3rd class’s Locked Ability means you don’t have to recast debuffs very often, which is only marginally useful.
- Counter (STR 4) buffs your strength by 10% (which stacks with buff spells) for a while after you get hit, which means it should be active the whole fight.
- Attacker (STR 27) is a chain ability that increases her attack by 30, and lowers her defense by 30. If you’re controlling the recipient, that’s probably a trade you can live with.
- Interception I &III (STA 4 and 27) (the later version is a chain ability) reduces the damage BR does when targeting the player by 5% and 20%, respectively. While Interception I probably isn’t worth it, Interception III looks like it would pair well with one of Duran’s Light classes using Provoke.
- Defense Help (STA 12) increases her defense by 20% when she’s almost dead, which is helpful.
- Super Stat Down I &II (INT 9 and 27) increases the potency of your debuffs by 5% and 7% respectively. I don’t know why they’re chain abilities, though.
- Hexas (INT 21) is basically an AOE CS as a move. It’s non-elemental, which is great, and it can probably cause BR to cancel some of it’s attacks/spells, just like CS’s do.
- Down Time (INT 12) increases the duration of your debuffs by 50%, which is nice, but I could also live without it (since you’re only debuffing BR).
- Payback (SPRT 4) gives you 2% CS each time you get hit. Probably not enough to matter.
- Defenseless+ / Enfeeble+ / Weaken+ (SPRT 21) are your debuffs. They’re helpful, but probably not as useful as Dark Hawk’s debuffs. You can also reproduce these with items. The fact that they’re multi-targetted doesn’t matter in the BR fight, except for use with Stat Down CS Boost (SPRT 27) which makes each debuff give her 30% CS gauge if a demon is out (15% if only BR is on the field). (Again, I question why this is on the class that has non-expiring skills, but at least this works fine for filling up her CS gauge really fast during non-boss fights.)
- Forsake (LUCK 2) ignores damage 5% of the time. More helpful than Interception.
- Pinpoint (LUCK 4) is a chain ability that increases one character’s crit chance by 10%, which might be consistent enough with Provoke (Duran LUCK 2) and/or Enigma (Hawk/Angela LUCK 2), if you give it to the Enigma-bearer.
- Magic Smash I &II / Critical Smash (LUCK 9 and 21 / 12) – Magic Smash I is a chain ability, but all three reproduce her debuffs, and thus aren’t important. (Unless someone can point out that they stack with Enfeeble / Weaken or with each other, in the case of Magic Smash I &II).
- Bad Luck (LUCK 27) gives a 30% chance of decreasing a stat by an additional 7%. (Again, I question why this is on the class that with AOEs)
Focus Rating :8.5/10 – Attacker gives her a leg up on her other classes, but at it’s heart, she’s a no-frills attacker after the first few moments of debuffing.
Support Rating :6/10 – Given that you can reproduce her stat downs with items, and you only need single-targetting in the BR fight, she doesn’t provide as much support as her Light classes. Also, I’m not certain if the AI will automatically apply the debuffs (for the couple of times where BR buffs his magic during the fight).
Final Thoughts :Overall decent, although I would rather have a Starlancer and/or Dark Hawk, or even a Dragon Master.
Compared to the Dragon Master, the Fenrir Knight gets Attacker, Interception III, and Bad Luck. Given that I don’t know how to determine if Bad Luck applied (and thus when to recast the debuff if it didn’t), I don’t think the Fenrir Knight has much going for it (unless you want to use the higher INT and Hexas).
Riesz Dark-Light (Dragon Master)
Dark-Light (Dragon Master):
- Her 2nd class’s Locked Ability is irrelevant to the BR fight, while her 3rd class’s Locked Ability gives her +20% attack while at full health. With a little prodding, your AI healer should be able to keep you topped off.
- Counter (STR 4) buffs your strength by 10% (which stacks with buff spells) for a while after you get hit, which means it should be active the whole fight.
- Interception (STA 4) reduces the damage BR does when targeting the player by 5%. Probably not enough to matter, since BR’s dangerous attacks are either doing way too much damage, or are stunlocking you.
- Defense Help (STA 12) increases her defense by 20% when she’s almost dead, which is helpful.
- Super Stat Down I &II (INT 9 and 27) increases the potency of your debuffs by 5% and 7% respectively. I don’t know why they’re chain abilities, though.
- Down Time (INT 12) increases the duration of your debuffs by 50%, which is nice, but I could also live without it (since you’re only debuffing BR).
- Jormungandr (INT 21) is basically an AOE CS as a move. It’s non-elemental, which is great, and it can probably cause BR to cancel some of it’s attacks/spells, just like CS’s do. It could apply poison, which is the only status effect that I could imagine working on BR (but I don’t think it does). (Could someone verify if any status effects work on BR?)
- Payback (SPRT 4) gives you 2% CS each time you get hit. Probably not enough to matter.
- Defenseless / Enfeeble / Weaken (SPRT 9) are your debuffs. They’re helpful, but probably not as useful as Dark Hawk’s debuffs. You can also reproduce these with items.
- Stat Down CS Boost (SPRT 27) makes each debuff she applies her 15% CS gauge.
- Summon CS Boost (SPRT 27) gives her 25% of her CS gauge when she casts Jormungandr, which seems pretty nifty.
- Forsake (LUCK 2) ignores damage 5% of the time. More helpful than Interception.
- Pinpoint (LUCK 4) is a chain ability that increases one character’s crit chance by 10%, which might be consistent enough with Provoke (Duran LUCK 2) and/or Enigma (Hawk/Angela LUCK 2), if you give it to the Enigma-bearer.
- Magic Smash / Critical Smash (LUCK 9 and 12) – the first one one is a chain ability, but both reproduce her debuffs, and thus aren’t important. (Unless someone can point out that they stack with Enfeeble / Weaken).
- Random Debuf II (LUCK 21) gives a 20% chance for a random debuff on each power attack hit. It would be nifty on any other class.
- Opposite Effect (LUCK 27) is a chain ability that reads “Triggers opposite effect when stat is decreased with move”, which I believe means that if she debuffs attack, she’ll also buff her own attack. This works out pretty well to make her a good Focus character.
Focus Rating: 8.5/10 – Opposite Effect isn’t quite enough to kill demons fast enough for my liking to rate her at a 9, but it does it’s duty.
Support Rating: 6/10 – Given that you can reproduce her stat downs with items, and you only need single-targetting in the BR fight, she doesn’t provide as much support as her Light classes. Also, I’m not certain if the AI will automatically apply the debuffs (for the couple of times where BR buffs his magic during the fight).
Final Thoughts: Overall decent, but I would rather have a Starlancer and/or Dark Hawk.
Compared to the Fenrir Knight, the Dragon Master has Summon CS Boost and Opposite Effect, which means A) you get more benefit from casting your summon than the Fenrir Knight, and B) you get more from Opposite Effect than the Fenrir Knight does from Attacker.