
Vollständiger Leitfaden für VirtuaVerse + 100 % Leistungsleitfaden.
Allgemeine Informationen
Hallo und willkommen zu meinem vollständigen, 100%igen Leistungsleitfaden für VirtuaVerse. Ich werde versuchen, alles, was ich herausgefunden habe, in meinem eigenen Durchspielen abzudecken.
VirtuaVerse ist ein Point-and-Click-Abenteuerspiel, und wie viele traditionelle Point-and-Click-Abenteuerspiele ist es sehr anfällig für das, was ich „Flaschenhals“ nenne. Ein spezifisches Element, das den Spieler davon abhält, Fortschritte zu machen. In diesem Spiel gibt es viele Engpässe, und ich werde versuchen, alle Punkte hervorzuheben, die am problematischsten zu sein scheinen.
Was die Errungenschaften betrifft:Sie erhalten 30 der verfügbaren 33 Errungenschaften, indem Sie einfach der Geschichte des Spiels folgen, daher würde ich nicht jede Errungenschaft notieren, die Sie auf dem Weg erhalten. Es gibt drei „geheime“ Achievements:„Karma Boost“, „Hardware Engineer“ und „Scammed!“ und ich werde sicherstellen, dass ich ihnen im Leitfaden erkläre, wie man sie bekommt.
In der gesamten Anleitung verwende ich „Talk with“. Wenn ich das verwende, bedeutet das, dass Sie mit dieser Person über alle verfügbaren Gesprächsoptionen sprechen müssen.
Wohnung
Das Spiel beginnt mit der Hauptfigur (Nathan) in seiner Wohnung.
Ihr Ziel in diesem Teil ist es, die Wohnung zu verlassen.
- Heben Sie das Hoverboard auf (neben dem Bett).
- Nehmen Sie die Nudeln (neben der Spüle) auf – das ist vielleicht nicht irrelevant, aber tun Sie es trotzdem.
- Heb die Medikamente auf (neben den Nudeln).
- Sprich mit dem Strange Gizmo, gehe alle Optionen durch, um ein wenig über die Welt um dich herum zu erfahren.
- Fahren Sie mit dem Aufzug nach oben.
- Schau in den Spiegel (lies die Botschaft im Lippenstift).
- Öffne den Münzrückgeber (unter dem linken Arkadenschrank), um ein paar Münzen herauszuziehen.
- Hebe den Schraubendreher rechts auf.
- Hebe den Ultra-Handschuh der Macht rechts unter dem Schraubendreher auf.
- Versuchen Sie, die Hardware neben dem Ultra-Handschuh der Macht aufzuheben, und ein Jumper fällt auf den Boden. Abholen.
- Hebe den Besen auf.
- Benutze den Schraubendreher am Coin Returner (unter dem rechten Arcade-Schrank), um die PlaySafe-Karte zu erhalten.
- Geh mit dem Aufzug nach unten und dann nach links zum Balkon.
- Versuchen Sie es mit der Tastatur (es würde nicht funktionieren).
- Benutze den Besen auf Jays Poster (das linke Poster über dem Bett), um herauszufinden, was der Code ist.
- Benutze die Knöpfe am Bett, um die Schublade zu öffnen. Verwenden Sie den Schraubendreher an der Schublade, um sie an Ort und Stelle zu halten.
- Nehmen Sie die Kreditkarte aus der Hülle in der Schublade.
- Bring den Schraubendreher zurück.
- Geh nach links zum Balkon und interagiere erneut mit der Tastatur. Diesmal sollte es dich zu Fall bringen.
- Geh ganz nach rechts und interagiere mit dem Fahrrad. Dies sollte Sie zur Pill Street bringen.
Pill Street
Wir haben ein paar Dinge in der Pill Street zu tun, aber im Allgemeinen ist es unser Ziel, das AVR-Headset zu reparieren.
- Wenn Sie an der Pillenstraße ankommen, gehen Sie nach rechts und sprechen Sie mit dem Händler.
- Geh weiter nach rechts und rede mit dem Schmuggler.
- Interagieren Sie mit dem Terminal (links vom Händler) und versuchen Sie, mit Ihrer Kreditkarte Geld abzuheben. Beachten Sie, dass die Maschine nicht funktioniert.
- Verlassen Sie das Terminal und gehen Sie zur Backstreet (das ist die Straße, die weiter hinten liegt).
- Sprich mit dem Türsteher. Er lässt dich nicht rein.
- Achten Sie auf das Adressschild direkt gegenüber dem Türsteher.
- Geh zurück zur Main Street und benutze das Terminal erneut.
- Klicke auf Essen und bestelle jede Pizza, die du möchtest (mein bester Freund hat sich feste Salami ausgesucht, also kannst du dazu passen) zu dir nach Hause. Bezahlen Sie mit Ihrer Kreditkarte.
- Geh zurück nach Hause und geh ganz nach links, um die Pizza zu holen, dann wieder auf dein Fahrrad und zurück zur Pill Street.
- Benutze das Terminal erneut, klicke auf Essen, bestelle erneut eine Pizza, diesmal in der Chestnut Street 1 (die Adresse, an der der Türsteher steht).
- Geh zurück in die Backstreet, sieh dir die Mini-Cutscene an und gehe dann in den Laden. Der Türsteher wird gefeuert.
- Sprich mit dem Ladenbesitzer, um zu erfahren, dass du eine Batterie und neue Linsen benötigst, um dein AVR-Headset zu reparieren.
- Nehmen Sie noch im Laden, in den Regalen, wo "Neu Neu" steht, 3 Dinge mit:altes Handy, holografische Statue und Schraubendreher-Kit.
- Benutzen Sie das Terminal auf der linken Seite und heben Sie etwas Geld mit Ihrer Kreditkarte ab (soweit ich weiß, spielt der Betrag, den Sie abheben, keine Rolle).
- Verlasse den Laden, gehe zurück zur Hauptstraße und dieses Mal zur Alley (es ist die Rechtskurve in der Hauptstraße, die nicht so weit hinten ist wie die Backstreet).
- Betritt das Restaurant und sprich dort mit allen 3 Leuten (manche davon sind ziemlich ekelhaft).
- Verlassen Sie das Restaurant und gehen Sie rechts in Richtung Back Alley.
- Gib die Pizza, die wir zuvor aus unserer Wohnung geholt haben, dem Bettler, um die Errungenschaft „Karma-Schub“ zu erhalten.
- Sprich mit dem Bettler.
- Beachten Sie, wie er bei unserer Ankunft eine Brille wegwarf. Wir brauchen sie, also versuche, sie aus dem Müllcontainer zu holen, und der Bettler lässt dich nicht.
- Heben Sie den Feuerlöscher rechts auf (das ist wahrscheinlich nutzlos, aber tun Sie es trotzdem).
- Geh zurück zur Hauptstraße durch die Gasse und sprich mit dem Schmuggler. Bitten Sie ihn, eine Patrone zu kaufen.
- Verwenden Sie Medikamente beim Schmuggler, um die himmlische Patrone zu erhalten.
- Geh zurück in die Seitengasse und benutze die himmlische Patrone auf dem Bettler. Leider mag er es nicht. Sprich noch einmal mit ihm und gehe zurück zur Main Street.
- Sprechen Sie erneut mit dem Schmuggler, fragen Sie ihn nach einer stärkeren Patrone und sprechen Sie dann mit dem Händler über die Aktivatoren.
- Sprich noch einmal mit dem Schmuggler, um ihn darüber zu informieren.
- Beachten Sie, wie der Händler seinen Computer weiterhin benutzt. Das liegt daran, dass er eine Dating-Site nutzt (obwohl er verheiratet ist). Wir werden dies zu unserem Vorteil nutzen.
- Gehen Sie vorher zum Verkaufsautomaten (zwischen der Alley und der Backstreet), verwenden Sie einige der Münzen, die wir haben (das Symbol wird sowohl Papiergeld als auch Münzen sein, die Sie verwenden können), und kaufen Sie ein Getränk namens Würziger Saft.
- Verwenden Sie das Terminal und klicken Sie auf Dating. Verwenden Sie Ihre PlaySafe-Karte, um darauf zuzugreifen.
- Scrollen Sie nach unten und finden Sie einen Typen namens Sam, 36 (zweiter von links unten). Das ist der Händler.
- Chatte mit ihm und klicke unten rechts auf dem Bildschirm auf „Drucken“ (manche Leute sagen, dieser hier könnte fehlerhaft sein, aber ich hatte kein Problem damit).
- Gehe nach rechts und rede erneut mit dem Händler. Er gibt dir die Aktivatoren.
- Geh nach rechts und rede mit dem Schmuggler. Er gibt dir die 4 GB Dope Cartridge.
- Geh zurück in die Gasse. Sprich mit dem Beggar, aber er wird die neue Patrone nicht ausprobieren, also müssen wir ihn ablenken und die neue Patrone dort platzieren, ohne dass er es merkt.
- Geh zurück in die Gasse und betritt das Restaurant.
- Unser Ziel hier ist es, Ärger zu machen. Beachten Sie, wie der stille Typ rechts nur blaue Teller aufhebt, und auch, dass er uns vorher gesagt hat, dass er scharfes Essen hasst.
- Setz dich neben den dickknochigen Burschen auf den Hocker.
- Warten Sie, bis ein blauer Teller ankommt (es wird ein Teller mit Maki), und verwenden Sie den würzigen Saft darauf, um ihn zu temperieren.

- Sehen Sie sich die kurze Zwischensequenz an und gehen Sie zurück in die Alley und zurück in die Back Alley.
- Verwenden Sie die 4-GB-Dope-Cartridge auf den Cartridges (sie sind rechts neben dem Beggar gestapelt).
- Sprich noch einmal mit ihm und er wird seine Freude an der neuen Patrone haben.
- Öffne den Müllcontainer und du erhältst die Einweg-AVR-Brille.
- Geh zurück zur Hauptstraße, benutze das Fahrrad und geh zurück zum Apartment.
- Benutzen Sie den Aufzug, um in den 2. Stock zu gelangen.
- Verwenden Sie das Schraubendreher-Kit auf dem Hoverboard, um den Akku zu erhalten.
- Verwenden Sie das Schraubendreher-Kit für die Einweg-AVE-Brille, um die Linsen in Ihre AVR-Brille zu bringen.
- Verwenden Sie den Akku auf der AVR-Brille, und Sie bringen sie zum Laufen!
- Gehen Sie den Fahrstuhl hinunter und sehen Sie sich die Zwischensequenz an, um zu sehen, dass Sie noch eine andere Person verarscht haben.
- Benutze das Fahrrad, um in die Slums zu gelangen.
Die Slums
Unser Ziel in den Slums ist es herauszufinden, ob die Untergrundgruppen der Stadt uns etwas darüber sagen können, was mit Jay passiert ist.
Beachten Sie, wie Sie Ihr AVR-Headset ein- und ausschalten können. Wir werden das während des Spiels ein wenig verwenden.
- Wenn Sie in den Slums ankommen, gehen Sie zum Squat.
- Sprechen Sie mit allen. Die Autoren werden nicht in menschlicher Sprache mit Ihnen sprechen, also müssen Sie einen Weg finden, mit ihnen zu sprechen. Das heißt, unser Ziel ist es, ein Blade-Tattoo und ein Blade-Abzeichen zu bekommen. Da ist ein Typ, der sich tätowieren lässt, und ein Tätowierer. Wenn Sie mit dem Tätowierer sprechen, müssen Sie ihn nicht nach einem bestimmten Tattoo fragen. Sprechen Sie einfach mit ihm über alle weiteren Möglichkeiten.
- Sieh dir den Draht an (er liegt auf dem Boden, links neben der Tätowiermaschine).
- Berühre den Touchscreen (er ist Teil der Tätowiermaschine) und versuche, damit herumzuspielen. Der Tätowierer ließ dich die Zeichnung nicht ändern.
- Geh hinaus in die Slums und schalte dein AVR-Headset aus.
- Beachten Sie, dass dort QR-Codes an der Wand sind. Verwenden Sie Ihr altes Mobiltelefon auf einer Handvoll davon (4–5), aber stellen Sie vor allem sicher, dass Sie es auf dem QR-Code von The Blade und dem QR-Code von Onslaught verwenden.

- Aktiviere dein AVR-Headset und klicke auf den Elektrokasten (der sich links neben der Tür des Squat befindet). Es ist gesperrt.
- Sehen Sie sich die Kabel an, die den Elektrokasten mit der Innenseite der Kniebeuge verbinden.
- Klicke erneut auf den Stromkasten. Diesmal wird es sich öffnen.
- Du wirst einen Touchscreen brauchen, also lass die Kiste erstmal stehen, geh zu deinem Fahrrad und zurück zur Pill Street.
- Gehen Sie in der Pill Street in die Backstreet zu dem Geschäft, in dem wir die elektronischen Geräte gekauft haben, sprechen Sie mit dem Ladenbesitzer und holen Sie sich einen Touchscreen. Geh zurück in die Slums.
- Speichern Sie Ihr Spiel hier, wenn Ihnen Erfolge wichtig sind (nur für den Fall).
- Verwenden Sie den Elektrokasten.
- Verwenden Sie den Touchscreen auf der Touchscreen-Halterung.
- Sie müssen die Kabel in Ordnung bringen. Die richtige Reihenfolge ist (von oben nach unten):Schwarz, Gelb, Weiß, Rot.
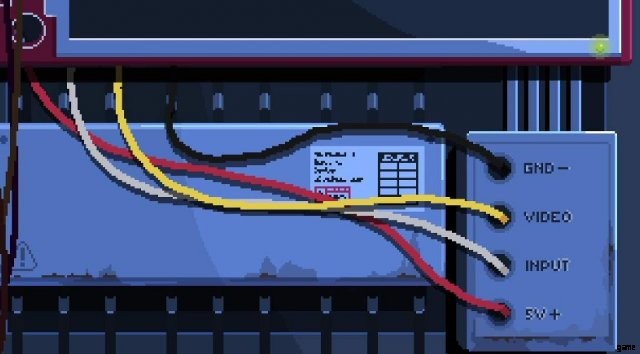
- Wenn dir das beim ersten Versuch gelingt, erhältst du die Errungenschaft „Hardware-Ingenieur“!
- Sobald es funktioniert, klicken Sie auf „Zeichnung ändern“. Ändere die Zeichnung in den QR-Code des Ansturms.
- Sehen Sie sich die Zwischensequenz an, um einen weiteren Mann zu sehen, den Sie vermasselt haben.
- Benutze dein Fahrrad und gehe zurück zur Pill Street.
- Benutze den Dead Prospect, um das Abzeichen der Klinge aufzuheben.
- Geh zurück in die Slums und benutze den Stromkasten. Ändern Sie den QR-Code zurück zu The Badge (ich bin mir nicht sicher, ob dies notwendig ist oder nicht, aber tun Sie es trotzdem).
- An diesem Punkt müssen Sie bemerkt haben, dass zufällig Leute auf der Straße herumlaufen. Wenn Sie zuvor mit den QR-Codes einer 3-4-Gruppe interagiert haben, sollten Sie in der Lage sein, mit einem der szenehaft aussehenden Mädchen, die die Straße entlang gehen, über diese Gruppen zu chatten (siehe Abbildung unten). Manchmal musst du ein paar Minuten warten, bis sie auftaucht. Erfahren Sie von ihr etwas über zufällige Dinge, die mit diesen Gruppen passieren.

- Geh zurück in die Kniebeuge.
- Sprich mit dem Tätowierer und hol dir dein Klingentattoo.
- Geh aus dem Squat, steig auf dein Fahrrad und geh zurück zur Pill Street.
- Interagieren Sie in der Hauptstraße mit dem Lagereingang (der Tür, wo der Typ gerade angeschossen wurde) und zeigen Sie ihnen Ihre Marke und Ihr Tattoo.
- Sprich mit diesem Typen und du solltest etwas Ausrüstung besorgen:Stifte, Lösungsmittel, Liquid Proof Protector Spray und ein AVR Drawing Tool.
- Verlasse diesen Ort, geh zu deinem Fahrrad und zurück in die Slums. Geh in die Hocke.
- Sprich mit dem Writer Girl über alle Optionen. Wenn Sie alle Informationen über die verschiedenen Gruppen haben, wird der Typ (Peg-Legged Writer) schließlich anfangen, normal mit Ihnen zu sprechen.
- Sie brauchen einen Beweis dafür, dass Sie mit Jay befreundet sind, also zeigen Sie dem Peg-Legged Writer die PlaySafe Card.
- Sieh dir die Zwischensequenz an und sie werden in den Club eilen. Verlasse die Kniebeuge.
- Geh direkt zu dem Typen (Boatman), der Radio mit richtig lauter Musik hört. Versuchen Sie, mit ihm zu sprechen, aber er wird Sie nicht hören.
- Geh nach links zur Holzhütte und öffne den Fensterladen. Beachten Sie, wie die Hauptfigur bemerkt, dass diese Hütte instabil erscheint.
- Verwende das Lösungsmittel auf der Holzhütte, um sie zu verbrennen.
- Geh nach rechts und sprich mit dem Bootsmann. Hilf ihm.
- Sprich noch einmal mit ihm und er bringt dich zu der Insel, auf der sich der Club befindet.
Der Club
Unser Ziel im Club ist es, Jay zu finden.
- Geh nach rechts und rede mit den Kindern, die neben dem Lagerfeuer sitzen. Sie sind seltsam. Nachdem Sie den Chat beendet haben, gehen Sie nach rechts weiter.
- Tritt in den Cubus Club ein.
- Sprich mit Elegant Clubber und mit allen anderen im Raum.
- Gehen Sie zur Bar (zweiter Eingang von links).
- Sprich vorerst mit allen außer dem Barkeeper und gehe dann zur Toilette (die Tür neben der Stelle, an der der Drone Racer steht).
- Schau dir das Poster der Alien-Königin auf der linken Seite des Raums an.
- Benutze das Urinal (wahrscheinlich nutzlos, aber tu es trotzdem).
- Verwende deine Haufen Münzen auf dem Kondomspender auf der linken Seite. Sie sollten die Meldung „Betrogen!“ erhalten. Leistung!
- Geh zurück zur Bar und dann zum Korridor.
- Geh nach rechts in die Haupthalle und sieh dir die kurze Zwischensequenz an. Sie werden danach sofort mit der Wache sprechen, also sprechen Sie mit ihm über alle Optionen. Er lässt dich nicht rein.
- Sprich mit allen in diesem Raum (BDSM-Paar und Weird Guy Trio).
- Gehe in die Dunkelkammer (der Eingang zur Dunkelkammer befindet sich auf der linken Seite des Raums).
- Benutze die grüne Tür rechts (Tür zur Dunkelkammer III). Es wird eine lustige Zeit geben, und Sie sollten sich ein Höschen besorgen. Gehe nach links, um die Dunkelkammer zu verlassen.
- Geh nach links zum Korridor.
- Sprich noch einmal mit dem eleganten Clubgänger. Sag ihm, dass du Hilfe brauchst. Wir müssen die Zugangskarte erhalten, indem wir mit Kryptowährung bezahlen.
- Geh zurück in die Bar.
- Sprich mit dem Roboter-Barkeeper.
- Kaufen Sie jedes einzelne Getränk für ihn.
- Benutze den Blut-Mario bei den Mädchen (das ist wahrscheinlich nutzlos, aber tu es trotzdem).
- Benutze alle anderen Getränke auf dem Drohnenrenner, um ihn betrunken zu machen. Auf diese Weise lässt er uns seine Drohne benutzen! Zusätzlich wird er uns eine Crypto Wallet geben.
- Geh zurück zum Roboter-Barkeeper und kaufe eine weitere Frozen Margarita.
- Verlasse die Bar und gehe ganz nach links, verlasse den Club und gehe zurück zu den Kindern neben dem Knochenfeuer.
- Fahren Sie mit ihnen um die Wette und Sie werden feststellen, dass Ihre Drohne zu langsam ist.
- Wir müssen es aktualisieren, also verwenden Sie den Jumper auf der Drohne und stellen Sie die Jumper so ein, dass sie so aussehen:
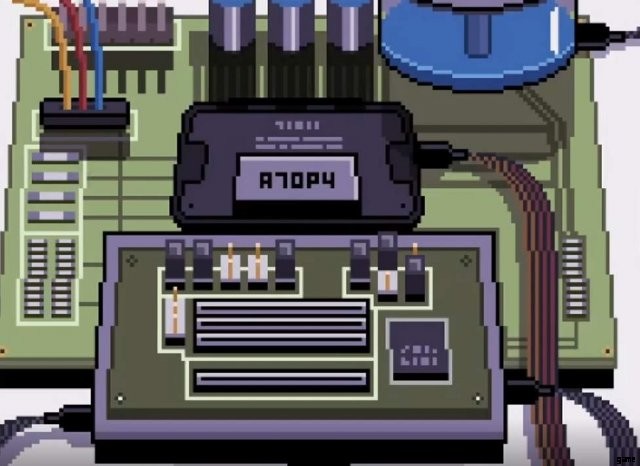
Falls Sie sich fragen, wie Sie die richtige Konfiguration finden – Sie können ein Handbuch mit der schnellsten Konfiguration von dem Händler erhalten, der mit dem Headset in der Pill Street geholfen hat. Es ist jedoch nicht erforderlich, dorthin zurückzukehren.
- Sprich noch einmal mit den Knochenfeuerkindern und du wirst feststellen, wie deine Drohne überhitzt.
- Klicken Sie erneut auf die Renndrohne in Ihrem Inventar und verwenden Sie diesmal die gefrorene Margarita auf dem Kühlmittel (die kreisförmig aussehende Komponente oben rechts auf der Hardware der Drohne).
- Fahren Sie wieder mit den Kindern um die Wette, diesmal schlagen Sie sie. Sie werden Ihrer Kryptowährungs-Brieftasche viel Geld hinzufügen.
- Geh nach rechts und zurück in den Cubus Club.
- Verwenden Sie das Cryptowallet voller Geld auf dem Elegant Clubber. Sie erhalten den AAA-Pass.
- Verwenden Sie den AAA-Pass auf dem Scanner links neben der linken Tür in diesem Raum (Kontrollzentrum, dasjenige, auf dem „Nur Mitarbeiter“ steht, wenn Sie Ihre AVR-Brille tragen).
- Sehen Sie sich den 3D-gedruckten Stuhl an und sprechen Sie dann mit The Nerd. Erfahren Sie, dass er einen großen Fetisch für Außerirdische hat, und insbesondere für die lila Königin, die wir zuvor in der Toilette gesehen haben. Beantworten Sie die Trivia-Fragen, wie Sie möchten, es ist belanglos.
- Verlasse den Raum und gehe in die Haupthalle.
- Betritt die Dunkelkammer.
- Gehen Sie ganz nach rechts in die Dunkelkammer und verwenden Sie den Touchscreen. Stellen Sie den Touchscreen auf das Modell des grünen Außerirdischen ein. Klicke erneut auf die grüne Tür (Dunkelkammer-III-Tür) und vergnüge dich noch mehr.
- Geh zurück in die Haupthalle.
- Sprich noch einmal mit dem BDSM-Paar, erzähle ihnen von der lustigen Zeit mit der grünen Alien-Kreatur. Sie werden dir sagen, dass es einen Typen gibt, der Blaupausen für diese Maschinen verkauft, also müssen wir ihn kontaktieren.
- Geh zurück zum Korridor und betritt die Bar. Auf die Toilette gehen. Sehen Sie sich die Telefonnummer oben links im Raum an.
- Verwenden Sie Ihr altes Mobiltelefon (Linksklick und nicht Rechtsklick). Sie erhalten die Blaupausen.
- Verlasse die Toilette, gehe zurück in die Haupthalle und zurück in die Dunkelkammer.
- Verwenden Sie den Touchscreen und klicken Sie unten links auf Hochladen. Verwenden Sie Ihr Telefon, um den Entwurf der Alien-Königin hochzuladen.
- Stellen Sie den Touchscreen auf die Alien-Königin und haben Sie auch Spaß mit ihr, indem Sie auf die grüne Tür (Tür zur Dunkelkammer III) klicken.
- Geh zurück zum Korridor und zurück zum Kontrollzentrum.
- Sprich noch einmal mit The Nerd, erzähle ihm von den neuen Einträgen in der Dunkelkammer.
- Sobald er gegangen ist, kannst du mit der Großen Konsole das Leben weiterer Menschen ruinieren.
- Geh nach einer kurzen Zwischensequenz nach rechts zum Korridor und dann nach rechts in die Haupthalle. Gehen Sie weiter nach rechts, bis Sie den Hacker Room erreichen. Sehen Sie sich die Zwischensequenzen an.
Das Blade-Hauptquartier
Dies ist das kürzeste Segment im Spiel. Unser Ziel hier ist es, herauszufinden, was mit Jay los ist und wie es von hier aus weitergeht.
- Beginnen Sie damit, mit allen (Jay, Ramirez und den beiden Gangmitgliedern) über alles zu sprechen. Sie erhalten eine Diskette.
- Verwenden Sie die Lorraine 500 (es ist die Tastatur in der Mitte des Raums). Es braucht einen Monitor.
- Nimm die Leiter rechts vom Lorraine 500 hoch.
- Benutze die Leiter am Schrank.
- Nimm den Monitor, der oben auf dem Schrank steht.
- Verwenden Sie den Monitor auf dem Lorraine 500. Sie benötigen noch ein Kabel.
- Geh nach links und benutze die Kiste.
- Verwirren Sie die Kabel ein wenig und klicken Sie auf zufällige Kabel (stellen Sie sicher, dass Sie versuchen, Kabel aufzuheben und nicht nur das Durcheinander von Kabeln). Wenn es beim ersten Mal nicht funktioniert, verschlüsseln Sie sie weiter, bis es funktioniert. Das kann ein bisschen dauern, aber irgendwann findest du das Richtige.
- Verwenden Sie das Monitorkabel am Lorraine 500.
- Verwenden Sie den Lorraine 500.
- Verwenden Sie die Diskette im Diskettenlaufwerk (rechts neben dem Monitor).
- Sehen Sie sich die Zwischensequenz an.
- Sprich wieder mit allen. Du erhältst den Schrankschlüssel.
- Benutze den Schrankschlüssel für den Schrank. Öffne den Schrank.
- Nehmen Sie den DFÜ-Moden (er befindet sich im 2. Stock über dem Schrank).
- Verwenden Sie den DFÜ-Modus auf dem Lorraine 500.
- Verwenden Sie den Lorraine 500.
- Sehen Sie sich die Zwischensequenz an und sprechen Sie noch einmal mit allen. Gehe nach links und verlasse das Blade-Hauptquartier.
- Sprechen Sie auf dem Weg zum Bus mit dem Online Services Broker.
- Wenn Sie den Bus erreichen, sprechen Sie mit allen Bandmitgliedern (es sind 3 – Bassist, Gitarrist und ein Schlagzeuger).
- Klicken Sie auf die rechte Seite des Busses, um zu reisen.
- Wir haben hier 2 Ziele:Satnajoskull und Nuwaka. Wir beginnen mit Nuwaka (das Ziel auf der rechten Seite).
Nuwaka
Unser Ziel hier ist es, den Cypher Master zu finden und mit ihm über den Quellcode zu sprechen.
- Gehen Sie zunächst nach rechts. Geh in die Stadt.
- Sprich mit dem Prediger. Möglicherweise müssen Sie zweimal mit ihm sprechen, wenn das Gespräch zurückgesetzt wird. Sprich mit ihm über alles.
- Gehen Sie zum Internetpunkt rechts neben ihm.
- Sprich mit dem Netrunner und versuche, den Vorhang zu benutzen.
- Sehen Sie sich den Drucker links an.
- Benutze deinen Haufen Münzen auf der Spielzeugmaschine und dann die Spielzeugmaschine.
- Es lässt eine Harpune fallen, also nimm sie auf.
- Gehe nach rechts und benutze den Vorhang.
- Benutze den Computer, aber er aktualisiert sich.
- Geh nach rechts und rede mit dem Systemadministrator. Rede mit ihr über alles. Sie sollten eine VHS bekommen und ein Papier für den Drucker drucken (wenn Sie sich den Drucker angesehen haben, bevor Sie mit ihr gesprochen haben).
- Geh nach links und nimm das Druckerpapier (es liegt auf dem Drucker).
- Geh zurück in die Stadt.
- Geh in die Garage und sieh dir eine kurze Zwischensequenz an. Sprich mit dem Mechaniker über alles und du solltest seine Visitenkarte bekommen. Verlasse diesen Raum fürs Erste.
- Geh nach rechts und sprich mit dem Holzkünstler. Talk with her about everything.
- Use the Panties on the Fuel Pump (it’s to the left of the Wood Artist). Go right, and talk with the Audiophile Villager. Talk with her about everything (this one might be useless).
- Talk with the kid that is building the machine.
- Go all the way to the left towards the Bus, and turn right to the Jungle. Keep going right until you reach an area to the right of the waterfall.
- Use the Marsh to get a Rusty Saw.
- Use the Valve, to find out that the fuel tank is out of gas.
- Go into the Hut.
- Use the VHS on the VCR. Watch the movie (this is probably useless, but do it anyway).
- Leave the room and go outside, then go left towards the Waterfall again, then left to the Jungle again.
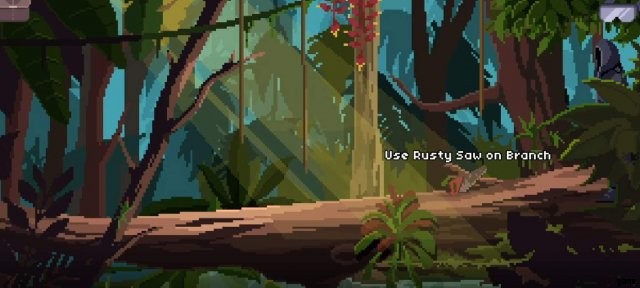
- Use the Rusty Saw on the Branch. This is somewhat of a pixel hunt, so refer to the picture below for the exact location of the Branch.
- Use the Branch with the Wet Panties.
- Go right to the Waterfall.
- Use the Torch on the Flame.
- Go left, and use the Torch on the Wasp Nest.
- Go up the road, and look at the Fruit to the left, at the Monument to the right and at the city in the distance.
- Go right and leave this place, and go left and all the way back to the Bus. Enter the Tour Bus (don’t travel), and look at the Comics that the drummer is reading, all the way to the left. Note the comics number (Issue 2107).
- Go to the right, and use the TV. Ask to watch an episode of Laserman 3000V, and make sure you’re watching episode 2107.
- Go right, and pick up the Happy Food. You should get a Laserman 3000V figurine.
- Go left, and talk with the drummer. Show him the figurine, and then spoil him the end of the comic.
- Leave the bus, and go right to Town.
- Talk with the kid and show him the figurine, but he doesn’t want it – we need to find a cooler figurine with a shield and a different color. Our goal here is to turn our lame figurine into a cool one for the kid.
- Go back to the bus, and use the Bathroom Door. The singer is there having a bad time.
- Pick up the Guitar Cable to the right of the Bathroom Door.
- Go left, and pick up the Comic. This should give you an idea of what the shield looks like, as well as the figurine’s color.
- Go right, and travel back to the Blade HQ.
- Make sure you have your AVR headset off, and look at the Online Services Broker’s Jacket (make sure you’re pointing at the jacket and not at him).
- Talk with him about everything, and show him the mechanic’s Business Card.
- Watch the short cutscene, and go back to the Bus, and back to Nukawa, and back to Town.
- Go to the Garage.
- Use the Keybox (to the left of the room), and pick up the Office Key. Use the Door to close it, and then use the Key to lock the mechanic inside.
- Use the Directional Switch to ruin yet another person’s day.
- In this room, pick up 3 things:the Pincers (on the white board at the back), the Fuel Tank (on the right – red with a skull drawing), and the Paint Bucket (at the far-left side of the room).
- Use the Pincers on the Leash (to the left of the dog) when he’s stretching it, letting him loose, which will chase the person who is using the Internet Point away.
- Leave this room, and talk with the Wood Artist.
- Go left into the Internet Point.
- Talk with the Sys Admin again.
- Use the Computer, which is now free to use, and sign up to the church’s AVR. Go to the right, and talk with the Sys Admin yet again.
- Leave the Internet Point, go right and talk with the Wood Artist again.
- Use the Fuel Tank with the Fuel Pump.
- Go left out of town, and back to the jungle and to the Waterfall.
- Once you reach the Waterfall, use the Paint Bucket on the Waterfall Pond, and then use the Laserman 3000V figurine on the Paint Bucket.
- Go to the zone to the right, and use the Fuel Tank on the Mega Boiler. Use the Valve.
- Pick up the Electronic Component (to the left of the Hut’s entrance).
- Look at the floating book, it has some ASCII writings, which translates to that you need to put some sort of sacrifice on the altar.
- Use the Holographic Statue on the Skull Table, and ring the bell to the right.
- Talk with the deity that showed up, and she will tell you that you need a special fruit to talk with the Cypher Master.
- Leave the Hut, and go back to the Bus, all the way back to the Blade HQ. Speak with Jay, and she will give you a Man-In-The-Middle Kit, and a Remote Control. Exit the Blade HQ, and go back to town.
- In town, go right and place the Man-In-The-Middle Kit on the Plant (it is to the right of the Wood Artist, under the mask).
- Use the Remote Control in your inventory and watch the short cutscene.
- Talk with the Wood Artist, and use the Laserman 3000V Shield on the Black Laserman 3000V figurine.
- Talk with the kid, and he will leave and let you use the Kannon machine.
- Use the Kannon machine, and the fruit will drop right next to you.
- Pick the Fruit up.
- Leave the Town, and go back to the Hut in the jungle, past the Waterfall.
- Enter the Hut.
- Ring the bell, and this time the deity will let you see the Cypher Master.
- Talk with him about everything.
- Leave the place, and go back to the Bus. Travel to Jakharrak (top right of the map).
Jakharrak
Our goal here is to find the video game box, that has the source code.
- Start by going inside the bus, and pick up the Ducttape (it’s on the shelf to the left of the guitarist).
- Go out, and go right.
- Go to the Hut (closest location to the Bus).
- Go into the Hut itself, and talk with the Android.
- Go back to the Hut, and pick up the Electric Component.
- Go out again.
- Pick up another Electric Component to the right, next to a broken monitor.
- Use the Bone to the right, but it won’t move.
- Go back to the Map, and go to the Crashed Plane (directly down from the hut).
- Talk to Solitary Traveler. He’s missing an eye.
- Go right, and note that the plane is unstable.
- Use the Car, and note how you can’t move it.
- Leave this area, and go to the Lighthouse (to the right of the Crashed Plane).
- Go Upstairs.
- Try going Upstairs once more at this floor, but it’s blocked.
- Look at the Cleaing Robot (the little bug that’s hanging out outside).
- In your inventory, use the Cable with the Harpoon, to create a Bat-Harpoon.
- Use the Bat-Harpoon on the Cleaning Robot. This will take you to the 3rd floor of the Lighthouse.
- Open the CAbinet at the left side of the floor, and pick up the Pills (they’re a bit difficult to see). Pick up the Wood Pole as well.
- Interact with the Barricade, but you can’t do anything to it.
- Use the Rusty Saw on the Barricade, and go upstairs.
- Go to the left, use and look at the antenna.
- Use this as a reference to make a similar antenna out of the components that you have (simply interact two components in your inventory with one another).
- Go all the way down, and pick up the Damaged Robot to the left (the Cleaning Robot we used earlier).
- Go back to the Map.
- Go to Sphynx-Bot (directly above the Lighthouse).
- Try going towards it, it will shoot a laser at you. Talk with the Sphynx, and this area.
- Go to the Hardware Graveyard (at the top of the map).
- Go right, and talk with the Android that is tied to a pole.
- Keep going up, and pick up a shovel.
- Interact with the Electronic Component, but a robot will snatch it from you.
- Go left back to the map.
- Go back to the Hut.
- Use the Shovel on the Bone to the right.
- Pick up the Skeleton.
- He will drop a Scanner, so pick that up.
- Look at Skull (to the left of the Skeleton). You will notice its right eye is glowing. Use the shovel on the Skull to break it and retrieve an AVR Chip.
- Go back to the Map, then to the Tour Bus, and back all the way to the Blade HQ.
- Talk with Jay.
- Go to the left of the base, and use the computer. Listen to all the sound files to find out what happened to the Archaeologist.
- Leave the base, and go back to the Bus. Travel back to Jakharrak.
- Go right to the map, and go to the Hut.
- Use the Antenna Pole (it is under the Antenna) on right side of the hut. Use it a couple of times until the main character notes that he hears some noise.
- Go inside the Hut, and look at the monitor.
- Leave the Hut, and go back to the map.
- Go to the bus, and enter the bus itself.
- Use the Bathroom Door, and give the pills to the singer.
- Pick up the Mirror.
- Go to the map, and go to the Sphynx-Bot.
- Place the Mirror on the Laser Hole that’s on the ground.
- Look at the Fallen Head (formerly the Sphynx) and pick up the Eye of the Sphynx.
- Go to the Crashed Plane.
- Give the Eye of the Sphynx to the Solitary Traveler. He will enter the Car.
- Use the Car, to push it towards the airplane.
- Use the Radar.
- Use the Antenna on Plane Roof.
- Leave this area, and go back to the map.
- Go to Hardware Graveyard.
- Use the Cleaning Robot on the Mole Hole.
- Use the Ultra Glove of Power on the Cleaning Robot.
- Use the Cleaning Robot on the Mole Hole again.
- Control the mole and take it all the way to the right, then all the way back to the left to leave. It’s wet there, so it can’t pick up the antenna.
- Use the Liquid Proof Protector Spray on the Cleaning Robot.
- Use the Cleaning Robot on the Mole Hole yet again.
- Pick up the Electronic Component, and use it with the other Electronic Component you have to make another Antenna.
- Use the Radar, make sure it’s bleeping, then talk with the tied up robot again. Ask him to hold it for you, but he can’t since he has no arms.
- Use the Wood Pole on the Antenna.
- Use the Ducttape on the Wood Pole + Antenna.
- Go left and go back to the Map.
- Go to the Hut.
- Use the Screwdriver Kit on the Android to get an Android Arm.
- Go back to the Hardware Graveyard.
- Use the Arm on the Android, and then the Ducttape + Wood Pole + Antenna to hold. Talk with him too.
- Leave this area and go back to the map.
- Go to the Hut.
- Enter the Hut, and look at the monitor on the left. It will pinpoint the location of the source code!
- Go back to the map, and go to the location of the source code (left of the Crashed Plane).
- Pick up the Game Box.
- Leave this area, go back to the map, back to the Tour Bus, and all the way back to the Blade HQ.
- Talk with everyone.
- Leave the Blade HQ, go back to the bus, and travel to Satnajoskull.
Satnajoskull
Our goal in here is to find the Technomancers. This is a very short segment with only two puzzles.
- Upon arriving at Satnajoskull, go right. Make sure you’re AVR glasses are on.
- You’ll see a ghost who will you give weird riddles. You are going to need the ASCII table in order to solve these riddles (if you don’t have it at this point, refer to the Nuwaka chapter of this guide).
- He is going to ask you a few riddles which are basically just simple math (only additions and subtractions). Try to translate the riddles to numbers, and then use the ASCII table to find the right symbols.
- For example, for the following riddle:“One Knight bows low in the presence of the king. He claims that three lands rightly belong to him. The king feeling merciful on this day does say:I’ll grant your wish, but not today”.
- In math terms:1 Knight, 3 Lands. 1+3 =4. So the answer is the ASCII symbol corresponding the number 4.
- Another example:“One Buccaneer challenges his rivals. He fights Eleven of them with his bare fists. Six guards arrive and start to shoot their rifles. They catch just three of them as the rest of them flee”.
- In math terms:1 Buccaneer, 11 of them, 6 guards, then 3 run away (so it’s minus 3). Which means:
- 11+6+1-3=15. So the answer is the ASCII symbol corresponding the number 15.
- In case you are struggling with a puzzle that starts with “Mostly there’s men”, the answer is 32.
- One puzzle apparently has to do with Ursa Major. This puzzle alludes to star constellation. The answer to this one is 7.
- Upon completing this trial, keep going right into the cave.
- Keep going right, until you reach a room with a keyboard. Interact with the Keyboard.
- The answer to this puzzle is found in the video we watched earlier in the Blade HQ (the one on the floppy disk). You need to look at the weird visuals and find the symbols that are hidden within it. If you want to rewatch it, watch the video of the Blade HQ section of this guide.
The correct sequence is:

- After the door opens, go right, and talk with the Technomancers.
- Leave the area, go left all the way back to the Bus, and back to the Blade HQ.
- Talk with Jay and Ramirez, and watch the cutscene.
The Sea and the Underwater Missile Base
Our goal here is to find the secret missile base, and get the missiles ready to launch.
- Start by talking with Captain Vildenburg. No need to tell him to set sail yet.
- Go to Below Deck by clicking on the red ladder.
- Pick up all the books (4 in total), the Bottle, the Fisherman Jacket and the Fishing Cord. You can also look at the marks on the wall. When you leave this room, your inventory should have 8 items:floppy disk, a bottle, a knife, fishing cord, and 4 books.
- Leave the deck and talk with the captain, and set sail.
- Our first stop will be the underwater missile base, which is always located at the bottom left part of the map. On the map it looks like this:

- Upon arriving there, use the submarine, and dive all the way down to the Underwater Missile Base.
- After entering it, go right to the Aquarium. You’ll see a huge octopus on through the window that is going to cause us some trouble.
- Keep going right, and you’ll reach a kitchen.
- Use the Fridge to open it, and take out the pot.
- Pick up the towel (to the right of the fridge).
- Go to the room to the right.
- You’ll need two shrimp cans here. One on the floor (just click on any open shrimp can that’s sitting on the floor), and one is on the table (the leftmost shrimp can on the table, this one is unopened).
- Use the Missile Command Center in the middle of the room. You’ll need the floppy disk to use it, so use the Floppy Disk in your inventory with the Disk Drive (it’s to the right of the chair, next to the table).
- Use the Missile Command Center again, but the octopus friend we saw earlier is blocking it.
- Go left all the way to the Submarine, and up all the way to the ship.
- Talk to Captain Vildenburg again, and tell him that an octopus is blocking the way. He will tell you that you need to create a bait. Refer to the book that we have about fish (The Great Fishing Compendium) to know what we’re going to need:Crab, Shrimp and Fish.
- Talk with Captain Vildenburg again, and we’re setting sail towards a location on the map that has small dots (you might have to travel around map of the sea a bit to find it – its location is randomized). This is what it looks like:

- Upon arriving there, interact with the fishing net. Pick up the fish, and interact with the fish. You’ll get a Fish and Fish with Eggs.
- Use the Knife on the Fish with Eggs, and use the Eggs on the Bottle.
- Talk with Captain Vildenburg again, and set sail again. This time, we’re going to go to a location on the map that is to the top-right of the underwater missile base. On the map, it looks like this:
- Go left on the ship to the submarine, and open the cargo bay. Use the Bottle with Eggs on the Cargo Bay.
- Enter the Submarine, and start diving down.
- Keep going down, until you see a crab to the left. Try to catch him, but he’ll run away. Simply interact with the rock above him, and then catch the crab while he’s eating the eggs.
- Keep going down until you reach the body of a whale. Pick up a Lead Wire and a Hook, then go all the way back up to the ship.
- Take out all the items that are in the Cargo Bay.
- Use the Fishing Cord on the Hook, and Jay will say that she doesn’t know how to tie a knot.
- Talk with Captain Vildenburg, who will show you how to tie a knot.
- Use the Fishing Cord on the Hook again, and it will tie it.
- Talk with Captain Vildenburg to set sail again, and go to the Underwater Missile Base.
- Get on the submarine, and dive all the way to the base again. Go to the kitchen room we visited earlier.
- Use the Pot on the Stove.
- Use the Stove to start up the flame.
- Use the Lead Wire on the Pot.
- Use the Towel on the Pot to pick it up.
- Use the Empty Shrimp Cream Can on the Pot to get a Can of Molten Lead.
- Use the Hook with Cord on the Can of Molten Lead to get a Hook with Cord and Plumb.
- Use the Hook with Cord and Plumb on both the Crab, the Fish and the unopened Shrimp Cream Can, to get a very special bait for the Octopus.
- Go to the left all the way back to the room where the Submarine was.
- Open the Cargo Bay, and put the bait in it.
- Go on the submarine, and interact with the octopus. Watch the Cutscene.
- Go all the way right to the Missile Control Center room (the room with all the cans), and use the Missile Command Center.
- Go left to the Aquarium (the room where we first saw the Octopus) and use the Control Station.
- Watch the Cutscene.
The Spacestation
Our goal here is to shut the spacestations server from within and put an end to the VirtuaVerse plan once and for all.
- Start by going left, talk with the Ticket Lady.
- Go right and use the Gates. Watch the cutscene.
- Go left and enter the Museum (the room to the far left).
- Take all the hardware components on the window to the left (although the only one you need is the Ancient GPU, but take all of them anyway).
- Go all the way right, and look at the picture of the astronaut with a red suit. His name is on the suit, but you can’t tell what it is.
- Open your inventory and use the Radio to start the DDoS attack.
- Watch some cutscenes, and get out of the museum and into the room that’s to the right of the museum to watch some more cutscenes.
- Leave that room, open the emergency box that’s to the right of the museum, and pick up the Axe.
- Go into the Museum.
- Use the Axe on the Space Suit to pick it up.
- Use the Axe on the yellow-ish window that has different components, and pick up a Handle.
- Go left and out of the Museum, then go back to the room that’s to the right of it (the one with the sliding door).
- Use the Knobs and watch the short cutscene.
- There are three access points to the space station. We’re going to start with the one that is in the middle but on the bottom of the station (that’s the only one that is open).
- Use the Floating Robot to the right, and talk with it.
- Go right to the next room.
- Talk with the Robot again.
- Try going right, but there will be an invisible obstacle. Use your Radio to contact Jay and Ramirez.
- Use the AVR Drawing Tool to erase the layer of fake reality on the right side of the room to see the heart.
- Use the Radio again and tell Jay and Ramirez about the Heart.
- Use the AVR Drawing Tool on the left side of the room, and use the Handleon the Locker.
- Pick up the Soldering Helping Hand.
- Go up, and then go up again until you reach a room with a chair.
- Use the AVR Drawing Tool to on the chair, then sit on it.
- Leave this room by going down, and make your way all the way until you get out of the spacestation.
- Go to the tourists space station, then go to the Museum.
- Keep going right in the Museum, and use the Soldiering Helping Hand on the picture of the Astronaut in a Red Suit to get his name.
- Go back all the way to the room with the chair/throne that we were in earlier.
- On the right of the control panel that opened up, change ‘Lab’ to Open’.
- Keep going down all the way then left, until you reach outer space again, then enter the spacestation entrance that is to the left.
- Go right all the way and talk with the flying robot (Zaymon) again.
- We have two missions here:to load a syringe with the energizing liquid, and to get rid of the chip that we installed earlier in our brain. We’ll start with getting rid of the chip.
- Use the AVR Drawing Tool on the right side of the room (where Zaymon is), and open the drawers (you can only open the top and bottom drawers). Pick up a Syringe and some Liquid from those drawers.
- Erase the left side of the room (under the white board), and pick up a vial of Anesthetic.
- Go right, and use the Anesthetic on the Medicine Slot that is next to the large tube-looking machine.
- Use the Tube Door, and your chip will be removed.
- Go left all the way to the Greenhouse.
- In here, pick up three things:Mushrooms (on the right side of the room), a Red Plant (in the middle of the room), and a Space Fruit (this one is a pixel hunt – the Space Fruit is in the mouth of the carnivorous plant). To pick up the Space Fruit, use the pincers, and make sure you interact with the fruit and not with the plant.
- Go right all the way back to the room with Zaymon.
- Use the Liquid on the Liquid Mixer.
- Use the Mushroom, Red Plant and Space Fruit on the Liquid Mixer.
- Use the Syringe on the Liquid Mixer.
- Go left to outer space, all the way to the room where the heart was.
- Use the Drug Syringe on Heart.
- Go down to the room that opened up.
- Look at the Motherboard.
- Use the Ancient GPU on the Motherboard.
- Go up all the way to the room where the chair/throne was.
- On the left side of the control panel, click on H307 to make sure the system works through the Secondary GPU.
- Leave the control panel, and was the cutscene.
- Go to the server room (it’s the last entrance to the spacestation that we didn’t use yet, that just opened up).
- Use the Radio.
- Use the Big Red Button.
- Watch the cutscene.
- Go to the right.
Herzliche Glückwünsche! You finished VirtuaVerse!
Achievements
In case you are in this guide simply for the details about the achievements, note that by simply following the story you will get 29 out of the 33 available achievements.
The other 4 secret achievements can be found in parts 2, 3 and 4. All of them are marked in bold in the guide, so refer to that if you’re struggling to get them.
The achievement in part 2 (Pill Street) is called Karma Boost, and it’s achieved by giving a pizza pie to the Beggar.
The achievement in part 3 (The Slums) is called Hardware Engineer, and it’s achieved by managing to connect the cables to the touchscreen in the Electric Box next to the Squat on your first try.
The 2 achievements in part 4 (The Club) are called “Weird Fantasies” and “Scammed!”. “Weird Fantasies” is achieved by using the Darkroom with the viking-looking man. “Scammed!” is used by using your coins on the condom machine that is located in the Toilet.