
Komplettlösung und Anleitung zum Erzielen von 100 % Erfolgen!
Walkthrough + 100 % Erfolge
Notizen und Fahrplan
Maid of Sker hat zwei Enden. Beide können während eines einzigen Spieldurchgangs freigeschaltet werden, indem der letzte Spielstand nach dem Abspann neu geladen wird. Für das böse Ende musst du alle vier Zylinder finden und am Ende Elisabeth vertrauen. Für das gute Ende musst du alle vier Notenblätter finden und das Lied am Ende selbst spielen.
Glücklicherweise gibt es nur einen Punkt, an dem es kein Zurück mehr gibt. Gleich zu Beginn, nach dem ersten Betreten des Hotels. Stellen Sie sicher, dass Sie mit dem ersten Klavier und dem ersten Phonographen interagieren, bevor Sie diesen Punkt passieren. Gegen Ende des Spiels – wenn Sie persönlich mit Elisabeth sprechen – können Sie zu allen anderen Orten zurückkehren und vergessene Sammlerstücke aufräumen (außer Phonograph #14). Sie haben jedoch keinen Phonic Modulator mehr. Verwenden Sie also alle Ladungen, bevor Sie sich Elisabeth auf dem Dachboden nähern.
Die Monster sind blind. Nur Ihre Geh-/Hustgeräusche und das Läuten von Glocken werden sie alarmieren, Umgebungsgeräusche wie sich bewegende Statuen oder sich öffnende Türen nicht. Bleiben Sie daher in staubigen Räumen oder in der Nähe von Kaminen ruhig, ducken Sie sich immer und halten Sie die Luft an. Beachten Sie, dass die Geräusche der Monster sehr verwirrend sein können. Überprüfen Sie noch einmal, ob sie Sie gefunden haben, bevor Sie eine Gebühr verschwenden oder weglaufen.
Es sind mindestens zwei Durchgänge erforderlich, um alle Erfolge freizuschalten. Es wird jedoch dringend empfohlen, das Spiel dreimal zu beenden.
Erstes empfohlenes Durchspielen
Spielen Sie das Spiel auf einfachem Schwierigkeitsgrad und machen Sie sich mit der Umgebung des Hotels vertraut. Finde alle Sammlerstücke, antworte auf jeden von Elisabeths Anrufen, läute alle Glocken, interagiere mit allen Instrumenten, verwende alle Phonic Modulator-Ladungen und gehe in jeden Raum. Speichern Sie das Spiel außerdem so oft Sie möchten und interagieren Sie mindestens einmal mit jedem Phonographen. Am Ende können Sie beide Endungen freischalten.
Weitere Informationen finden Sie in der unten aufgeführten exemplarischen Vorgehensweise. Es deckt alle oben genannten Aktionen ab.
Zweites empfohlenes Durchspielen
Schließen Sie das Spiel im Schwierigkeitsgrad "Schwer" ab. Denken Sie daran, dass Ihre Ersparnisse begrenzt sind. Sie können die Phonographen nur 10 Mal benutzen (vorher 5). Während meines Durchspielens habe ich hier gespeichert:
- Phonograph Nr. 3
- Phonograph Nr. 5
- Phonograph #7
- Phonograph #8
- Phonograph Nr. 10
- Phonograph Nr. 11
- Phonograph Nr. 12
- Phonograph Nr. 14
- Phonograph Nr. 15
Ich empfehle Ihnen dringend, die Hauptziele zu verfolgen, ohne nach Sammlerstücken zu suchen. Stellen Sie außerdem sicher, dass Sie alle Zylinder so schnell wie möglich abholen (Sie können die Notenblätter ignorieren).
Dritte empfohlene Spielrunde
Spiele das Spiel auf einfachem Schwierigkeitsgrad, ignoriere die Telefonanrufe, werde nicht getroffen, verwende nicht den Phonic Modulator und speichere das Spiel nur einmal. Das ist einfacher, als es sich anhört. Da Sie das Spiel bereits zweimal abgeschlossen haben, können Sie effizient durch das Hotel navigieren und den Monstern mühelos ausweichen. Leider ist es derzeit unmöglich, den letzten Boss auszulösen, ohne das Spiel zu speichern. Daher können Sie das Spiel vorher nicht speichern, ohne den Erfolg zu brechen. Wenn Sie getroffen wurden, machen Sie sich keine Sorgen. Sie können diesen Erfolg in einem anderen, weniger stressigen Spieldurchgang erreichen (siehe „Optionaler vierter Spieldurchgang“).
Optionaler vierter Durchlauf
Falls Sie während des vorherigen Spiels getroffen wurden, starten Sie ein neues Spiel im einfachen Schwierigkeitsgrad. Sie können so oft speichern, wie Sie möchten. Leider zählen die Treffer auch nach dem Laden des vorherigen Speicherstands (Sie können Ihre Statistiken verfolgen, indem Sie die Esc-Taste drücken). Sie können jedoch Ihre gespeicherten Dateien sichern und nach einem Treffer neu laden. Sie befinden sich in:
- …Steamuserdata
826940remote
Erfolge
Insgesamt haben die Entwickler 20 Achievements implementiert. Fast alle sind übersehbar. Weitere Informationen finden Sie in den Abschnitten Roadmap und Walkthrough.
Sammlerstücke &Erkundung
- Maids of Sker – Finden Sie alle musikalischen Puppen.
- Gelehrter – Alle Notizen finden.
- Easy Listening – Alle Gramophone-Aufnahmen anhören.
- Ende auf einem hohen Ton – Spiele alle Musikinstrumente im Spiel.
- Chief Butler – Läuten Sie alle Glocken im Erdgeschoss.
- Wales Interactive – Interaktiv mit der Walskulptur (Friedhofseingang, hinter Büschen).
- Sker Explorer – Besuchen Sie alle Orte und Räume in der Sker-Villa und auf dem Gelände.
Schließen sich gegenseitig aus
- Smooth Operator – Alle Freisprechnachrichten abhören.
- Ärgerlicher Anrufer – Ignorieren Sie Elisabeths Anrufe.
- Phonic Boom – Verwenden Sie alle Phonic Modulator-Ladungen.
- Luddite – Don’t use the Phonic Modulator.
Endings &Challenges
- Perfect Harmony! – If Thomas plays the four pieces of the Counter Song on the Harmonium.
- Rapturous Applause! – Thomas gives Elisabeth the four brass music cylinders.
- Hard Times – Complete the game on hard setting.
- Dodgy Geezer – Don’t get hit by the enemies at all in the game.
- Life Saver – Complete the game saving one time or less.
Miscellaneous
- Animal Lover – Pet The Dog (at Sker Point).
- Choking Hazard – End up coughing 10 times.
- Don’t Breathe – Hold your breathe more than 50 times.
- Bull in a China Shop – Bump into furniture 250 times.
Walkthrough &Maps
This walkthrough covers all puzzle solutions, collectibles and secrets. It’s optimized and will guide you through the entire game step by step.
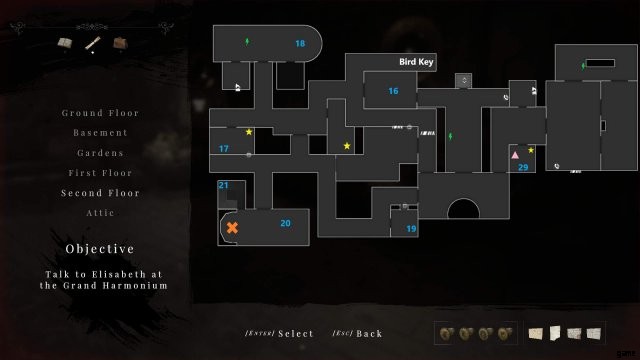
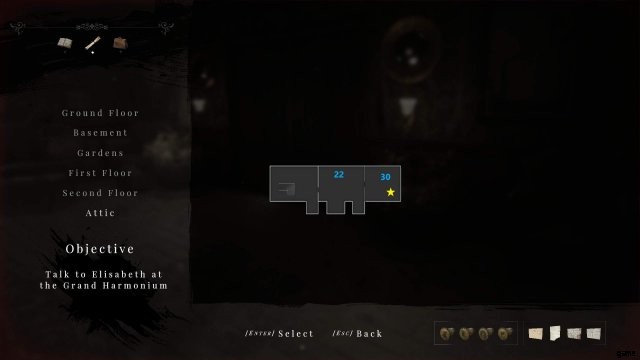
Maps
Notes:
- Click on a map to zoom in.
- Not listed collectibles are in “no map areas”. Refer to the walkthrough for more information.
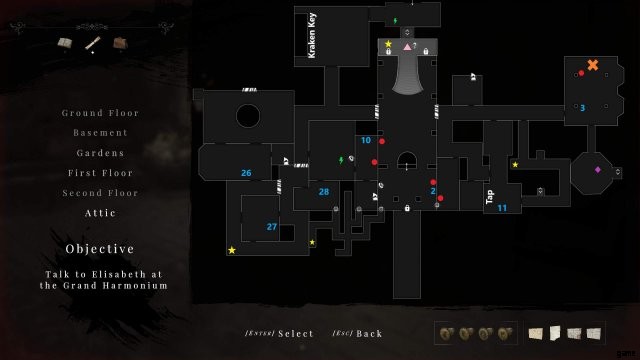
Legend:
- Blue number ➟ note, matches numbering in walkthrough.
- Yellow Star ➟ music doll.
- Pink triangle ➟ instrument.
- Red circle ➟ bell.
- Orange cross ➟ cylinder.
- Purple Diamond ➟ music sheet.
- Green flash ➟ Phonic Modulator charge.
Ground Floor
Basement
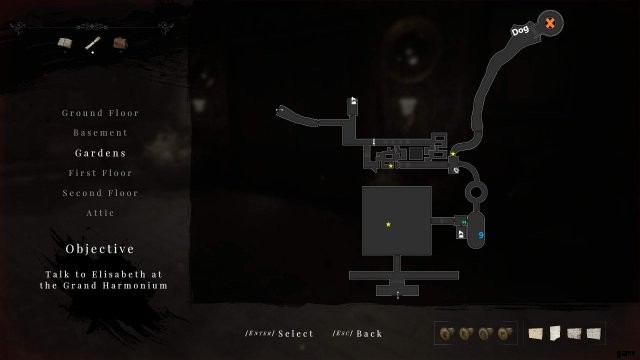
Gardens
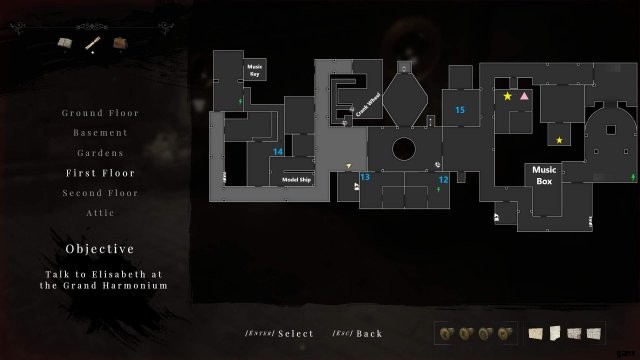
First Floor
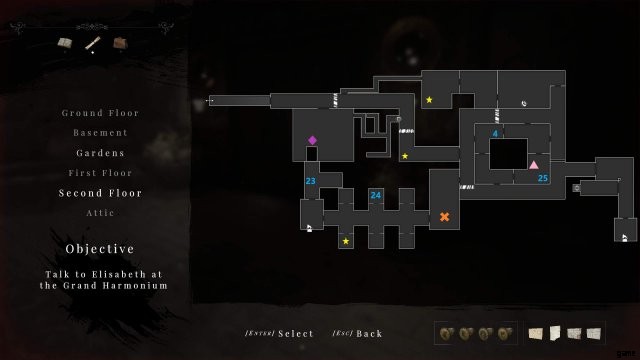
Second Floor
Attic
Part 1:Basement &Gardens
– No Map Area Start –
Watch the intro to receive the first note [Note #1 | Elisabeth’s Letter]. After arriving at the train station, pick up the music sheet [Music Sheet #1 | Thomas Evans], leave the train and follow the linear path until you reach a pavilion. Interact with the phonograph [Phonograph #1] and with the piano [Instrument #1]. Continue to follow the path, open the gate and enter the hotel (point of no return).
– No Map Area End –
Answer the call in the entrance hall. Go up the stairs and interact with the organ [Instrument #2]. Find a note on the counter at the reception [Note #2 | Isaac’s Grand Reopening Note] and a map in a box behind the counter. Ring the bell [Bell #1] and press each of the six buttons on the wall. Now, head towards the chapel and enter the first room on the left to find a phonograph [Phonograph #2]. Leave the room and speak to the man behind the door on the right. Now, enter the chapel and find a note in front of the statue with the skull [Note #3 | Williams Family Bible], the first cylinder [Cylinder #1 | Cerberus] and a bell [Bell #2]. Leave the chapel and enter the first room on the left. Find a music doll on a table in a corner [Doll #1] and follow the small passage to a bloody trail. Try to call the elevator door and interact with the nearby power switch after the blackout. Open the elevator door and reach floor B.
Leave the elevator, enter the room on the right and interact with the phonograph [Phonograph #3]. Now, follow the linear path until you hear someone crying. You can’t avoid getting hurt, but luckily you will find medicine just a few steps further. Find a note in the next room [Note #4 | Isaac’s Ledger Deaths &Disappearances], leave through the first door (not the one close to the note) and find a music doll at the end of a short hallway [Doll #2]. Now, follow the path through the second door, open a locked box and pick up the basement map. Leave through one of the doors and answer the second phone call.
Follow the path until you reach the cooling chamber. Inside, pick up a music doll [Doll #3] and proceed through a narrow hallway. Prepare to hold your breath with LMB. The monster will disappear and you will be able to proceed through the next section without any pressure.
– No Map Area Start –
After leaving the basement, interact with the phonograph [Phonograph #4]. Find a doll on a crate in the open area with a monster [Doll #4]. Pick up a note just a few steps further [Note #5 | Mysterious Note] and leave the monster behind. Before entering the graveyard, go through the collision-free bushes on the left to find the whale statue. At the graveyard, interact with the tombstone to trigger a cutscene.
Read the note on the coffin on the left [Note #6 | Jebediah’s Cult Letter]. Now, hug the right wall to find a room with a phonograph inside [Phonograph #5]. Follow the path and you will eventually find a treasure and a note [Note #7 | Isaac’s account of HMS Providence]. Interact with the red button to move the rail car and solve the next puzzle:activate two switches and unlock both door bolts on the right. Use the elevator to leave the area.
Inside the church, find an easily missable note on a book behind the row of seats on the right [Note #8 | Jebediah’s Ritual Notes]. Ring both bells and leave the church. Walk to the right and pick up the music doll at the end of the path [Doll #5]. Now, turn around and follow the other path, watch the short cutscene and head back to the hotel.
– No Map Area End –
Enter the small building on the left to find a phonograph [Phonograph #6]. In the first maze, you can find a doll [Doll #6] if you stay on the right. At the end of the second maze, answer the phone call. Then, pick up the map in the locked box and open the door opposite of the telephone booth. Take the doll [Doll #7] and make your way to Sker Point. As soon as you reach Sker Point, free the dog and ring the bells in the following order:E-W-E-N. Obtain the second cylinder [Cylinder #2 | Hero] and head back to the room with the telephone booth. Leave through the door on the left.
Inside the laboratory, find a note on a table [Note #9 | Isaac’s Plans] and pick up the Phonic Modulator. Head through the door on the left and pick up two Phonic Modulator charges [Phonic Modulator charges #1 and #2], and go through the door on the left. Interact with the phonograph [Phonograph #7]. Now, you will have to find two switches to open the gate. The switches are on the right and the gate is on the left. Also, there’s an easily missable doll in the center of this area [Doll #8].
Part 2:Ground Floor &First Floor
Back inside the hotel, take a Phonic Modulator charge [Phonic Modulator charge #3]. Enter the next room and open the chest at the stage to receive the Kraken key. Unlock the door and follow the path to the right. Answer the phone call and pick up a Phonic Modulator charge [Phonic Modulator charge #4]. Leave the room and pick up a part of the map as well as a newspaper article [Note #10 | Morning Herald Newspaper], ring the third bell [Bell #3] and interact with each of the six buttons. Find a phonograph behind the next door [Phonograph #8]. Now, you will have to backtrack a bit. Follow the way back to a locked door leading to the main hall. Head to the reception and find a locked room. Use the Kraken key and take the Beer tap as well as a note [Note #11 | Isaac’s Audio-Visual Notes]. Now, go back to the bar and mount the tap. Interact with the taps in this order:1-3-2-4. Climb up the secret ladder behind the statue in the main hall.
Answer the call and enter room 107. Find a note [Note #12 | Isaac’s Journal] and a Phonic Modulator charge [Phonic Modulator charge #5]. Then, reach the next room through the destroyed wall in the bathroom. Find a note [Note #13 | Jebediah’s Journal], leave the room and head through the big door on the left. Go through the next door on the left and interact with the phonograph [Phonograph #9]. Now, follow the path to the right and find a map in room 104. Leave the room again, pass room 105 and reach the storage. Take the red crank wheel and crawl through the small passage (take the left path). Back in the main hall of the first floor, follow the central path to a model ship. Interact with the bells:3-2-4-1.
Find a broken crest piece inside the model ship. Go through the door on the left and walk to the right. The Music key is in the back of the next room – take it. Before you leave through the second door, pick up another Phonic Modulator charge laying on a table [Phonic Modulator charge #6]. At the end of the short narrow path, find a note on a table [Note #14 | Isaac’s Reprimand of Abraham] and use the valve to proceed. After pressing the red button, turn around and leave the small passage. Approach the red room from the other side and find another broken crest piece inside. Head back to the telephone booth and answer another call. Open the big door on the left with the Music key.
Follow the path to the right until you find a green door. Interact with the phonograph [Phonograph #10]. Leave and go through the next door on the left. Interact with the music box to trigger a dream sequence.
– No Map Area Start –
During this scene, you’ll find a doll [Doll #9] and a music sheet [Music Sheet #2 | Matilda Norton].
– No Map Area End –
Now, walk back all the way to the telephone booth. Find a note [Note #15 | The Siren in Greek Myth] in room 108 and take the crest piece in the bathroom.
Open the portholes to find a crank wheel (random) to be able to escape from the trap. Afterwards, head to the library by following the path to rooms 109-110. Open the door in front of the library and find a map. Enter the bathroom, open the mirror cabinet on the left and interact with the switch to extinguish the fire. Take the doll [Doll #10]. Now, enter the library. Again, your goal is to find all switches. Both of them are upstairs, as well as a Phonic Modulator charge [Phonic Modulator charge #7]. After obtaining the broken crest piece, head back to the telephone booth and repair all coats of arms. Use the elevator to reach the ground floor.
Part 3:Second Floor &Attic
Leave the elevator and find a doll on the right [Doll #11]. Open both gates and head back to the elevator. Reach the second floor and answer the call. Find a Phonic Modulator charge in front of the closed gate [Phonic Modulator charge #8]. Follow the linear path and find a note on a table [Note #16 | Prudence’s Letter to Elisabeth]. Leave the room and go to the right. Try to take the Bird key, turn around and walk straight until you find a locked box with a map. Now, follow the central path and open the first door on the left (kitchen). Find another doll [Doll #12].
Follow the path and ignore the next big door on the left. Stay left and find another doll [Doll #13] as well as a note [Note #17 | Elisabeth’s Lyrics for Counter Song] in the nursery. Leave and walk through the door on the left. Find another phonograph [Phonograph #11] in a room close to the door you just went through. There’s a note in the bedroom [Note #18 | Elisabeth’s Counter Song Plan], as well as a Phonic Modulator charge [Phonic Modulator charge #9]. Backtrack a bit and go through the big door on the right. Follow the path to the left and be prepared for your first encounter with Abraham. Run away from the creature by following the path to the right of the broken wall. Open the door at the end of the hallway and find a note [Note #19 | Thomas Letter to Elisabeth]. Crawl through the small vent to avoid Abraham. Now, go through the broken wall and interact with the bells alternately (you need to be fast) – until both gates are open.
Head through the gate on the right and find a save room on the left [Phonograph #12]. Weaken the creature by interacting with the machine a few times. Then, make sure to answer the call and pick the Bird key from the body. Also, find a map and a Phonic Modulator charge nearby [Phonic Modulator charge #10]. Check the map and head to the locked door in the bottom left corner. Use the Bird key and find a newspaper [Note #20 | Article of a Tragic Loss] as well as a cylinder [Cylinder #3 | Siren]. Go through the door nearby and head upstairs. While walking upstairs, pick up another note [Note #21 | Elisabeth’s Diary Entry 01]. In the attic, play the piano:fish – dog – bird – cage – deer. Continue your journey and find a note on a bed on the left [Note #22 | Elisabeth’s Diary Entry 02]. Approach the woman (the Phonic Modulator will break, make sure to find and use all charges beforehand).
Part 4:Basement &Ground Floor
After falling off the attic, walk straight and find a note [Note #23 | Elisabeth’s Diary Entry 03]. Go to the left and interact with the phonograph [Phonograph #13]. Follow the path and enter the first cell on the right to find a music doll [Doll #14]. There’s a note in the second cell on the left [Note #24 | Mythology]. Now, find the last cylinder [Cylinder #4 | Medusa] at the end of the path. Make your way to the locked music door in the basement and open it. Find a note [Note #25 | Isaac’s Blueprint Notes] and interact with the piano [Instrument #3]. Navigate to the music sheet [Music Sheet #3 | Henry Hughes] and leave the basement (don’t go back to the elevator).
– No Map Area Start –
After the cutscene, find a phonograph in the back [Phonograph #14] and escape. Note, that you won’t be able to return to this area.
– No Map Area End –
Climb up the ladder and find the last save room [Phonograph #15]. Leave the room and find a note on the left [Note #26 | Elisabeth’s Diary Entry 04]. Now, interact with the switches and press the big button in the piano room alternately to defeat the final boss. Make sure to stand still when the music stops. After using the amulet in the cage, find a key at the piano and leave the room.
Now, leave the area and stay right until you find a doll on a green table [Doll #15]. Turn around and go through the broken wall. Take the note [Note #27 | Page From Isaac’s Journal] and interact with the projector. Follow the only available path until you find a drawing on a barrel [Note #28 | Crude Drawing] and crawl through the vent. Immediately turn right to find a doll [Doll #16]. Finally, head back to the main hall through the vents.
Now, backtrack to the first floor and the second floor, open all locked doors and enter all not yet greyed out areas. On the first floor, you will find a doll [Doll #17] and a piano [Instrument #4] and on the second floor a doll [Doll #18], a note [Note #29 | Hidden Room Plans] and a piano [Instrument #5]. Also, head back to the attic and examine the last room. Find a note [Note #30 | Elisabeth’s Diary] and a doll [Doll #19] there. Finally, make sure to enter every room on the ground floor and use the crown key in the chapel. In the secret area behind the statue, find the last music sheet [Music Sheet #4 | Arthur Morris] and climb down the ladder.
– No Map Area Start –
Pick up the last music doll [Doll #20]. Finally, head back to the main hall and talk to Elisabeth.
– No Map Area End –
- For the bad ending, trust Elisabeth (requires all cylinders).
- For the good ending, play the song yourself (requires all music sheets).