LifeAfter ist ein Überlebensspiel von NetEase Games, das für Android und iOS verfügbar ist. Werfen wir einen Blick auf LifeAfter-Leitfaden, Tipps, Cheats und Strategien 2021
LifeAfter von NetEase Game ist ein erstklassiges Überlebensspiel, bei dem Sie die Wildnis erkunden, sich mit Freunden oder zufälligen Spielern zusammenschließen, um infizierte Zombies niederzuschlagen, infiziert und ums Überleben zu kämpfen. Es gibt jede Menge Karten zu erkunden, jede Menge Quests/Herausforderungen zu erledigen. Sie werden Ihr eigenes Herrenhaus bauen und nützliche Gegenstände wie Waffen, Rüstungen, Munition und vieles mehr herstellen. Wenn Sie gerade erst angefangen haben, es zu spielen, dann unser heutiger LifeAfter-Leitfaden und LifeAfter-Tipps, Cheats und Strategien wird dir helfen. Wir haben auch die exemplarische Vorgehensweise für Anfänger (Tutorial) veröffentlicht.
Achtung – diese Anleitung ist für Spieler gedacht, die gerade erst mit dem Spiel begonnen haben. Wenn Sie das Spiel schon eine Weile spielen, sehen Sie sich bitte unsere folgenden Beiträge an:–
- LifeAfter-Leitfaden für Fortgeschrittene
- LifeAfter-Tipps und Tricks
Inhalt des Artikels⇓
- Leitfaden
- Tipps, Cheats für Anfänger
- Tipps &Tricks für Fortgeschrittene
- Walkthrough(Start)
- Erste Schritte
- Meisterschaft
- Karten und Ressourcen
- Wie man Rüstungen und Waffen bekommt
- FAQ Wiki-Hilfe
- LifeAfter-Rezepte
Die erste Komplettlösung⇓
Nachdem Sie den Charakter erstellt oder das Aussehen angepasst haben, landen Sie auf einem unbekannten Land (Highway). Dort finden Sie einen NPC namens Aleksey. Er wird Sie bis zum Tutorial führen. Am Ende der Tutorial-Quests wird er von der infizierten Kreatur namens Lozarov getötet. In der oberen linken Ecke des Bildschirms können Sie die Quests überprüfen. Die erste Quest fordert Sie heraus, eine brauchbare Ausrüstung zu finden. Alles, was Sie tun müssen, ist, sich in den leuchtenden Kreisbereich zu bewegen. Dort finden Sie den Lebensdetektor. Öffne es. Gehe voran und nimm die Tasche. Öffnen.
Die zweite Quest fordert Sie auf, den Verband zu verwenden, um die Ausdauer wiederherzustellen. Tippen Sie auf dem Bildschirm auf das Feld für das medizinische Kit -> verwenden Sie Verbände.
Danach müssen Sie mit Aleksey sprechen. Die nächste Quest fordert Sie auf, die Ressourcen für die Herstellung einer Machete zu sammeln. In der Wildnis kannst du jede Menge Ressourcen wie Erz, Stein, Holz, Nahrung und mehr sammeln.
RSS⇓
In der frühen Phase des Spiels ist Stein/Holz/Nahrung die nützlichste Ressource. Du kannst Stein/Erz von den Felsen sammeln.
Sie bekommen Holz von den Bäumen. Es gibt zwei Arten von Waffen, die Sie zum Sammeln von Holz und Stein benötigen. Diese beiden Waffen sind eine Axt, eine Spitzhacke. Um Bäume zu fällen, benötigen Sie eine AXT. To get stones/ores from the rocks, you need a pickaxe. If you have none of these weapons, you can still gather these resources. But, In this tutorial, the game gifts these tools free.
Just below the mini-map, you can switch between the weapons. To gather the resources, go close to the wood or tree or any item -> point to it(aim) -> tap the AXE icon on your screen. The character picks the resources automatically.
Additionally, you can make these weapons(tap the make option at the bottom-left corner) -> here you can craft tools, weapons, ammo, health material.
DOG/Ladder
After gathering enough resources, talk to the NPC. After that, follow the dog to discover the way to escape. The dog will guide you to the ladder. Tell about the ladder to Aleksey. This tutorial teaches you how to leave a map using a helicopter and go back to the home. Once you are out, NPC will guide you to a cabin where you will face infected Zombies and Lazarov.
Helicopter
The zombies and Lazarov will try to kill you. You will have to get out of the cabin and follow Aleksin to find a vehicle to leave. After that, you will find a group of people with a Helicopter. Aleksey will give a shotgun to you. But without ammo. The ammo box is near the helicopter. Go there and replenish ammo. After that, you will have to craft Barricades. On the same location, there would be an old chest. Open that chest and you will find the Barricade or Barricade material there. Go to the make option -> all -> Barricade -> craft. Once crafted, open the bag -> select Barricade -> gear -> put the Barricade on circle(behind Aleksey).
Once you are done, zombies will arrive. Keep fighting with them until your team is ready to board. Aleksey repairs the Helicopter. Head towards the helicopter. After that, Lazarov, the creature, attacks your Helicopter.
The Safe Place
Lazarov attacks crash your Helicopter and all the characters fell into the river. After that, follow Aleksey. You will come across a place. This is basically the building tutorial. In this tutorial, you learn how to repair walls, build walls, doors, use gear workstation, build balconies, and more. That place already has a bunch of facilities; material bench, weapon chest, gear workstation. Using the material bench, you can craft doors. Using the gear workstation, you can craft a simple rifle. Use the weapon chest to replenish ammo.
After that, a bunch of zombies will invade that place. Fight them. Then, an airdrop will appear. Visit there and collect the resources. So this is the LifeAfter game’s 2nd part walkthrough. Let’s head to the LifeAfter Lab walkthrough.
Lab
 After getting the air-drop supplies, talk to the NPC. Aleksey will guide you to the lab, where you interact with some scientists. Explore a bit. After that, you get the message box. Place it anywhere on the ground. Then choose to leave a message. Put some resources and leave a message -> confirm. After that, you will fight against the infected zombies. In the next room, there is a cabinet. Find it(Your dog will be there). Use the gun to break/shatter the lab cabinet door and get the lab access card. After getting the lab access card, head to the exit door(go straight, the right – towards the lab cabin door). After that, you will escape. Find the radio and communicate with support. Once done, you will get another airdrop. From this airdrop, you get an AR(Rifle). Use it to defeat Lazarov.
Once escaped, you will enter the town hall. There you will interact with a number of NPCs; Justin, Rachel, Bulk, and more. At last, you leave the town hall and enter the game “LIFEAFTER”.
So this is the complete LifeAfter walkthrough to pass tutorial. Let’s learn more in the Get Started Part.
LifeAfter – Get Started; Home Foundation⇓
After completing the tutorial(leaving the town hall), you will enter the development zone where the game lets you build a cabin. But, when you enter that zone, there would be an infected zombie around. You will have to make a bow weapon and strike down it. To complete this quest, you need to make bow and craft arrows. As we mentioned above, you need an AXE or Pickaxe to gather wood/stone. But, at that time, you have nothing. All you need to do is go close to the rock and tree -> tap the punch/action option on the screen. Gather wood and make a bow. Gather wood and stone -> craft arrows.
Also, note that when you land in that area, there would be a container near the cabin. Open it and get the resources. This is important to make a bow. If you go manually(gathering), it will take time. So find that container asap. After that kill that infected zombie.
Das ist es. In the next quest, you will have to contact with the radio. The radio(Comms station) is near the cabin. Find it. There would be a home sign too. Retrieve it. Just back side of the cabin, there would be a ground. Retrieve it. There are some more objects that you need to retrieve.
Once picked, head to the bag menu -> select ground -> gear -> place it in the blue zone. Now, gather the wood, stone and build your home. Also, explore a bit and you will find a bed, chair, gear workstation, material bench.
Place all these facilities inside the house. Build walls, doors, stairs. Das ist es. So this is the LifeAfter get started guide for beginners.
LifeAfter Guide⇓
Progress; Manually, Newbiew Chapters
After building the house, there are two ways to progress through the game. You can either follow the newbie walkthrough quest guide or explore the things manually. Newbie Guide -> At the top-right corner of the game screen -> tap the newbie button -> here you can accept the challenges. On the left page of the book, you can check the rewards. On the right page of the book, you can check the challenges.
You can also set your own goal. Zum Beispiel; make a weapon, armor, make your house more durable or strong. In all these missions, you need to gather resources. These resources can be found in the Wilderness. (Aim over the material bench, gear workstation to find out the facilities/items that you can craft).
Wilderness
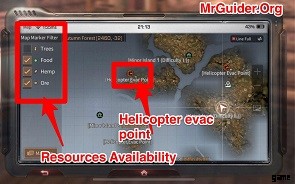 ⇒To travel to the different areas of Island, you use a Helicopter. While staying in the development zone, tap the mini-map at the top-right corner. The red exit icon displays the location of a helicopter. Go there -> open. A map window will pop out on your screen. You can visit a number of areas. Choose Pact Zone -> Fall Forest. You can unlock new areas by raising gathering skill level. Gathering skill level increases as you gather resources on the wilderness areas(i.e. Fall Forest) or complete the daily quests.
Tap the proceed button to go there.
⇒Once you are there, tap the mini-map -> tap the + icon on the right side to zoom. On the left side, you can check the resources available in that area. Note down the icon and close the mini-map. Follow the small icons on the mini-map and get the resources. Zum Beispiel; Food is pointed out as a green icon. Hemp is like a leaf. Gather these resources(As much as you can).
⇒Once you are done, find a helicopter(open the mini-map -> red exit icon). Go there -> use the ladder.
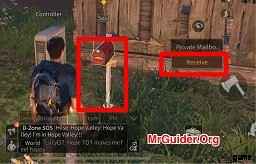 ⇒Keep in mind that you can not go away with the infected items. After climbing up through the ladder on the helicopter evac point -> you will find the postman there. Interact with him and choose to mail the items. Also, check the backpack if there is anything to collect. After that, go to the home -> you will find the mailbox there -> open it -> get the items back.
Health, Hunger, HP – LifeAfter⇓
In LifeAfter game, to stay alive for a long time, you will have to maintain the character’s stats. Your character will die if you fail to maintain health, hunger, and HP. Hunger – Find food, cook items(explore a bit and you will find the cooking place). Consume these food items. HP -> Use bandages to recover HP. Health – Keep the body warm, out of negative effects. A decrease in health or Hunger stats will directly affect HP. The character will die as soon as the HP reaches 0. You can use the nanoplastic to craft bandages, ammo, and much more stuff.
How To Add Friends In LifeAfter Game?
At the bottom of the screen, tap the chatbox -> go to the contacts tab -> search the player name and add friends. To create a party, tap the flag option at the top-left of the screen(quest box). Tap the empty area to team up. Also, see – How to play with friends or share the resources
LifeAfter Skills Guide⇓
Tap the home button at the top-left corner of the screen. Tab abilities option. There you can see the three abilities of your character. Gathering, Combat, and Craft. Gather – To level up gather ability or master gather ability, you need gathering skill points. Earn these points by gathering resources from the wilderness. Combat – To master the combat or level up combat ability, hunt wild animals, zombies on the map. Craft – Craft items to earn crafting skill points. As you gain more, crafting ability level will increase. Tap any ability -> there you can get details of skills.
To upgrade these skills, you need dollars, and skill points. Dollar or New Dollar is the universal currency in LifeAfter game. You can get it from training quests, by selling items to the merchant, login or event reward. Skill Points can be obtained by completing bounty quests, from the mall, stronghold battles, by killing the mystic creature.
LifeAfter Mastery – Gathering Mastery, Combat Mastery, Crafting Mastery⇓
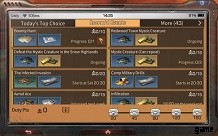 One of the best ways to gain mastery points is by completing the quests at each map that you have unlocked so far – fall forest, sandcastle, snow highlands, etc. Also, once you reach a certain level in the game, you will unlock daily quests function. Earn points by completing the dailies – and, at certain points milestone, you get rewards; gathering mastery, combat mastery, and crafting mastery.
Gathering Mastery – farm/grind on each map – you may get special items – give these items to NPCs for gathering mastery, complete map bounty quests, dailies(duties, duty points), event quests.
Combat Mastery – participate in the camp boss missions and deal as much damage as you can, deal damage to infected/Mystic-Creature, do patrol and camp drills, participate in camp infected resistance event, play Miska university to earn combat mastery points.
Crafting – craft the items(not much helpful though), recommended – complete the map bounty quests, dailies, NPC quests.
LifeAfter Maps and Resources⇓
LifeAfter Fall Forest Map:–
- Twig
- Hardwood Vines
- Sapling
- Plant Root
- Eisenerz
- Flint
- Cast Iron Drill Bit Bone
- Hide
- Mushroom
LifeAfter Sandcastle Map:–
- Resin
- Wood Core
- Oak Seedline
- Hemp Sep
- Hemp Bast
- Castor Seed
- Tin Ore
- Sulfur
- Ally Drill Bit
- Claw Beast Tandon
LifeAfter Snow Highlands Map:–
- Old Cypress
- Cypress Leaf
- Gingko Seedling
- Flax Leaf’Flax Petal
- Aluminum Ore
- Kyanite
- Grease
- Beast Horn
Mouthswamp:–
- Old Cypress
- Cypress Leaf
- Gingko Seedling
- Flax Petal
- Flax Leaf
- Aluminum Ore
- Kyanite
- Grease
- Beast Horn
Mount Snow:–
- Boxwood
- Broadleaf
- Jute Leaf
- Jute Stem
- Copper Ore
- Silicon
- Diamond Drill Bit
- Beast Tooth
- Beast Fur
Santopany:–
- Old Oak
- Birch Root
- Silver Ore
- Pyargyrite
- Sisal Leaf
- Seaweed Leaf
- Kenaf Bast
- Beast Blood
- Rugged Tail
Redwood Town:–
- Old Oak
- Birch Root
- Sisal Leaf
- Kenaf Bast
- Silver Ore
- Pyargyrite
- Beast Blood
- Rugged Tail
LifeAfter Levin City:–
- Pyrite
- Dogbane Stalk
- Elm Bark
- Scale
- Beast Tail
- Kendir
- Kamacite
- Elm Leaves
- Beast Spine
- Beast Hoof
- Castor Bast
- Nettle Leaf
- Rare-earth Ore
- Gold Ore
- Cedar Leaves
- Redwood
- Rugged Tail
- Beast Blood
- Kenaf Beast
- Sisal Leaf
- Pyargyrite
- Silver Ore
- Birch Root
- Old Oak
- Beast Fur
- Beast Fur
- Beast Tooth
- Jute Stem
- Jute Leaf
- Silicon
- Copper Ore
- Broadleaf
- Boxwood
- Beast Horn
- Grease
- Flax Petal
- Flax Leaf
- Kyanite
- Aluminum Ore
- Cypress Leaf
- Old Cypress
How do I get new armors or guns in LifeAfter?
Some armors or guns unlock as you upgrade the Manor. But, not all! You need to fuse the shards using the Formula R&D Machine to get new guns or armors. You can get shards from the NPC(Check the list – here), from the events, treasure map chests(via stronghold points), in Charles town chests, and from the shop. Also, see – List of guns &armors and fusion method
So this is the LifeAfter guide für die Anfänger. Let’s take a look at our top LifeAfter tips, cheats &strategies!
For advanced tips, please refer to this link:–
- LifeAfter Tips &Tricks
LifeAfter Tips &Tricks For Beginners⇓
1.) Craft Weapons and Armor ASAP
If you have followed the walkthrough above, you should be having a bow weapon. But that’s not a good weapon if you want to survive for a long time. You must craft a rifle as soon as possible to explore the deadly zones. Go close to the gear workstation -> craft -> weapons. You can craft machete, the melee weapon.
Mondragon Rifle, the gun. To craft machete, you need wood, stone, hemp, iron ore. All these items can be obtained in the wilderness(Helicopter -> Pact Zone -> wilderness(i.e. autumn forest)). To craft Mondragon rifles, you need wood, pig iron, and bone. Bone can be obtained by killing animals in the wilderness(for example; wolf, deer).
To craft pig iron, you need iron ore, twig. Iron Ore – From the rocks. Twig – cut trees. Hemps – From the wilderness. Tap the mini-map once you are in the wilderness -> zoom in to the mini-map, on the left side, it will show you the available resources.
Armor – An armor can increase the HP cap, defense, damage reduction. It would be better to craft an armor as soon as possible.
2.) Get the Backpack Back
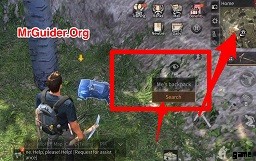 You will lose the items if the character dies. After that, you respawn on a random location or at home. You can claim back the items that you lost in your last life by visiting the death place. It is marked as a backpack icon on the mini-map. Go there asap.
3.) Feed The Dog, Let The Dog Guard
You can assign your dog as a guard. Go close to the dog house signboard -> view pet -> tap the dog -> guard. To feed the dog; tap the dog avatar at the top-left corner of the game screen, choose feed. In LifeAfter game, you can improve the mood or increase the fullness stats of dogs by feeding. You can feed bones, meat, watermelon, milk, vegetables, and much more. If the dog is not in a good mood, he will not follow your commands.
4.) Gather Hemp, Store Some Bandages
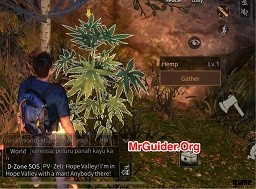 HP is one of the main stats of your character. In LifeAfter game, you can restore the HP of character by using bandages. You can craft bandages with Hemp. Hemp item can be obtained from the wilderness. Tap the make option -> restore -> bandage. Use it when low on HP.
5.) Use Bed To Restore HP, Health
Use the bed -> sleep. It will restore the character’s HP and health. By default, you get a bed for free. All you need to do is explore a bit in the cabin area. Or you can craft a bed with a material bench.
6.) Team Up With Friends
Teaming up with friends makes the combat much easier. If you don’t have friends playing the same game, go to the FB -> search for LifeAfter Facebook group. You can find friends there :D. To increase friendliness so that you can be a roommate with a friend, you need to play together. Team up with the friend and play Miska, strongholds, complete quest together, participate in the events together, and do all the things together to increase friendliness.
7.) Participate In The Events
LifeAfter game release new events from time to time – make sure that you participate in these events – complete the quests, draw items, and loot as many rewards as you can.
“LifeAfter” Complete Guides List:–
- LifeAfter Tips
- Intermediate Guide – Fishing, How to raid someone house, and more
- Chapter 1 Walkthrough
- Chapter 2 Walkthrough
- (New) Chapter 3 Walkthrough
- (New) Chapter 4 Walkthrough
- Chapter 5 Walkthrough &tips
- How do I craft a repair bench?
- What is camp and How do I Join or leave a camp?
- How do I upgrade my Manor?
- I am a Mayor and what things should I know to be a great Mayor?
- What are certs and what should I pick?
- How do I add friends and become a roommate? I also want to share resources.
- I need Potassium Nitrate, How do I craft it?
- How do I get Master Key and open locked chests?
- How do I get Lime and Sandstone?
- What are sturdiness, durability and all this stuff?
- How do I sell resources, gun for gold bars?
- I need tips to progress fast and in a balanced way
- List of recipes(Includes Event also)
- How do I craft a UZI?
- How do I craft UMP9?
- Where can I get Polymer Coating and Film Fabric?
- Sandcastle complete exploration and photo quests
So these are the basic LifeAfter tips and LifeAfter guide for beginners 2021. If you have more tips to share with fellow players, comment below!
Für weitere Updates, Spielneuigkeiten, Spielanleitungen, neue Spielveröffentlichungen und Benachrichtigungen – „Gefällt mir“ auf Facebook – MrGuider, Folgen Sie uns auf Twitter – @techhuntr. Schauen Sie sich an – Die besten neuen Android-Spiele heute. Haben Sie Vorschläge? Hier einreichen
