Genshin Impact hinterlässt den Spielern eine riesige Welt zum Erkunden und eine Vielzahl von Herausforderungen, denen sie sich stellen müssen. Trotz der anfänglichen Verfügbarkeit von nur 2 Regionen beim Start gibt es bereits eine Fülle von Inhalten, die jeden stundenlang spielen lassen, um neue Dinge zu entdecken und zu grinden Ressourcen. Da ständig viel Material und Erfahrung benötigt werden, um mit den zunehmenden Herausforderungen Schritt zu halten, ist eine effiziente Methode zum Farmen und Grinding durch jede wiederholbare Herausforderung in Genshin Impact erforderlich.
Natürlich gibt es zahlreiche Herausforderungen, an denen Sie teilnehmen können, und jede bietet viele Belohnungen. Während Domänen, Aufträge und andere Quests jeweils ihre eigene Vielfalt an Spaß und Spannung bieten, sind Bosskämpfe unserer Meinung nach die strategisch verlockendsten, egal ob Sie alleine oder mit anderen Abenteurern spielen.
Wenn Sie Genshin Impact gerade entdeckt haben und erst kürzlich in seine Fantasiewelt eingetaucht sind, empfehlen wir Ihnen dringend, zuerst unseren Genshin Impact-Anfängerleitfaden zu lesen. Unser Anfängerleitfaden bietet die grundlegendsten Tipps und Strategien, damit Sie direkt in Ihr Abenteuer starten können. Außerdem haben wir einen Leitfaden für Fortgeschrittene mit weiteren Tipps und Strategien, die Ihnen dabei helfen, schnell und effizient im Spiel voranzukommen.
Eine der größten Spaß- und Aufregungsquellen von Genshin Impact liegt in der riesigen Liste von Helden, die Sie rekrutieren können, um sich Ihnen bei Ihrem Abenteuer anzuschließen. In der Lage zu sein, sofort zwischen 4 einzigartigen Helden in einer Gruppe von 4 zu wechseln und eine Vielzahl von Elementkombinationen zu initiieren, macht jeden Kampf zu einem einzigartigen Erlebnis. Obwohl jeder Held etwas Neues auf den Tisch bringen kann, heben sich einige einfach von anderen ab, und wenn Sie wissen möchten, welche Helden unserer Meinung nach erstklassig sind und welche nicht, können Sie sich unsere ansehen Genshin Impact-Stufenliste.

Jeder Held in Genshin Impact ist einzigartig von anderen, abgesehen von seiner elementaren Affinität und der verwendeten Waffe. Die Reihe aktiver und passiver Fähigkeiten, die jeder Held besitzt, verleihen jedem einen anderen Nutzen innerhalb und außerhalb des Kampfes. Obwohl Rollen nicht einfach jedem Helden zugewiesen werden, können sie so aufgebaut werden, dass sie ihrem Hauptzweck im Team besser entsprechen, und mit der richtigen Waffe und den richtigen Artefakten kann jeder viel effizienter werden. Wenn du nach Ideen suchst, wie du deine Lieblingshelden bauen kannst, dann empfehlen wir dir, zu unserer Charaktererstellungsanleitung zu gehen.
Vorausgesetzt, Sie haben unsere vorherigen Guides bereits gelesen oder Genshin Impact ausgiebig genug gespielt, sollten Sie bereits einen fairen Anteil an Boss-Begegnungen haben. Bosse, die über die verschiedenen Orte in Genshin Impact verstreut sind, bieten ein vielfältiges Maß an Herausforderungen und Erfahrungen. Auf dem anfänglichen Weltlevel kann es ziemlich einfach sein, selbst die härtesten Bosse zu besiegen, aber wenn du höhere Abenteuerränge erreichst und das Level deiner Welt erhöhst, werden Feinde, einschließlich Bosse, auch im Schwierigkeitsgrad größer.
Bosse in Genshin Impact können in 3 Typen eingeteilt werden:normale Bosse, Elite-Bosse und wöchentliche Bosse. Normale Bosse sind die einfachsten der Gruppe und werden normalerweise in zufälligen Missionen oder an Orten mit einer Schatzkiste unter ihrer Bewachung angetroffen. Das Einfordern von Belohnungen von diesen Bossen verbraucht kein Originalharz. Elite-Bosse befinden sich immer an einer bestimmten Stelle auf der Karte und haben zur einfacheren Navigation auch ihre eigenen Symbole auf der Karte. Nachdem Sie einen Elite-Boss besiegt haben, müssen Sie 40 Originalharz ausgeben, um die Belohnungen aus ihren Truhen zu erhalten. Wöchentliche Bosse sind die schwierigsten der Gruppe und erfordern auch 60 Originalharze, damit Sie Belohnungen einfordern können, nachdem Sie sie besiegt haben. Sowohl normale als auch Elite-Bosse werden durch einfaches Teleportieren an einen anderen Ort sofort wiederbelebt. Wöchentliche Bosse haben eine Abklingzeit von 1 Stunde, die eingehalten werden muss, bevor sie erneut herausgefordert werden.

Wiederholt angreifende Bosse können eine gute Quelle für Artefakte sein, und sowohl Elite-Bosse als auch wöchentliche Bosse werden dir Aufstiegsmaterialien für deine Helden einbringen. Da jede Aufstiegsstufe höhere Grade jedes Aufstiegsmaterials erfordert, wird die Notwendigkeit, es kontinuierlich zu bewirtschaften und seine höheren Stufenversionen jedes Materials herzustellen, zu einer notwendigen Schleife. Obwohl einige Belohnungen dir diese Materialien auch einbringen können, ist es ein wichtiges Wissen, genau zu wissen, welchen der Bosse du engagieren musst, um die zu farmen, die du mehr als andere benötigst.
Um ehrlich zu sein, Geduld und Wiederholung werden Sie schließlich dazu bringen, jeden Boss zu schlagen, dem Sie begegnen. Wenn Sie jedoch bestimmte Materialien anbauen und mehr aus Ihrer Spielzeit herausholen möchten, wird die Effizienz bei jedem Unterfangen wichtig. Daher wird es zu einer wichtigen Abenteuerkomponente, die richtigen Strategien und die besten Helden zu kennen, die man für jeden Bosskampf mitbringen kann, insbesondere im Fall der Elite-Bosse und der wöchentlichen Bosse.
In diesem Genshin Impact Boss-Leitfaden konzentrieren wir uns auf alle sechs Elite-Bosse im Spiel, um Ihnen eine Vorstellung davon zu geben, was jeder einzelne Ihnen möglicherweise für Belohnungen einbringen kann, sowie die wichtigsten Tipps und Strategien, um sie im Kampf zu dominieren .
Anemo Hypostasis [Stormbearer Mountains, Mondstadt]
Einzigartige Drops: Vayuda-Türkissplitter / Fragment / Brocken / Edelstein, Hurrikansamen
Mögliche Artefakt-Drops: Blood-Soaked, Instructor, Lucky Dog, Gladiator’s Finale, Wanderer’s Troupe

Anemo Hypostasis ist nur einer von 3 Elite-Bossen, die alle gleich aussehen, abgesehen von ihren unterschiedlichen elementaren Affinitäten, die die Art des Schadens bestimmen, den sie verursachen können, und ihre Verwundbarkeit, sowie eine einzigartige Reihe von Bewegungen, mit denen Sie sich vertraut machen müssen Erhöhen Sie Ihre Überlebenschancen durch ihre Angriffe und besiegen Sie sie in kürzerer Zeit. Der verwundbare Teil ist eigentlich der rautenförmige Kristall, der von 8 Würfeln bewacht wird, und für den Anfang sollten Sie wissen, dass jeder der Hypostasis-Bosse unverwundbar ist, wenn diese Würfel ihn umgeben.
Unabhängig davon, gegen welche Hypostasis Sie kämpfen, nutzt jeder die 8 Würfel, die ihn umgeben, um anzugreifen. Die allgemeine Strategie besteht darin, einen sicheren Abstand zu halten und diese Angriffe zu vermeiden, während man sich gleichzeitig auf einen Gegenangriff vorbereitet, da diese Fälle sie kurz darauf verwundbar machen. Wenn Sie jedes seiner Angriffsmuster gut genug kennen, sollten Sie wissen, wann Sie anfangen sollten, die Lücke zu schließen, da Sie so viel Schaden wie möglich anrichten möchten, wenn es verwundbar wird.
Einer der häufigsten Angriffe von Anemo Hypostasis besteht darin, Würfel zu verwenden, um ein Vakuum zu erzeugen und dich näher an sein Auge zu saugen, um Schaden zuzufügen. Sobald Sie sehen, dass der Wind innerhalb des Gebiets um Sie herumwirbelt, können Sie leicht davon wegrennen. Am Ende gibt es einen explosiven Effekt, der dir immer noch Schaden zufügen kann, aber du kannst sofort danach hineinstürmen, um etwas Schaden anzurichten.
Sobald Sie Anemo Hypostasis schweben sehen und Flügel auf jeder Seite erscheinen, erscheint auch ein kleiner Wirbelwind auf dem Boden direkt unter Ihnen. Sie haben einen Bruchteil einer Sekunde Zeit, um davonzurennen, denn wenn Sie von seinem Wind erfasst werden, bleiben Sie über Wasser und können dem folgenden Anemo-Angriff nicht ausweichen. Nach dem Angriff wird Anemo Hypostasis zu Boden fallen und Sie können es ebenfalls angreifen.
Gegen Mitte des Kampfes wird Anemo Hypostasis zahlreiche kleine Tornados beschwören, die sich auf dem Boden bewegen. Es gibt jedoch Lücken zwischen den Tornados, in denen Sie sich sicher aufhalten können. Es ist also in Ordnung, einfach einen guten Abstand zu jedem einzelnen zu halten. Der Angriff dauert etwa 4 Sekunden, so kurz vor dem Ende kannst du dich näher an Anemo Hypostasis heranbewegen, um danach etwas Schaden zu verursachen.
Sobald die HP von Anemo Hypostasis auf etwa 25 % gesunken sind, beginnt sie sich aufzuladen, und ein starker Anemo-Impuls wird schnell einen großen Bereich abdecken und Ihnen schweren Schaden zufügen, wenn er trifft. Es ist möglich darüber zu springen, aber auch das Verlassen der Plattform funktioniert. Nach etwa 3 Sekunden wird ein zweiter Impuls abgegeben, und sobald die Anemo-Aura nachlässt, können Sie erneut angreifen.
Anemo Hypostasis kann sich selbst heilen, wenn es kurz vor dem Ablauf steht, und schwebende Kugeln können über Windböen schweben, auf denen Sie ebenfalls reiten können. Das Ergreifen dieser Kugeln kann deine Helden heilen und einen Teil ihrer Heilung nehmen, also sei bereit, auf jeder so viel wie möglich zu reiten und ein Sperrfeuer von Angriffen zu starten, sobald die Windböen nachlassen.
Cryo Regisvine [Tempel der Tausend Winde, Mondstadt]
Einzigartige Drops: Shivada Jade Sliver / Fragment / Chunk / Gemstone, Hoarfrost Core
Possible Artifact Drops: Blood-Soaked, Legacy, Lucky Dog, Gladiator’s Finale, Wanderer’s Troupe, Prayers to Springtime
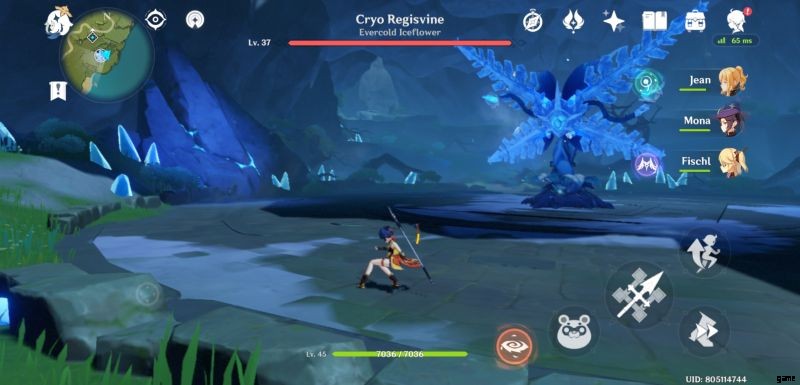
Regisvines actually look like gigantic versions of whopperflowers. While having different elemental affinities and sets of moves, both of these elite bosses share some characteristics. For starters, regisvines always have a weak spot at the base of their bodies that can stun them if hit with enough damage. These weak spots can be vividly seen as it continuously glows. Initially, when their heads fall into the ground, their weak spots are on their heads but on subsequent stuns, their weak points will be randomly place on other spots that can only be clearly hit with bows.
Fire and lightning are powerful elements against ice elemental creatures and Cryo Regisvine is no exception. The melt elemental reaction as well as overloaded will render it more susceptible to damage and any pyro or electro elemental attack can deal more damage to it. It is best to save elemental skills and elemental bursts for when regisvines are stunned but using either ensuring that it hits the regisivne’s weak spot works best.
One of Cryo Regisvines most basic attacks is launching a trio of cryo spikes that burst from the ground towards you. Simply moving to the side will dodge the attack but the important note to keep in mind is that it can launch this attack 3 times. You will notice a glimmer of light shine across the regisvine’s leaves indicating it is about to attack so in-between these shots, you can squeeze in some damage and move out of the way once the leaves start to shine.
If Cryo Regisvine’s stems move to its side and start to glow, it will unleash twin ice beams that will cross on your exact location. These can deal huge damage but otherwise easy to avoid by running sideways away from the attack.
As ice crystals begin to form around Cryo Regisvine, you should know that what happens next is that homing cryo darts will soon appear to start chasing you around. With 4 darts appearing on each of its sides, 8 darts will pursue you in one attack and Cryo Regisvine will do this 3 times, one after another. It will be difficult to dodge this attack through walking so it is best to save some stamina for running while it launches this attack. Once you are cleared after the 3 shots, you can close in and chip in some attacks.
When Cryo Regisvine starts to charge up its ice powers as ice particles form around it, blue pillars of frost appear within the battle arena. The falling glimmer of ice will not deal any damage to you but once they hit the ground, an explosive burst of cryo shards can deal a lot of damage within a small AoE. Once you see the AoE, it will be easy to steer clear of the rest and these showers of ice also follow you to some extent so constantly moving around will help you avoid being hit by them.
At around 50% HP, Cryo Regisvine will unleash a powerful ice beam around the entire arena, freezing its outer radius. Beyond the initial damage of the ice beam itself, stepping on the frozen grounds will cause continuous damage. It takes about a full second for ryo Regisvine to charge up for this attack and you will notice the spectacular glow in its head before it unleashes the ice beam. Moving a bit towards its left side and following its head around as it freezes the field clockwise will help you avoid the beam. Staying close to Cryo Regisvine in this situation, likewise saves you from the ground’s freeze damage.
Electro Hypostasis [Cape Oath, Mondstadt]
Unique Drops: Vajrada Amethyst Sliver / Fragment / Chunk / Gemstone
Possible Artifact Drops: Instructor, Legacy, Prayers of Wisdom, Curative, Lightning Prism
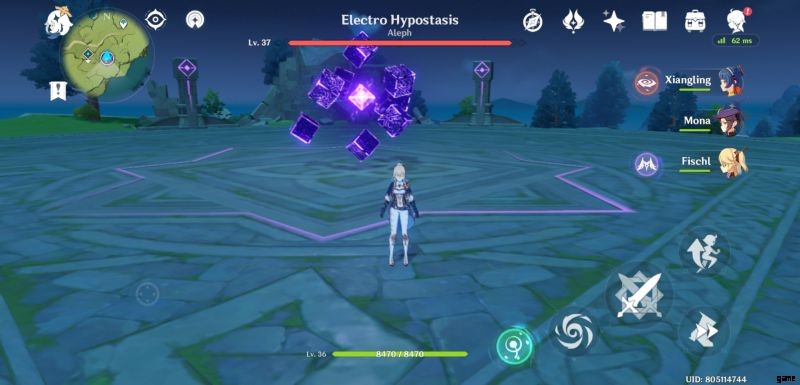
Just like Anemo Hypostasis, Electro Hypostasis is invulnerable when the 8 cubes surround it. For the most part, the only opportunities to deal damage to it comes after it has launched an attack. Any form of attack is useful against the hypostasis itself but once it summons electro barriers to heal itself, only elemental attacks will work on it. Further, using a cryo skill to inflict a supercharged status can boost its damage intake.
One of Electro Hypostasis’ creative attack skill is the “rock-paper-scissors” move where it takes the form of a rock-shaped fist first to try and punch you out. Constantly moving around makes it easy enough to dodge it, but be sure to always stay ready for the other 2 attacks that follow. There will be a short period of time afterwards to give you some opportunity to attack.
Another common attack from Electro Hypostasis makes use of the cubes to spin fast and form a drill construct that does a straight dash towards you. It is fairly easy to dodge as well and what follows is a continuous barrage from each cube that shoot themselves towards you. Continuously moving until the last cube hits the ground works well so be ready to move in closer as the hypostasis lowers itself to the ground for some beating immediately after.
Once the 8 cubes form a circular pattern on the side of Electro Hypostasis, you shoul know that it is ready to unleash a continuous beam of electro rays in a counter-clockwise direction. Note that only 4 of the 8 cubes will be firing so there is ample space in-between the lasers where you can move in. The closer you are to the center, the shorter the distance you need to walk or run in. Once the beams extinguish, you can start pounding on Electro Hypostasis.
Electro Hypostasis has a visually confusing attack that seemingly spray cubes along the ground randomly. Once the cubes start rotating below the hypostasis, you should move farther from it and more easily be able to dodge the cubes by moving left and right. Electro hypostasis will be spraying cubes in a clockwise pattern for about 10 seconds and if you can manage to count in your head for the duration of the attack, you can identify the right time to close in as the attack ends.
When Electro Hypostasis is close to expiring, it will lock you in an area with an electro barrier. Within it, bolts of lightning will randomly drop down from the sky and as intimidating as it looks, especially in an enclosed space, keeping your eyes on the ground makes the series of attacks easy to predict and dodge.
With its health at around 20% or below, Electro Hypostasis will summon a trio of electro prisms as a last ditch effort to heal itself. These constructs are invulnerable to normal attacks and can only be damaged by elemental attacks. Saving up your elemental skill or elemental burst for this is a surefire way of winning and, if you can afford to, switching around all characters to deploy available skills will be greatly helpful.
Geo Hypostasis [Guyun Stone Forest, Liyue]
Unique Drops: Prithiva Topaz Sliver / Fragment / Chunk / Gemstone, Basalt Pillar
Possible Artifact Drops: Instructor, Legacy, Curative, Gladiator’s Finale, Wanderers Troupe
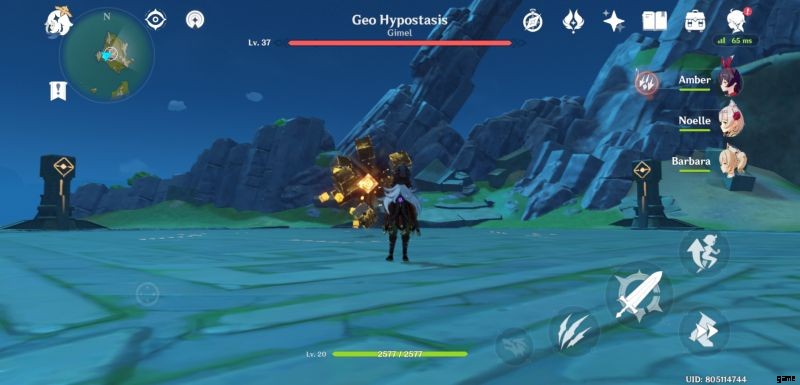
Geo Hypostasis is perhaps the most defensive of the elite bosses in that it uses a lot of constructs that you need to destroy on top dealing damage to it at every opportunity. The rock pillars are tough to destroy but like most obstacles is largely susceptible to attacks from a claymore-wielding unit. The geo cubes that appear near it should always be disposed of first as these cubes can render Geo Hypostasis invulnerable or help it unleash powerful attacks.
Geo Hypostasis’ basic attack will have it spit geo bullets towards you but you can easily dodge it in an open field. As there may be rock pillars in the area, you can hide behind one while also taking it down. Note as well that while Geo Hypostasis is atop the geo pillar that you destroy, it will be staggered and be vulnerable to attack. While you want to consistently be working on destroying the rock pillars, take opportunities to do so as well while Geo Hypostasis in on top of one.
As Geo Hypostasis floats atop one of the stone pillars, you will notice a stream of light flow down to the pillar. When a change in the pattern appears and light quickly moves down across the rock pillar, a pulse will be unleashed that will knock you away from it and dealing a bit of damage. Instead of moving away from it, though, it is best to squeeze in as many attacks as you can especially if you are close to destroying the pillar while the hypostasis in on top of it.
Geo Hypostasis will emit a stronger, more dangerous pulse from each of the pillars in the battlefield. You will know that it will come when a geo cube appears beside the stone pillar at the center of the ring. It will be very difficult to steer clear of the pulses unless you step off the arena but once you destroy the geo cube, the attack ends.
Geo Hypostasis can also cast a rain of rocks just like Electro Hypostasis’ lightning storm. In the same manner as well, checking the ground for marks as to where each attack will land greatly helps to avoid getting hit. You can still squeeze in bits of damage to the pillars or to the hypostasis but it will be challenging.
Once Geo Stasis only has bits of HP left, it will summon 3 geo pillars that you need to destroy quickly. If you fail to do so, Geo Stasis will replenish some health but if you destroy all 3 fast enough, then it will only take a couple of hits to finish off this elite boss.
Oceanid [Qingce Village, Liyue]
Unique Drops: Varunada Lazurite Sliver / Fragment / Chunk / Gemstone, Cleansing Heart
Possible Artifact Drops: Blood-Soaked, Legacy, Prayers of Destiny, Adventurer, Gladiator’s Finale, Wanderer’s Troupe
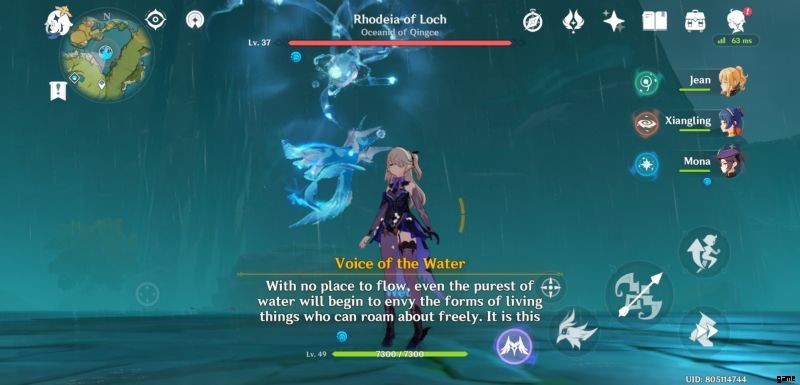
From this elite boss’ name, you can already tell that it is going be a battle that involves water and as you close in on Oceanid’s location, the pouring rain that keeps the area and everyone within it wet, will be the final confirmation that it is a hydro elemental battle. Oceanid’s appearance may initially look like that it can be hurt, but Oceanid is actually invulnerable to attacks and the only way to beat it is through defeating the elemental creatures that it summons at random.
There are 5 different elemental animals that Oceanid can summon, and some of them come in pairs or in groups, with each one packing its own unique attacks that can hurt you severely. After summoning 2 sets of water elementals, Oceanid will sink 2 platforms in the arena, making it difficult for you to move around the longer the battle stretches, unless you have Lisa who can walk on water.
Although each of Oceanid’s summons can be hurt with any type of attack, electro element users can deal the most damage to each of them. Likewise, water elementals just like the hydro slimes can easily be frozen, so having both an electro and cryo user in your team will help make the battle easier. Some of the summoned elemental animals are difficult or impossible to damage with melee attacks, so being ready with a ranged attacker is also important.
To start off, the water elemental frog can be the most annoying summon from Oceanid, and the most damaging. It can splash water on you from a medium distance and leap right to where you are. For the most part, having a hero who can summon a companion as an agro taker helps in this situation as it is much easier to deal damage to water froggy when its attention is away from you. In any case, there are pauses in-between its attacks so you can always squeeze in some hits. Just stay away from its face as much as possible and attack on its side or back instead.
The water elemental hawks that Oceanid summons work just like flying archers and can damage you with their spit from a certain distance. As they are flying, it is difficult to hit them with melee attacks so eliminating them with a bow user or catalyst user is important.
The hydro crabs continuously spray bubbles at mid range and will be hard to deal with close-ranged attacks unless their attention is not on you. These crabs may not deal as much damage but the rate of fire each one has can be very troublesome. For these elementals, a ranged attacker is also important.
The cranes, on the other hand, seems a lot easier to deal with. Cranes will attack you with water waves directed towards you, and dodging it leaves you time to squeeze in some hits on them. There are a few seconds in-between each of their attacks so after some time, you will be able to easily work with a pattern to attack them intermittently between their hydro attacks.
The water elemental squirrels can move fast but only have short-ranged attacks. It can be hard to dodge their attacks and at the same time counter-attack with a melee attack but they are fairly easy to deal with if you keep your distance with a bow or catalyst user.
The water boars seem to be the toughest of the bunch but move the slowest. Their only way of dealing damage to you is with their charge attack, which can only go forward. They have this typical gesture of real-life or cartoon animals that are about to charge, so it is very easy to predict when they will start charging at you.
Note that there is an invisible time limit within which you must dispose of Oceanid’s minions once they are summoned. If you fail to eliminate the water elementals fast enough, Oceanid will launch a fast moving water sphere that travels the ground and hits you like a train. Likewise, avoid letting any of the water elementals fall into the water around or within the arena, in case some platforms have been sunk by Oceanid, as they will respawn back in the battlefield with full health.
Pyro Regisvine [Cuijue Slope, Liyue]
Unique Drops: Agnidus Agate Sliver / Fragment / Chunk / Gemstone, Everflame Seed
Possible Artifact Drops: Blood-Soaked, Instructor, Prayers for Illumination, Adventurer, Gladiator’s Finale, Wanderer’s Troupe
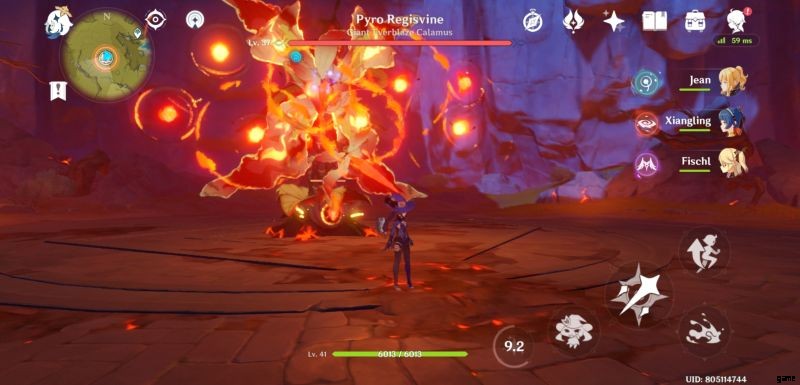
Like Cryo Regisvine, Pyro Regisvine’s elemental affinity makes it vulnerable to a certain element and in this case, hydro elemental heroes are on the spotlight. Anything wet becomes more susceptible to elemental reactions like being frozen or electro-charged, so having a cryo user and an electro user in your party will help as well.
One of Pyro Regisvine’s attacks combine homing fire missiles with flame spikes that run on the ground. The fire orbs that appear on the regisvine’s sides stay afloat for a while before they home in on your location, giving you a head start to start dashing to the sides. Pyro Regisvine will unleash two sets of homing fireballs, before finally sending a trio of fire spikes from the ground to strike at your location. All these can be easily avoided if you move around Pyro Regisvine and once you make it past the final stretch of this attack, you can chip in some of your own attacks until you see it ready to strike once more.
Once Pyro Regisvine’s leaves start straightening to its side and glow brighter than usual, it means that it is ready to let a rain of fire strike down on you and the entire arena. Each strike’s area of effect can be seen with its obvious glow, although it is fast enough that simply walking about will not be enough to avaoid it. It is best to keep running once you see the the flame-lit circles pop up while keeping an eye as well on the area where you are running to. Once the rain of fire comes to a halt, there will be a brief moment when you can hit Pyro Regisvine with some attacks.
If you see Pyro Regisvine with its head staring on the ground, the next thing to expect is a quick fire spike attack that travels through the ground to where you are. A quick side step will dodge this attack but if Pyro Regisvine is still staring at the floor afterwards, it means he will do it again, and up to a third time. You can attack in-between each shot but have very little time to do so. Once it finishes with a trio of attacks, there will be a bit more time to deal it some damage.
With Pyro Regisvine’s stems or arms stretching a bit to each side, it will barrage you with a machine gun-like series of fireballs that home in on your location. Constantly moving will help you to easily avoid it and running towards one side works best. A total of 16 shots will be made, 2 at a time, which means that if you run on either side, you can swoop in a bit closer towards the end of the barrage to start with a counterattack sooner.
Similar to the homing missile and fire spike combo we mentioned earlier, Pyro Regisvine can also follow up the homing fire missiles with an exploding plant bomb that can deal damage as well as knock you away. The plant bomb will cause an AoE damage when it hits the ground and will explode a second time after a short while. You will know that he is going to throw one with the charge animation so it is best to continue running to the sides once he does.
These 6 elite bosses sufficiently cover each hero’s needs as far as ascension materials go but it doesn’t mean that no new elite bosses will be added in future updates. We may yet cover the other bosses in a future guide as well but for now, though, this is where our Genshin Impact boss guide ends. We certainly hope that every bit of tip and strategy we shared with you in this guide will level up your performance in your succeeding bouts with each of them. If you have some additional tips, tricks, or strategies you would like to share in addition to what we have provided, you are very much welcomed to lodge them down in the comment area!