Funkige Beats, aufregendes Kampfsystem, herausragendes Charakterdesign basierend auf der Mythologie mit einer interessanten Storyline obendrein, Dislyte ist ein urbanes mythologisches Pop-Fantasy-Rollenspiel, veröffentlicht von Lilith Games auf iOS- und Android-Plattformen.
Vom selben Schöpfer beliebter Titel wie AFK Arena und Aufstieg der Königreiche Es verwendet ein rundenbasiertes Gacha- und optionales Auto-Battler-System, ähnlich wie Handyspiele wie Dragon Tamer und Knighthood. Was Dislyte von den meisten mobilen Titeln unterscheidet, ist der dynamische Soundtrack, der Sie dazu bringt, mit dem Kopf im Takt zu nicken, die faszinierende Geschichte hinter den Charakteren und ihrer Welt und das einzigartige Kampfsystem, das die normalerweise komplizierte und langweilige Erfahrung rundenbasierter RPGs vereinfacht.
Die Kombination erinnert stark an die Art und Weise, wie Persona 5, ein rundenbasiertes RPG, das derzeit für Playstation 3 und 4 veröffentlicht wird, eines der normalerweise langweiligen Spielgenres aufpeppt und es frischer und fesselnder macht. In Verbindung mit einer großen Auswahl an Espern, die Sie sammeln können, indem Sie Kapitel im Story-Modus abschließen, goldene Schallplatten in Echo drehen, die Sie in Geschäften kaufen oder als Belohnung von Bounties oder Trials erhalten können, sind Sie für ein fetziges, actiongeladenes Spiel gerüstet Zeit!
Dislyte spielt im Jahr 2027, wo Überreste der Antike, mysteriöse außerirdische Obelisken, aus dem Boden sprießen und göttliche Wellen freisetzen, die bestimmte Menschen in Esper verwandelten. Als die Auserwählten gelten Espern fast magische Kräfte, die von Göttern aus vier verschiedenen Mythologien beeinflusst wurden:der nordischen, griechischen, chinesischen und ägyptischen. Aber mit diesem „Geschenk“ kommen aggressive und gefährliche Monster namens Miramons und Sentinels, die das mysteriöse Wesen bewachen.

Die Geschichte beginnt mit Brynn, einer Punkrockerin, die live vor einer überfüllten Arena mit Sieg, ihrem Partner, auftritt, als sie ihre Absicht bekannt geben, für ihr Musikgeschäft in Gyrate zu bleiben. Als ihre Aufführung zu Ende geht, beginnen Miramons anzugreifen, was dazu führt, dass sie in Sicherheit fliehen. Der Miramon-Angriff löst anschließend Brynns eigene Esper-Verwandlung aus und verleiht ihr ein Paar Flügel, die aus ihrem Rücken sprießen, und eine Woge unerklärlicher Macht.
Als frischgebackener Esper war Brynn jedoch machtlos, die beiden schattenhaften Gestalten, einen Wolfsmenschen und einen Scharfschützen, daran zu hindern, Sieg mitzunehmen und sie bewusstlos zu schlagen. Sie wird von der Esper Union gerettet und wird von zwei anderen Espern begleitet:Drew, ein ehemaliger Butler mit den Kräften von Anubis, und Q, ein Vlogger mit den Kräften von Cupid, um Sieg zu finden und gleichzeitig die heimtückische Agenda des Schattendekrets aufzudecken. Wird Brynn ihren Partner vor dem Schattendekret retten können? Und was war Siegs Vergangenheit mit der rätselhaften Organisation?

Wenn Sie von der Geschichte begeistert sind und leichter vorankommen oder einfach lernen möchten, wie Sie sich effektiv durch Wellen von Kämpfen kämpfen und wahnsinnig schwierige Bosse besiegen können, ist unser ausführlicher Dislyte-Anfängerleitfaden genau das Richtige für Sie!
Es erklärt alle Grundlagen, die Sie wissen müssen, um die Besonderheiten des Spiels zu lernen. Wir haben so viele Tipps und Tricks aufgeschrieben, wie wir uns vorstellen können, die Ihnen zu Beginn Ihrer heroischen Suche helfen würden, sich wieder mit Sieg zu vereinen und ein Meisterstratege im Kampf zu werden.
1. Kennen Sie Ihre Stärken und Schwächen
Elementarklassen
Es gibt vier große Elementarklassen in Dislyte, aber im Gegensatz zu den meisten Spielen, in denen sie normalerweise die gleiche Struktur von Erde, Wind, Wasser und Feuer verwenden, hat dieses hier Schimmer, Wind, Strömung und Inferno.
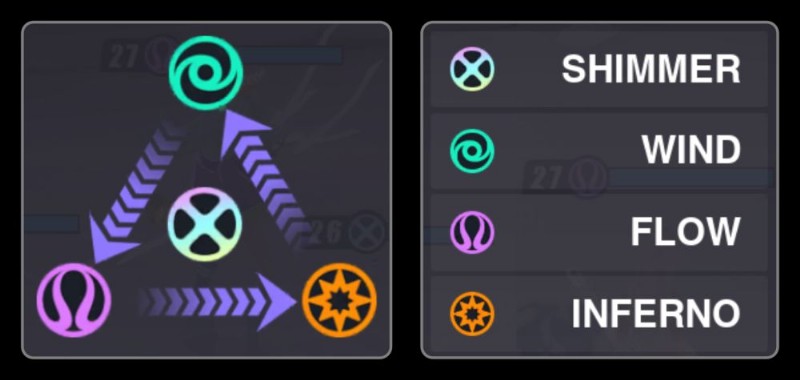
• Schimmern – hat keine elementaren Vor- oder Nachteile. Es wird durch ein X-Symbol in einem Kreis mit einem farbigen Farbverlauf dargestellt.
• Wind – stark gegen Flow, schwach gegen Inferno. Es wird durch einen kleinen Kreis dargestellt, der von Kurven innerhalb eines Kreises umgeben und grün gefärbt ist.
• Fluss – stark gegen Inferno, schwach gegen Wind. Es wird durch ein Paar gekrümmter Linien innerhalb eines Kreises dargestellt und ist lila gefärbt.
• Inferno – stark gegen Wind, schwach gegen Flow. Es wird durch einen 8-zackigen Stern in einem Kreis dargestellt und ist orange gefärbt.
Sie funktionieren normalerweise auch nicht auf die gleiche Weise wie andere RPGs, sodass es sich zunächst als verwirrend erweisen könnte, sich daran zu erinnern, welches Element stärker als das andere ist. Aber keine Sorge, die Entwickler haben dies bereits vorweggenommen und während des Kampfes mehrere Indikatoren gesetzt, die Ihnen helfen können, festzustellen, was was ist.
Verwandt: Dislyte Rare Esper Guide:Eine vollständige Beschreibung jedes seltenen Espers
Vorteil- und Nachteilindikatoren
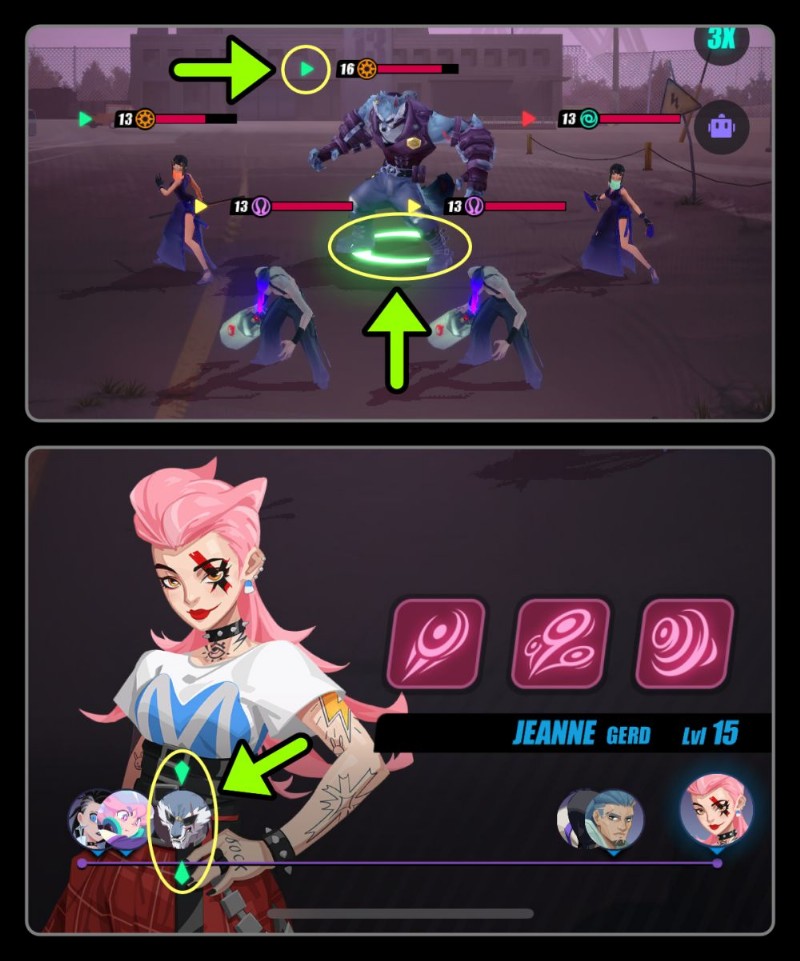
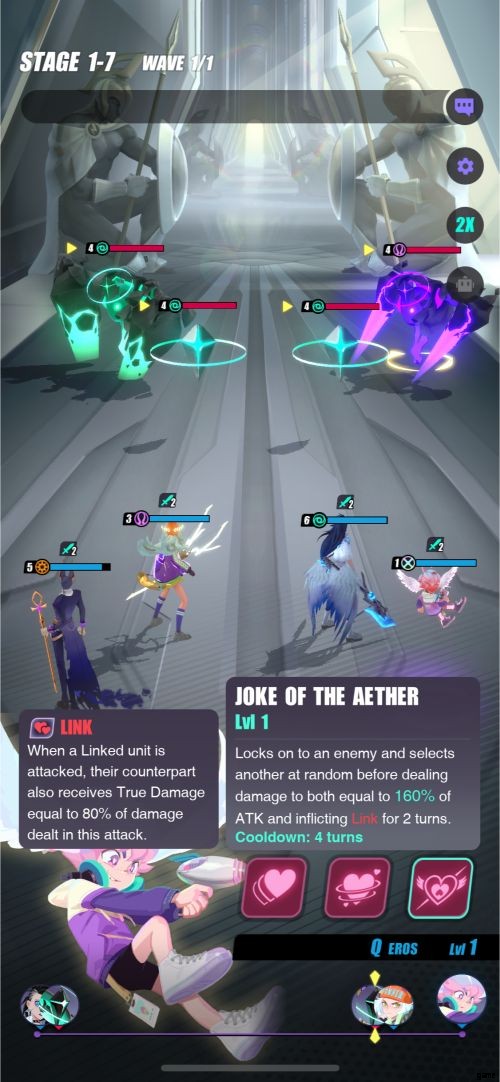
Während Sie an der Reihe sind, sehen Sie möglicherweise einen Pfeil auf der linken Seite der HP-Leiste eines Feindes, einen Kreis unter Ihrem ausgewählten Feind und zwei Pfeile, die auf die AP-Leiste zeigen, wo sich Ihr ausgewählter Feind befindet. All dies sind Indikatoren, die je nach Vorteil oder Nachteil Ihres aktuell ausgewählten Verbündeten gegenüber Ihrem Feind die Farbe entweder in Rot, Gelb oder Grün ändern.
• Rot – Das Element deines ausgewählten Verbündeten hat einen Nachteil gegenüber dem Element des Feindes. Angriffe auf diesen Feind haben eine Chance von +50 %, einen Fehlschlag auszulösen.
• Gelb – Das Element deines ausgewählten Verbündeten hat keinen Vorteil oder Nachteil gegenüber dem Element des Feindes. Dies geschieht, wenn sowohl Ihr Verbündeter als auch der Feind dasselbe Element haben oder wenn Sie jemanden mit dem Schimmer-Element verwenden oder darauf zielen. Angriffe auf diesen Feind verursachen normalen Schaden.
• Grün – Das Element deines ausgewählten Verbündeten hat einen Vorteil gegenüber dem Element des Feindes. Angriffe auf diesen Feind haben eine Chance von +15 %, einen kritischen Treffer auszulösen, und eine Chance von +50 %, einen Elementarsegen auszulösen.
Angriffsergebnisse
Während des Kampfes haben Sie die Möglichkeit, bestimmte Angriffsergebnisse während des Angriffs auszulösen, die von verschiedenen Faktoren abhängen. Diese Angriffsergebnisse beeinflussen, wie viel Schaden während eines Angriffs zugefügt wird.

• Fräulein – verursacht 25 % weniger Schaden und wird von Angreifern mit elementarem Nachteil ausgelöst.
• Kritisch – verursacht zusätzlichen Bonusschaden, der entsprechend dem C. DMG (Critical Damage) des Angreifers skaliert und unabhängig von Vor- oder Nachteilen von Elementen ausgelöst werden kann. Die Wahrscheinlichkeit dieser Auslösung basiert auf der C.RATE (Critical Rate) des Angreifers.
• Elementarer Segen – verursacht 30 % mehr Schaden und wird von Angreifern mit elementarem Vorteil ausgelöst.
Angriffsergebnisse werden in der Reihenfolge Miss> Crit> Elemental Boon beurteilt. Sie können nur eines dieser Ergebnisse oder eine Kombination aus Crit and Miss oder Elemental Boon haben. Du kannst kein Ergebnis von Miss + Elemental Boon haben.
Siehe auch:Dislyte Epic Esper Guide:A Complete Description of Each Epic Esper
Statuseffekte
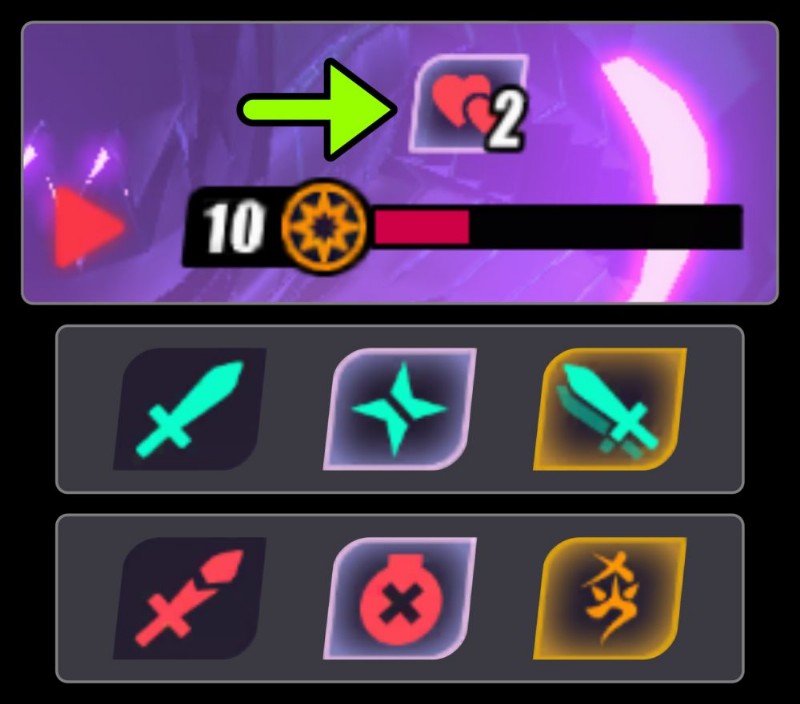
Manchmal finden Sie Symbole über der HP-Leiste. Diese stellen Buffs und Debuffs dar, die den Charakter derzeit betreffen. Buffs und Debuffs sind Statuseffekte, die sich positiv oder negativ auf den Charakter auswirken können. Diese reichen vom Erhöhen oder Verringern eines bestimmten Werts, dem Hinzufügen von mehr Schaden oder der Heilung von mehr HP zu einem Charakter, dem Verhindern, dass er sich bewegt, und so weiter.
Die daran angehängte Zahl gibt die Anzahl der Runden an, die der Status dauern wird. Jeder Buff oder Debuff hat ein einzigartiges Symbol, das ihn darstellt, aber alle haben eine bestimmte Farbe oder einen bestimmten Rahmen, der anzeigt, was sie sind.
• Grünes Symbol – stellen Buffs dar, die positive Statuseffekte sind.
• Rotes Symbol – stellen Debuffs dar, die negative Statuseffekte sind.
• Silberner Rahmen – stellen Statuseffekte dar, die ACC und RESIST ignorieren, nicht verfehlen können und ausgelöst werden müssen. Erscheint bei Buffs oder Debuffs, die für einen bestimmten Esper oder Feind spezifisch sind. Der bisher einzige einzigartige Debuff, der diesen Rahmen nicht hat, ist Celine (Sirene)’s Sleep.
• Goldrahmen – stellen unaufhebbare / nicht entfernbare Statuseffekte dar. Erscheint bei Buffs oder Debuffs, die für einen bestimmten Esper oder Feind spezifisch sind.
Verwandt: Leitfaden für legendäre Esper von Dislyte:Eine vollständige Beschreibung aller legendären Esper
Seien Sie gewarnt, dass die meisten Bosse oder Wächter gegen viele Debuffs resistent sind, daher ist es oft besser, diese Debuffs anderen Feinden in ihrer Umgebung zuzufügen.
2. Bilden Sie einen starken Trupp!
Das Hauptziel des Spiels ist es, Ihre Feinde zu eliminieren, indem Sie ihre HP auf Null bringen und alle Wellen in einer Phase beseitigen. Jede Stufe kann jeweils 1-3 Wellen haben, wobei die letzte Welle die stärksten Feinde und manchmal einen Boss enthält. Um diese Wellen zu überleben und deine Schlachten zu gewinnen, musst du einen starken Trupp bilden. Du kannst bis zu 5 Esper (und manchmal Geister wie Starimon, über die ich später sprechen werde) im Kampf haben.
Während die Kombination von Espern basierend auf ihren Fähigkeiten und Stärken wichtig ist, um Ihren Trupp zu bilden, gilt die tatsächliche Reihenfolge der Formation nicht für den allerersten Charakter, der als Ihr Kapitän dienen wird.
Verwandt: Dislyte-Rangliste:Eine vollständige Rangliste aller Esper
Wählen Sie Ihren Kapitän
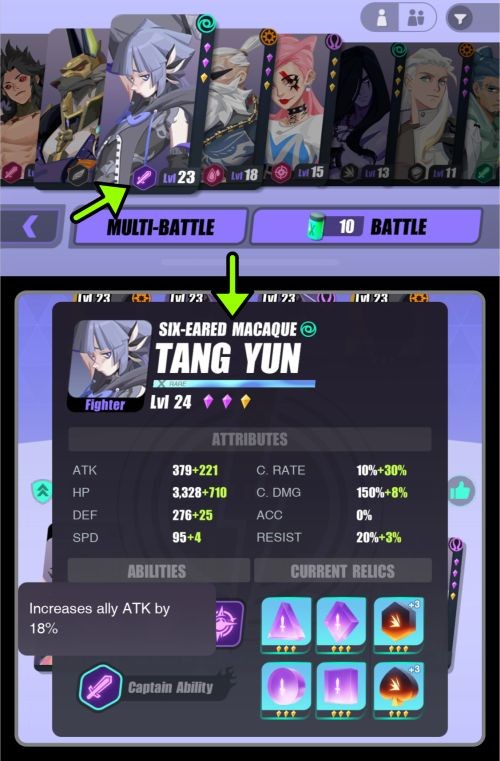
Jeder Esper kann Kapitän sein, aber nicht jeder Kapitän hat eine Kapitänsfähigkeit. Kapitänsfähigkeiten sind einzigartige Fähigkeiten, die einige Esper haben, die einen bestimmten Wert des gesamten Trupps erhöhen. Wenn du einen Esper mit der Fähigkeit eines Kapitäns in den Platz des Kapitäns platzierst, wird die Beschreibung der Fähigkeit direkt unter deinem Trupp angezeigt.
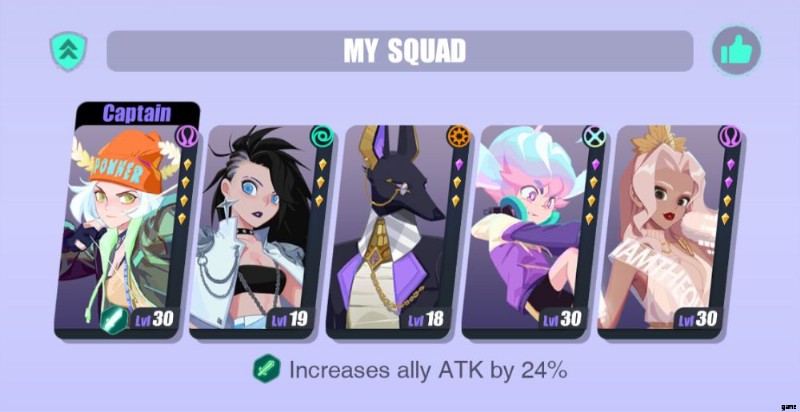
Anhand der Symbole neben ihren Stufen können Sie ganz einfach feststellen, welcher Esper über eine Kapitänsfähigkeit verfügt, wenn Sie durch Ihre Auswahl an Espern blättern, wenn Sie vor dem Kampf ein Team bilden, oder wenn Sie außerhalb des Kampfes die Registerkarte Esper überprüfen. Wenn du deinen Esper auswählst und auf das Captain-Fähigkeitssymbol klickst, das auf seiner Statistikseite erscheint, wird es dir sagen, was seine Fähigkeit tut.
Wenn Sie durch Ihre Auswahl an Espern blättern, werden Sie möglicherweise feststellen, dass einige ihrer Symbole ausgegraut sind. Das liegt daran, dass nicht alle Captain-Fähigkeiten in allen Modi funktionieren. Einige Captain-Fähigkeiten funktionieren nur in bestimmten Modi wie Ritual und Sonic Miracles in Trials oder Point War. Unten ist eine Liste von Espern, die Captain-Fähigkeiten haben:
Für jeden Modus
Legendär
| Erhöht HP von Verbündeten um 30 % | Jin Yuyao (Königinmutter), Gabrielle (Njord), Ahmed (Geb) |
| Erhöht die ATK von Verbündeten um 30 % | Sun Wukong (Tang Xuan), Raven (Odin), Li Ling (Nezha) |
| Erhöht Verbündeten-DEF um 30 % | Donnar (Thor) |
| Erhöht Verbündeten-SP um 25 % | Tiye (Nuss), Ollie (Osiris) |
| Erhöht Verbündeten-C.RATE um 25 % | Lewis (Ares) |
| Erhöht die AK von Verbündeten um 40 % | Triki (Loki), Lucas (Apollo) |
| Erhöht den WIDERSTAND von Verbündeten um 40 % | Sally (Sif), Siena (Gaia) |
Episch
| Erhöht HP von Verbündeten um 24 % | Heng Yue (Chang’e) |
| Erhöht die ATK von Verbündeten um 24 % | Mona (Artemis), Eira (Freya), Stewart (Dionysos) |
| Erhöht Verbündeten-DEF um 24 % | Ren Si (Schwarze Schildkröte) |
| Erhöht Verbündeten-SP um 20 % | Long Mian (Ao Bing) |
| Erhöht Verbündeten-C.RATE um 20 % | Falken (Horus), Kaylee (Anuket) |
| Erhöht die ACC von Verbündeten um 30 % | Celine (Sirene), Chloe (Medea) |
| Erhöht den WIDERSTAND von Verbündeten um 30 % | Fabrice (Freyr) |
Selten
| Erhöht HP von Verbündeten um 18 % | Unky Chai (Yue Lao) |
| Erhöht die ATK von Verbündeten um 18 % | Tang Yun (Sechsohraffe), Chalmers (Idun) |
| Erhöht Verbündeten-DEF um 18 % | Lauren (Heket) |
| Erhöht Verbündeten-SP um 15 % | Melanie (Medusa) |
| Erhöht Verbündeten-C.RATE um 15 % | Leon (Vali) |
| Erhöht die AK von Verbündeten um 20 % | Jeanne (Gerd) |
| Erhöht den WIDERSTAND von Verbündeten um 20 % | Berenice (Bastet) |
Nur für Point War
Legendär
| Erhöht HP der Verbündeten im Point War um 40 % | Cäcilia (Isis) |
| Erhöht die ATK der Verbündeten im Point War um 40 % | Narmer (Ra), Biondina (Poseidon) |
| Erhöht die DEF der Verbündeten im Point War um 40 % | Clara (Hera) |
| Erhöht den WIDERSTAND von Verbündeten im Point War um 50 % | Hyde (Hades) |
Episch
| Erhöht HP der Verbündeten im Point War um 30 % | Alexa (Aphrodite), Dhalia (Calypso), Nicole (Nephthys) |
| Erhöht die ATK der Verbündeten im Point War um 30 % | Arcana (Hermes), Bonnie (Eris) |
| Erhöht die DEF der Verbündeten im Point War um 30 % | Laura (Neith) |
| Erhöht die ACC der Verbündeten im Point War um 40 % | Anesidora (Pandora) |
| Erhöht den Widerstand der Verbündeten im Point War um 40 % | Luo Yan (Yanluo Wang) |
Selten
| Erhöht die DEF der Verbündeten im Point War um 24 % | Bardon (Baldr) |
| Erhöht die SPD der Verbündeten im Point War um 20 % | Li Ao (Tao-Krawatte) |
Nur für Ritual- und Klangwunder
Episch
| Erhöht die HP der Verbündeten in Ritual- und Schallwundern um 30 % | Jacob (Jormungand), Meredith (Scylla) |
| Erhöht die ATK der Verbündeten in Ritual- und Schallwundern um 30 % | Lu Yi (Dayi), Hathor (Lynn), Xie Chuyi (Todeswächter Hei) |
| Erhöht Verbündeten-DEF in Ritual- und Schallwundern um 30 % | Asenath (Nefertem) |
| Erhöht die SPD von Verbündeten in Ritual- und Schallwundern um 25 % | Sander (Set) |
| Erhöht die ACC von Verbündeten in Ritual- und Schallwundern um 40 % | Kara (Serket), Xie Yuzhi (Todeswächter Bai) |
Selten
| Erhöht die C.RATE von Verbündeten in Ritual- und Schallwundern um 20 % | Halle (Hodur) |
Habe immer einen Heiler
Im Gegensatz zu den meisten Rollenspielen bietet Dislyte Ihnen weder ein Inventar, das Sie im Kampf öffnen können, noch Tränke, die Sie verwenden können. Wenn ein Verbündeter im Kampf stirbt, können Sie ihn auch nicht mit Gegenständen zurückbringen. Selbst wenn ein Mitglied deines Teams stirbt, aber du den Kampf trotzdem gewinnst, erhält es glücklicherweise immer noch Erfahrungspunkte.
Verwandt: Dislyte Squad Formation Guide:Empfohlene Teamformationen
Für den Gelegenheitsspieler, der nicht so viel Zeit zur Verfügung hat, ist dies perfekt, da es die Dauer der Kämpfe kurz hält, es aber auch schwierig macht, Kämpfe mit starken Gegnern zu überleben. Anstatt sich mit Tränken einzudecken, musst du deine HP-Statistik erhöhen oder einen Esper mit einer Heil- oder Wiederbelebungsfertigkeit oder einem Buff hinzufügen, um deinen Trupp am Leben zu erhalten.

Die allererste Heilerin, die Sie erhalten, ist Helena (Helen) und Sie können sie in Ihre Liste aufnehmen, sobald Sie das erste Kapitel abgeschlossen haben. Während ihre ersten beiden Fähigkeiten nicht besonders stark sind, haben sie Effekte, die einen Buff eines Feindes deaktivieren und die AP des Ziels verringern könnten, was nützlich sein kann. Die wichtigste Fähigkeit, die sie besitzt, ist jedoch ihre dritte, nämlich Whispered Blessing.
Im Wesentlichen heilt es einen anvisierten Teamkollegen um einen Prozentsatz seiner HP (20 % auf Stufe 1), heilt aber auch alle anderen Verbündeten um einen geringeren Prozentsatz (10 % auf Stufe 1). Sie im Team zu haben, erhöht sofort die Überlebensfähigkeit Ihres Teams. Während Sie das Spiel weiterspielen und durch verschiedene Esper wechseln, sollten Sie Ihre anderen Optionen für Heiler erkunden. Nachfolgend finden Sie eine Liste, die wir für Sie zusammengestellt haben:
Alle Heiler im Spiel
| Legendär | Episch | Selten |
| Clara (Hera) | Alexa (Aphrodite) | Berenice (Bastet) |
| Cecelia (Isis) | Asenath (Nefertem) | Chang Pu (Yaoji) |
| Jin Yuyao (Königinmutter) | Fabrice (Freyr) | Helena (Helene) |
| Sally (Sif) | Heng Yue (Chang'e) | Lauren (Heket) |
| Luo Yan (Yanluo Wang) | Ye Suhua (Shao Siming) |

Wenn es um Auferstehung geht, ist Luo Yan (Yanluo Wang) der einzige Esper, der im Moment einen Verbündeten wiederbeleben kann, der auch ein Heiler ist.
Alternativen zu Heilern
Wenn Sie alternativ keinen der Heiler verwenden und eine andere Teamkombination haben möchten, können Sie stattdessen diese Esper in Ihr Team aufnehmen:

Die dritte Fertigkeit von Catherine (Hela), Underworld Presence, gewährt allen verbündeten Espern für eine Runde einen Standoff-Buff. Dieser Buff hält einen Esper mit mindestens 1 HP bis zur nächsten Runde am Leben, egal wie oft er angegriffen wird.

Gabrielle (Njords) dritte Fähigkeit, Rush, segnet alle Verbündeten mit Immunität (die verhindert, dass du geschwächt wirst) und DEF Up für 2 Runden.

Die zweite Fähigkeit von Celine (Sirene), Sound of Nature, gewährt 2 Runden lang SPD Up und 1 Runde DEF Up.

Die dritte Fertigkeit von Bardon (Glatzkopf), Rise to Honor, gewährt allen verbündeten Espern 2 Runden lang DEF Up.
Mehrere Zielfähigkeiten sind ein Muss
Da Sie normalerweise 5 Feinde pro Kampf haben und bis zu 3 Wellen bekämpfen können, ist es ein Muss, einen Esper in Ihrem Team zu haben, der mehr als einen Feind gleichzeitig angreifen kann. Dadurch sparen Sie nicht nur Zeit, sondern können auch Ihre Feinde töten, bevor sie Sie töten. Wenn Sie Ihre Feinde mit mehreren Zielfertigkeiten schwächen, insbesondere wenn diese Fertigkeiten Debuffs haben, wird das Blatt im Kampf erheblich gewendet, wenn Ihre anderen Verbündeten den Job erledigen.
Esper, die mehr als 1 Gegner angreifen
| Legendär | Episch | Selten |
| Tiye (Mutter) | Celine (Sirene) | Q (Amor) |
| Tang Xuan (Sun Wukong) | Kara (Serket) | Melanie (Medusa) |
| Rabe (Odin) | Eira (Freya) | Layla (Medjed) |
| Narmer (Ra) | Falken (Horus) | Jeanne (Gerd)** |
| Li Ling (Nezha) | Lu Yi (Dayi)* | Bai Liuli (Weiße Schlange)* |
| Triki (Loki) | Arcana (Hermes) | |
| Hyde (Hades) | Luo Yan (Yanluo Wang) | |
| Biondina (Poseidon) | Chloe (Medea)* | |
| Gabrielle (Njord) | Catherine (Hela) | |
| Unas (Shu) | Pritzker (Mimir) | |
| Lucas (Apollo) | Jakob (Jormungand) | |
| Siena (Gaia) | Ren Si (Schwarze Schildkröte) | |
| Lin Xiao (Weißer Tiger) | ||
| Long Mian (Ao Bing) | ||
| Anesidora (Pandora) | ||
| Bonnie (Eris) | ||
| Xie Chuyi (Todeswächter Hei) | ||
| Xie Yuzhi (Todeswächter Bai) | ||
| Kaylee (Anuket) |
* Greift zufällige Feinde an, greift aber möglicherweise nicht alle an.
**Greift mehr als einen Feind an, aber nicht alle.
Solange Sie diese drei Arten von Espern in Ihrem Team haben (oder vielleicht sogar eine Kombination dieser Eigenschaften auf einem oder zwei Espern), haben Sie eine solide Grundlage und können selbstbewusst gegen alle möglichen Feinde kämpfen.
Wählen Sie eine gute Balance von Elementen
Vor jedem Kampf gehst du zum Formationsbildschirm, wo du auswählen kannst, welche Esper für den Kampf verwendet werden sollen. Abgesehen von den drei erwähnten Typen von Espern ist es auch wichtig zu überlegen, welchen Elementartyp Sie für Ihr Team auswählen sollten. Es gibt 4 Elemente und 5 Esper, also wird mindestens ein Element dupliziert. Sie müssen nicht alle Elemente haben, um in Kämpfen erfolgreich zu sein, aber es ist oft die sicherste Wahl, wenn Sie sich nicht sicher sind, welchen Feinden Sie begegnen werden, und besonders, wenn Sie zum ersten Mal auf die Bühne oder das Level stoßen.

Im obigen Beispiel enthalten die angezeigten potenziellen Feinde 1 Boss-Gegner mit einem Wind-Element und 3 normale Feinde mit Flow-Elementen. Wenn Sie Ihre Formation allein darauf aufbauen, könnten Sie daran denken, 1 oder 2 Inferno-Elemente (stark gegen Wind) und bis zu 3 oder 4 Wind-Elemente (stark gegen Flow) zu haben. Was Sie in potenziellen Feinden sehen, repräsentiert jedoch nicht immer alle Feinde, denen Sie in dieser Phase tatsächlich begegnen werden.
Auf dem zweiten Bild sieht man, dass es auf der ersten Welle Feinde gibt, die auch das Inferno-Element haben. Wenn ich die zuvor beschriebene Formation gemacht hätte, hätten diese Feinde, die stark gegen das Windelement sind, die meisten meiner Esper geschlagen, bevor ich die letzte Welle erreichte.
Die potenziellen Feinde, die auf dem Formationsbildschirm erschienen, schienen in dieser Phase nur die der letzten Welle zu zeigen und nicht die der ersten Welle. Im Allgemeinen ist es also am besten, eine gute Balance aller Elemente in Ihrem Team zu finden und sich nur auf bestimmte Elemente zu konzentrieren, wenn Sie die Etappe bereits beendet haben und wissen, wie die Feinde angreifen.
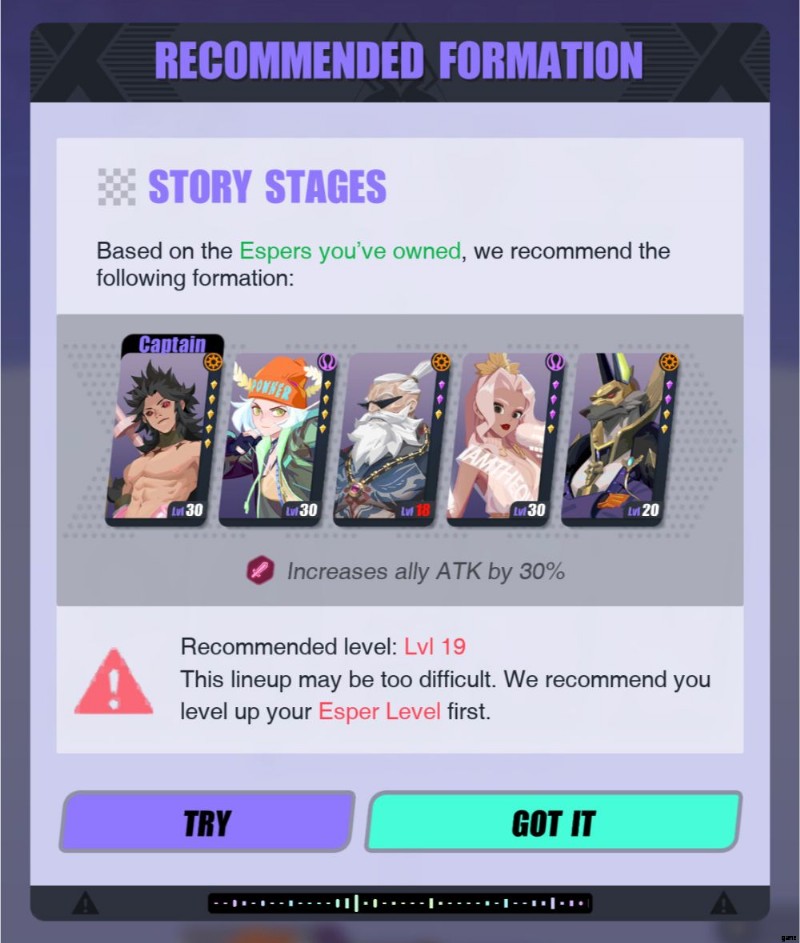
Im Formationsbildschirm siehst du möglicherweise auch ein Daumen-hoch-Zeichen neben „Mein Kader“. Wenn Sie darauf klicken, schlägt das Spiel eine Formation vor, die Sie verwenden können. Obwohl es manchmal gute Vorschläge geben kann, empfehlen wir nicht, sich ständig auf diese Funktion zu verlassen, da ihre Vorschläge die Elemente, mit denen Sie konfrontiert werden, nicht wirklich berücksichtigen. Hätte ich ihren Vorschlag für diese Phase befolgt, hätten die 4 Feinde mit Flow-Elementen die 3 Inferno-Esper, die ich hatte, leicht getötet.
3. Geschwindigkeit ist der Schlüssel
Eine Sache, an die Sie sich erinnern müssen, ist, dass die Reihenfolge der Esper in Ihrem Team die Reihenfolge, in der sie angreifen, nicht wirklich beeinflusst. Das hängt ausschließlich von ihrer SPD und AP ab. Bevor wir Ihnen Tipps geben können, wie Sie Cooldowns, SPD und die Aktionspunktleiste missbrauchen oder nutzen können, lassen Sie uns zunächst erklären, was sie sind und was sie bewirken.
Fähigkeiten und Abklingzeiten
Bei bestimmten Fähigkeiten, die Sie gerade verwendet haben, erscheint eine Zahl darüber, wenn Sie den Charakter in Ihrem nächsten Zug verwenden, wie die dritte Fähigkeit auf dem Bild unten. Dies ist eine Cooldown-Nummer. Abklingzeiten sind eine Möglichkeit für das Spiel, um zu verhindern, dass Sie zu stark werden und eine sehr starke Fertigkeit spammen. Die Zahl, die darüber erscheint, ist die Anzahl der Runden, die durchlaufen werden müssen, bevor Sie es erneut verwenden können.
Die erste Fertigkeit auf deinem Esper ist die Grundfertigkeit, die keine Abklingzeit hat und immer verfügbar ist, es sei denn, du wurdest von einem Debuff getroffen, der es dir unmöglich macht, irgendwelche Aktionen auszuführen.
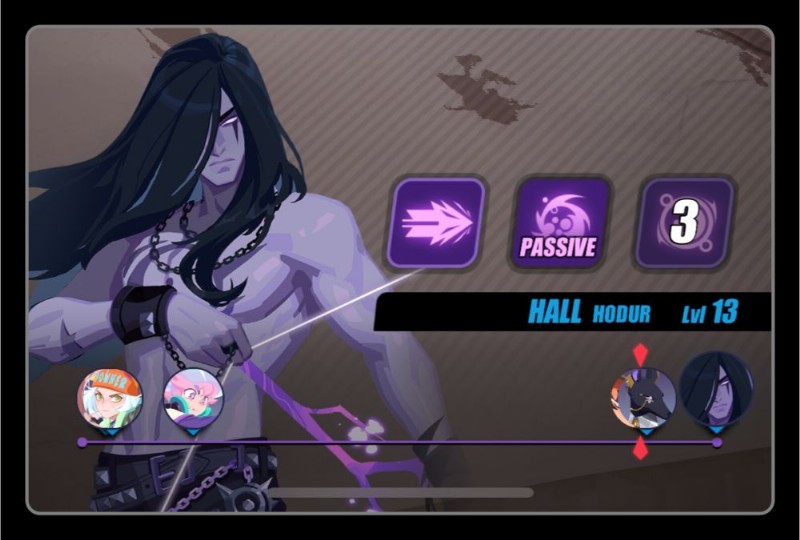
Der zweite Skill ist entweder ein stärkerer aktiver Skill mit einer Abklingzeit oder ein passiver Skill. Passive Fähigkeiten werden von selbst aktiviert und können oft einen Auslöser oder eine Bedingung für ihre Aktivierung haben. In unserem Beispiel wird das Passiv von Hall (Hodur) nur aktiviert, wenn ein Verbündeter einzelne Ziele angreift. Wenn sie dies tun, würde Hall (Hodur) mit einem zusätzlichen Schlag seines Bogens folgen, der Schaden in Höhe von 40 % der ATK verursacht und dem Feind für 1 Runde Gift zufügt.
Die dritte Fertigkeit ist die stärkste Fertigkeit des Charakters und hat normalerweise die höchste Abklingzeit.
AP, SPD und die Aktionspunktleiste
Die Aktionspunkteleiste ist die dünne violette Leiste mit Pfeilen und Symbolen Ihrer Esper und Feinde. Jeder Charakter im Kampf hat seine eigenen AP oder Aktionspunkte, die sich mit der Zeit füllen. Sie können es überprüfen, indem Sie ein paar Sekunden lang auf einen Feind oder Verbündeten drücken, damit die Statistiken des Charakters angezeigt werden, oder es überprüfen, indem Sie auf das Zahnradsymbol auf der rechten Seite des Kampfbildschirms drücken. Sobald es zu 100 % gefüllt ist, hat dieser Charakter eine Runde, um sich zu bewegen.
Je schneller du 100 % AP erreichst, desto schneller kannst du deinen nächsten Zug haben und desto schneller vergehen deine Cooldowns. Die AP aller Charaktere füllen sich jedoch nicht im gleichen Tempo. Aus diesem Grund werden Sie manchmal feststellen, dass der Feind Ihre Verbündeten plötzlich überholt, obwohl sie zuvor weit zurück waren, und umgekehrt.

Die Geschwindigkeit, mit der sich ein AP füllt, hängt von SPD ab. Leider gibt es keine Möglichkeit, die SPD Ihrer Verbündeten und die SPD Ihrer Feinde während des Kampfes zu bestimmen oder zu vergleichen, sondern nur die AP %. Sie müssen sich auf Ihre eigene Beobachtungsgabe verlassen, um festzustellen, ob sich Ihre Feinde viel schneller bewegen als Ihre Verbündeten. Hier wird die Aktionspunkteleiste nützlich, da sie eine gute visuelle Darstellung bietet.
Es gibt mehrere Möglichkeiten, das Blatt im Kampf zu wenden, indem Sie effizient mit APs und Cooldowns arbeiten.
SPD manipulieren
Geschwindigkeit beeinflusst, wie schnell ein Charakter seine AP auffüllt und seinen nächsten Zug macht. Sie können es erhöhen, indem Sie Relikte mit SPD-Boni ausrüsten, Ihren Esper durch Aufstieg verbessern, Esper-Fähigkeiten mit einem SPD-Up-Buff verwenden und Ihrem Trupp einen Esper mit einer erhöhten SPD-Captain-Fähigkeit zuweisen.
Dies ist sehr nützlich, wenn Sie Verbündete haben, die entweder langsamer sind als Ihr Feind, oder wenn Sie diese zusätzliche Geschwindigkeit benötigen, damit bestimmte Buffs, Debuffs und Fähigkeiten besser zu Ihrem Vorteil funktionieren. Eine hohe Geschwindigkeit gibt dir auch einen präventiven Vorteil und lässt dich zu Beginn des Kampfes als Erster agieren. Wenn Sie die Initiative ergreifen, stellen Sie sicher, dass Ihre Feinde Sie nicht debuffen oder töten, bevor Sie angreifen können.
Alternativ können Sie sich auch darauf konzentrieren, Esper mit SPD-Debuffs in Ihren Trupp zu setzen und entweder die Feinde anzuvisieren, die sich am schnellsten bewegen, die Feinde, die am härtesten treffen, oder die Feinde, die heilen können. Diese drei Arten von Feinden können sich als die am schwierigsten zu besiegenden erweisen, daher ist es wichtig, sie zuerst ins Visier zu nehmen. Unten haben wir eine Liste von Buffs &Debuffs zusammengestellt, die SPD oder AP und die Esper, die sie haben, modifizieren, sowie eine Liste von Captains, die SPD-Buffing-Fähigkeiten haben:
SPD- und AP-Buffs
 | SPD nach oben | Erhöht SPD um 30 %. | Sienna (Gaia), Celine (Sirene), Eira (Freya), Sander (Set), Anesidora (Pandora), Xie Yuzhi (Death Guard Bai), Meredith (Scylla) |
 | Brisingamens Wacht | Gewährt 15 % Bonus-AP am Ende des Zuges jedes Teammitglieds. Dieser Debuff ignoriert ACC und RESIST, kann nicht verfehlen und muss ausgelöst werden. | Eira (Freya) |
 | Eile | (Undispellable) Gewährt 30 SPD pro Hast (max. 3 Steigerungen). Wird nach einem Angriff gebannt. | Unas (Shu) |
SPD- und AP-Debuffs
 | SPD nach unten | Reduziert SPD um 30 %. | Tiye (Nuss), Kara (Serket), Eira (Freya), Sander (Set), Lin Xiao (Weißer Tiger), Long Mian (Ao Bing), Dhalia (Calypso), Xie Chuyi (Todeswächter Hei), Kaylee (Anuket), Brynn (Walküre), Melanie (Medusa), Lauren (Heket) |
Captain-Fähigkeiten mit SPD-Buffs
| Erhöht die SPD von Verbündeten um 25 % | Tiye (Nuss), Ollie (Osiris) | legendär |
| Erhöht die SPD von Verbündeten um 20 % | Long Mian (Ao Bing) | episch |
| Erhöht die SPD von Verbündeten um 15 % | Melanie (Medusa) | Selten |
| Erhöht die SPD der Verbündeten im Point War um 20 % | Li Ao (Tao-Krawatte) | Selten |
| Erhöht die SPD von Verbündeten in Ritual- und Schallwundern um 25 % | Sander (Set) | episch |
| Erhöht die SPD der Verbündeten in Holobattle um 35 % | Unas (Shu) | legendär |
| Erhöht die SPD der Verbündeten in Holobattle um 25 % | Pritzker (Mimir) | episch |
Stopp sie vollständig
Eine andere Möglichkeit, mit Feinden mit hoher SPD umzugehen sowie Feinde hart zu treffen und zu heilen, besteht darin, sie daran zu hindern, sich zu bewegen oder Aktionen auszuführen. Diese Methode ist auch nützlich, um zu verhindern, dass Gegner, die dem rechten Ende der Aktionspunktleiste am nächsten sind, angreifen oder heilen und somit eine Runde überspringen. Nachfolgend finden Sie eine Liste von Debuffs, die Ihnen dabei helfen können.
Aktionsstoppende Debuffs
 | Verschlingen | Verhindert, dass das Ziel Aktionen ausführt, ausgewählt wird, angegriffen und gebufft/geschwächt wird. | Li Ao (Tao-Krawatte) |
 | Einfrieren | Kann keine Aktionen ausführen. | Long Mian (Ao Bing), Dhalia (Calypso), Kaylee (Anuket), Brynn (Walküre) |
 | Versteinerung | Kann keine Aktionen ausführen oder die Abklingzeit von Fähigkeiten verringern. | Triki (Loki), Jacob (Jormungand), Melanie (Medusa) |
 | Schlaf | Kann keine Aktionen ausführen, bis es beschädigt ist. | Celine (Sirene), Stewart (Dionysos) |
 | Stun | Cannot take actions. | Jin Yuyao (Queen Mother), Tiye (Nut), Triki (Loki), Lucas (Apollo), Sienna (Gaia), Arcana (Hermes), Sander (Set), Pritzker (Mimir), Anesidora (Pandora), Bonnie (Eris), Dhalia (Calypso), Xie Yuzhi (Death Guard Bai), Bardon (Baldr), Tang Yun (Six-Eared Macaque), David (Jason), Layla (Medjed), Jeanne (Gerd) |
Alternatively, you can choose to force your enemies to use their weakest attack, which is their basic attack, so they won’t be able to use any of their stronger hard-hitting or healing skills.
Action-Limiting Debuffs
 | Silence | Cast only basic ability. | Jiang Man (Meng Po), Bai Liuli (White Snake), Ollie (Osiris), Laura (Neith) |
 | Taunt | Forced to attack the debuff caster with basic ability at the start of turn. | Djoser (Atum), Falken (Horus), Ren Si (Black Tortoise), Bardon (Baldr), Li Ao (Tao Tie), David (Jason), Ollie (Osiris) |
Use the enemies’ high SPD to your advantage
Sometimes, when you can’t control something, the best thing to do is to embrace it. Since their turns come by so quickly, there are certain debuffs that you can use against your high SPD enemies that will trigger a negative effect at the start of every turn.
Debuffs best used on High SPD Enemies
 | Bleed | Receives True Damage equal to 50% of the debuff caster’s ATK at the start of the turn. | Lu Yi (Dayi), Lin Xiao (White Tiger), Zelmer (Sekhmet) |
 | Pandora’s Box | Takes effect at the start of the target’s 2nd turn. Removes a certain percentage of current HP and inflicts Stun for 1 turn. | Anesidora (Pandora) |
 | Poison | Loses 4% of max HP at the start of the turn. | Jiang Man (Meng Po), Kara (Serket), Jacob (Jormungand), Hall (Hodur), Layla (Medjed), Meredith (Scylla) |
Making the most out of your high SPD
Alternatively, if your Espers are the ones with high SPD, there are some buffs that will complement this stat very well that also trigger at the start of each turn:
Buffs best paired with High SPD
 | Recovery | Recovers 15% max HP at the start of the turn. | Asenath (Nefertem), Fabrice (Freyr), Heng Yue (Chang’e), Luo Yan (Yanluo Wang), Berenice (Bastet), Ye Suhua (Shao Siming), Ollie (Osiris), Nicole (Nephthys) |
 | Conductor | Deals damage to all enemies based on DEF at the beginning of each turn. Removed upon receiving disables. | Donnar (Thor) |
 | Neko-Sense | Each stack increases Tevor’s damage taken by 15%. When stacks are maxed, resets all ability cooldowns and attacks a target twice the next turn, then removes all existing stacks. Max 2 stacks. | Tevor (Sphinx) |
4. Know When to Use Your Skills
Each Esper has their own unique set of skills. How you use those skills will dictate how you do in battle. Basic skills, the first skill on your set, have no cooldowns and can be used anytime. On the other hand, your higher damage skills, healing skills or buff and debuff skills (which are usually the second or third skill) have cooldowns of their own unless they’re a passive skill. Because of this, you won’t always have the option to use them so you have to be wise when it comes to timing.
When to use Basic Skills
Since this is usually the least powerful skill you usually use this when your two other powerful skills are on cooldown. Aside from that though, it may benefit you to use them if you are saving your stronger skills for the next wave and the enemies that are left are close to death. The first skill is also typically a one-target skill, and depending on the Espers on your team, using this skill can be the best choice in a situation.
An example of this is Mona (Artemis)’s first skill, Moonshot, where she gains an additional turn if she kills an enemy with this attack. Another example is Hall (Hodur)’s Passive 2nd skill where each time an ally attacks individual targets, he deals an attack of his own on the same target.
When to use your High Damage Skills
This depends greatly on the kind of enemies you have. If you have 1 wave of enemies, use them as soon as you can to finish the battle. If you have 2-3 waves of enemies, it’s best to use just a couple of them at a time so that when you reach the next wave, there are still some strong skills that are not on cooldown that you can use on the fresh batch of enemies.
Avoid using your high damage skills on enemies that are already near death unless it is the last enemy. You would not want to waste a skill that could be used to attack a healthier enemy. Aside from this, prioritize using multiple-target skills at the start so that you could weaken the enemy and it would be easy to pick them off with your one-target skills.
When to use your Healing Skills
The best time to use them is when your ally’s life is less than 50% unless you are fighting an enemy or boss that could launch a fairly strong attack like Kronos from Ritual Miracle. In those cases, you’d want to make sure to keep your HP as full as possible before Kronos attacks as he launches a second attack as a bonus turn if he successfully kills at least one ally with it. There are also a couple of Espers with that type of skill that could wipe out your team blow after blow so be careful.
When it comes to fighting in multiple waves, I highly suggest that you hold off on using your healing skills when the wave you are currently in is about to finish and you still have a next wave waiting for you. This is because the game heals you in between waves. If you have 50% or more HP left in you before the wave ends, save your heals for later.
When to use your Buff and Debuff Skills
Buffs and debuffs are always best used at the start of a battle so that each attack would be at its best potential. Just make sure that your first turns are not all buff and debuff skills and balance them out with some damage attacks (unless of course your buff and debuff skills deal damage as well). However if you would like to know each specific buff and debuff’s best use, read on to the next section below.
5. Strategize with Buffs and Debuffs
There are many different buffs and debuffs in the game and a few of them are unique to certain Espers. You don’t need to learn all the buffs and debuffs by heart to play the game and win your battles, but when you find yourself stuck on a level or stage, it has its advantages.
Learning what they do and how to use it can greatly help you in battle and even help you form your squad. Below is a list of buffs and debuffs and which Espers possess them as well as our notes on their recommended use. Take note that this list does not involve buffs and debuffs of Miramon, Sentinels and other enemies.
How to utilize Buffs
Buffs are status effects that positively affect a character.
Regular Buffs
These are buffs that are usually shared by many different Espers and can be disabled.
 | ATK Up | Increases ATK by 40%. | Narmer (Ra), Sally (Sif), Sienna (Gaia), Fabrice (Freyr), Luo Yan (Yanluo Wang), Dhalia (Calypso), Taylor (Hercules), Brynn (Valkyrie), Freddy (Fenrir), Ye Suhua (Shao Siming), Unky Chai (Yue Lao) |
Useful against enemies with high HP or DEF. Low ATK allies will greatly benefit from this.
 | C.RATE Up | Increases C.RATE by 30%. | Lewis (Ares), Dhalia (Calypso), Taylor (Hercules), Xie Chuyi (Death Guard Hei), Kaylee (Anuket), Helena (Helen), Unky Chai (Yue Lao) |
Use with allies that have high C.DMG to fully utilize this buff.
 | CRIT RESIST | +30% CRIT RESIST | Laura (Neith), Meredith (Scylla) |
Best used on low HP or DEF allies or when against enemies with high C. RATE or C. DMG.
 | DEF Up | Increases DEF by 60%. | Donnar (Thor), Gabrielle (Njord), Celine (Siren), Bardon (Baldr), Ye Suhua (Shao Siming), Nicole (Nephthys), Meredith (Scylla) |
Useful against enemies with high ATK. Low DEF allies will greatly benefit from this. May not be so useful against enemies with True Damage.
| | Immunity | Cannot be debuffed. | Donnar (Thor), Gabrielle (Njord), Sally (Sif), Unas (Shu), Clara (Hera), Cecilia (Isis), Fabrice (Freyr), Lynn (Hathor), Chang Pu (Yao Ji) |
Useful against enemies with many debuff skills.
 | Invincibility | Immune to all damage. | Fabrice (Freyr), Ye Suhua (Shao Siming), Ollie (Osiris) Nicole (Nephthys) |
Useful for when you are up against enemies that you have an elemental disadvantage with. Also useful for when you have an ally that is near death and cannot be healed immediately or at all.
 | Recovery | Recovers 15% max HP at the start of the turn. | Asenath (Nefertem), Fabrice (Freyr), Heng Yue (Chang’e), Luo Yan (Yanluo Wang), Berenice (Bastet), Ye Suhua (Shao Siming), Ollie (Osiris), Nicole (Nephthys) |
Useful for all situations but best used during battles that you have a hard time surviving. Good to pair with an Esper with a SPD buff so heals would be frequent.
 | Shield | Absorbs damage equal to shield strength. | Tang Xuan (Sun Wukong), Berenice (Bastet), Lynn (Hathor), Cecilia (Isis), Clara (Hera), Lynn (Hathor), Berenice (Bastet), Laura (Neith) |
Shield Strength is not a base stat and usually depends on many factors like the caster’s HP, the HP of the ally it is casted on or overflow healing. To maximize its use, focus on increasing the HP of the Esper that has this buff or use on high HP allies depending on how the Esper’s skill that has this buff works.
 | SPD Up | Increases SPD by 30%. | Sienna (Gaia), Celine (Siren), Eira (Freya), Sander (Set), Anesidora (Pandora), Xie Yuzhi (Death Guard Bai), Meredith (Scylla) |
Useful against enemies with high SPD. Low SPD allies will greatly benefit from this.
 | Standoff | Retains at least 1 HP. (In this state, Esper is Immune to AP Down.) | Catherine (Hela), Freddy (Fenrir), Nicole (Nephthys) |
Best used when fighting through multiple waves and boss fights or Sentinels. Useful to use just before a strong enemy attacks or when an ally is in danger of dying. Do not use it when your allies are at full health or are not in danger of dying yet.
 | Soul Guard | 30% of the damage taken by the carrier is redistributed to the caster. The carrier, when dies, revives immediately and restores 10% of their max HP. This buff expires on the caster’s death. | Nicole (Nephthys) |
Best used on low HP or DEF Espers on your team.
Silver-Framed Buffs
These are buffs that are unique to their Espers and ignore ACC and RESIST, cannot Miss and must be triggered.
| | Brisingamen’s Watch | Grants 15% bonus AP at the end of each teammate’s turn. | Eira (Freya) |
Best used on allies with low SPD. May also be beneficial to use it along with allies that can stun or silence or increase other allies’ speed, letting your team attack more often than your enemies.
 | Death Tome | Marks the current HP% of a teammate. After 2 turns, if the teammate has lost some HP, then restores to the marked HP%; if the teammate has died, then resurrects them. | Luo Yan (Yanluo Wang) |
Allies with low maximum HP would benefit greatly from this buff. It is also helpful for dealing with multiple waves of enemies and fighting boss battles or Sentinels.
 | Fangs | Can’t be Poisoned. May retaliate to an attack with Poison for 1 turn. | Jacob (Jormungand) |
A good counter against enemies with Poison debuff.
 | Kiss of the Nightingale | Blesses an allied Esper, returning 60% of damage received as True Damage to the attacker. (Alexa (Aphrodite)’s third skill returns 75% of damage instead). | Alexa (Aphrodite) |
A good counter against enemies with high ATK. Best used with high HP allies so that they could take in a lot of damage and return a lot of them back to the enemy.
 | Lotus Mark | Reduces damage taken by 50%. Disappears when attacked. | Asenath (Nefertem) |
Best used before a strong enemy would attack, especially enemies that have skills that damage more than one enemy. Very useful against Sentinels or boss battles.
 | Tiger Roar | C.RATE increases 100% during the next attack. | Lin Xiao (White Tiger) |
Best paired with allies that have high C.DAMAGE.
Gold-Framed Buffs
These are buffs that are unique to their Espers and are undispellable or not removable.
 | Breath of the Deep | (Undispellable) Grants +5% ATK per stack, and +3% damage reduction per 10 stacks; up to 50 stacks. | Hyde (Hades) |
To fully utilize this, use against enemies with debuffs and / or allies with buffs as each buff or debuff on Hyde (Hades) will grant a stack of this buff.
 | Bull Rage | +10% DEF and +5% RESIST per stack. Max 10 stacks. | Djoser (Atum) |
Useful against most enemies, especially those that have debuff skills.
 | Burning Sun | Amplifies the power of Emblazoned Strike. | Narmer (Ra) |
To fully utilize this buff, increase Narmer (Ra)’s ATK stat through buffs during battle or advancements, resonance or ascension outside of battle.
| | Conductor | Deals damage to all enemies based on DEF at the beginning of each turn. Removed upon receiving disables. | Donnar (Thor) |
Avoid using against enemies with disabling debuffs. To fully utilize this buff, increase Donnar (Thor)’s DEF stat through buffs during battle or advancements, resonance or ascension outside of battle.
 | Death | (Undispellable) Inflicts additional damage equal to 5% of the target’s max HP (under 50% of ATK) upon dealing damage. | Tang Xuan (Sun Wukong) |
Useful against enemies with high HP. Even more useful when paired with an ally that does multiple attacks per turn that would trigger the additional damage for each time.
| | Haste | (Undispellable) Grants 30 SPD per Haste (max 3 stacks). Dispelled after launching an attack. | Unas (Shu) |
Best used against enemies that have high SPD or when your team has low SPD.
| | Neko-Sense | Each stack increases Tevor’s damage taken by 15%. When stacks are maxed, resets all ability cooldowns and attacks a target twice the next turn, then removes all existing stacks. Max 2 stacks. | Tevor (Sphinx) |
Best used with an ally that can heal Tevor (Sphinx) as he takes additional damage from the buff before he can use it against enemies.
 | Scorch | (Undispellable) Inflicts Diseased for 2 turns upon damaging the target. | Tang Xuan (Sun Wukong) |
Useful against enemies with healing abilities. Even more useful when paired with an ally that has a poison debuff.
 | Shackle | (Undispellable) Has a 40% chance to inflict DEF Down for 2 turns upon damaging the target. | Tang Xuan (Sun Wukong) |
Useful against enemies with high DEF. Even more useful when paired with an ally that does multiple attacks per turn for a higher chance to trigger DEF Down.
 | Supporting Song | (Undispellable) Grants +2% base ATK per stack (max 25 stacks). | Ahmed (Geb) |
Best used on high damage-dealing Fighters or Espers that may need a little ATK boost.
 | Sweet Harvest | Can’t Move. All Allied Espers take 25% less damage. Each time before an ally moves, dispels a debuff on them and heals them for some HP. | Sally (Sif) |
Best used against enemies that have skills that cause debuffs. Also very useful against Sentinels or boss battles.
 | Thunder Blessing | Increases DEF by 20% upon receiving damage (stacks up to 5 times). | Donnar (Thor) |
Best used against enemies that deal multiple attacks per turn.
How to utilize Debuffs
Debuffs are status effects that negatively affect a character.
Regular Debuffs
These are debuffs that are usually shared by many different Espers and can be disabled.
 | ATK Down | Reduces ATK by 40%. | Donnar (Thor), Gabrielle (Njord), Falken (Horus), Lynn (Hathor), Anesidora (Pandora), Q (Cupid), Hall (Hodur), David (Jason), Ye Suhua (Shao Siming) |
Useful against enemies with high ATK. Low DEF Esper allies have a higher chance of surviving when this is used.
| | Bleed | Receives True Damage equal to 50% of the debuff caster’s ATK at the start of the turn. | Lu Yi (Dayi), Lin Xiao (White Tiger), Zelmer (Sekhmet) |
Useful against enemies with high DEF since True Damage ignores it. To fully utilize this buff, increase your Esper’s ATK stat through buffs during battle or advancements, resonance or ascension outside of battle.
| | Buff Blocker | Cannot be buffed. | Raven (Odin), Biondina (Poseidon), Chloe (Medea), Chalmers (Idun) |
Useful against enemies with buffing skills.
 | DEF Down | Reduces DEF by 60%. | Tang Xuan (Sun Wukong), Raven (Odin), Gabrielle (Njord), Unas (Shu), Djoser (Atum), Ren Si (Black Tortoise), Lin Xiao (White Tiger), Xie Chuyi (Death Guard Hei), Brynn (Valkyrie), Drew (Anubis), Q (Cupid), Zelmer (Sekhmet), Hall (Hodur), Berenice (Bastet), Ollie (Osiris) |
Useful against enemies with high DEF. High ATK Esper allies will have the best advantage over this.
 | Diseased | Cannot be healed. | Tang Xuan (Sun Wukong), Kara (Serket), Lin Xiao (White Tiger), Luo Yan (Yanluo Wang), Chalmers (Idun), Layla (Medjed), Leon (Vali) |
Useful against enemies with healing abilities. Even more useful when paired with an ally that has a poison debuff.
| | Freeze | Cannot take actions. | Long Mian (Ao Bing), Dhalia (Calypso), Kaylee (Anuket), Brynn (Valkyrie) |
Target enemies closest to your current character in the Action Point Bar to make them skip a turn or enemies with the highest AP percentage. Can be used to prevent high damage-dealing enemies or enemies with strong abilities from attacking.
 | Miss Rate Up | Increases Miss Rate by 50%. | Triki (Loki), Arcana (Hermes), Alexa (Aphrodite), Catherine (Hela) |
Choose a team of Espers that have an elemental advantage over your enemies to efficiently utilize this buff.
| | Poison | Loses 4% of max HP at the start of the turn. | Jiang Man (Meng Po), Kara (Serket), Jacob (Jormungand), Hall (Hodur), Layla (Medjed), Meredith (Scylla) |
Very useful against enemies that have high HP. May also be useful against enemies that have high SPD since their turns come by so quickly and they get damaged at the start of each turn.
| | Petrification | Cannot take actions or reduce ability cooldown. | Triki (Loki), Jacob (Jormungand), Melanie (Medusa) |
Target enemies closest to your current character in the Action Point Bar to make them skip a turn or enemies with the highest AP percentage.
 | Sear | Increases damage received by 25%. | Raven (Odin), Tevor (Sphinx), Xie Chuyi (Death Guard Hei), Leon (Vali), Bai Liuli (White Snake), Nicole (Nephthys) |
Useful against enemies with high DEF. High ATK Esper allies will have the best advantage over this. Espers with skills with True Damage would be even more effective.
| | Silence | Cast only basic ability. | Jiang Man (Meng Po), Bai Liuli (White Snake), Ollie (Osiris), Laura (Neith) |
Very useful against enemies that have strong 2nd and / or 3rd skills but weak basic abilities. Can prevent some healer enemies from healing their team.
| | Sleep | Cannot take actions until damaged. | Celine (Siren), Stewart (Dionysus) |
Target enemies closest to your current character in the Action Point Bar to make them skip a turn or enemies with the highest AP percentage. Can be used to prevent high damage-dealing enemies or enemies with strong abilities from attacking or from healers to heal their team.
| | SPD Down | Reduces SPD by 30%. | Tiye (Nut), Kara (Serket), Eira (Freya), Sander (Set), Lin Xiao (White Tiger), Long Mian (Ao Bing), Dhalia (Calypso), Xie Chuyi (Death Guard Hei), Kaylee (Anuket), Brynn (Valkyrie), Melanie (Medusa), Lauren (Heket) |
Useful against enemies with high SPD or when allied Espers have low SPD.
 | Stun | Cannot take actions. | Jin Yuyao (Queen Mother), Tiye (Nut), Triki (Loki), Lucas (Apollo), Sienna (Gaia), Arcana (Hermes), Sander (Set), Pritzker (Mimir), Anesidora (Pandora), Bonnie (Eris), Dhalia (Calypso), Xie Yuzhi (Death Guard Bai), Bardon (Baldr), Tang Yun (Six-Eared Macaque), David (Jason), Layla (Medjed), Jeanne (Gerd) |
Target enemies closest to your current character in the Action Point Bar to make them skip a turn or enemies with the highest AP percentage. Can be used to prevent high damage-dealing enemies or enemies with strong abilities from attacking or from healers to heal their team.
| | Taunt | Forced to attack the debuff caster with basic ability at the start of turn. | Djoser (Atum), Falken (Horus), Ren Si (Black Tortoise), Bardon (Baldr), Li Ao (Tao Tie), David (Jason), Ollie (Osiris) |
Very useful against enemies that have strong 2nd and / or 3rd skills but weak basic abilities. Can prevent some healer enemies from healing their team. Can be used to prevent high damage-dealing enemies or enemies with strong abilities from attacking or from healers to heal their team.
Silver-Framed Debuffs
These are debuffs that are unique to their Espers and ignore ACC and RESIST, cannot Miss and must be triggered.
| | Devour | Prevents the target from taking actions, being selected, being attacked and being buffed/debuffed. | Li Ao (Tao Tie) |
Target enemies closest to your current character in the Action Point Bar to make them skip a turn or enemies with the highest AP percentage. Can be used to prevent high damage-dealing enemies or enemies with strong abilities from attacking or from healers to heal their team.
 | Eye of Horus | When this debuff expires, the carrier receives True Damage equal to 20% of total damage they received during this debuff. | Falken (Horus) |
Useful against enemies with high DEF since True Damage ignores it. Best paired with allies that have a buff that increases ATK.
 | Link | When a Linked unit is attacked, their counterpart also receives True Damage equal to 80% of damage dealt in this attack. | Q (Cupid) |
Useful against enemies that are in stealth and enemies that your team has an elemental disadvantage against. The skill will link your selected enemy randomly, but if you happen to link an enemy you have an elemental disadvantage against and an enemy you have an elemental advantage against, attacking the latter will make it easier to kill the former. Linking two enemies then using an area attack or any attack that affects more than one enemy will make each Linked enemy experience almost twice the damage.
 | Netherbloom | Enemies marked with Netherbloom will suffer a Netherbloom blast after taking 5 attacks, receiving damage equal to 85% of Meng Po’s ATK. This blast also deals damage of the same amount to 2 other random enemies. Has a 50% chance of Silencing the affected targets for 2 turns. | Jiang Man (Meng Po) |
Best used with an ally that does multiple attacks so that you can trigger a Netherbloom blast more quickly. Allies with high SPD or those that have buffs that increase speed may also be beneficial paired with this debuff.
 | Neko-Curse | This debuff is removed upon the carrier’s death, dealing 40% of Tevor’s ATK as True Damage to all enemies. Each Stack increases the multiplier by 40%, max 5 stacks. | Tevor (Sphinx) |
To fully utilize this debuff, increase Tevor (Sphinx)’s ATK stat through buffs during battle or advancements, resonance or ascension outside of battle. Helpful when fighting against high HP enemies or enemies that heal often.
| | Pandora’s Box | Takes effect at the start of the target’s 2nd turn. Removes a certain percentage of current HP and inflicts Stun for 1 turn. | Anesidora (Pandora) |
Very useful against enemies that have high SPD as they will reach their 2nd turn before most characters in battle.
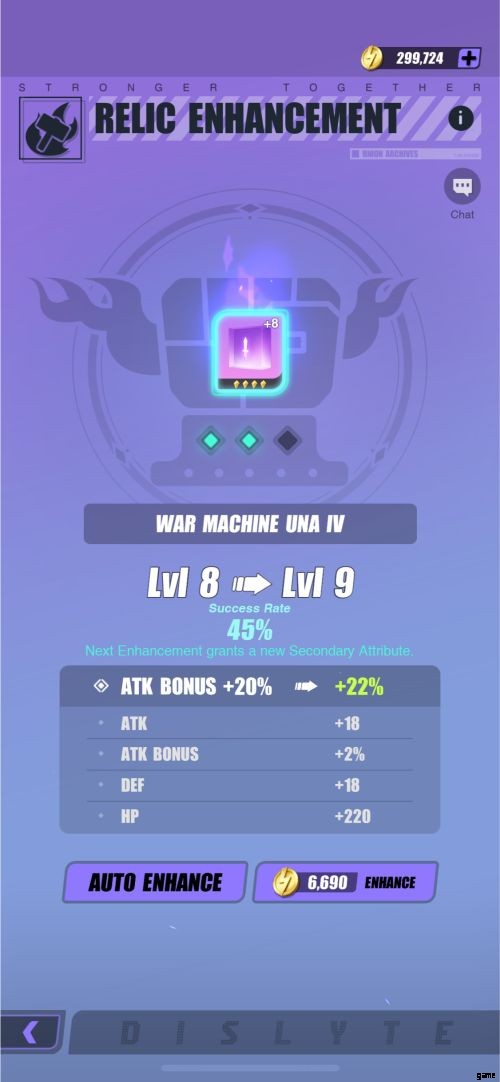
6. Enhance your Espers
At some point you will find that no matter how many times you redo a level and no matter how many different combinations of teams and strategies you’ve tried, you still can’t pass a certain stage. When that time comes, it means it’s time to enhance your Espers through the Espers tab.
Equip them with Relics
Relics are the equivalent of equipment in most RPGs. It is one of the easiest improvements to implement as you can freely equip and unequip them to any Esper you have. Relics increase certain stats of your Esper, and if you manage to equip them with a set of four (Triangle, Diamond, Circle and Square) or a set of two (Hexagon and Club) you get a set bonus. You can easily identify which are sets because they have the same names.
Relics have a main attribute and can have up to 4 secondary attributes. Each Relic slot has a different main attribute:
• Triangle – ATK
• Diamond – DEF
• Hexagon – HP
• Circle – ATK / ATK% / DEF / DEF% / HP / HP% / C.RATE / C.DMG
• Square – ATK / ATK% / DEF / DEF% / HP / HP% / ACC / RESIST
• Club – ATK / ATK% / DEF / DEF% / HP / HP% / SPD
Secondary Attributes on the other hand may vary.
The stars on the Relic determine how high are the stats you can get from it. The number of stars on a Relic can go as low as 2 or as high as 6. The higher the number of stars, the more gold it costs to enhance. However, the number of stars does not determine the quality of the Relic.
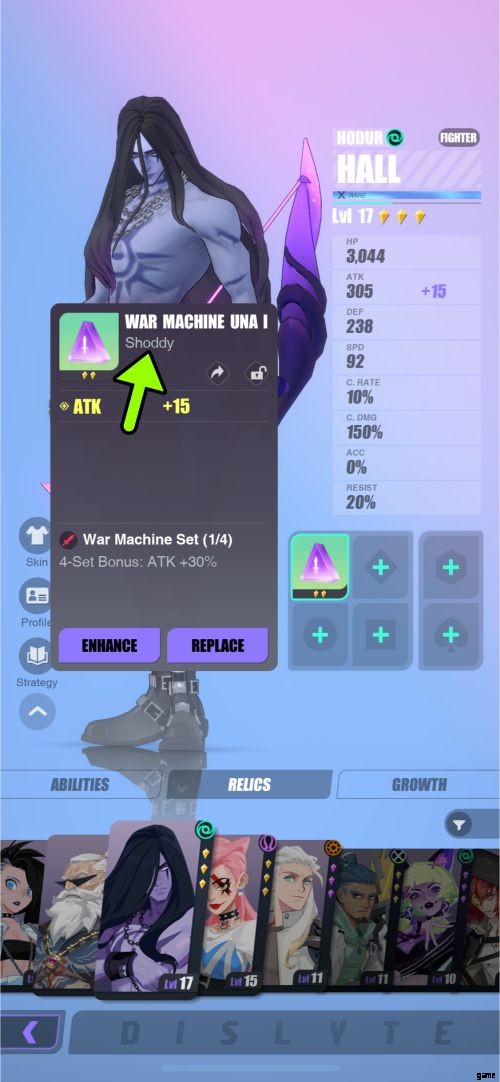
Relic Quality determines how many secondary attributes they can have at level 0 and how many attributes they can have when fully enhanced at lvl 15. You can find out what quality your Relic is by clicking on the Relic and checking underneath the name of the relic.
Below, we have listed the different Relic Qualities, their number of secondary attributes at Lvl 0 and how many boosted secondary attributes you can get at Lvl 15.
| Quality | Number of Secondary Attributes at Lvl 0 | Boosted Secondary Attributes at Lvl 15 |
| Shoddy | 0 | 1 |
| Good | 1 | 2 |
| Elite | 2 | 3 |
| Superior | 3 | 4 |
| Flawless | 4 | 5 |
When you enhance a relic, the main attribute is improved. For every three enhancements, a secondary attribute is unlocked. Once it is, the next enhancements at three intervals will boost a random secondary attribute.
We highly suggest not investing too much in Shoddy or Good Quality Relics. Elite Relics may be fine for a while when you are just starting, but Superior and Flawless Relics are the ones that are worth investing in for the long run.
However, they cost a lot more to enhance, especially since the Success Rate of the enhancement lowers and the price increases for each level up. If you fail an enhancement, you can try again until you reach the limit of failures. Once you reach that limit, your Relic will be guaranteed to enhance. The number of tries until guaranteed enhancement only appears when you auto enhance.
Auto Enhance will let the Relic enhance automatically until a certain level. Keep in mind that if you do, the game will keep enhancing it, even after failing, until you succeed or until you run out of funds.
You can obtain Relics by playing through Story Mode or Ritual Miracle and Cube Miracle in Trials or buying them in Shops. When you reach account level 7, you also have the option of making your own 6-Star Relics but they are very expensive to make and you need to gather Relic Dust, Relic Crystals or Relic Essences from Cube Miracle for it. However, if you want a specific type of Relic sometimes this is the only way to obtain it.
Experimons, Abilimons and Starimons
In Advancement, you can enhance your Esper with the use of special entities called Experimons, Abilimons and Starimons. You can buy these in Shops or earn them as rewards in the Infinite Miracle under Trials, Bounties, Achievement Rewards, Course Rewards, and Daily Login Gift. You may also check under Events to see if there are any quests or freebies that give those out.

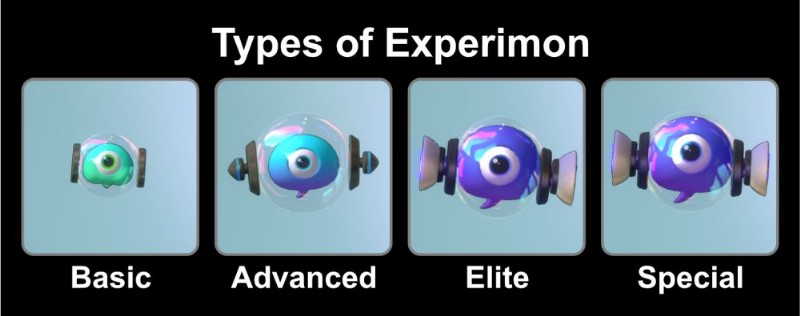
Use Experimons to increase your levels
There are four different types of Experimons that you can use to increase your level:Basic, Advanced, Elite and Special. To give you an idea of their differences, we made a table comparing how much XP or experience points you can get and how much a level 1 Esper can level up if an Experimon of a certain type is used for Level Advancement. You can also use Experimons on Starimons to level them up. You can use up to 5 Experimons at a time to level up.
| Experimon | XP | Leveling up a Lvl 1 Esper |
| Basic | 1,000 | Lvl 4 |
| Advanced | 4,000 | Lvl 10 |
| Elite | 20,000 | Lvl 20 |
| Special | 75,000 | Lvl 30 |
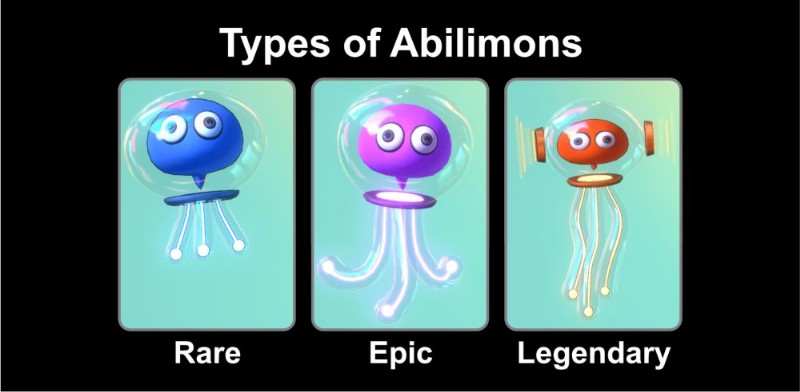
Use Abilimons to enhance your abilities
Abilimons come in three types of rarities that you can use to enhance your abilities:Rare, Epic and Legendary. Unlike Experimons that you can use on any Esper, Abilimons have to match the same rarity as the Esper you are enhancing. You can also use up to 5 Abilimons at a time to enhance your abilities.
These upgrades can potentially increase your abilities’ damage, decrease cooldowns, increase trigger chance and so on. Unfortunately, you cannot use which ability to upgrade as it chooses a random ability that has not been maxed yet.
Use Starimons to promote your Esper
A Esper’s level cap depends on their rarity. In order to increase their level cap, you must promote them, adding a star next to their level. Each star increases the level cap by 10. A Rare Esper can be promoted 3 times, an Epic 2 times and a Legendary 1 time. However, you can only promote them when your Esper has reached its maximum level.
| Esper Rarity | Level Cap |
| Rare | Lvl 30 |
| Epic | Lvl 40 |
| Legendary | Lvl 50 |
Starimons, like Abilimons, also come in three types of rarities that you can use to promote your Esper:Rare, Epic and Legendary. Similar to Abilimon, you also need to match the Starimon you will use to the Esper of the same rarity. You may also promote your Starimon the same way so that you can have Starimons of higher rarity as it is a lot harder to get.

There is also an option to use other Espers to promote your Starimon or other Espers but it is not advisable as duplicate Espers are best used for Resonance. On the other hand, if you’ve already maxed out your Esper through Resonance, this would be the best way to dispose of your extras.
Merging your duplicate Espers
Since you can only get Espers through Echo, which is a Gacha system where everything is random, you will sometimes get duplicates of your Espers. Duplicates may seem like a waste at first glance but you can actually increase your ATK, HP and DEF when you resonate them with the same Esper. Rare Espers get 4 Energy when resonating, 5 for Epic Espers and 6 for Legendary Espers.
All of them will get a Lvl 1 Starimon of the same Star Rating afterwards. There doesn’t seem to be a benefit from leveling up a duplicate before Resonating them. If you try to Resonate a higher leveled or upgraded Esper to a new, Unresonated Esper, you will still get the same result.
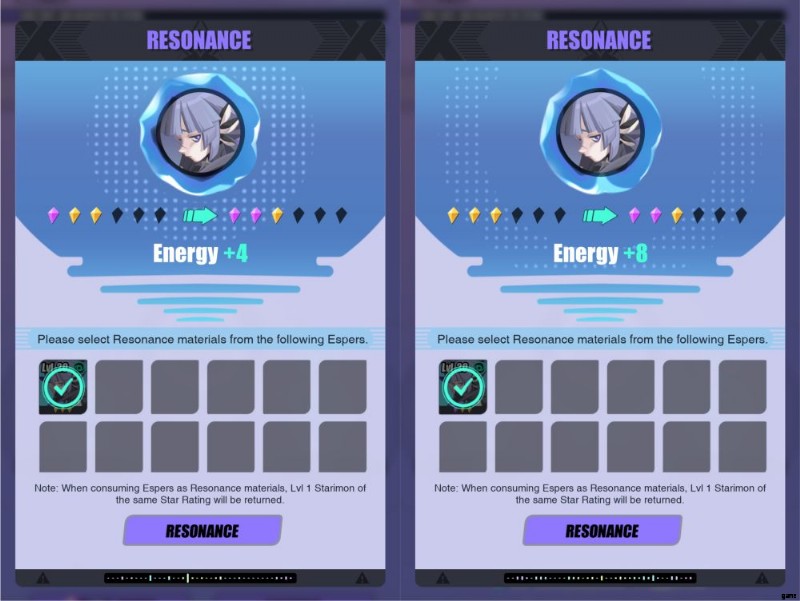
In the example below, the image at the left includes an Esper that was Resonated once (already received +4 Energy) and is being combined with an Unresonated Esper. From this, they will get another +4 Energy. All in all, they have a total of +8 Energy received from the two Resonance which is the same result as the right where an Unresonated Esper is combined to an Esper that was Resonated once.
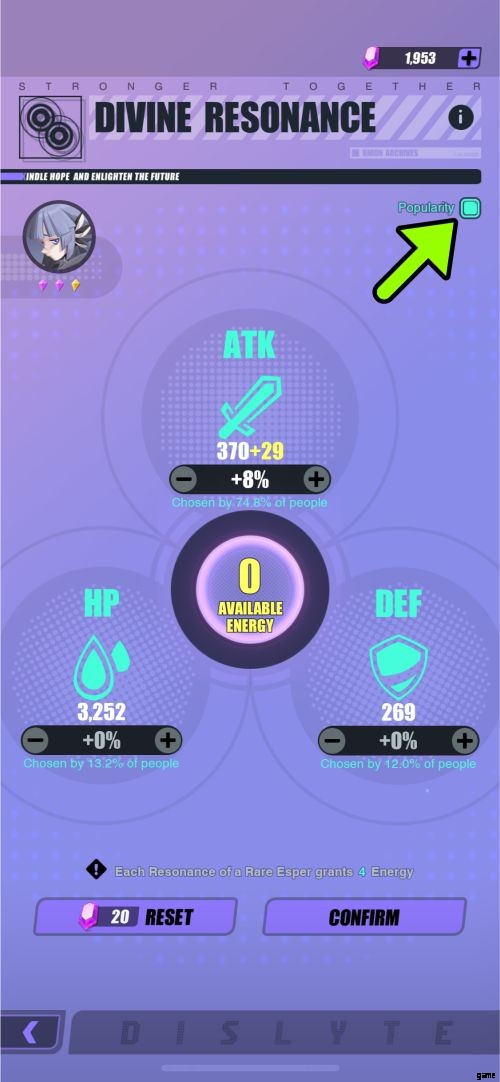
Since each Esper is unique, you need to take a couple of minutes to read what each of their skills do in order to fully use them to your advantage. You might think that adding more ATK to your character would be the best way to increase their damage in battle, but some skills may depend more on HP or DEF. If you’re unsure, there’s a popularity tab at the upper right side that can tell you which stat most people choose to apply to the Esper.
Alternatively, you could also save your duplicates and use them in Esper Fusion to unlock new Espers. However, you can only unlock this at account level 25.
Unlocking more Upgrades
Ascension is unlocked at Account Level 15. Here, each Esper gets 6 Phases of Bonuses that they can get at Lvl 1, 10, 20, 30, 40 and 50. Each Phase costs Waves that match the Esper’s element. Each bonus ranges from Stat increases to Ability Upgrades. You can get Waves from Sonic Miracle in Trials.
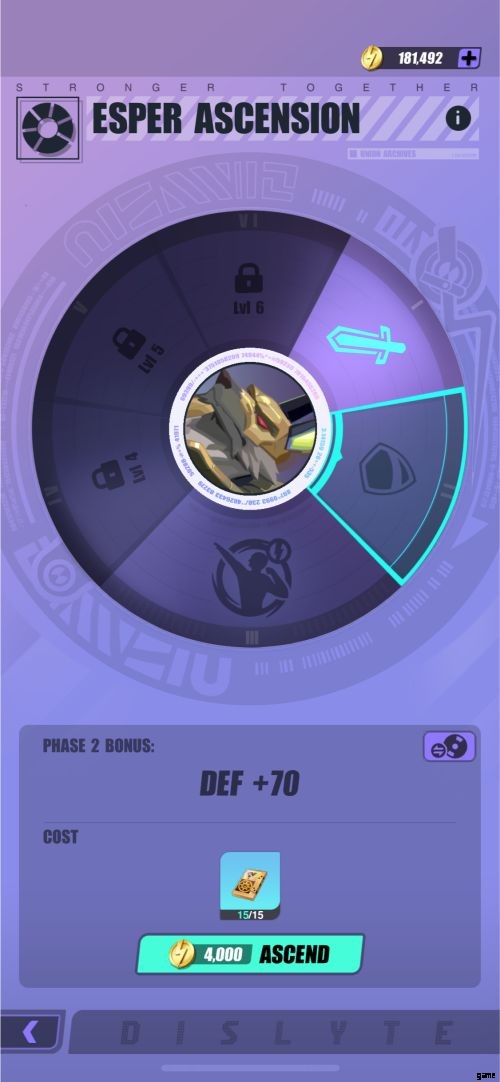
You can also use the S-Remixer to turn Basic Waves into Advanced Waves and then into Elite Waves which are required to unlock later Phases.
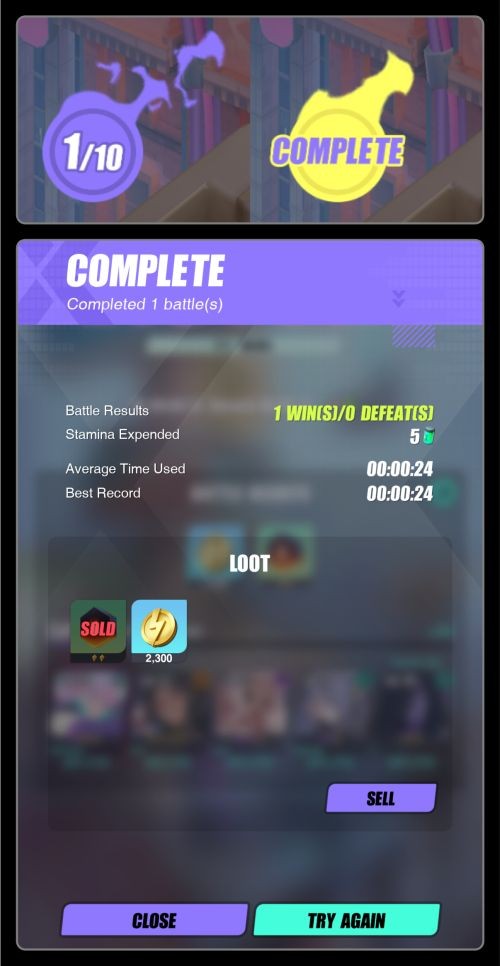
7. Farm with Multi-Battles
When you’re in the Formation Screen, you might have noticed the option at the lower left that says “Multi-Battle”. Multi-Battles are a great way to farm for relics and materials while easily leveling up your Espers or Starimon if you have enough Stamina to use.
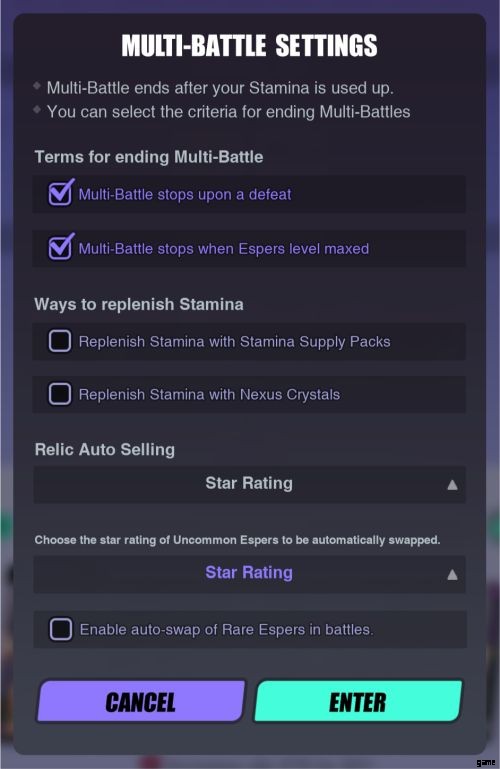
Before it proceeds, the game will allow you to set the terms for ending a Multi-Battle, ways to replenish Stamina and Relic Auto Selling. Even without setting any terms, Multi-Battles always end at the 10th round. We recommend keeping the terms “stops upon defeat” and “stops when Espers level maxed” to minimize the amount of stamina and experience points wasted.
We also recommend Auto Selling Relics that are 1-2 stars. If your level is even higher and you’re Multi-battling against stronger enemies, you may even set it to 1-3 or 4 stars. As for replenishing stamina, that is up to you. But take note that the settings you chose in a Multi-Battle will be retained on the next one.
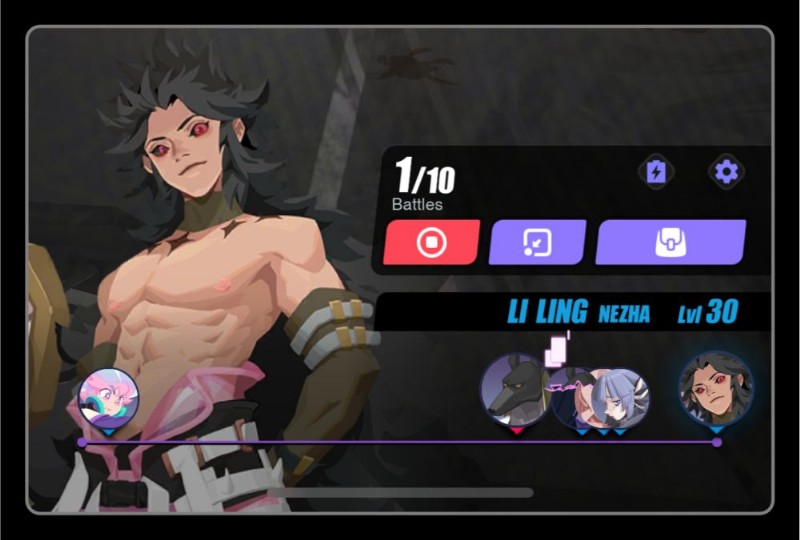
Once the Multi-Battle starts, a different set of buttons will appear where your abilities usually are. Clicking the cogwheel icon will allow you to change the settings at any time during the Multi-Battle. The bag icon contains all the Relics, Experimons and other resources you gathered during the Multi-Battles. The red stop icon will stop the Multi-Battles after the current battle has finished. The second button allows you to minimize the current Multi-Battle and play on another game mode which is great because you get to farm in two different modes at the same time.
However, you cannot do a Multi-Battle on one mode then play on the same mode. You also cannot do more than one Multi-Battle at the same time. Aside from this, you have to clear the stage at least once before you can Multi-Battle it. Currently the only modes where Multi-Battles are possible are Story Mode, Ritual Miracle and Sonic Miracle.
Once you’ve minimized your Multi-Battle, you will see a purple flame with numbers on it on the lower left part of your screen. This will track your Multi-Battle’s progress. Once this turns yellow, the Multi-Battle is complete and you can click on it to collect your XP and loot.
8. Collect Freebies and Rewards
There are a lot of Freebies and Rewards you can get in the game if you know where to look. They range from daily rewards to tasks that may not be easily noticed.
Getting Daily Gifts
These Daily Gifts greet you as soon as you open the game for the first time in the day so it would be very hard to miss. You don’t even have to worry about missing a day as the game just picks up where you left off!

Plaza’s Daily Pack
While Plaza is the place to go to buy resources with real money, they do provide a daily pack for free so be sure to check once a day.

Friendship Matters
In the Friends Tab, you can add your friends or recommended players to be your friend. Having friends in the game has many benefits. By just having friends and an Esper on your Friend Assist slot, you can earn 100 Friendship Points daily. You can also give and claim friendship points from them which you can exchange at the shop for Stamina, Random Wish Stickers and Starimon among others.

Aside from this, you can assign one of your strongest Espers for Friend Assists, letting your friends add your Esper to their team in Ritual Miracle and Sonic Miracle. In turn, you can also use theirs up to 50 times a day. This is very handy when you’re stuck on a stage or you just want some help leveling up.
Limited-Time Events
This changes all the time and has a time limit so be sure to check often which missions are available to gain more rewards. These usually offer the same items as the ones in Missions, but sometimes they will offer Espers that are difficult to obtain.
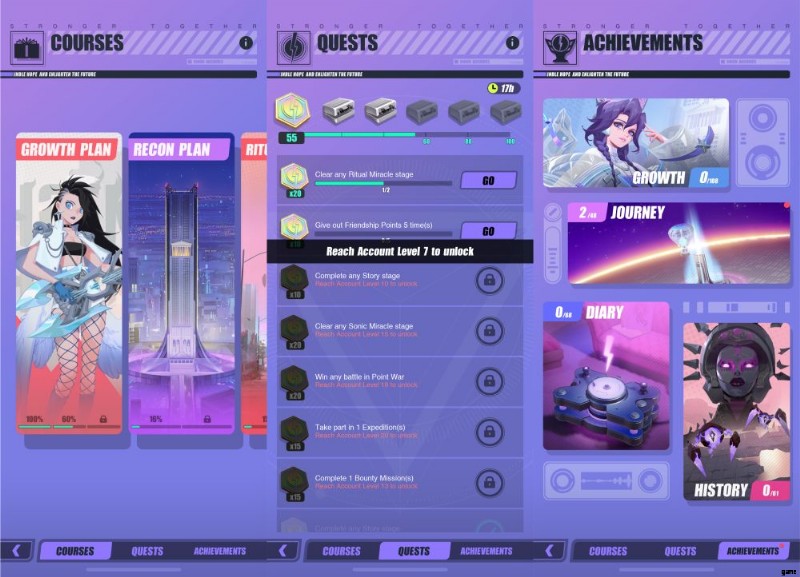
Passive Missions
Just by playing the game normally, you can accomplish rewardable tasks from Courses, Quests and Achievements under the Missions Tab so be sure to check often! Rewards range from Experimon, Abilimon, Starimon, Relics, Relic Sets, Gold Records, Nexus Crystals, Gold, Relic Dust, Waves, Supply Vouchers, Friendship Points, Admission Certificates and more.
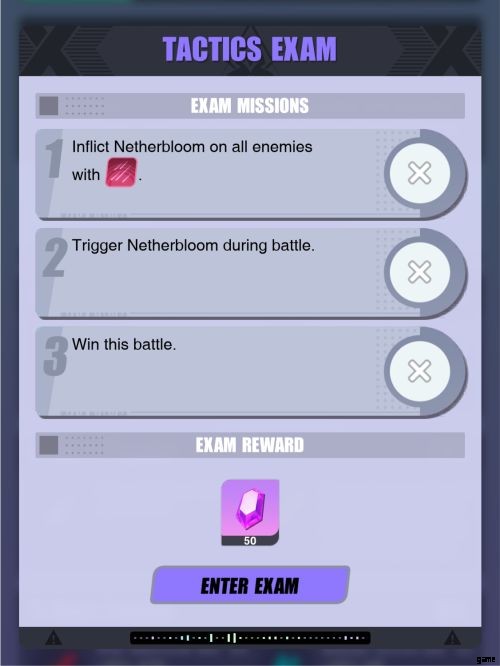
Passing the Tactics Exam
When you first get your Epic and Legendary Espers, you can take the Tactics Exam by going to the Espers Menu, selecting your Esper and clicking Strategy. Passing a Tactics Exam will reward you with Nexus Crystals. All you need to do is to accomplish the three exam missions to pass it which can be done in less than 5 minutes.
Unlocking Espers’ stories in Careers &Diary
When you go to an Esper’s Profile and check Careers you can find the conditions to unlock each segment which is to reach Level 20 and 30 and sometimes there is a fourth segment that you can unlock when you reach Esper Ascension Phase 4.
Unlocking these segments will not only tell you an Esper’s back story, but also reward you some Nexus Crystals. Diary does the same thing except you have to complete a Friendship Commission Bounty to unlock it. Friendship Commission Bounties usually just require you to watch a cutscene about the Esper. The reward for this is Gold.

Become a Bounty Hunter
Another way to earn more rewards is by fulfilling Bounties. Five Bounties are displayed at a time and the tasks vary from acquiring certain items, defeating specific enemies and even watching cutscenes of an Esper’s story.
To accept a bounty, you have to exchange a Mission Letter. 3 Mission Letters are given to you at 00:00 UTC everyday and you can have a maximum of 6 Letters. Rewards vary from Gold, Gold Records, Stamina and Nexus Crystals. We recommend checking the Bounties before playing in different game modes since certain Bounties may be easily completed as you play.
9. Other Hints and Easter Eggs
These are hints that don’t necessarily make you better at the game but can improve your gaming experience.
Get rid of distractions!
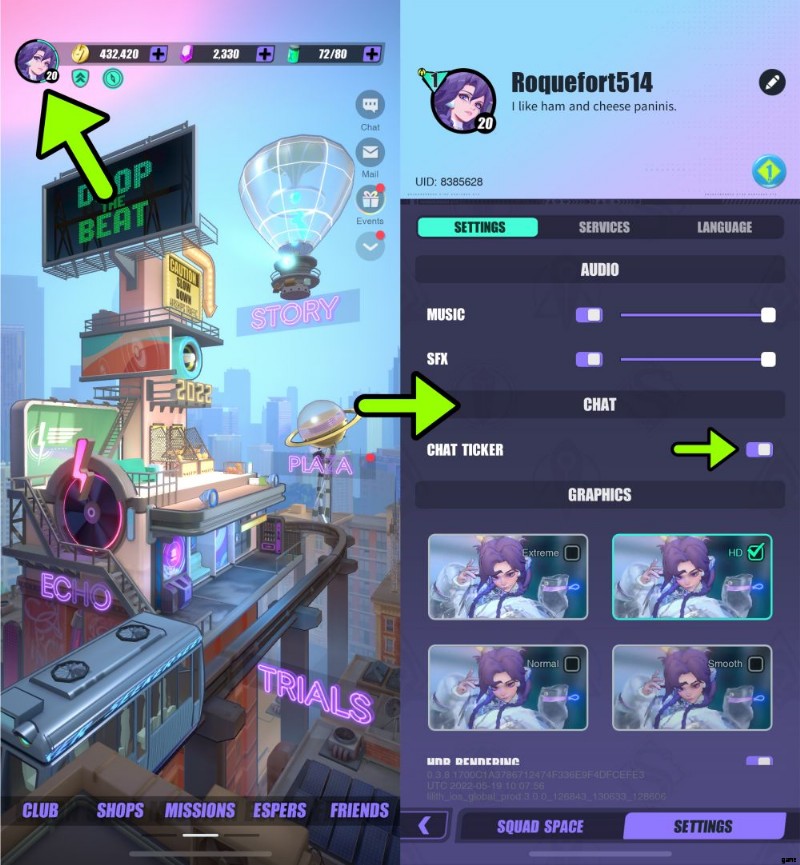
By default, world chat pops up on the screen just below the bar that displays your currencies. While this may not be a big deal for some people, it can prove to be distracting, especially if you are trying to immerse yourself in the game and there are system announcements about the Ripple Dimension or someone is debating about whether pineapple deserves to be on pizza.
If this is something you want to hide, you can easily stop the chat from appearing by clicking on your profile picture at the upper left side of the screen, going to the settings tab and turning off the Chat Ticker.
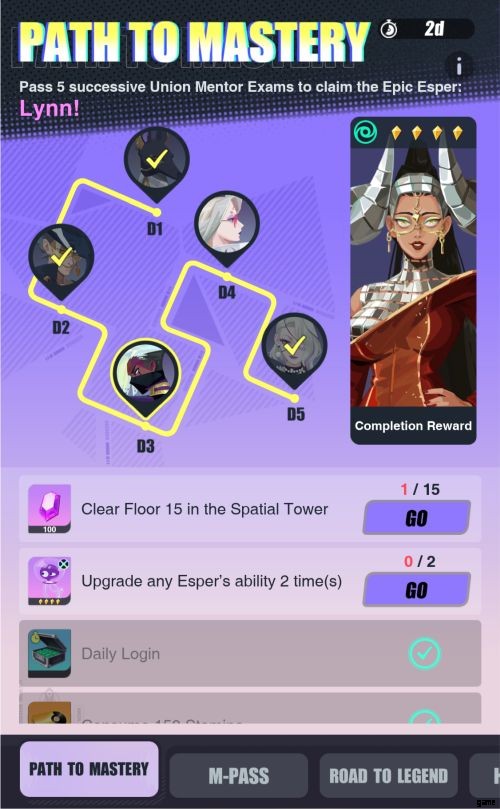
Play Music at the Bar!
This was more of an easter egg but since one of the Path to Mastery Quests was to Play “We Could Have a Good Time” at the bar, it is helpful to know where it is as it is an easy quest to accomplish. Aside from this, If you just genuinely want to know which artists are responsible for the sick, funky beats that’s invading your earbuds, read on!

Swipe left to go to the bar. There you will find Discoboom with her pet, BoomBoom. If you click it, it will come up to you and show you the list of music the game has and play it for you!
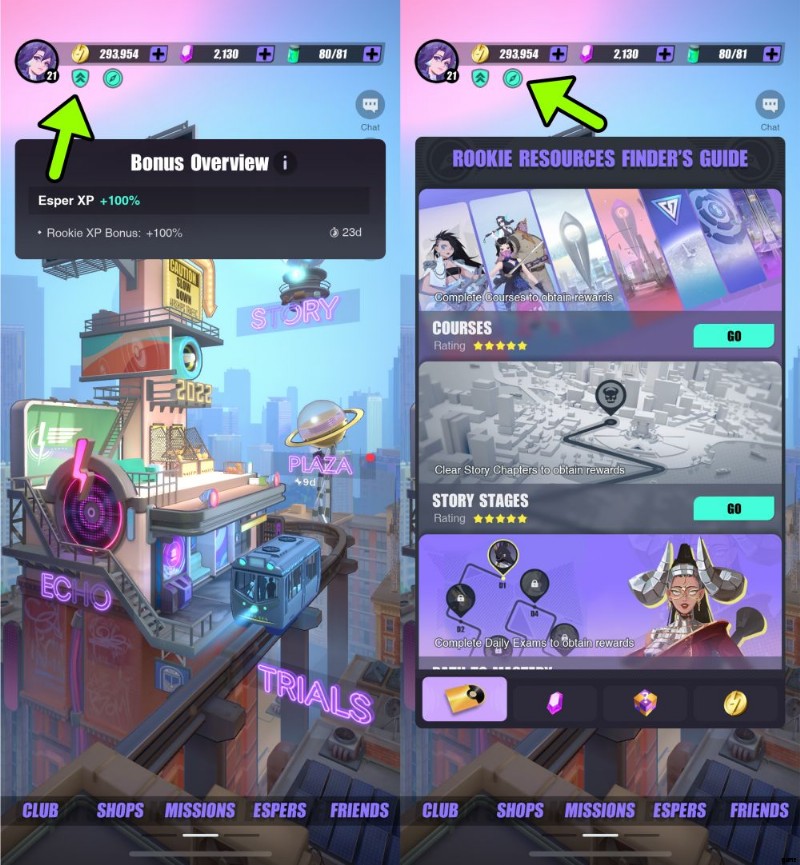
Check Bonuses &Resource Finder!
Sometimes, Dislyte gives away bonuses when they have special events like +100% Esper EXP they had on their global launch. To check, you can click on the badge icon with two up arrows just below the coin currency to see.
The button right next to it on the other hand leads you to the Rookie Resource Finder’s Guide. It’s very handy as it tells you exactly where to go to get more Gold Records, Crystals, Relics and Coins.
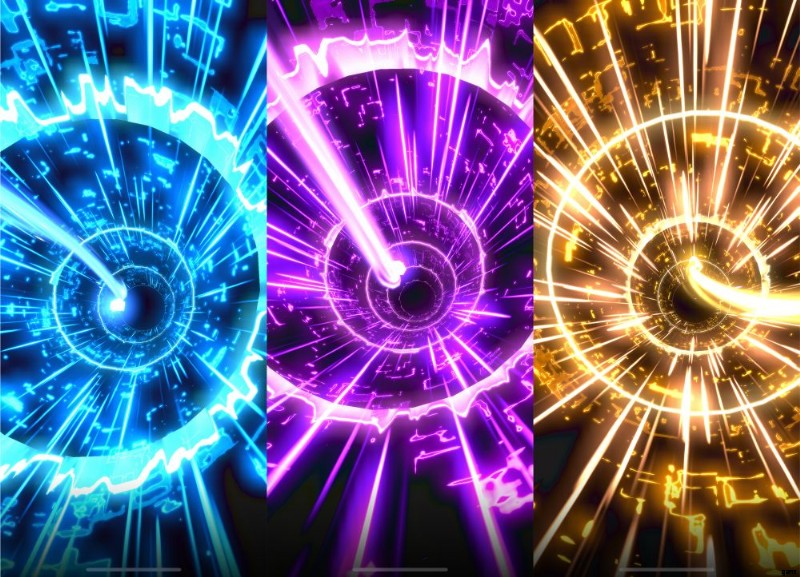
Know what tier of Esper you’ll get before it appears!
Knowing this will not in any way help you change the result, but it does make things exciting and is something that other people don’t notice straight away. When you spin a Gold Record in Echo, there is a chance to get a Rare, Epic and Legendary Esper. The animation sequence before the reveal shows a light traveling through a portal. The light color changes depending on what Esper you will get. It turns blue for Rare, Purple for Epic and Gold for Legendary.
And this marks the end of our beginner’s guide to Dislyte. As long as this was, it barely scratched the surface of what the game has to offer. Since this game just had its official global recently, there are many features that have yet to be introduced and many more adventures waiting to be unveiled.
We hope that you find our tips helpful as you play to the beat of this funky fresh game. If you have any tips and tricks that were not mentioned in this guide, feel free to share them in the comment section below!