Es war das Jahr 1792 – der mächtige Vampirjäger Richter Belmont vom Belmont-Clan hatte Graf Dracula mit seiner Peitsche, dem Vampire Killer, niedergeschlagen. Eine Zeit lang wurde der Frieden in ganz Europa wiederhergestellt, aber 5 Jahre sind vergangen und alles ist nicht so, wie es scheint.
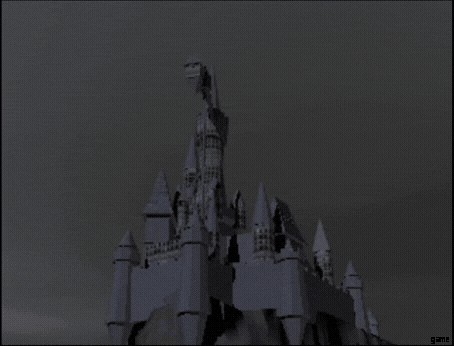
Es ist jetzt das Jahr 1797 und Lord Draculas Schloss Castlevania ist immer noch intakt, als ob er noch am Leben wäre. Richter Belmont ist verschwunden, aber ein neuer Retter wurde in dieses dunkle Schloss gerufen, in dem viele umgekommen sind:ein Mann namens Alucard, der Sohn des Vampirfürsten. Das Schloss winkt zu Alucards Rückkehr, während er versucht aufzudecken, warum sein angestammtes Zuhause trotz der Bemühungen des Belmont-Clans, den Fluch zu beseitigen, intakt bleibt. Willkommen in Castlevania. Kommen Sie, kommen Sie alle, und leihen Sie Ihre Sinne der Symphonie der Nacht.
Konamis klassisches, Genre-definierendes Meisterwerk, Castlevania:Symphony of the Night , ist jetzt ein mobiles Spiel, das sowohl bei Google Play als auch im App Store erhältlich ist. Erlebe die Nostalgie, die verwunschenen, verfluchten Hallen von Draculas Schloss zu durchqueren, in Alucards Suche nach dem Frieden seines Vaters. Während es auf der ursprünglichen PlayStation (PSX) und der PlayStation Portable (PSP) lief, heißt Symphony of the Night eine neue Generation von Spielern willkommen, die seine Funktionen erkunden, all seine Geheimnisse entdecken und eines der besten Spiele aller Zeiten genießen können stammen aus dem Franchise selbst.
An der Schwierigkeit hat sich nicht viel geändert, aber wenn Sie zu dieser neuen Generation von Spielern gehören, machen Sie sich keine Sorgen; Wir sind uns bewusst, dass das Spiel eine ziemliche Herausforderung sein kann. Bist du neugierig genug, herauszufinden, wie du durch das Schloss kommen und all seine Geheimnisse aufdecken möchtest? Suchen Sie nicht weiter als in unserem umfassenden Castlevania:Symphony of the Night Anfängerleitfaden unten!
Inhaltsverzeichnis- Was ist das für ein Spiel?! Ein erbärmlicher kleiner Haufen Geheimnisse!
- Namenseingabe
- Richters letzter Kampf
- Alucard im Detail
- Das Pausenmenü und wie man darin navigiert
- Alucards tödliche Gnade
- Sekundärwaffen
- Das Zauberbuch
- Dirty Combat 101 (alias Fighting Smart)
- Interessante Artikel
- Machen Sie sich mit Ihren Vertrauten vertraut
- Relikte und wo sie zu finden sind
- So lesen Sie die Karte
- Erkundung und Rückverfolgung sind der Schlüssel
- Zusammenfassung und Fazit
Was ist das für ein Spiel?! Ein erbärmlicher kleiner Haufen Geheimnisse!

Obwohl die Überschrift oben auf den originalen, kitschigen Dialog verweist, der in der PSX-Version vorhanden war, enthält dieser Port stattdessen Audio und Dialog aus der PSP-Version. Abgesehen von den Referenzen sind wir uns ziemlich sicher, dass Sie sich fragen, was Castlevania genau ist. Keine Sorge, wir geben dir eine kurze Geschichtsstunde.
Castlevania ist eine Reihe von größtenteils seitlich scrollenden Spielen über die Bemühungen des Belmont-Clans, eines mächtigen Clans von Vampirjägern, Graf Dracula Vlad Tepes tot zu halten. Wenn es nicht Dracula ist, den sie davon abhalten wollen, die Welt zu verderben, dann sind es Draculas verrückte Sektenanhänger, die mindestens alle Jahrhunderte nach seiner Wiederauferstehung schreien (sprechen Sie von einem echten Fanclub). Gelegentlich ist nicht der Belmont-Clan derjenige, der kämpft, es könnten andere sein, die versuchen, das Land aus Draculas Griff zu befreien.
Einige bemerkenswerte Beispiele dafür wären Hector; ein Mensch, der unter Dracula als Devil Forgemaster arbeitete und dafür verantwortlich war, Draculas Armee von Dämonen, Shanoa, zu erschaffen; eine mysteriöse Frau von einer Organisation namens Order of Ecclesia, Jonathan Morris und Charlotte Aulin; ein Paar Vampirjäger, die mit dem Belmont-Clan und dem Belnades-Clan (einem Clan von Zauberern, die sich mit den Belmonts verbündet haben) Blutsbande haben, Cornell; ein junger Werwolf, der sich auf die Suche macht, um seine Adoptivschwester Ada davor zu retten, ein Opfer zu sein, um Dracula und in diesem Titel Alucard wiederzubeleben; Draculas Sohn, halb Mensch, halb Vampir, der seiner eigenen Mutter versprochen hat, seinen Vater zur Ruhe zu bringen, sollte er wieder anfangen, Menschen zu schaden.
Verwandt: Castlevania:Symphony of the Night Komplettlösung Teil 1
Symphony of the Night verdient eine besondere Erwähnung, da es das Genre „Metroidvania“ geschaffen hat. Die Etymologie dieses Genres stammt aus dem Portmanteau von „Metroid“ und „Castlevania“. Das Spiel ist in der Tat ein Castlevania-Titel, aber es teilt die Erkundungs- und Backtracking-Funktionen, die die Spieleserie Metroid hat. Es gibt bestimmte Power-Ups und Gegenstände, die erforderlich sind, um zu weiteren Teilen des Spiels zu gelangen, und meistens gibt es hier und da eine Menge versteckter Geheimnisse – einige der Geheimnisse könnten Bosse oder bahnbrechende Ausrüstung sein (Ja, wir reden über die Crissaegrim).
Mit all dem, was im letzten Absatz gesagt wurde, ist Symphony of the Night ein langes Spiel. Sie können es aufheben und ablegen, wann immer Sie möchten, aber es erfordert viel Geduld und Geschick, wenn Sie sein goldenes Ende erreichen möchten. Es gibt mindestens vier Enden in diesem Spiel, aber wir überlassen es Ihnen, das meiste davon selbst zu erkunden. Dieser Leitfaden wird nur ein paar Geheimnisse enthüllen, die für Sie nützlich sein werden, aber nichts, was die Handlung der Geschichte verderben könnte.
Sobald Sie ins Spiel einsteigen, spielen Sie noch nicht als Alucard – Sie spielen als Richter und spielen seinen Sieg über Dracula im vorherigen Teil des Spiels, Dracula X aus dem Super Nintendo Entertainment System (SNES), nach. P>
Namenseintrag
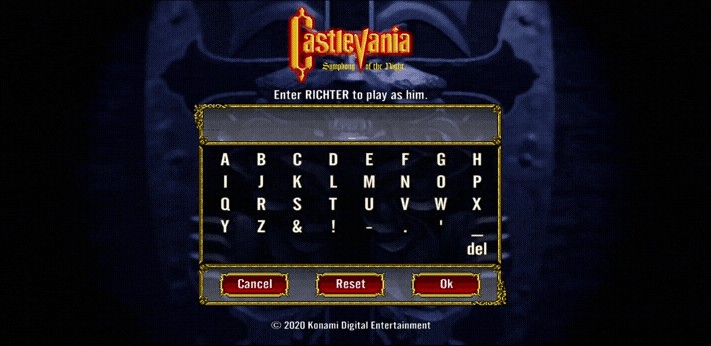
Seit dieses Spiel auf Mobilgeräte portiert wurde, wurden weitere Funktionen hinzugefügt:Schaltflächen für Zaubersprüche und Transformationen, eine einfachere Möglichkeit, durch Ihr Inventar zu navigieren, und viele andere. Ein Feature in dieser Portierung im Vergleich zu seinen Vorgängern ist die Möglichkeit, sofort als Richter Belmont oder Maria Renard zu spielen, indem man RICHTER oder MARIA in den Namenseingabebildschirm eingibt.
Diese beiden Charaktere sind zwar an sich schon mächtig, aber nicht Empfohlen für Anfänger, da sie sofort durch das Schloss sausen können, ohne dass ein Levelaufstieg erforderlich ist. Warum sie nicht empfohlen werden, ist, dass es einige Teile des Schlosses gibt, die Geschick zum Navigieren erfordern; einige von ihnen sind Bosse.
Allerdings empfehlen wir neuen Spielern stattdessen, das Spiel als Alucard zu spielen, da Sie die Besonderheiten des Schlosses besser kennenlernen und die Geschichte des Spiels aufdecken werden. Wenn Sie als Alucard spielen, müssen Sie Ihren Namen beliebig eingeben. Hier sind einige andere interessante Namen, die Sie verwenden können, aber genau wie RICHTER und MARIA werden sie nicht für Anfänger empfohlen:
- X-X!V’’Q — Glücksmodus. Alucard beginnt mit seiner LCK-Statistik bei 99, hat aber für alles andere stark verringerte Zahlen (für die Perspektive würde Alucard normalerweise mit 70 HP beginnen, hier sind es 20 HP). Er beginnt auch mit einem Lapislazuli, der ihm noch mehr LCK verleiht.
- AXEARMOR — Alucard beginnt mit der Axtrüstung in seinem Inventar. Wenn Sie dies ausrüsten, wird er zum Feind namens Axtrüstung. Es hat seine eigenen Bewegungen, aber er kann nicht so hoch springen, wie er es normalerweise tut. Sie müssen das Spiel mit einem beliebigen Ende beenden, sonst funktioniert dieser Name nicht.
Apropos Geschichte, wie wäre es mit dem letzten Kampf im Intro?
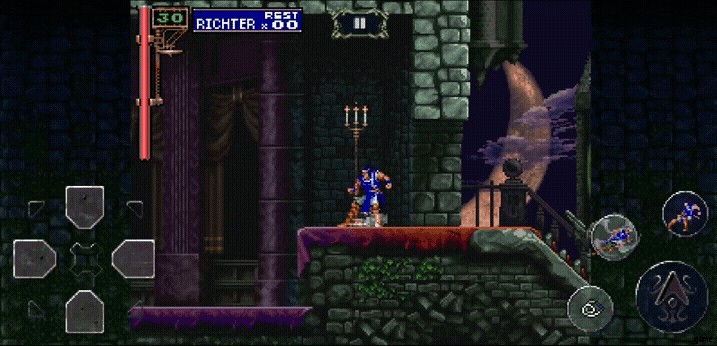
Richters letzter Kampf
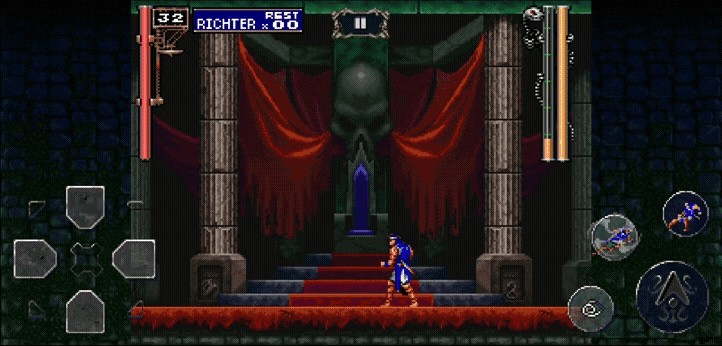
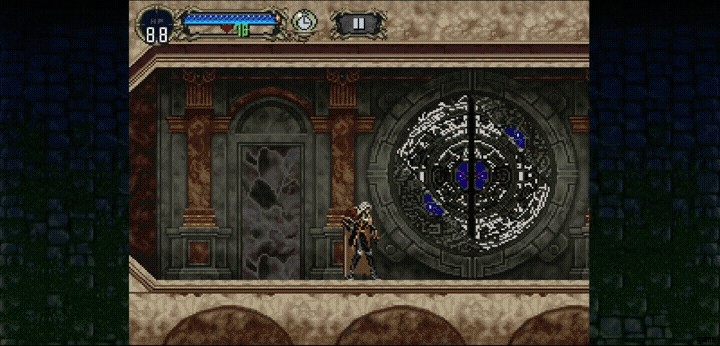
Sie werden sofort von den heulenden Winden auf Draculas Horst begrüßt. Eine lange Treppe mit blutrotem Teppich liegt vor Ihnen, und Sie, Richter Belmont, sind auf dem Weg, die Arbeit ein für alle Mal zu Ende zu bringen. Werden Sie scheitern oder erfolgreich sein?
Da dies ein Castlevania-Spiel ist, können viele Dinge zerstört werden:Kerzen, Urnen, Vasen, Lampen, alles, was Sie versuchen, mit Ihrer Waffe zu schwingen. Diese Dinge lassen Herzen fallen. Verwechseln Sie sie nicht damit, dass sie Sie heilen, sie füllen jedoch nur Ihre Sekundärwaffenmunition auf. Andernfalls lassen einige dieser Kerzen selbst Sekundärwaffen fallen.
Zum Beispiel lässt der allererste Kandelaber, dem Sie oben auf der Treppe begegnen, ein Kreuz fallen (mehr zu Sekundärwaffen gleich). Einige Mauerstücke können auch zerstört werden, wie der Eingang zur Halle vor Draculas Thronsaal. Wenn Sie gegen die Ecke der Decke des Eingangs schlagen, wird Ihnen ein Schalter angezeigt, der eine geheime Treppe öffnet, die zu einem Raum führt, wie unten abgebildet.
Leider können die Gegenstände darin nicht in Alucards Teil des Spiels übernommen werden. Worauf es jetzt ankommt, ist, wie Sie Dracula besiegen. Wir sind sicher, dass Sie herausgefunden haben, wie Sie Richter bewegen können, aber unten ist ein Diagramm, das zeigt, was jede Taste für ihn tut:
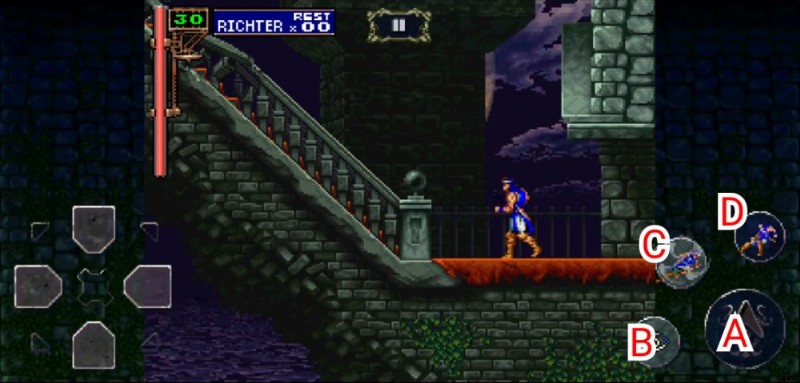
a. Springen – Eine grundlegende Fähigkeit. Dieser Button lässt Richter über Hindernisse springen. Du kannst zweimal darauf tippen, damit er einen Rückwärtssalto ausführt.
b. Peitsche — Durch Drücken dieser Taste peitscht Richter seinen Vampir-Killer auf alles, was vor ihm ist. Wenn Sie diese Taste gedrückt halten, lässt Richter sie zu Boden fallen. In diesem Modus können Sie das Richtungspad verwenden, um es herumzuschlagen oder herumzuwirbeln.
c. Angehen — Richter wird seine Kraft aufbringen und vorwärts und durch alles vor ihm stürmen. Dies verursacht Schäden.
d. Folie — Dieser Knopf lässt Richter eine sehr schnelle Rutsche ausführen. Durch zweimaliges Drücken springt Richter in die Luft und wirkt wie ein Weitsprung.
Abgesehen von all diesen können Sie zweimal links oder rechts auf das Steuerkreuz tippen, um Richter zum Laufen zu bringen. Sie können Richter auch einen Supersprung ausführen lassen, indem Sie schnell drücken:[ICN:Down] [ICN:Up] + Jump. Der Supersprung wird Richter sofort zur Decke des Levels treiben. Das ist nützlich, um über hohe Dinge (oder Bosse, *zwinker zwinker*) zu springen ).
Wenn Sie [ICN:Up] gedrückt halten und die Peitschentaste drücken, verwendet Richter seine Sekundärwaffe (dies kann auch in der Luft erfolgen), aber wenn Sie [ICN:Up] gedrückt halten und die Tackle-Taste drücken, führt Richter seinen Item Crash aus . Der Item Crash ist ein mächtiger Zauber, der nur Richter vorbehalten ist und eine Menge Herzen verbraucht. Hier ist, was Richters Sekundärwaffen im Detail tun:
| Sekundärwaffe |  |  |
| Keine | Keine | Flammenpeitsche – Verleiht Richters Peitsche vorübergehend zusätzlichen Schaden. (15❤) |
 Kreuz | Richter wirft das Kreuz nach vorne und es dreht sich kurz, bevor es wie ein Bumerang zu ihm zurückkehrt. (1❤) | Großkreuz – Richter beschwört die Kräfte der Heiligkeit herauf und lässt zwei massive Kruzifixe um sich herumwirbeln, die das gesamte Gebiet mit heiligem Licht reinigen. (20❤) |
| Weihwasser | Richter wirft die Weihwasserflasche auf den Boden und zerschmettert sie. Es reinigt den unheiligen Bereich, indem es in eine Welle blauer Flammen platzt. (1❤) | Wassersturm – Richter ruft heiligen Regen vom Himmel herab und beschädigt für kurze Zeit alles um sich herum. (15❤) |
Richter hat Zugriff auf alle anderen Sekundärwaffen, wenn Sie als er spielen. Aber da wir uns in diesem Leitfaden auf Alucard konzentrieren werden, lassen wir Sie diese selbst entdecken. Nachdem dies alles geklärt ist, gehen wir nun zum Kampf mit Dracula über. Das ist der Teil, wo Sie Richter ganz nach links bringen.
(HINWEIS:Sie können jeweils nur eine Sekundärwaffe tragen. Nachdem Sie eine aufgenommen haben, wenn Sie gerade die andere haben, lassen Sie die vorherige auf den Boden fallen. Wählen Sie mit Bedacht aus.)
Nach dem Austausch zwischen Richter und Dracula beginnt der eigentliche Kampf. Es gibt ein paar Dinge, die Sie über Dracula wissen müssen, bevor wir zum Wesentlichen kommen:
- Nur Draculas Kopf ist anfällig für Schaden. Nachdem er seine erste Lebensleiste aufgebraucht hat, offenbart er seine wahre Form. Dieses Formular kann überall angegriffen werden.
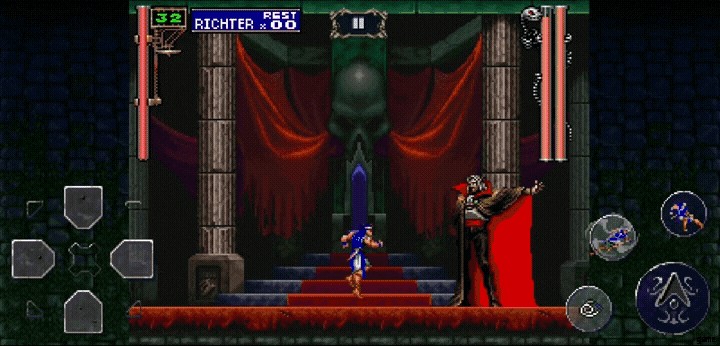
- In Draculas erster Form teleportiert und fächert er seinen Umhang nach außen und schießt ein Trio von Feuerbällen auf dich. Dieses Trio kann mit dem Vampire Killer zerstört werden, am effektivsten, indem man es mit den langen Druck- und Richtungstasten herumwirbelt. Dracula schießt gelegentlich ein Paar große Feuerbälle, die jedoch nicht zerstört werden können. Du kannst diese vermeiden, indem du dich unter den ersten duckst und über den anderen springst, indem du einen Supersprung ausführst oder indem du durch seinen Kopf tackle.
- Während Draculas zweiter Form hat er drei Attacken:Er kann ein paar Feuerbälle aus seinem Mund auf dich spucken, versuchen, dich zu zerquetschen, indem er auf dich springt, oder nach oben fliegen und einige unheilige Blitze auf dich herabregnen lassen. Die Feuerbälle aus seinem Mund können nicht zerstört werden, aber die Blitze schon.
Nachdem du Dracula genug Schaden zugefügt hast, hast du ihn erfolgreich besiegt. Hurra! Aber warten Sie, hat Richter genug Schaden erlitten, um ihn zu töten, dass eine junge Maria Renard auftauchte, um sein Leben zu retten? Hast du ihn überhaupt ohne Sekundärwaffen besiegt? All dies wirkt sich unmittelbar danach auf die Statistiken von Alucard aus. Hier sind alle möglichen Szenarien:
| Bedingung | Auswirkung auf Alucard |
| Besiege Dracula, ohne Schaden zu nehmen. | Alucard beginnt mit +5 auf sein HP-Maximum. |
| Besiege Dracula ohne aufgesammelte Sekundärwaffen und ohne die Flammenpeitsche zu benutzen. | Alucard beginnt mit +5 auf sein HP-Maximum, +1 auf seine STR, CON, INT und +5 auf sein LCK. |
| Schließen Sie den gesamten Prolog innerhalb von 1 Minute ab. | Alucard erhält +5 auf seine HP, sein Herzmaximum, STR, CON, INT und LCK. |
| Besiege Dracula mit ausgerüstetem Weihwasser. | Alucard beginnt mit +5 auf sein MP-Maximum und sein Herz-Maximum. |
| Besiege Dracula mit ausgerüstetem Kreuz. | Alucard beginnt mit +10 auf sein MP-Maximum und +5 auf sein Herzmaximum. |
| Sammle mehr als 40 Herzen im Prolog. | Alucard beginnt mit einer Neutronenbombe in seinem Inventar. |
| Verzehren Sie alle Herzen von Richter. | Alucard beginnt mit einer Herzauffrischung in seinem Inventar. |
| Richter verliert all seine HP und Maria kommt, um ihn wiederzubeleben. | Alucard beginnt mit einem Trank in seinem Inventar. |
Die ersten drei können erreicht werden (der erklärende Dialog zwischen Richter und Dracula kann durch Antippen des Bildschirms übersprungen werden) und wenn Sie sie erreichen, beginnen Sie mit einer sehr mächtigen Alucard. Er sollte 85 HP, 25 MP, 55 Hearts, 14 STR, 13 INT, 13 CON, 17 LCK haben. Wenn Sie ein solches Kunststück nicht erreichen können, ist das vollkommen in Ordnung, da Sie kontinuierlich so viel üben können, wie Sie möchten, indem Sie das Spiel beenden und einen neuen Speicherstand erstellen. Wie auch immer, das Spiel wird immer noch ziemlich herausfordernd bleiben.
Auf Alucards Teil des Spiels!
Alucard im Detail
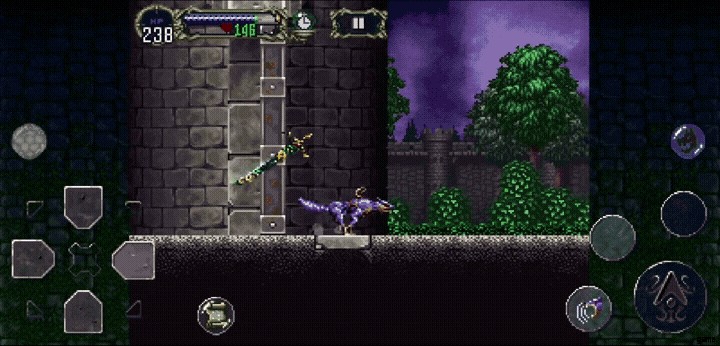
Es ist ein Rausch durch den Wald – Blitze durchbohren den Nachthimmel, starke Winde wogen durch die Bäume und ein einsamer, verhüllter Mann beeilt sich, seinem Schicksal zu begegnen. Nachdem er über die Brücke gesprungen ist, erkennt Alucard, dass er den Punkt erreicht hat, an dem es kein Zurück mehr gibt.
In dem Moment, in dem die Spieler die Kontrolle über Alucard übernehmen, bemerken sie, dass sich etwas an ihm anders anfühlt als damals, als sie Richter benutzten:Alucard ist ein mächtiges Wesen. Anmut in seinem Schritt, Wut in seinem Schlag, Tod in seinem Gefolge – Alucard ist in der Tat Lord Draculas Sohn, und er ist eine Kraft, mit der man rechnen muss.
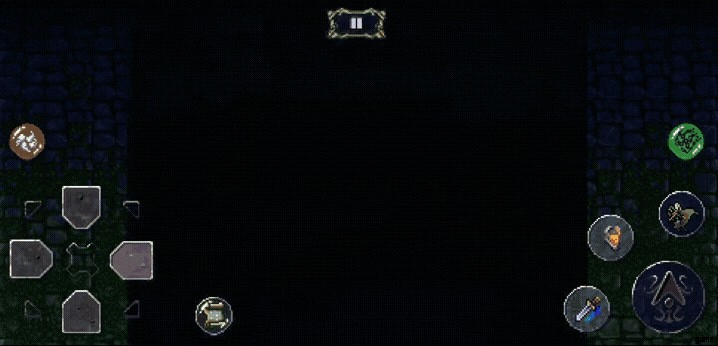
Seine Klinge schneidet durch die Feinde vor ihm wie ein heißes Messer durch Butter, sein Schild schützt ihn vor jedem Projektil, das auf ihn geschossen wird, und er hat ein paar Tricks im Ärmel, die wir bald besprechen werden. Aber einige von Ihnen könnten verwirrt sein, wie er genau funktioniert. Keine Angst, das Kontrollschema ist hier:
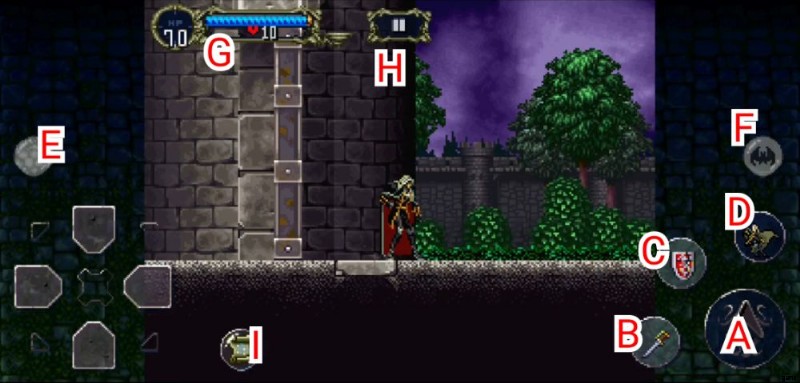
a. Springen — Ähnlich wie bei Richter befindet sich der Sprungknopf von Alucard in der gleichen Richtung. Der Unterschied hier ist, dass Alucard viel höher und weiter springen kann als Richter, wenn der Sprungknopf länger gedrückt wird. Auf dünnen Vorsprüngen kann Alucard durch gleichzeitiges Drücken der Abwärts- und der Sprungtaste nach unten springen. Er kann auch die Richtung seines Sprungs in der Luft ändern. Wenn du den Leap Stone bekommst, kann Alucard Double Jump machen und wenn du die Gravity Boots bekommst, kann er Super Jump machen. Mehr dazu im Abschnitt Relikte und wo sie zu finden sind.
b. Rechte Hand — Mit dieser Schaltfläche kann Alucard alles verwenden, was gerade in seiner rechten Hand ausgerüstet ist. Wenn Sie [ICN:Up] gedrückt halten und dann drücken, wird Alucard seine Sekundärwaffe einsetzen.
c. Linke Hand — Dieser Knopf lässt Alucard den Gegenstand benutzen, den er in seiner linken Hand hält. Ähnlich wie bei der rechten Hand wird Alucard durch Halten von [ICN:Up] und Drücken dieser Taste dazu gebracht, seine Sekundärwaffe einzusetzen.
d. Backdash — Alucard weicht einem Angriff geschickt aus, indem er schnell nach hinten springt. Dies kann verwendet werden, um sich schneller fortzubewegen, aber achten Sie auf Feinde!
e. Zauber — Wenn Sie diese Schaltfläche einmal antippen, führt Alucard den derzeit in diesem Slot markierten Zauber aus. Wenn Sie diese Taste lange drücken, können Sie alle verfügbaren Zauber von Alucard durchlaufen, wenn sie bereits das erste Mal ausgeführt wurden.
f. Umwandlung — Durch einmaliges Antippen dieser Schaltfläche verwandelt sich Alucard in die aktuell ausgewählte Form. Wenn Sie Ihren Daumen auf dieser Schaltfläche gedrückt halten, können Sie aus den von Ihnen gesammelten Relikten aus allen Formen wählen, die Sie haben.
g. Statusleiste — Dies zeigt den aktuellen Status unseres Dhampir*-Helden. Die Zahlen ganz links auf der Leiste stellen seine aktuellen HP dar, die hellweiß sind, wenn er bei voller Gesundheit ist. Wenn diese 0 erreichen, stirbt er. Der blau leuchtende Balken ist sein MP. Wenn er MP verbraucht, indem er Zaubersprüche wirkt oder bestimmte Waffenfertigkeiten ausführt, hört die Leiste auf zu leuchten. Er gewinnt MP im Laufe der Zeit zurück.
Unterhalb der MP-Leiste befindet sich seine Herzzahl. Wenn seine Herzzahl 0 erreicht, kann er keine Sekundärwaffe verwenden, es sei denn, er sammelt mehr. Der Behälter ganz rechts in der Statusleiste enthält Alucards derzeit ausgerüstete Sekundärwaffe. Wir werden darüber im Abschnitt Sekundärwaffen sprechen.
h. Pausenmenü — Diese Schaltfläche pausiert das Spiel und ermöglicht Ihnen den Zugriff auf Alucards Inventar, die Zaubersprüche, die er gelernt hat, die gesammelten Relikte, seine Vertrauten und die Optionen des Spiels. Wir werden seinen Inhalt später ausführlich besprechen.
ich. Karte — Wenn Sie darauf drücken, können Sie die Burgkarte lesen. Wir werden dies im Abschnitt So lesen Sie die Karte besprechen.
Alles kann in Alucards linker oder rechter Hand ausgerüstet werden. Was für Sie wichtig ist, ist, dass Sie entweder oder bequem verwenden können. Zum Beispiel werden im Spiel standardmäßig seine Waffen in seiner rechten Hand ausgerüstet, während seine Schilde auf der linken Seite sind. Wenn Sie möchten, dass er es umgekehrt verwendet, können Sie dies tun. Er kann auch zwei verschiedene Waffen führen, wie im obigen GIF abgebildet. Apropos Schild:Du wirst feststellen, dass er seinen Schild benutzen kann, wenn du lange auf die Hand drückst, in der du ihn gerade ausgerüstet hast.
Der Schild bedeckt Alucards Körper. Er kann auch vorwärts rennen, während er es hochhält. Was der Schild tatsächlich tun kann, ist ihn vor jedem entgegenkommenden Projektil zu schützen:Knochen, Äxte, Feuerbälle – was auch immer. Die meisten Projektile können blockiert werden, indem Alucard seinen Schild hochhält. Was er jedoch nicht blocken kann, sind Nahkampfangriffe, Feuerströme oder -fahnen, Blitze und alles, was nicht als separates Projektil erscheint.
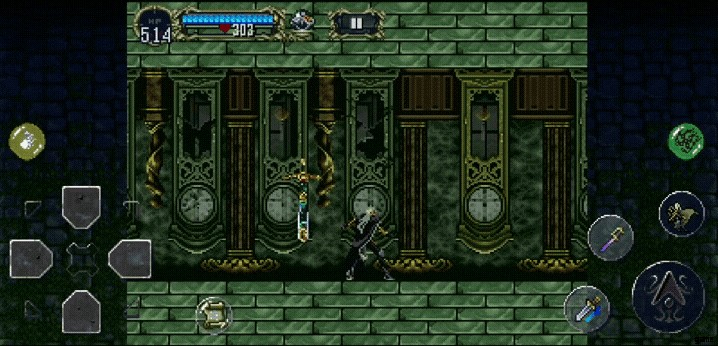
Während Sie sich durch den Eingang der Burg kämpfen, werden Sie schließlich auf einen Ort stoßen, an dem Mermen endlos spawnen. Oben auf der Treppe befindet sich ein massiver Felsen, über den Sie springen können, und unten gedeihen die Wassermänner in ihrem kleinen Teich. Der Felsen kann zerstört werden, also schwingen Sie Ihr Schwert darauf und Sie erhalten einen Schmorbraten. Wenn Sie sich durch diesen geheimen Tunnel bewegen, können Sie auch sein anderes Ende zerstören. Dies ist ein Feature in fast allen Castlevania-Spielen:Bestimmte Wände und Böden (oder Decken) können zerstört werden.
Versuchen Sie einfach, Ihre Waffe gegen jede Wand zu schwingen, die lustig aussehen könnte, und es könnte Sie überraschen, wenn Alucards Angriffe sie direkt durchschneiden. Viele von ihnen droppen sogar spezielle Items oder decken sogar geheime Räume auf. Was die Wassermänner betrifft, so werden Sie auch feststellen, dass das Wasser in Draculas Schloss Alucard feindlich gesinnt ist. Tauchen Sie ihn nicht ins Wasser, sonst nimmt er Schaden, zumindest bis Sie das Heilige Symbol finden.
Als Alucard an den Wassermännern vorbeikommt, trifft er auf Tod, sein Kindermädchen (kein Scherz, der Tod hat sich wirklich um ihn gekümmert, seit er ein Kind war). Der Tod versucht Alucard davon abzubringen, das Schloss alleine anzugreifen, aber letzterer besteht darauf. Ersterer beschließt, den verschrobenen Schlingel zu bestrafen, indem er ihm seine gesamte Ausrüstung wegnimmt. Diese finden Sie später wieder. Die fehlende Ausrüstung von Alucard ist wie folgt:
(HINWEIS:Für die Zwecke dieser Anleitung verwenden wir ein Symbol von Alucards Schwert, um die Angriffsfunktion darzustellen.)
| ARTIKEL | TYP | EFFEKT | BESONDERE FÄHIGKEIT |
 Alucard-Schwert | Schwert | ATT +42, verursacht Schnittschaden | Streik von hinten: verbraucht 5 MP |
 Alucard-Schild | Schild | DEF +5 | Schildrutenzauber: Fügt dem Feind 255 Schaden zu, stellt 8 HP und 1❤ wieder her, gewährt 3 Sekunden Unverwundbarkeit. Entzieht kontinuierlich MP, während der Schild hochgehalten wird. |
 Alucard Mail | Text | DEF +20, widersteht Feuer-, Donner- und Eisschaden | nicht zutreffend |
 Drachenhelm | Kopfbedeckung | STR +4, DEF +3, halbiert die Verteidigung des Gegners | nicht zutreffend |
 Dämmerungsumhang | Umhang | CON +10 | nicht zutreffend |
 Halskette von J | Zubehör | DEF +5 | nicht zutreffend |
Es gibt noch viele weitere interessante Gegenstände im Schloss, die wir ausführlich im Abschnitt „Interessante Gegenstände“ besprechen werden. Wir werden ihre Standorte bekannt geben, aber wir werden den Standort der Alucard-Ausrüstung überraschen.
An diesem Punkt des Spiels werden Sie feststellen, dass Alucard jetzt keine Gegenstände mehr bei sich hat! Hier beginnt das eigentliche Spiel. Das Spiel gibt Ihnen jetzt zwei Skelette, die Schwerter führen. Wenn man sie tötet, lässt einer das Kurzschwert fallen, während der andere den Roten Rost fallen lässt.
Das Kurzschwert ist das bessere Schwert der beiden, da das Rotrost eines der schlechtesten Schwerter in Symphony ist. Obwohl wir nicht übertreiben, hat der Rote Rost tatsächlich einen Nutzen, bei dem Sie den Doppelgänger (einen Boss) daran hindern können, sein Schwert zu ziehen. Der Rote Rost ist ein verfluchtes Schwert, das gelegentlich in seiner Scheide stecken bleibt, also schwinge es auf eigene Gefahr.
All dies gesagt, Sie werden überall im Schloss weitere faszinierende Gegenstände finden können. Was es braucht, ist etwas Einfallsreichtum. Von Zeit zu Zeit werden wir einige interessante Möglichkeiten aufzeigen, spezielle Gegenstände zu erhalten, die Ihren Fortschritt vorantreiben und beschleunigen. Möglicherweise können Sie sogar Gegenstände erhalten, die sonst hinter Bereichen stecken, die Relikte erfordern. Achtung!
Artikel, Artikel, Artikel. Hier gibt es viel auszupacken, oder? Wie wäre es, wenn wir uns das Pausenmenü ansehen?
*Dhampir – (S.) Die formelle Bezeichnung für eine Person, die halb Mensch, halb Vampir ist.
Das Pausenmenü und wie man darin navigiert
Im Pausenmenü von Symphony of the Night können Sie Alucards Statistiken einsehen, wie Sie Alucards aktuelle Ausrüstung anpassen, nachsehen, welche Zaubersprüche Sie gelernt oder welche Relikte Sie bisher gesammelt haben, oder seine Vertrauten ändern. Der komplexeste Teil davon ist sein Ausrüstungsbereich.
Für viele Erstspieler können wir davon ausgehen, dass dies für sie etwas verwirrend sein könnte. Oft erwerben sie einen neuen Gegenstand, wissen aber nicht, wie sie ihn ausrüsten sollen. Keine Sorge, hier ist eine kleine Aufschlüsselung dessen, was Sie sehen werden, und wir beginnen zuerst mit dem Statusbildschirm.
Der Statusbildschirm zeigt viele Begriffe und Zahlen, die dem durchschnittlichen RPG-Spieler bekannt sind. Aber für diejenigen, die gerade bei Symphony reingesprungen sind und nicht verstanden haben, was diese sind, hier ist ein kurzes Glossar, was jedes einzelne Element darin bedeutet:
- Stufe — Dies zeigt das aktuelle Level von Alucard an. Immer wenn er etwas tötet, erhält er Erfahrungspunkte oder EXP. Jedes Monster im Schloss hat unterschiedliche EXP und je schwieriger sie zu töten sind, desto mehr EXP geben sie normalerweise.
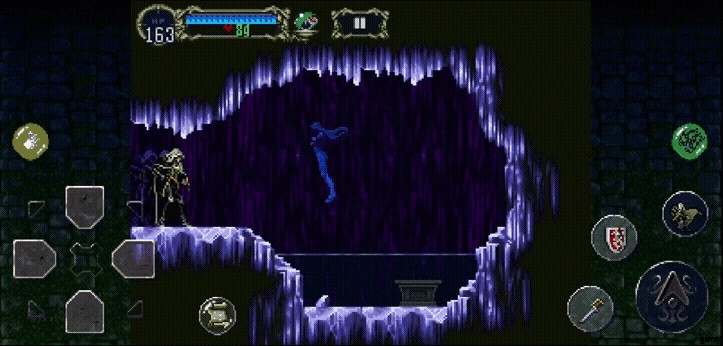
- Status — Der Standardstatus von Alucard sollte GUT sein. Wenn er vergiftet (POISON), versteinert (STEIN) oder verflucht (FLUCH) wurde, wird er sich in diese verwandeln. Gift reduziert seinen Gesamtschaden um die Hälfte und kann mit einem Gegengift geheilt werden, Versteinerung friert Alucard vollständig ein und verdoppelt seinen erlittenen Schaden, und der Fluch hindert ihn am Angriff, was mit Uncurse geheilt werden kann.
Wir haben hier die Versteinerung herausgegriffen, weil sie nur geheilt werden kann, indem man das Steuerkreuz wiederholt in verschiedene Richtungen reibt, oder wenn Sie die Faerie Familiar haben, kann sie einen Hammer aus Ihrem Inventar verwenden.
- EXP — Dies stellt dar, wie viele Erfahrungspunkte Alucard insgesamt gesammelt hat.
- WEITER — Die Zahlen hier geben an, wie viel EXP Alucard benötigt, bevor er aufsteigt. Es zählt bis 0 herunter. Sobald es 0 erreicht, steigt Alucard auf und die für das nächste Level erforderliche EXP wird erhöht.
- GOLD — So viel Geld hat Alucard derzeit bei sich.
- ZIMMER — Dies ist die Gesamtzahl der Räume, die Alucard erkundet hat. Ein Raum ist jeder Bereich im Schloss, der durch einen verblassenden Übergang getrennt ist. Eine Tür trennt die verschiedenen Bereiche des Schlosses.
- KILLS — Diese Zahlen stellen die Gesamtzahl der Feinde dar, die Alucard getötet hat.
- ZEIT — Dies ist die Gesamtzeit, die Sie mit dem Spielen des Spiels verbracht haben. Der Timer bewegt sich nicht, wenn Sie sich im Pausenmenü befinden.
- PS — Siehe Statusleiste unter dem Abschnitt Alucard im Detail steht für Gesundheitspunkte. Dies kann erhöht werden, indem Sie aufsteigen oder einen HP Max Potion sammeln, der von Bossen fallen gelassen und in einigen Räumen versteckt wird.
- MP — Siehe Statusleiste unter Alucard im Detail steht für Magic Points. Dies kann durch Levelaufstieg erhöht werden.
- HERZ — Siehe Statusleiste unter Alucard im Detail. Dies kann erhöht werden, indem Sie einen Heart Max Potion sammeln, der in einigen Räumen versteckt ist.
- STR — Das ist Alucards Stärke. Mehr STR lässt ihn mit der Waffe, die er gerade in den Händen hält, härter zuschlagen. Es stapelt sich mit seinem ATT-Stat. Diese erhöht sich mit jedem Levelaufstieg.
- CON — Dies repräsentiert Alucards Verfassung oder seine „natürliche“ Verteidigung. Für jeweils 10 Punkte in seinem CON erhöht er seine DEF um 1 Punkt. Dies geschieht auch alle 2,5 Punkte oder so. CON bestimmt auch, wie lange er vergiftet oder verflucht bleibt. Höherer CON bedeutet weniger Zeit für diesen Status. Diese erhöht sich mit jedem Levelaufstieg.
- INT — Die Zahlen hier sind die Gesamtintelligenz von Alucard. Größere Zahlen in INT erhöhen den Schaden, den er mit etwas anderem als seinen Waffen verursacht. Dazu gehören seine Zaubersprüche oder seine Sekundärwaffen. Allgemein gesagt, wenn der Angriff die Verwendung von Alucards MP oder Herzen erfordert, wird der Schaden, den er verursacht, von diesem Wert abgeleitet. Diese erhöht sich mit jedem Levelaufstieg.
- LCK — Das ist Alucards Glücksstatistik. Höhere LCK bedeutet eine höhere Chance, einen kritischen Treffer zu landen oder Items fallen zu lassen. Dieser Wert ist notwendig, wenn Sie nach Ausrüstung schleifen. Das Talisman-Accessoire ist ebenfalls auf diesen Wert angewiesen.
- ATT R — Dies ist der Gesamtschaden, den Alucard mit der Waffe verursacht, die sich derzeit in seiner rechten Hand befindet. Der Schaden in beiden Händen ist gleich, wenn er derzeit eine Zweihandwaffe ausgerüstet hat.
- ATT L — This is the overall damage that Alucard deals with the weapon currently in his Left Hand. The damage in both hands will be the same if he currently has a two-handed weapon equipped.
- DEF — This is the amount of damage mitigated from enemy attacks by Alucard’s armor.
In the tab next to it, you should see what he is capable of equipping. This is the Equip screen. Here, he has a total of 7 slots in which you can equip him with certain items:
- Head — Helmets, headgear, and anything that might fit on Alucard’s head.
- Body — Armor to protect our hero.
- Cloak — This is where you can fit Alucard with the incredibly stylish cloaks you can find all throughout the castle.
- Right Hand — Weapons, items, shields.
- Left Hand — Just like the Right Hand, but on the Left.
- Other 1 &2 — These are accessory slots. Rings, necklaces, anything that doesn’t seem to fit elsewhere. They’re interchangeable and you can mix and match whichever accessories you seem to like together.
Selecting any of these slots will allow you to browse the Equipment available. By tapping the Filter button that appears on the upper-right portion of the screen, you’ll be able to sift through what you’ll be able to put in the slot but this only applies to what you can use in his Right Hand or Left Hand.
One thing we’d like to point out is how Alucard would restore his HP or MP by drinking potions or eating food. Unlike modern RPGs where you can simply choose the item and then hit a “Use” button, you will have to give Alucard your desired item.
Let’s say that you’d like for him to drink a Potion to recover his HP. You will have to equip the Potion first in either hand, and unpause the game. When you’re in play, tap the Hand which you’ve equipped the Potion in and he will drink it. For food, it’s basically the same thing, except Alucard will prefer to toss the food down on the floor first. Walking over the food he dropped will make him eat it. He’s quite sophisticated, you see.
This section displays any and every spell Alucard has already cast. It will display a sequence of buttons to cast first, and then they will be available for selection using the Spell button. Because the game’s button sequences aren’t that reliable, we will outline every single spell and what they do in the Spellbook section.

This is where all the Familiars you have found can be summoned and dismissed. Simply tapping any of their names will call them to Alucard’s side. To view them in detail, please see the Get Familiar with Your Familiars section.
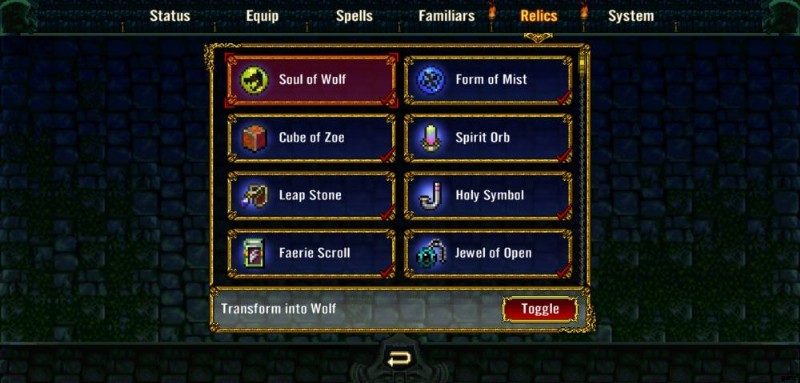
This is a part of the Pause Menu where you can browse the Relics that you’ve collected thus far. They also each have a brief description of what they do. If you’re up for a challenge, you may also disable some Relics, but be warned, you will need some of these. To see an in-depth guide to each of them, they are found in the Relics and Where to Find Them section of this guide.
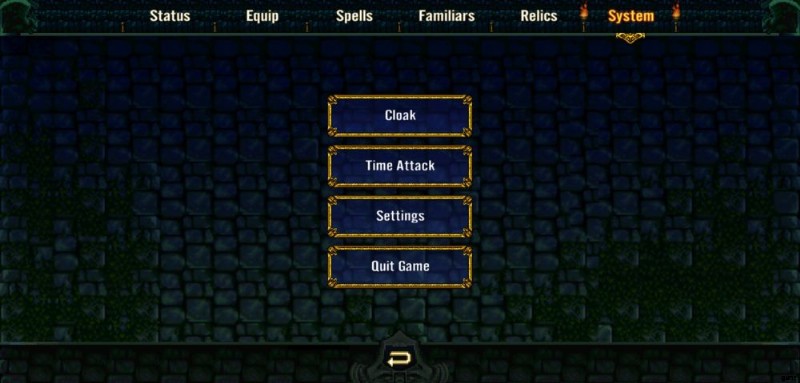
Lastly, you have the System menu. Here, you can change the lining of the Reverse Cloak, the colors of the Joseph’s Cloak, change the game’s languages, or even return to the main menu. Simple.
We’re getting to the juicier part of the guide. This is the best part of Castlevania as a whole:combat. Ready yourself!
Alucard’s Deadly Grace
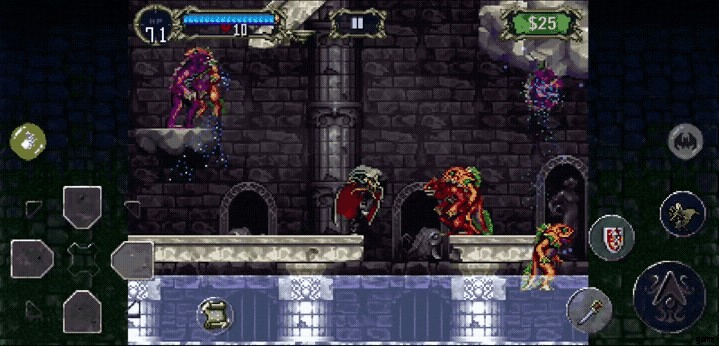
One thing you are bound to notice immediately after taking control of Alucard is that he is quite fluid in every single move he makes.
His sword swings are swift and deadly, his jumps are far and high, and the way he runs through the castle halls is as though he were gliding on air. He is smooth, deft, and deadly. This is further exemplified by the way his controls work. As discussed earlier in this guide, he can carry one thing in each hand, backdash, perform Spells, and collect Relics to further improve the way he fights. But the spell-casting and Relic usage will be discussed in the Dirty Combat 101 section. Here, we will cover the basics of his actions.
By tapping the Right Hand button (assuming this is where you equipped a weapon), Alucard will swing at the enemy directly in front of him. He can also do this while ducking by holding [ICN:Down] on the d-pad, and even attack downward with most weapons by long-pressing [ICN:DgDownRight] or [ICN:DgDownLeft] depending on where you want him to face. The downward strikes are usually for smaller enemies like Fleamen and Frogs.
Apart from using his shield, Alucard can also attack certain projectiles to destroy them. He can also attack in midair, swing across from him or downward using the same controls. Most weapons each have varying swing speed with two-handed swords being slower than many.
If you fancy dual-wielding, you can equip two different weapons in each hand and use one or the other when the time arises. For instance, wielding a Firebrand in the Right Hand and an Icebrand in the Left allows you to tackle enemies with different elemental resistances.
When unsure of an enemy’s attack, ducking is a safe bet, but pressing the Backdash button is safer. What happens is that Alucard will swiftly glide backwards, away from the enemy’s attack. Jumping over enemy attacks also works as some of them can be perfectly evaded that way. Holding down the Jump button will result in higher and longer jumps.
But combat aside, doing long jumps can get you across wider gaps (at least until Alucard can turn into a Bat or after you find the Leap Stone or the Gravity Boots), and Backdashing makes you travel slightly faster than running through the castle’s halls (until you find the Power of Wolf Relic).
Just like Richter, Alucard can also equip Sub-Weapons and use them. The next section will discuss them in detail.
Sub-Weapons

Upon obtaining the Cube of Zoe, your first Relic, destroying candles, lamps, and any flame attached to a wall will drop hearts, money, and the occasional Sub-Weapon.
As explained earlier, Sub-Weapons are small but deadly items that can be utilized by holding (ICN:Up) and then pressing any Hand Button (ICN:AlcSub). Each Sub-Weapon has its own consumption of Hearts and its own behavior. Naturally, more Hearts consumed means that the weapon is more powerful. Below is a table of any and every Sub-Weapon that Alucard can obtain in the castle as well as their Heart consumption and what they can do:
| SUB-WEAPON | HEARTS REQUIRED | WHAT IT DOES |
 Knife | 1❤ | Flies straight at the enemy, can be thrown rapidly. |
 Axe | 4❤ | Hurled upwards in an arc, pierces through multiple enemies as it rises and falls. |
 Holy Water | 3❤ | Emits a brief, green flame that rapidly damages anything caught in it. |
 Rebound Stone | 2❤ | Bounces all over a room, damaging any enemy it passes through. |
 Bible | 5❤ | Violently flies around Alucard, damaging enemies hit by it and destroying projectiles. |
 Stopwatch | 20❤ | Stops time for a few seconds. Some enemies may be immune. |
 Vibhuti | 3❤ | Scatters holy ashes on the floor, damaging enemies that step on them. The ashes linger for a short while. |
 Agunea | 5❤ | Fires lightning bolts at the enemy, can be fired rapidly. |
 Cross | 100❤ | Grand Cross — Alucard summons the powers of holiness and causes two massive crucifixes to swirl around him, purifying the entire area with holy light. |
Each of these Sub-Weapons have their own unique uses that suit the game’s different enemies and bosses. One example we can give is the Axe’s use on the game’s first boss, Slogra and Gaibon. This can be used to damage them when Gaibon lifts Slogra up into the air. When tossed, the Axe will slash through both of them, damaging them just enough for you to defeat them both. We’ll cover more of this in the Dirty Combat 101 section.
Sub-Weapons aside, there are still other ways Alucard can dispatch his enemies. This is where things are going to get tricky!
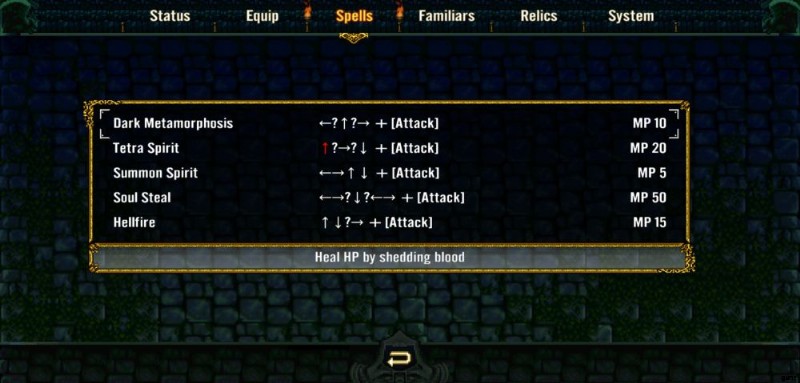
The Spellbook

Among Symphony of the Night’s many secrets is Alucard’s ability to perform Spells.
This is a secret because only those familiar with the inputs are able to cast them. Most people will not have tried performing these and would rather finish the game without them. This goes especially for the PSX and PSP versions of the game. Sure, they can be purchased from the Master Librarian in the Long Library, but many of them can be cast right off the bat if Alucard has enough MP to perform them.
Do know that the sequences of these inputs should be cast perfectly in order. If you miss a button or do not fit the requirements of the spell (not enough MP, missing Relic, etc.), you will not be able to cast it successfully.
Each and every Spell that Alucard casts varies in MP and has its own unique behavior and usage as well — some of these focus on healing the dhampir, while others are solely used to heavily damage enemies. Below is a table of any and all Spells that Alucard can cast. Be warned that some of them will require certain things to be effectively cast:
(NOTE:This is all assuming Alucard is facing the right. If he is facing the left, the spell has to be done the other way. Meaning, if you plan to cast Dark Metamorphosis while he is facing the left of the screen, you have to start with the [ICN:Right] button, Tetra Spirit’s arrows should descend to the left instead of the right, etc.)
| SPELL | MP USAGE | INPUT &REQUIREMENTS | BEHAVIOR |
| Summon Spirit | 5 |  | A spirit flies out from the center of the screen and repeatedly attacks some enemies present before flying out. |
| Tetra Spirit | 20 |  (The  should be held for at least 2 seconds) should be held for at least 2 seconds) | A salvo of four spirits fly out from the center of the screen, attacking multiple enemies repeatedly. Can focus on a single target for massive damage. |
| Dark Metamorphosis | 10 |  | Alucard awakens the darkness of his vampiric side and can heal by getting showered on by enemies that shed blood. He will need to use a weapon that cuts for them to bleed. |
| Hellfire | 15 |  | Alucard performs his father’s trademark Spell. He will teleport and then reappear before lifting his cape to shoot a trio of fireballs. Halten  after he reappears will cause him to launch the bigger fireballs. after he reappears will cause him to launch the bigger fireballs. |
| Soul Steal | 50 |  | Alucard draws out the life energies of all the enemies around him, restoring his health. Useful against bosses with a lot of HP or when Alucard needs healing in general. |
| Wing Smash | 8 | (Bat Form only)  | Alucard flies at the enemy at a high speed. His flight can be controlled at an upward or downward angle. |
| Wolf Charge | 10 | (Wolf Form only, requires Skill of Wolf Relic)  | Alucard lunges at his enemy with a vicious bite. He also tears through multiple enemies using this. |
| Sword Brothers | 30 | (Requires Sword Familiar summoned)  (The  key should be held for at least 2 seconds) key should be held for at least 2 seconds) | The Sword Familiar will damage all enemies on screen. |
These can all be cast anytime, anywhere. That said, they can also be applied to bosses!
Dirty Combat 101 (AKA Fighting Smart)
Does a specific boss get you down? Is an enemy in particular blocking the way? Make them move not just with what weapons you wield, but the Spells and Sub-Weapons you currently have.
Each weapon class has its own attribute and effects. Naturally, most swords have the Cut attribute unless they are said to be elemental. These attributes can be used against specific enemies and bosses. Spells like Summon Spirit and Tetra Spirit will be the easiest to cast early on due to their low MP requirements and their high damage output.
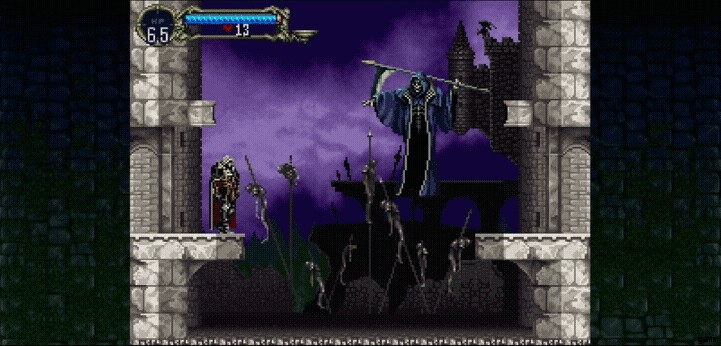
The Hellfire Spell also qualifies, since it allows Alucard a brief moment of invulnerability while he casts it as well as the ability to teleport anywhere on a flat surface. To give you an example of how to fight smart, let’s cover how you can take down the first two bosses of the game rather easily:
| BOSS | LOCATION | WHAT TO BRING |
| Slogra and Gaibon | Alchemy Laboratory | Axe (Sub-Weapon) |
| Doppelganger 10 | Outer Wall | Red Rust, Holy Water (Sub-Weapon) or Stopwatch (Sub-Weapon) |
Let’s first talk about Slogra and Gaibon. These two demons are Death’s trusted minions who have been sent to kill Alucard in the hopes that he doesn’t prevent Dracula’s resurrection. Hitting Slogra (the bird with the spear) will cause him to jump backwards, forcing Gaibon (the blue one that flies) to catch him midair. Slogra will then angle his spear downward and Gaibon will try to drop him on Alucard. While Slogra is getting picked up or while he is in midair with Gaibon, chuck some Axes on them.
You can also cast Summon Spirit or Tetra Spirit if you have them unlocked to further damage them. After hurting Slogra enough, he will lose his spear and resort to stabbing Alucard with his beak instead. When Slogra dies, Gaibon will try to spew fireballs at Alucard which are easily destroyed by blocking with his shield or by attacking them. His first attempt would be to fly upward and spit them from there.
After reaching a height, Gaibon will drop and shoot more fireballs at Alucard while standing upright. Alucard can duck under the stream of fireballs and cut Gaibon in the stomach repeatedly. When Gaibon hits a certain HP threshold, he will turn red and spew bigger fireballs at a rapid pace but the same tactic can be applied here. Killing Gaibon first will make the fight easy as Slogra will repeatedly leap backwards when hurt, having nobody to catch him, but this is harder to pull off since Gaibon often flies about.
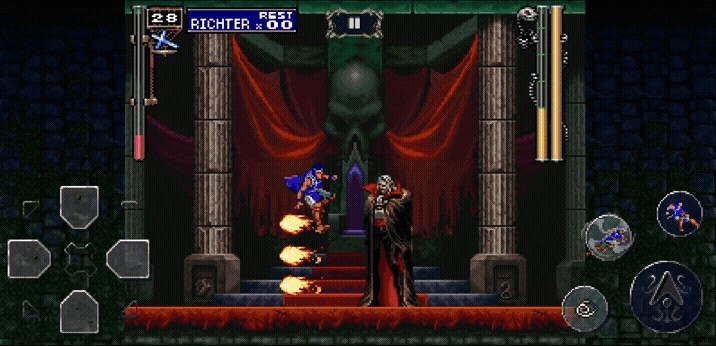
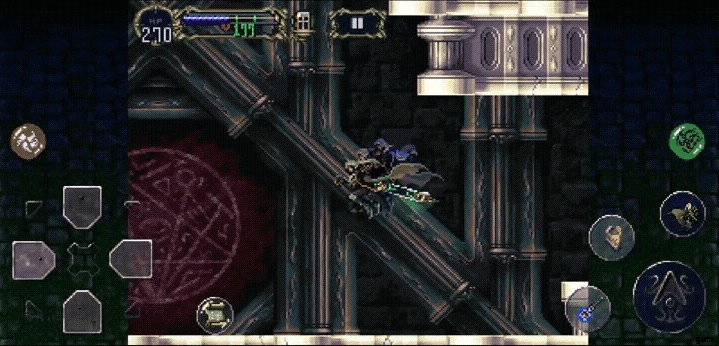
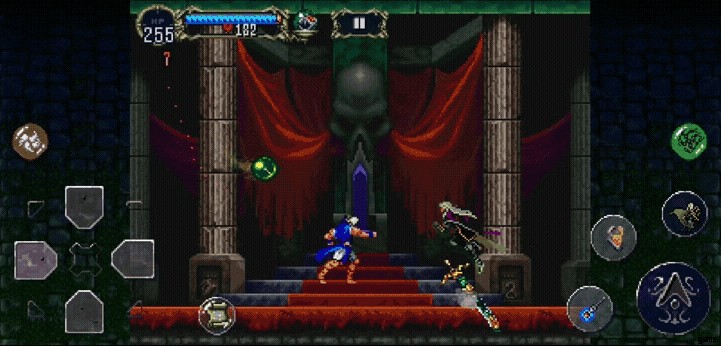
The Doppelganger, on the other hand, is quite challenging if you aren’t prepared. Ensure first that you aren’t carrying a Knife Sub-Weapon since he will copy your every move. You can prevent him from advancing toward you by dropping Holy Water in front of him. The flames will stagger him. Additionally, equipping the Red Rust and landing a hit on him will Curse him, preventing him from drawing his sword.
Of course, you’ll have to re-equip whatever sword you had initially before this, because the Red Rust’s attack power is terrible. If you happen to have carried the Stopwatch from the Marble Gallery, you can freeze the Doppelganger in place and slash at him repeatedly, killing him effortlessly. This was captured in the GIF above.
These are but two bosses in the whole game. There are many more ways you can win, and to give you food for thought, we’ve prepared a list of items worth looking for.
Interesting Items

Much like every RPG out there, Symphony of the Night is chock full of surprises. Below is a list of a few items and their locations. Having any of these can help make your run smoother or more enjoyable:
| ITEM | ITEM TYPE | LOCATION | USAGE | SPECIAL SKILL |
 Walk Armor | Body | Catacombs | Exploring the castle will increase its overall defense. This includes areas you have already discovered. | n/a |
| Holy Rod | Club | Long Library | A very useful weapon that can easily dispatch most enemies in the castle — many of which have a weakness to Holy damage. |  Holy Explosion — Alucard delivers a mighty swing, increasing the radius of the Holy Rod’s power. It also deals more damage than a regular swing. |
 Holy Sword | Sword | Colosseum, also dropped by the Vandal Sword enemies from the Clock Tower | A powerful weapon that is considerably stronger than the Holy Rod. However, the Holy Rod’s speed might favor more players. Both can be wielded in each hand. Finding this in the Colosseum will require flight, however. |  Holy Burst — Alucard causes a small explosion of holy energy in his immediate vicinity, finishing off the attack with a powerful swing. |
 Joseph's Cloak | Cloak | Sold by Master Librarian ($30,000) | This is the second best Cloak in the game. You can change the colors of this cloak in the System Menu under the Cloak option. | n/a |
 Crissaegrim | Sword | Forbidden Library, dropped by Schmoos | You have won the game. | n/a |
   Alucart Set | Sword, Body, Shield | Marble Gallery, requires the Leap Stone and the Stopwatch (Sub-Weapon) | This set dramatically boosts Alucard’s LCK stat, making it easy to farm for rare items. Be warned that the stats this set offers doesn’t add much. Also puts Alucard under the special status “ALUCART”. | n/a |
 Ring of Ares | Accessory | Abandoned Pit to the Catacomb | A ring that grants Alucard the strength of 24 men, but at the cost of 24 of his current Defense. High risk, high reward as it makes Alucard hit so much harder in the early game. | n/a |
 Shield Rod | Club | Colosseum, Final Stage:Bloodlines (Easter Egg only) | A special rod that is extremely powerful with a shield. It can be used simultaneously with a different shield to cast a different spell each time. |  Shield Spell — Simultaneously pressing the Shield Rod and the Shield you are currently equipped with casts a spell based on the shield.  Star Shield — Alucard generates a floating, energy shield that blocks projectiles where it’s cast. |
 Rune Sword | Sword | Dropped by the Dodo | Arguably the rarest sword of the game. It’s similar to the Heaven Sword but instead cleaves whatever’s in front of Alucard when thrown. |  Extended Throw |
 Brilliant Mail | Body | Dropped by the Snipers of Goth | A suit of armor that greatly improves the power of Sub-Weapons. | n/a |
There are still more items out there, but we’d rather you find them out yourself. Trust us, the surprises are all worth it!
Now how about some Familiars?
Get Familiar with Your Familiars
Familiars are little helpers that assist Alucard in battle. Each of them have their own unique abilities, but in the case of this port, there are at least two of these Familiars that share the same stats and moves as their regular counterparts (with minor differences).
Finding Familiars can help you explore the castle more safely as with each time they level up, they grow stronger in power. Just like Alucard, they gain EXP but this time, it’s based on the longer they are kept by his side. Below is a list of all the available Familiars in the game and where you can find them.
| FAMILIAR | FEATURES | LOCATION |
| Faerie | Can automatically heal Alucard using Golden Apples or any Potions and dispel him of debuffs using items from his inventory. She can also buff him with potions of specific Resistance if Alucard is hit by a particular element. | Long Library (Faerie Card) |
| Devil | Fights by Alucard's side. Gains the ability to perform elemental spells with his trident as he levels up. Can press switches. | Abandoned Pit to the Catacombs (Demon Card) |
| Bat | Fights by Alucard's side. Swoops at enemies and becomes more aggressive every level. When Alucard is in Bat Form, it will mimic Alucard's fireball attack (Fire of Bat). At higher levels, it will have additional bats by its side that will also mimic Alucard's fireballs. | Alchemy Laboratory (Bat Card) |
| Ghost | Fights by Alucard's side. It latches onto enemies and causes small explosions dealing magic damage which increase in speed per level. At Lv70, its attacks heal Alucard for 8 HP each. If Alucard assumes the Bat form, it will leave. Turning back to his original form, his Wolf form, or his Mist form will call the Ghost back. It can be ordered to attack particular enemies by making Alucard pass an enemy of choice in his Mist form. | Castle Keep (Ghost Card) |
| Sword | Fights by Alucard's side. It will fly at an enemy's location and swing in a circular motion, causing rapid damage. As its level goes up, its aggression grows and at Lv50, it will disappear from the screen and appear in Alucard's inventory as a regular sword to wield. It can be re-summoned as a Familiar through this menu. It will change appearance at Lv60, becoming even more aggressive as a Familiar and more powerful as a sword. It also comes with the powerful Sword Brothers spell (see the Spellbook section). | Olrox's Quarters (Sword Card) |
| N Demon | Similar to the Devil Familiar. The only exception to it is that it has a large nose, glasses, and a funnier personality as opposed to the Devil's more formal one. | Colosseum (N Demon Card) |
| Fairy | Similar to the Faerie Familiar. Unlike the Faerie, however, this one will sing Alucard a lullaby and put him to sleep if you make him sit on a chair by pressing ↑ when in front of one. | Olrox's Quarters (Fairy Card) |
Leveling up your familiars is hard work, but pick one that suits your needs and it’ll take great care of you. It’s always good to invest in one early, especially as soon as you get its card. Be warned that you can only summon one Familiar at a time.
Familiar Cards are Relics by themselves. The question is, which items are specifically classified as Relics, exactly? Let us tell you!
Relics and Where to Find Them
Relics are powerful items that are required for you to traverse the castle’s various obstacles.
Some of these involve places where you’d need to fit in like grills or small gaps, some of them require Alucard to jump a certain height, others have more essential abilities that you will eventually need since the game only gets harder as you progress. Below is the complete list of Relics, excluding the aforementioned Familiar Cards:
| RELIC | LOCATION | USAGE |
 Cube of Zoe | Entrance | Your first Relic. Items now drop from candles and lamps. |
 Spirit Orb | Marble Gallery | Shows how much damage you deal. |
 Faerie Scroll | Long Library | Tells you the name of each enemy you attack. |
 Jewel of Open | Sold by Master Librarian ($500) | Opens Blue Doors. |
 Leap Stone | Castle Keep | Allows Alucard to Double Jump by pressing the Jump button again in midair. |
 Gravity Boots | Marble Gallery, requires Soul of Bat | Allows Alucard to Super Jump by pressing the below command: Can be done repeatedly in midair. |
| Merman Statue | Underground Caverns | Summons the mysterious oarsman at large bodies of water. |
 Holy Symbol | Underground Caverns, requires Merman Statue | Allows Alucard to go underwater without taking damage. |
 Soul of Wolf | Outer Wall | Grants Alucard the Wolf Form, can run as a wolf by double tapping  or or  |
| Power of Wolf | Entrance, requires Soul of Bat or Gravity Boots | Alucard’s speed as he runs in Wolf Form increases overtime, a great way to travel long hallways. |
 Skill of Wolf | Alchemy Laboratory, requires Soul of Bat or Gravity Boots | Grants Alucard the ability to perform the Wolf Charge Spell, see the Spellbook section for its input command. |
 Form of Mist | Colosseum | Grants Alucard the Mist Form. Allows him to pass through grills. |
 Power of Mist | Castle Keep, requires Soul of Bat. Fire of Bat optional. | Prolongs the Mist Form. |
 Gas Cloud | Floating Catacombs, defeat Galamoth | Mist Form now damages enemies. |
 Soul of Bat | Long Library, requires Form of Mist | Grants Alucard the Bat Form, allows him to fly. |
 Fire of Bat | Clock Tower, requires Soul of Bat or Gravity Boots | Gives Alucard’s Bat Form the ability to spit fireballs. |
 Echo of Bat | Olrox’s Quarters, requires Soul of Bat or Gravity Boots, defeat Olrox | Allows Alucard’s Bat Form to use its echoes in dark places. |
 Force of Echo | Reverse Caverns | Alucard’s Bat Form can now use its echo to damage enemies. |
 Ring of Vlad | Defeat Darkwing Bat | INT +10, allows entry to the final boss room |
 Rib of Vlad | Defeat Akmodan II | CON +10, allows entry to the final boss room |
 Heart of Vlad | Defeat Medusa | Immunity to Curse, allows entry to the final boss room |
 Tooth of Vlad | Defeat The Creature | STR +10, allows entry to the final boss room |
 Eye of Vlad | Defeat Death | LCK +10, allows entry to the final boss room |
The last five Relics are quite important since they will allow you to find the room of your final battle. Once you have successfully obtained these as well as defeated the bosses that guard them, you may find it in the heart of the Black Marble Gallery. Do note that the Golden Ending requires you to have explored everything with a completion rate of at least 196% of castle exploration (200.6%, total).
Location, location, location — you’ve seen this repeated a couple of times in the guide now. Problem is, how does one read the map? It’s actually simpler than it looks.
How to Read the Map
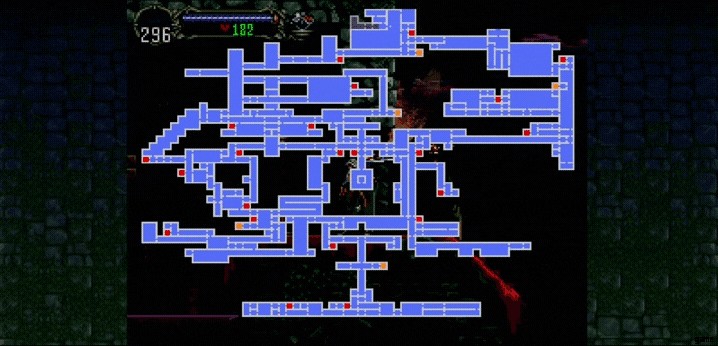
Dracula’s castle is HUGE . If this game didn’t have a map system of some sort, we’d all be lost.
Thankfully, the developers thought ahead and gave everyone a map which you can buy from the Master Librarian in the Long Library. The item itself grants the player a basic outline of the castle, though, each player has the Map Button from the start, as seen in the Alucard in Detail section. Pressing this will reveal the rooms you have discovered and the rooms you are yet to discover.
Of course, any area that doesn’t seem highlighted hasn’t been discovered yet, but at the same time, there are hidden areas that only you can find out by breaking them with your weapon or having the Faerie Familiar summoned. There are a few other things that stand out in the map when you look at it.
The white, pulsating circle is your current location — it shows where you are in a room, hallway, or tower. There are also tiny rooms that are colored red and yellow. These rooms are quite important because they provide essential features that help you explore the castle and keep healthy. The red ones are Save Points.
A large, golden crystal that beats like a heart morphs into Alucard’s coffin when you choose to save. Making contact with this crystal by pressing the [ICN:Up] button will replenish all of Alucard’s HP and MP.
Conversely, the yellow rooms are Warp Rooms. These rooms allow Alucard to walk through their glowing portals by pressing the [ICN:Up] button. However, you will have to observe the animal head atop the portal, as each of them signify which room Alucard might currently be in:
- Scorpion — Outer Wall
- Horse — Entrance
- Lion — Castle Keep
- Goat — Olrox’s Quarters
- Snake — Abandoned Pit to the Catacomb
With the essentiality of Warp Rooms mentioned, this is where the charm of Castlevania comes from:exploration.
Exploration and Backtracking is Key
You will quickly notice that there are some places that are hard to reach. These require specific Relics or Familiars to uncover.
Symphony of the Night is not a linear game. This means that the stages you find are not particularly in an order you need to follow. The game can be played at your own pace, meaning you can use time between hunting down bosses to farm for equipment or gold to buy all sorts of neat things from the Master Librarian. You can utilize Warp Rooms to get around, or the Library Card to bring yourself to the Master Librarian’s shop if you need to.
As far as equipment and weapons are concerned, follow this rule of thumb:if it wields a weapon, it most certainly drops one. For gold, keep mental notes of which candles in specific areas drop them. Some of them can drop bags of gold that cost as much as $2000, but these are usually placed in hard-to-reach places. Look out!
Do not also be ashamed of dying. Dying on any of your attempts actually gives you ideas on how to tackle a problem better. Perhaps you might’ve been wearing the wrong equipment, or you haven’t thoroughly studied a boss’ attacks. It’s all a matter of understanding how to explore the game.
No enemy is unkillable (except for Stone Skulls; those are invulnerable), and each area has its own little secret to uncover. If anything, keep a stash of Library Cards ready just in case you need to escape the wrath of a boss or a particularly difficult area.
Summary and Conclusion
As a whole, Symphony of the Night is a very complex game. Unless you know entirely what you’re doing, the game cannot be completed in a single day. You will have to consistently visit Save Points, explore every nook and cranny of the castle in order to gain the Golden Ending. Essentially, just remember what you’ve learned from this guide:
- Defeating Dracula as Richter will directly affect Alucard’s stats. The best outcome would be to complete the entire Prologue under 60 seconds, have Richter not take a single hit of damage, and to defeat Dracula without the use of a Sub-Weapon or Richter’s Flame Whip. Achieving this isn’t easy, but it won’t hurt to try.
- Alucard’s full set is powerful, but there are more powerful items hidden in the castle. Good luck finding them!
- Sub-Weapons can be utilized when the situation or enemy arises. They all have their own form of efficacy and they can be made stronger when wearing the Brilliant Mail.
- Alucard can cast Spells without having to buy the command sheets from the Master Librarian. Casting them early on (like in the very beginning) permanently unlocks them for use.
- Use everything you have at your disposal when fighting a boss or a particularly hard enemy to get past. Spells and Sub-Weapons make boss fights easier if you use them correctly. Give any and every of them a try!
- Relics are used to get past various obstacles. Vlad’s treasures are also needed in order to fight the true final boss of the game.
- Read the map often just so you don’t get lost. Red rooms are Save Points which restore Alucard and yellow rooms are Warp Points which bring you around the castle.
- Explore every room thoroughly. You’ll find passages that require certain Relics that also hide little secrets. Dying should also help you figure out what you should do in order to prevent it from happening again.
And this concludes our beginner’s guide for Castlevania:Symphony of the Night! A long journey awaits you and only you can see it through until the end. Are you an experienced hunter of the night? Do you know other secrets about this game that we might have missed here? Leave your thoughts in the comment section down below!