Der südkoreanische Entwickler Netmarble ist bekannt für eine große Auswahl an Handyspielen aus verschiedenen Genres, darunter Marvel Future Fight, The King of Fighters Allstar und BTS World. Das US-Büro des Unternehmens hat auch ein ziemlich einzigartiges Handyspiel für NBA-Fans, und es heißt NBA Ball Stars. Das Spiel, das für iOS- und Android-Geräte verfügbar ist, ermöglicht es Ihnen, einige der besten Spieler der 30 NBA-Teams sowie ausgewählte Legenden vergangener Epochen zu sammeln.
Aber anstatt sie in einer traditionellen 5-gegen-5-Umgebung mit einem Joystick zu steuern, um sie herumzubewegen, und Bildschirmtasten, um sie schießen, springen oder passen zu lassen, steuerst du sie, indem du Edelsteincluster auf einem Puzzlebrett zerbrichst und sie einschaltest ihre Fähigkeiten und erhöhen ihre Chancen, den Ball zu schießen oder den Schuss eines Gegners erfolgreich zu verteidigen.
Angesichts der Tatsache, dass dies ein NBA-Spiel mit echten Spielern und Teams ist, aber mit einer anderen Mechanik als das übliche Handyspiel in diesem Genre, gibt es hier möglicherweise viel zu entpacken. Ja, auch wenn die Puzzle-Spielmechanik recht einfach ist, müssen Sie bei diesen Puzzles bestimmte Dinge tun, um Ihre Gewinnchancen zu verbessern, und es gibt auch zahlreiche Funktionen und Spielmodi, die besprochen werden müssen .
Lassen Sie uns nach all dem in unseren NBA Ball Stars-Leitfaden eintauchen, der alles enthält, was Sie über die vielen Funktionen und Modi des Spiels wissen müssen, sowie einige Tipps und Strategien, die Ihnen helfen könnten, mehr Spiele in diesen verschiedenen Modi zu gewinnen.
1. Die Grundlagen der NBA-Ballstars
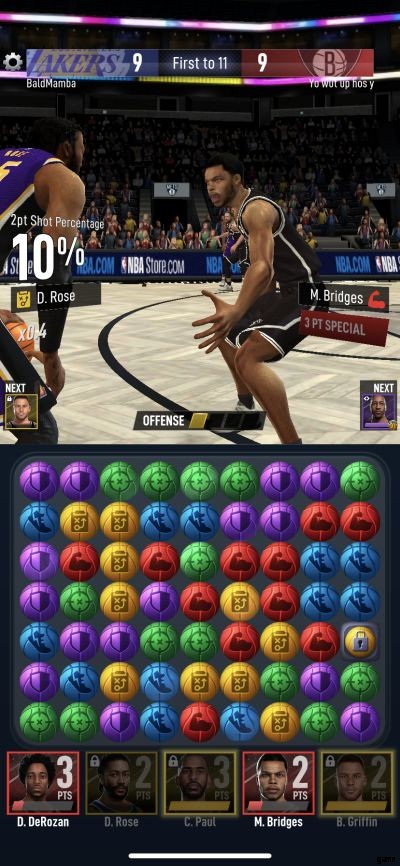
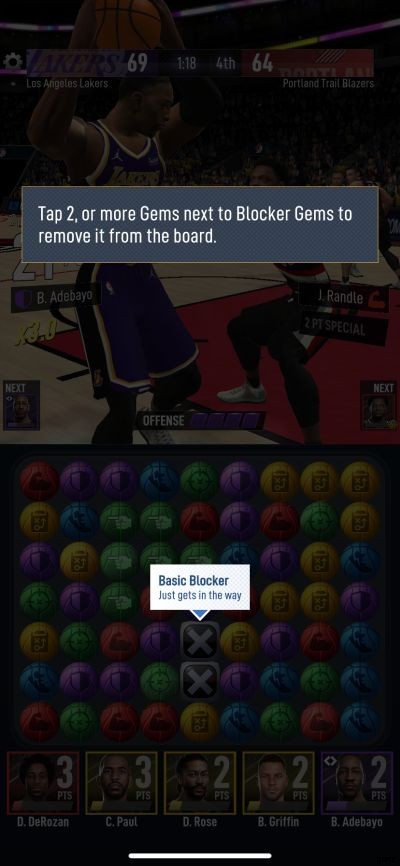
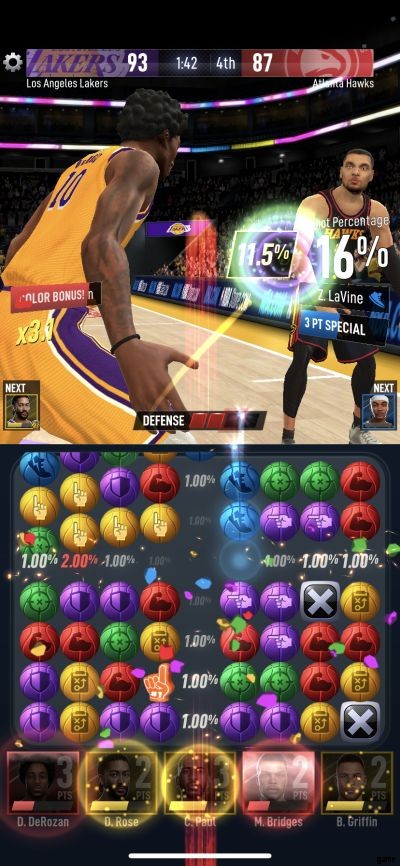
Im Gegensatz zu den meisten anderen Handyspielen mit echten NBA-Teams und Spielern ist NBA Ball Stars wohl einzigartiger, weil es Puzzle-Gameplay mit Basketball-Action kombiniert. Im Gegensatz zu dem, was Sie vielleicht denken, ist das Puzzle-Gameplay, von dem wir sprechen, kein Match-Three. Sie müssen immer noch einige Edelsteine platzen lassen, und Sie können dies nur tun, indem Sie mindestens zwei verbundene Edelsteine der gleichen Farbe platzen lassen, mögen sie rot, gelb, grün, blau oder lila sein.
Für jeden Edelstein, den Sie platzen lassen, erhöhen Sie entweder Ihren möglichen Schussanteil in der Offensive oder verringern den des Spielers, den Sie in der Verteidigung bewachen – die tatsächlichen NBA-Statistiken spielen hier keine Rolle, da es fast ausschließlich darum geht, wie schnell Sie Ihren bekommen können Wurfquote bis zu 100 Prozent (oder so nahe wie möglich) und wie schnell Sie die Wurfquote Ihres Gegners auf null reduzieren können.
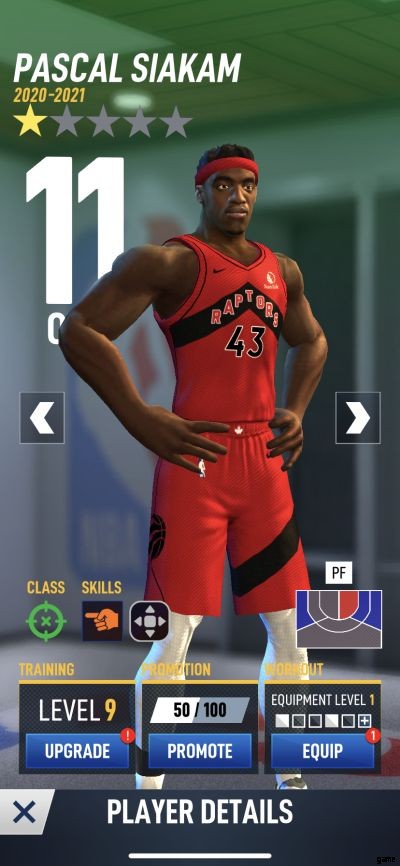
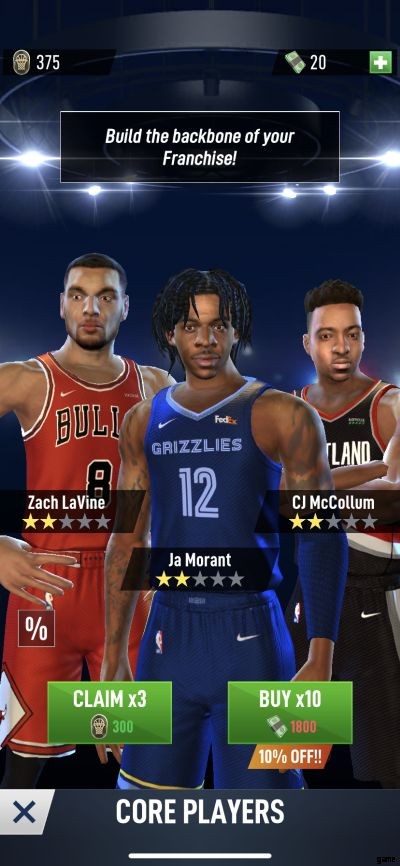
Zu Beginn des Spiels werden Sie aufgefordert, Ihr Lieblingsteam auszuwählen – wie bei vielen anderen mobilen Sportspielen hat Ihre Wahl des Teams keinen Einfluss auf Ihre Fünf-Mann-Liste, also erwarten Sie nicht LeBron James und Anthony Davis, wenn Sie sich für die Los Angeles Lakers entscheiden. Stattdessen erhalten Sie eine Aufstellung von fünf zufälligen NBA-Stars, und mit Stars meinen wir echte Star-Kaliber-Spieler und keine Randstarter, Zweitplatzierten oder Drittplatzierten.
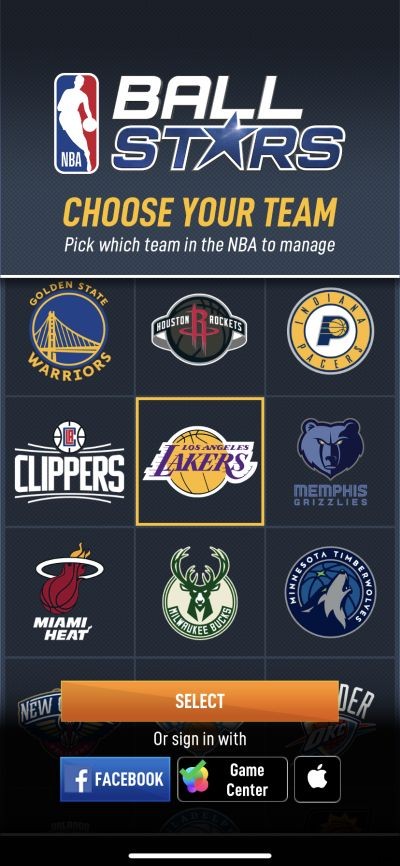
Das gilt auch für die gegnerischen Teams, denen Sie gegenüberstehen – es wird eine zufällige Mischung aus Spielern verschiedener realer Teams sein, von denen jeder seine eigene Gesamtbewertung und eine Seltenheit von einem bis fünf Sternen hat. Zu Beginn musst du dich mit Ein- oder Zwei-Sterne-Spielern begnügen, aber das ist in Ordnung, da deine Gegner am Anfang sowieso viel schwächer sein werden.
Wenn Sie das Tutorial mit Ihrem Assistenten GM Kara durchgehen, werden Sie sehen, dass das Löschen einer bestimmten Größe von Edelsteinclustern zu einem Power Gem führt, mit dem Sie noch mehr vom Spielfeld entfernen können. Es gibt verschiedene Arten von Power Gems, die Sie erstellen können, obwohl Sie die Farbe der Edelsteine im Cluster im Tutorial-Popup ignorieren sollten – dies gilt für alle Farben. Ein Fünf-Edelstein-Cluster ergibt den Power-Edelstein mit dem Finger nach oben – das ist der Column Clear-Edelstein.
Löschen Sie einen Cluster aus sechs Edelsteinen und Sie erhalten den Power Gem mit dem Finger nach links, der, wie Sie vielleicht vermutet haben, als Row Clear bekannt ist. Cluster aus sieben bis neun Edelsteinen ergeben eine Bombe oder Area Clear; Aktivieren Sie es und Sie werden den 3 × 3-Bereich um die Bombe herum zerstören. Wenn Sie schließlich eine Gruppe von zehn oder mehr Edelsteinen löschen, erhalten Sie einen Meisterschaftsring oder Color Clear, der alle Edelsteine der gleichen Farbe zerbrechen würde; dies unabhängig davon, wo sie sich auf der Platine befinden, falls aktiviert.
In der Tutorial-Phase wird auch erklärt, dass Sie im Saisonmodus (zunächst) in den letzten zwei Minuten eines Spiels beginnen, in dem Sie 5-gegen-5 gegen ein KI-gesteuertes Team spielen. Die Aktion hier ist rundenbasiert, wobei jede Runde aus vier Versuchen besteht, Ihre Schussquote so nahe wie möglich an 100 Prozent zu bringen, oder aus vier Versuchen, die Schussquote des Gegners auf Null zu bringen – oder so nahe daran.
Sie verdienen Spielergelder, die zum Upgraden Ihrer Spieler verwendet werden, Trainings-XP, eine Ressource, die in Verbindung mit Spielergeldern verwendet wird, um sie aufzuleveln, und GM-XP, die Ihnen helfen, Ihr GM-Level zu erhöhen – und das nicht nur erhalten Sie noch mehr Belohnungen, da Sie auf bestimmten Ebenen auch neue Funktionen freischalten können. Beachte auch, dass die Spiele im Saisonmodus länger werden – zuerst von den letzten zwei Minuten bis zu den letzten drei Minuten – während du weiter aufsteigst und dein Team verbesserst!
Nachdem wir nun das Wesentliche des Spiels aus dem Weg geräumt haben, wollen wir uns anderen einfachen Tipps und Hinweisen zuwenden, die Ihnen in den frühen Stadien des Spiels helfen können.
2. Du musst nicht dieselbe Farbe wie die Klasse deines Spielers haben
Während der Tutorial-Phasen werden Sie feststellen, dass die meisten, wenn nicht alle Edelsteine, die Sie zerbrochen haben, dieselbe Farbe hatten wie die Klasse Ihres Spielers. Wie Sie irgendwann feststellen werden, müssen Sie nicht jedes Mal nach einem Streichholz derselben Farbe suchen. Während Sie einen Bonus erhalten, indem Sie einen Cluster mit der gleichen Farbe wie die Klasse des Spielers mit dem Ball zerbrechen oder den Spieler des Gegners mit dem Ball verteidigen, ist es in Ordnung, Edelsteine einer anderen Farbe zu zerbrechen, besonders wenn Sie dadurch etwas erschaffen können ein Kraftstein.
Es dreht sich alles darum, an das große Ganze zu denken, also forcieren Sie das Problem nicht, wenn Sie keine gelben Edelstein-Cluster für jemanden wie Chris Paul oder Blake Griffin finden können, die beide in der gelben Spielerklasse abgelegt sind. Wenn Sie zum Beispiel die Möglichkeit sehen, einen Color Clear oder Area Clear zu erstellen, denken Sie nicht über die Farbe nach – brechen Sie einfach den Cluster, da dies Ihnen wahrscheinlich helfen wird, mit Ihrem offensiven Ballbesitz zu punkten oder einen schlechten Schuss in die Verteidigung zu erzwingen.
Aus einem weiteren Grund raten wir dringend davon ab, sich ausschließlich auf die gleiche Edelsteinfarbe zu konzentrieren wie die Klasse des Spielers mit dem Ball in der Offensive oder des aktiven Verteidigers in der Defensive, und genau darauf gehen wir gleich im nächsten Tipp ein.
3. Jeder kaputte Cluster lädt die Spezialfähigkeiten deiner Spieler auf
Das Spiel wird Ihnen dies schon früh zeigen, aber falls Sie es verpasst haben, werden Sie beim Blick auf Ihre Aufstellung in der unteren Hälfte des Spielbildschirms feststellen, dass jeder Spieler einen Ladebalken hat, der sich jedes Mal füllt, wenn Sie ihn machen ein Spiel.
Selbst wenn Sie einen Spieler mit der Rugged-Klasse (lila) steuern, können Sie gelbe Cluster zerbrechen, und das wird die Spezialfähigkeiten Ihrer Spieler mit der Decisive-Klasse stärken, die natürlich den gelben Edelsteinen entspricht. Was sind also diese besonderen Fähigkeiten und wie können sie Ihnen helfen, mehr Spiele in NBA Ball Stars zu gewinnen?
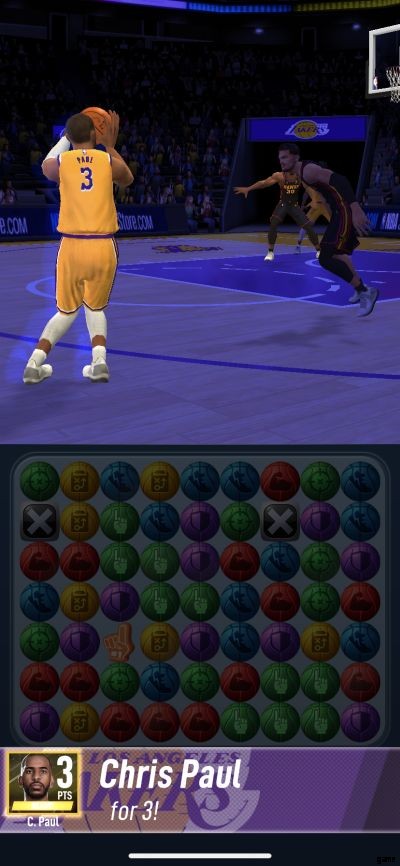
Noch einmal, diese Spezialfähigkeiten können vom Spieler und seiner Klasse abhängen und sie können in der Offensive oder Verteidigung eingesetzt werden – schließlich werden Sie erfahren, dass es Spieler gibt, deren Spezialfähigkeiten an beiden Enden des Bodens funktionieren. In den meisten Fällen kann die Spezialfähigkeit so einfach sein wie das Erzielen eines garantierten Zwei- oder Drei-Punkte-Schusses – aktivieren Sie sie und der ehemals aktive Spieler passt den Ball mithilfe der Spezialfähigkeit an den Teamkollegen, der den Schuss ausführt mit 100-prozentiger Genauigkeit. In der Verteidigung können spezielle Fähigkeiten es einem großen Mann ermöglichen, seinen Gegner zu blockieren, oder kleineren und/oder athletischeren Spielern, den Ball zu stehlen und einen Turnover zu erzwingen.
Schließlich werden Sie sehen, dass Gegner auch Spezialfähigkeiten starten können (natürlich können sie das!), und Sie werden eine Anzeige unter ihrem Namen sehen, die ihre Fähigkeit anzeigt und wie nahe sie daran sind, sie aufzuladen. Normalerweise haben Sie nur eine Chance, diese Spezialfähigkeit zu stoppen, anstatt der üblichen vier, und wenn Sie nicht in der Lage sind, ihren erwarteten Schussprozentsatz auf Null zu senken, ist diese Fähigkeit so gut wie gestartet, unabhängig davon, wie hoch der Prozentsatz sein mag !
In diesem Zusammenhang haben sowohl Sie als auch Ihr Gegner die Möglichkeit, nach einem Fehlschuss offensive Rebounds zu erzielen, und Sie werden die Chancen dafür auch auf dem Spielbildschirm sehen, normalerweise nachdem jemand einen Schuss verfehlt hat. Sowohl Angriffs- als auch Verteidigungswerte scheinen eine Rolle bei der Beeinflussung der Chancen auf einen erfolgreichen offensiven Rebound zu spielen, aber wenn sich jemand das Board für einen zweiten Versuch schnappt, sind das garantiert zwei Punkte, ähnlich wie die meisten offensiven Spezialfähigkeiten funktionieren.
4. Stellen Sie sicher, dass Sie Ihre Spieler aufleveln
Es mag zunächst nicht allzu wichtig klingen, da Sie feststellen werden, dass Ihre ersten Gegner im Saisonmodus leichte Beute sind. Aber schließlich müssen Sie Ihre Spieler ziemlich häufig verbessern, um mit der Konkurrenz mithalten zu können, nicht nur im Saisonmodus, sondern auch in den anderen Spielmodi. Und das trotz der Tatsache, dass alle Spieler, die Sie empfangen werden, Ein- oder Zwei-Sterne-Spieler sind, die noch einen langen Weg vor sich haben, bevor sie gut werden, es sei denn, Sie sind bereit, echtes Geld zu zahlen. P>
Das heißt nicht, dass Sie jeden so weit wie möglich aufleveln sollten – das Upgraden von Spielern erfordert Spielergelder und Trainings-XP, und obwohl Sie mit diesen Saisonmodussiegen viel davon verdienen, haben Sie nicht unendlich viel davon diese Ressourcen. Stattdessen sollten Sie sich auf diejenigen mit den besten Basisbewertungen und / oder der höchsten Seltenheit von Sternen konzentrieren und von dort aus weitermachen. Aber was ist überhaupt so wichtig daran, Spieler zu verbessern?
Die Antwort auf diese Frage ist einfach – jeder Spieler hat einen Multiplikator basierend auf seiner Offensivwertung im Vergleich zur Defensivwertung des Spielers, der ihn verteidigt, oder umgekehrt. Spieler mit einem Vorteil in einer der Wertungen haben einen höheren Multiplikator als diejenigen, die dies nicht tun, und dieser Multiplikator spielt eine große Rolle bei der Bestimmung Ihres erwarteten Schussprozentsatzes – ein Spieler mit einem 3-fachen Multiplikator wird sehen, dass sein Schussprozentsatz viel schneller ansteigt als einer dessen Multiplikator ist etwa 1x oder weniger.
Umgekehrt haben Sie eine viel größere Chance, einen Gegner am Schießen zu hindern, wenn Ihr Multiplikator 3x im Gegensatz zu 1x ist. (Wenn es weniger als 1x ist, bedeutet das, dass Sie im Nachteil sind!) Es wird nicht einfach sein, diesen Prozentsatz auf 50 Prozent zu bringen, wenn Sie einen niedrigen Multiplikator haben, also rüsten Sie einfach Ihre Spieler weiter auf, um zu haben a more consistent advantage on both offense and defense!
As a bonus tip, each player’s maximum level is capped based on your GM level, so if you’re trying to upgrade a certain player on your team and you’re at GM level 10, you can only upgrade up to level 10 for the meantime while you haven’t leveled up to GM level 11.
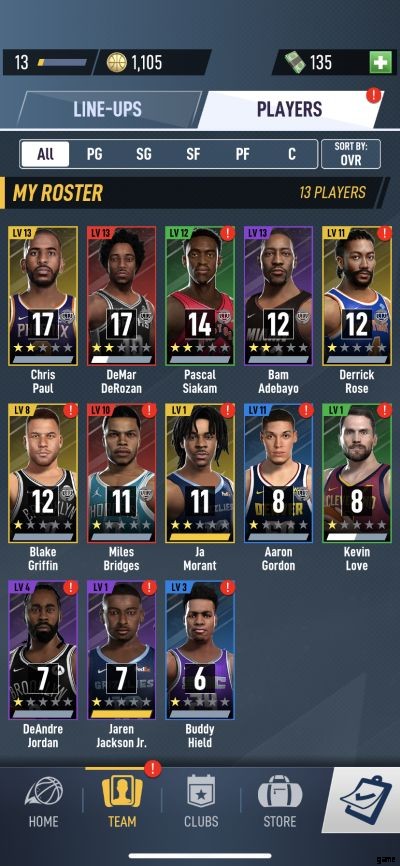
5. Know Your Players And Review Their Stats And Skills Regularly
Aside from upgrading your players in NBA Ball Stars, you should also review your player profiles, which you can do by tapping on the Team tab, going to Players, then tapping on any of the players you currently have unlocked. By default, all players are sorted based on their overall rating, though you can also sort them based on position if you wish. Tap on a player and you’ll see their name, star rarity, overall rating, and more valuable information that could help you make a more informed choice when selecting your lineups for the next game.
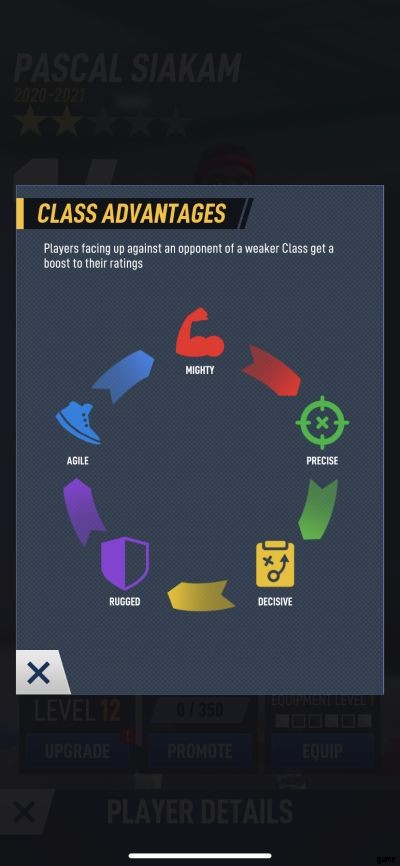
Regarding the information that can be found when reviewing each player’s profile, you will see their class, which can be Agile (blue), Mighty (red), Precise (green), Decisive (yellow), or Rugged (purple). Agile players are usually the more athletic ones, Mighty players are supposed to have good physical strength, Precise players are known to be good shooters, Decisive players are usually the playmakers, and Rugged players are typically defensive specialists.
Next to that, you’ll see their Special Skill — some players have this and others don’t, but those that have such a skill may be able to swap rows or columns, destroy them, or create more gems of a certain color, among other effects. You will also see their Versus Skill, which is yet another type of skill that allows players to create special gems once they are fully charged — we will discuss this in greater depth later, but some of these gems may include Obstacle Gems, which simply “get in the way,” thus making it harder for opponents to break matching clusters, and Color Lock Gems, which prevent opponents from breaking gems of a certain color.
Next to the class and skills, right above the Workout section on the right side, you’ll see the player’s Preferred Zones — these are where players are most and least effective with their shooting. Areas highlighted in red are hot zones where a player may have a better chance of scoring than what their expected percentage indicates, while those in blue are those where their chances of scoring will be lower than expected. Gray zones are more neutral than anything else, while orange ones are extremely hot zones that are considered the most optimal for the player in question.
Right below those areas, you’ll see the Training, Promotion, and Workout sections — under Training, you can perform player upgrades or, if you choose not to level them up just yet, you can go there simply to check a player’s offensive and defensive rating. You can promote players to the next highest rarity level if you’ve collected enough shards to do so, while in the Equipment section, you can equip players with various items in order to boost their offensive or defensive rating.
Make it a habit to visit the Players section in the Team menu, because that won’t just help you familiarize yourself with your own players — if an opposing team has them as well, that’s just as good as scouting them ahead of the game!
6. Load Up On Player Funds And Training XP By Redeeming Your Merchandise Collections
Aside from playing more games in the various modes, including Season Mode, you can earn more Player Funds and Training XP by heading to the Merchandise Collections section — you can find this in the main screen by tapping on Collect on the right side of the screen. You can actually redeem the Player Funds and Training XP at any time you wish, but it would be best if you space it out every four hours or so, because that’s how long it takes for the Merchandise Collections to fully load up.
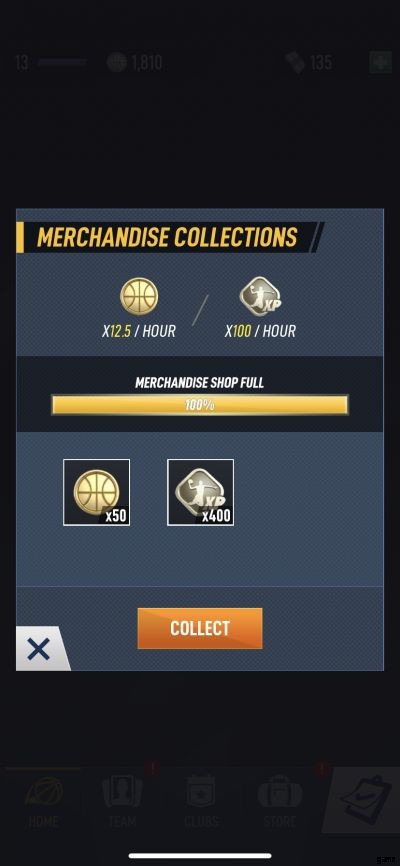
That means you can access this about three or four (or even five, if you’re having an especially sleepless night) times a day if you stick by the four-hour rule; it might not sound like much, considering the maximum amount of resources you can redeem is 50 Player Funds and 400 Training XP, but trust us when we say that’s going to keep adding up as long as you remember to wait four hours — or turn on your game notification so you’re informed anytime that the Merchandise Collection has filled up.
7. Watch Out For Those Versus Skills
As the game will let you know once the time comes, opposing teams, may they be AI or human-controlled, can try to get the upper hand on you by placing certain types of gems on the board after they’ve successfully pulled off a Special Skill. This is what NBA Ball Stars calls Versus Skills, and they may include allowing players (or allowing you as well) to place basic obstacles on the board to make it more difficult to successfully break those big clusters — or any other kind of match.
Certain players can blast entire rows or columns of gems with their Versus Skill, while others are so deadly that they can prevent certain colors from being matched (Color Lock) or prevent players from using their Special Skills. These may make it rather challenging and sometimes frustrating once you’ve leveled up sufficiently as a general manager, but there is a way to get rid of them.
In order to get rid of the blocker gems that appear whenever an opposing player converts on a Special Skill and activates his Versus Skill, you’ll need to break clusters around them or use one of your Power Gems, though that won’t always be easy — the AI tends to act quite smartly when it comes to the placement of blocker gems! Similarly, you too can set up blocker gems with a Special Skill, though you won’t be able to choose where to place the gems — this is done randomly by the AI, which is just fine as you won’t be able to view your opponent’s board anyway.
8. You Can Combine Multiple Power Gems For A Greater Effect
As good as it is to create a Power Gem by breaking a cluster of five or more gems, how about if you’ve got at least two of them in there, all next to each other or in the same row/column with one of those Row or Column Clear gems in place? Fortunately, you can combine these Power Gems to come up with an even greater effect where more gems are broken and more Special Skills are charged for more players on your team.
For example, if you’ve got an Area Clear and a Row Clear next to each other, activating the Row Clear wouldn’t just eliminate the row where it’s located; as you’re using it in conjunction with the Area Clear, you can break even more gems in the process, as the ones in the upper and lower rows will also be affected.
Another simple example would be if you use a Column Clear on a column where there’s a Row Clear or vice versa; either way, you’re going to be taking out every single gem in that row and column, instead of all the gems in just one of those two!
Whenever you’ve got the opportunity, make sure you’re trying out those Power Gem combos; they just might turn out to be enough to help you score a crucial shot or make a key defensive stop against your opponent. Besides, we can’t help but admit it’s cool to watch all those gems get broken whenever two or more Power Gems are combined in the same move.
9. Why Should You Complete The GM Prep List?
On the bottom right corner of the main screen, you’ll see a button with a checklist icon, and that will lead you to the GM Checklist, which is a list of introductory tasks that you will need to complete in order to unlock a new player and help you earn items to improve your players and team as well — these include Draft Tickets, pieces of gear, and Contract Shards, all of which shall be discussed later on in this guide in more detail.
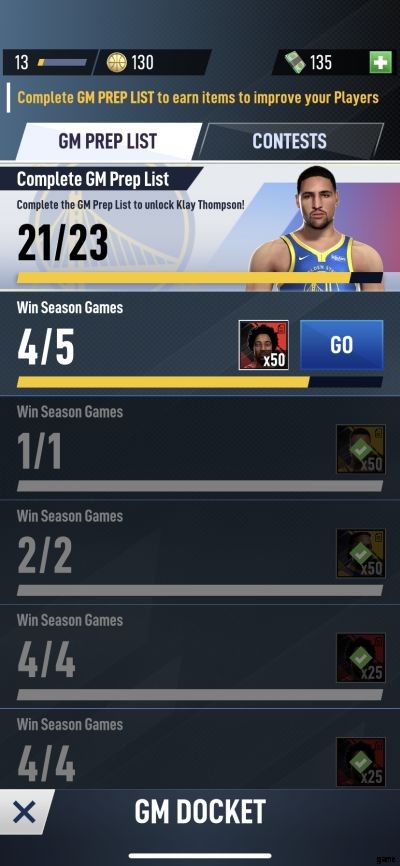
The tasks are things that you can complete organically while playing the game — you will be asked multiple times to win a certain number of Season Mode games, trigger Player Skills during a game in any mode, update one of your team’s formations, level up your players, and win games in other modes. You can tap on the checklist to review the active tasks at any time, though not all of the tasks will be available — these shall be slowly revealed as you continue making progress toward the checklist’s completion.
Once you have completed the checklist, you will unlock a new player in Klay Thompson, who’s currently sitting out yet another season for the real-life Golden State Warriors but available in the game to help any GM that may need a shooting guard. You will also unlock the Contests feature once you make it to GM level 14 — this can be found next to the checklist, and this offers limited-time events where you can potentially win more of the rewards we mentioned earlier on in this tip, even if you’ve already completed the checklist!
10. About Versus Mode – Competing Against Other Human GMs
Once you reach GM level 5 in NBA Ball Stars, Versus Mode will be unlocked, and as the name suggests, this is the mode where you can compete against other human-controlled teams. Unlike Season Mode, where you get to jump in during the final minutes of the fourth quarter and the final scores are fairly close to how actual NBA scores look like (they’re actually closer to late ‘90s NBA scores).
Both teams in Versus Mode games play to 11 points — you may end up with 12 or 13, but as long as you reach at least 11 points before your opponent does, you win the game and earn Player Funds, Training XP, and Ranking Points — the latter determines your placement in your current league or whether you will get promoted to the next one.
Based on your placement at the end of the week, you can earn more rewards — those in the Unranked league, for instance, will earn 100 Player Funds and 500 Training XP, while those who are high up in the Diamond League I (that’s 2,200 to 2,399 Ranking Points, in case you’re wondering) will earn five Sealed Duffle Bags (packed with mostly high-end items), 70 Instant Rematch Tickets (for quickly replaying previous games), and 450 Premium Player Draft Tickets.
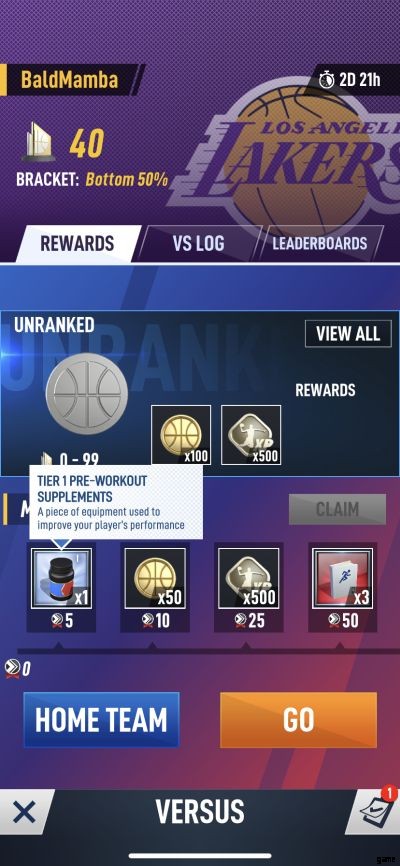
On the Versus screen, you will also see a couple other tabs next to the default Rewards tab — Vs Log allows you to view the results of your previous matchups, while Leaderboards shows you the latest local, global, and club rankings. Below your ranking and league information, you’ll see the Milestones section, where you can claim certain rewards, including Player Funds, Training XP, equipment/gear, and more, once you reach a certain number of Ranking Points.
Next to Go, you can tap on Home Team if you want to start the game with a small lead over your opponent; this is only available for those at GM level 16 or higher, so if you aren’t, you’ll have no choice but to start out with your score at zero and the opponent holding a lead of one to three points.
Right before committing to a game, you can change your team’s five-man lineup or formation by tapping on Edit and Change respectively. If you think your opponent’s overall rating is too high compared to yours (this can happen quite a lot), you can re-roll for a new opponent, albeit at the cost of 100 Player Funds per re-roll. Hit Play once you’re ready to hit the court, but keep in mind that each game costs one Versus Ticket. Versus Tickets refresh automatically until you’ve reached the maximum allowable of five, though you can pay cash to buy new Versus Tickets at the in-game store at any time.
11. RPG Hierarchy Applies When It Comes To Formations And Player Classes
You’ve probably seen it multiple times in many an RPG — it’s the elemental system or hierarchy, where A is stronger than B, B is stronger than C, and C is stronger than A. That also applies in NBA Ball Stars, and you will first be informed of this when Kara discusses the different formations that are available in the game. 5 Out beats Big Man, Big Man beats Stretch Big, Stretch Big beats Triple Point Guard, and Triple Point Guard beats 5 Out.
And once you reach level 13, the colors of each player class will become far more relevant, with a similar hierarchy coming into play. Mighty (red) beats Precise (green), Precise beats Decisive (yellow), Decisive beats Rugged (purple), Rugged beats Agile (blue), Agile beats Mighty — it’s pretty simple to memorize, and as we had noted above, this isn’t too different from the hierarchies you may be familiar with from any given RPG.
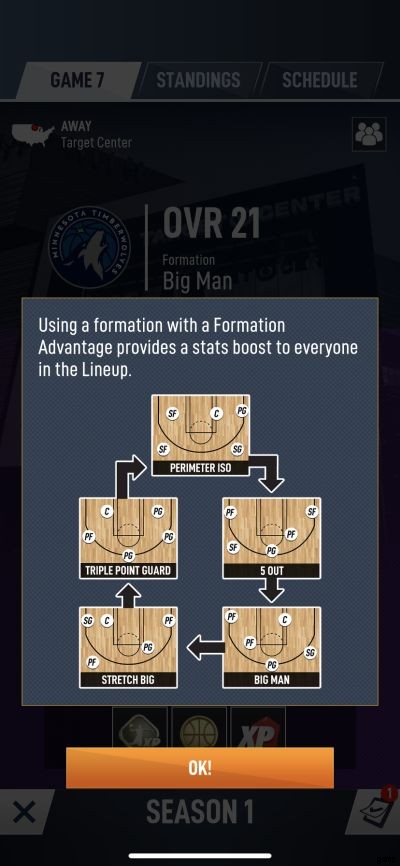
When it comes to the formations, it should be easy to see which formation is better than the other, simply by seeing how your team rating is affected depending on the formation you choose. That means you should choose the formation that gives you the best team rating — and the widest gap from the opposing team’s overall rating.
The player class hierarchy should also give you an idea of which players will have higher multipliers than others when being defended, or defending someone from the opposing team. This is good information to know in the early goings, and while we’re not sure why such details are only available once you reach GM level 13, it’s still very useful nonetheless.
12. Have At Least Three Player Classes Represented In Your Lineup
Although it may make the most sense to start your highest-rated players regardless of their class, that might not be the most practical approach if you’re trying to win more consistently. If you have, say, only Mighty (red) and Decisive (yellow) represented, that leaves three colors essentially wasted as far as charging up Special Skills goes — sure, breaking blue, green, or purple gem clusters could help raise your shooting percentage or decrease that of your opponent, but those gems won’t count toward anybody’s Special Skills. That could make it harder for you to have enough Special Skills ready for a big come-from-behind rally, or to end the game faster than expected.
Instead of merely looking at overall ratings and disregarding gem color/player class, it would be much more preferable to field a lineup that has at least three classes represented; four may be most ideal, and five, while sometimes a bit too many, is also fine. That leaves you with enough, or more than enough options for charging Special Skills, and if you’ve also got players whose Special Skills are only for use on defense (such players seem to be rarer in NBA Ball Stars), that allows you to win a game on either end of the floor!
Granted, your gem-breaking strategy and the ratings of the players on both teams will still have more bearing on who wins the game, but if you’ve got as many bases as possible covered, you can be more confident of a positive outcome once the final buzzer rings — or once 11 points has been reached by one team.
13. Earn Contract Shards And More By Playing In Showdown Mode
Showdown Mode becomes available to players who have reached GM level 9, and as you keep leveling up, new challenges in this mode will get unlocked as well, giving you different ways to load up on your basic resources while also earning Contract Shards.
As we haven’t talked about this resource yet in depth, you’ll need Contract Shards in order to collect most of the players available in the game, with more common players requiring fewer shards to unlock and rarer players requiring more. Also, if you have enough Contract Shards for an existing player, you can promote them to the next highest star rarity, which improves their Offensive, Defensive, and overall ratings immediately.
The available challenges in Showdown Mode may change on a daily or weekly basis, but the concept of games in this mode is similar to Versus Mode, except for the fact you’ll be playing against AI opponents. Essentially, you’re entering a tournament in this mode, with each of the three games requiring that you score at least 11 points to win. But since this is a tournament, each team you face will be progressively harder to beat than the last, with a higher overall rating.
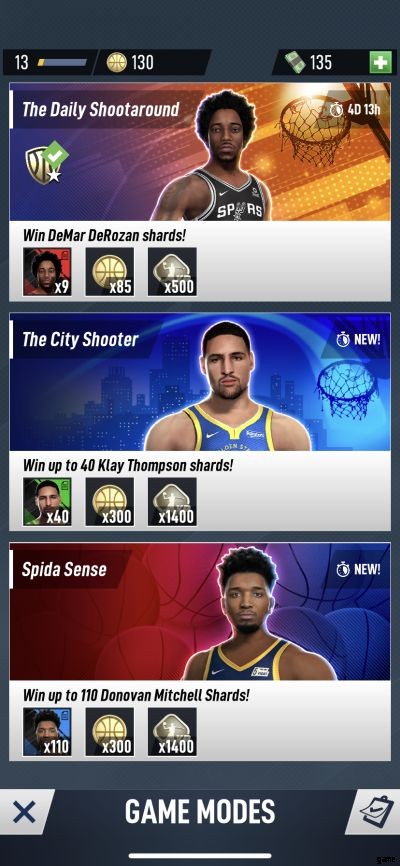
You don’t need to worry too much, though, as each challenge allows you to choose your preferred difficulty; as the game will inform you, higher difficulty levels mean better prizes! (At the moment, the game’s challenges include The Daily Shootaround with DeMar DeRozan shards, The City Shooter with Klay Thompson shards, and Spida Sense with Donovan Mitchell shards.)
Your prizes will also depend on how far you reach in the tournament — reaching the quarterfinals in Novice difficulty gets you more XP than Funds, reaching the semifinals gets you more Funds than XP, and winning the Finals gets you Player Funds, XP, and Contract Shards of the featured player. Opting for the higher difficulties could also earn you some Equipment Tokens, on top of the XP, Funds, and Shards we already mentioned. Make sure you aren’t aiming too high, because it costs 10 Showdown Tickets per tournament to enter! (These tickets, much like Versus Tickets, refill automatically.)
The game will warn you about this, but be sure you’re choosing your starting lineup carefully — once you’ve chosen your starting lineup, you cannot change it in the middle of the tournament! Also, you can replay Showdown challenges and automatically simulate them once you’ve completed them, so that should save quite a bit of time if you’re gunning for the same top prize the second time around.
14. Adding New Players To Your Roster With Draft Picks
The Draft tab is the default one in the Store menu, and it is at this point where we should mention that there are different types of Draft Tickets you can use to make a selection. Core Player Draft Tickets are used in the Core Player Draft, and these would usually yield one-star or two-star players that might not have much use or upside once your overall team rating reaches the 100 mark or thereabouts.
Premium Player Draft Tickets will oftentimes be good for a two- or three-star player, though chances are you won’t be able to unlock the player just yet with the Contract Shards you earn. Lastly, Legendary Draft Tickets can get you two-star players and above, with a greater chance of fully unlocking the player — for the last two, it’s still possible you will end up with one-star Contract Shards, so keep your expectations reasonable!
Aside from the GM Checklist and Contests, some of the other ways you can acquire Draft Tickets are as a level-up reward, or as a milestone reward for winning games in Versus Mode. You can also purchase them with cash, though this premium form of currency is a bit hard to come by; you can get more cash as part of your daily login rewards (including the third to fifth-day rewards) or by purchasing it with real money in the store. Additionally, the sixth-day daily rewards as of this writing include seven Premium Player Draft Tickets, so that should be something to look forward to as well!
15. Outfit Your Players With Equipment To Improve Their Stats
Much like you should be outfitting your heroes with new armor and weapons in RPGs, your players in NBA Ball Stars also need certain pieces of equipment to improve their Offense or Defense stats (depending on the item) and increase your chances of winning matches, regardless of the game mode.
As we mentioned earlier, these items can be earned as Versus Mode and Showdown rewards, by completing GM Checklist tasks, or as part of your rewards for increasing your GM level, but you can also buy Gear Bags at the store with your Equipment Tokens, which can be earned by completing the non-novice tournaments in Showdown Mode. These come in six tiers of increasing rarity (and cost), and could be a great way for you to load up on items to outfit on your best players.
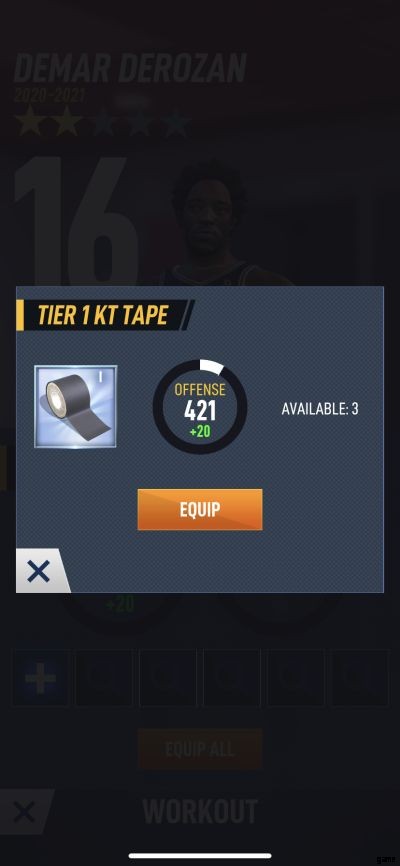
Depending on the type of item, you can equip it in one of the six available slots per player — gear is not player-specific, but you will need to fill up all of those six slots in order to increase a player’s equipment level. That means you can only equip Tier 1 equipment on an equipment level 1 player, Tier 2 equipment on an equipment level 2 player, and so on.
We would suggest focusing mainly on your top players when equipping items, as that should allow you to fill up those slots faster and consequently increase their Equipment Level so you can make use of the more premium gear and keep increasing their Offense and Defense stats and overall rating.
And this wraps up our comprehensive guide of Netmarble’s basketball game NBA Ball Stars. If you have discovered any other tips or strategies, feel free to drop us a line in the comment area below!