Dieser Leitfaden beschreibt alle Errungenschaften des Basisspiels.
So erhalten Sie alle Erfolge
Wichtige Informationen
Bitte beachten Sie, dass es in diesem Spiel keine verpassbaren Erfolge gibt. Unvollendete Inhalte oder verschiedene Erfolge können nach Abschluss der Geschichte erhalten werden. Abgesehen davon lassen sich einige Erfolge an bestimmten Punkten während des Spiels leichter erzielen („Das ist ein Messer“, „Geh, Kick Rocks“).
Beachten Sie auch, dass an bestimmten Stellen in der Geschichte Teile der Karte gesperrt werden. Wie oben erwähnt, hindert Sie dies nicht daran, Inhalte in dieser Region abzuschließen, da die vollständige Karte verfügbar ist, nachdem die Geschichte abgeschlossen ist.
Geschichte
Dieser Abschnitt behandelt nicht nur Errungenschaften, die durch das Abschließen bestimmter Missionen erzielt werden, sondern auch alle, die während des Abschließens dieser Missionen freigeschaltet werden. Möglicherweise können Sie einige dieser zusätzlichen Errungenschaften vor den hier aufgeführten Teilen freischalten, aber dies ist ein garantierter Weg, sie zu erhalten, wenn nicht.
Dieser Abschnitt enthält auch sehr milde Spoiler. Alle Erfolge in diesem Abschnitt werden einfach durch das Abschließen der Hauptgeschichte des Spiels erzielt. Wenn Sie also ein völlig spoilerfreies Erlebnis wünschen, vermeiden Sie bitte diesen Abschnitt.
Nur eine Fleischwunde
- Raus aus Crazy Willie's
Verdient für das Abschließen der Mission:„Du hast einen Todeswunsch“ in der Handlung „Er ist mein Bruder“.
Besser leben durch Chemie
- Verbessere zum ersten Mal entweder deine Gesundheit, deine Ausdauer oder deinen Fokus
Mit NERO-Injektoren können Sie Ihre Gesundheit, Ausdauer oder Konzentration verbessern. Diese können an NERO Checkpoints oder Forschungsstandorten auf der ganzen Karte gefunden werden, aber Sie werden Ihren ersten während der „He’s My Brother“-Storyline finden.
Der Zweck und die Mittel
- Entdecken Sie, was mit NERO passiert ist
Verdient für den Abschluss der Mission:„Sie schlafen nicht“ in der „Findet NERO“-Storyline.
Sonderlieferung
- Liefern Sie nach Tucker oder Copeland
Verdient für den Abschluss der Geschichte „Jagd auf Leon“, unabhängig davon, welche Wahl Sie treffen.
Verloren und Gefunden
- Fahre mit Boozer nach Süden
Verdient für den Abschluss der Mission:„Niemand hat es kommen sehen“ in der Handlung „Er ist mein Bruder“.
Waffenbrüder
- Schauen Sie bei Boozer nach
Verdient für den Abschluss der Mission:„Ich könnte eine Hand gebrauchen“ in der „Er ist mein Bruder“-Storyline.
Eins runter
- Besiege deine erste Horde
In Days Gone sind Horden wahrscheinlich das härteste Hindernis, dem Sie begegnen werden. Sie erfordern Planung und Vorbereitung, um sie zu töten, besonders im frühen Spiel. Es gibt viele Werkzeuge, die du während deines Spiels freischalten wirst, die das Töten von ihnen erleichtern, aber die meisten erfordern einen ziemlichen Fortschritt durch Nebenmissionen, um sie zu erwerben.
Technisch gesehen kannst du diesen Erfolg jederzeit erlangen, aber du musst diese Aufgabe nach der Mission „Du allein habe ich gesehen“ vom Wizard Lake Camp abschließen.
Das Warten auf diese Mission ist eine besonders einfache Möglichkeit, diesen Erfolg freizuschalten, denn wenn Sie zu oft sterben, gibt Ihnen das Spiel die Möglichkeit, diesen Abschnitt insgesamt zu überspringen und den Erfolg trotzdem freizuschalten.
Wenn Sie darauf bestehen, eine Horde frühzeitig zu töten oder die Mission rechtmäßig durchzuführen, sollten Sie einige Tipps beachten. Da es für mich schwierig ist, vorherzusagen, welche Ausrüstung du haben wirst, bevor du zum ersten Mal versuchst, es mit einer Horde aufzunehmen, werde ich versuchen, einige grundlegende Strategien aufzuzeigen, die ich am nützlichsten fand.
- Stellen Sie sicher, dass Sie so viel Munition/Sprengstoff und Gesundheits-/Ausdauerregeneration wie möglich haben.
- Ausdauerregeneration ist extrem wichtig, Horden sind schnell und das Einzige, was dich vor ihnen hält, ist deine Ausdauer.
- Horden sind tagsüber untätig, Sie können dies verwenden, um Fallen aufzustellen, Ihren Fluchtweg zu planen, falls sie Sie überwältigen und eine beträchtliche Anzahl töten, bevor sie aktiv werden und mit der Jagd beginnen.
- Zusammen mit allen Fallen, die du platzierst, sind Sprengstoffe wie Granaten und Molotows großartig, um die Horde auszudünnen. Verwenden Sie diese am besten, wenn die Horde im Leerlauf ist oder wenn Sie sie in enge Räume wie Flure, Gassen, Tunnel oder zwischen Lastwagen leiten können.
- Dächer sind dein Freund. Horden können und werden Gebäude erklimmen, um dich zu erreichen, aber je mehr sie klettern müssen, desto weniger rennen sie auf dich zu. Pass nur auf, dass du dich nicht einklemmst.
Wie ich oben sagte, sind Horden wahrscheinlich der schwierigste Teil des Spiels. Einige Orte machen es einfacher, mit ihnen umzugehen, andere erschweren es. Wenn du weiter stirbst, vermeide sie einfach vorerst und gehe weiter in die Haupt-/Nebenmissionen und du wirst mehr Ausrüstung freischalten, um später mit Horden zu helfen.
Nehmen Sie Ihren Namen zurück
- Erwidern Sie den Gefallen
Verdient für das Abschließen der Mission:„Hätte es kommen sehen sollen“ in der „Auseinandergerissen“-Storyline.
Reiten NOMAD
- Allein auf die Straße gehen
Verdient für den Abschluss der Mission „Nomadenreiten“ in der Handlung „Wir haben alles getan“.
Halt dich fest
- Ein bekanntes Gesicht sehen
Verdient für den Abschluss der Mission:„Ein Krieg, den wir gewinnen können“ in der Handlung „Ich erinnere mich“.
Draußen wird es kalt
- Verbinden Sie sich wieder mit dem, was Sie verloren haben
Earned for completing the mission:“We Couldn’t Take the Risk” in the “I’m Never Giving Up” storyline.
Morior Invictus
- Ride out to take back what’s yours
Earned for completing the mission:“Ascending from the Underworld” in the “Race Against Time” storyline.
I’ve Been Waiting for This
- Take revenge, once and for all
Earned for completing the final mission:“For An Outlaw Biker”.
Days Done
- Complete the story of Days Gone
Earned for completing the final mission:“For An Outlaw Biker”.
Map Completion
Welcome to the Party, Pal
- Clear all Ambush Camps, Infestations, and NERO Checkpoints in a single region
For more details, see the other achievements in this section.
World’s End
- Complete the World’s End storyline
The “World’s End” storyline requires you to find 12 NERO Checkpoints and 18 NERO Research Sites located around the map. Both location types have NERO Injectors, a stat upgrade needed for the “Performance Enhanced” achievement.
NERO Checkpoints are abandoned outposts that are without power. To restore power you need to collect fuel cannisters scattered around the area and bring them to the generator. You may also need replace a broken fuse on a mobile unit. There are also often loud speakers that will attract nearby enemies once power is restored. You can prevent this by cutting the wires leading to the speaker.
With the power on you can access the interior of the outpost where you will find a NERO Injector, a bed and an audio log. The checkpoint also becomes a fast travel point.
NERO Research Sites are often in hard to reach location like perched on a cliff or hidden in caves or forests. Some will even require you to use your bike to clear a jump to reach. However that is where the difficulty ends as they have no need for refueling generators and you can simply grab the NERO Injector without issue.
Ambush Camp Hunter
- Complete the Ambush Camp Hunter storyline
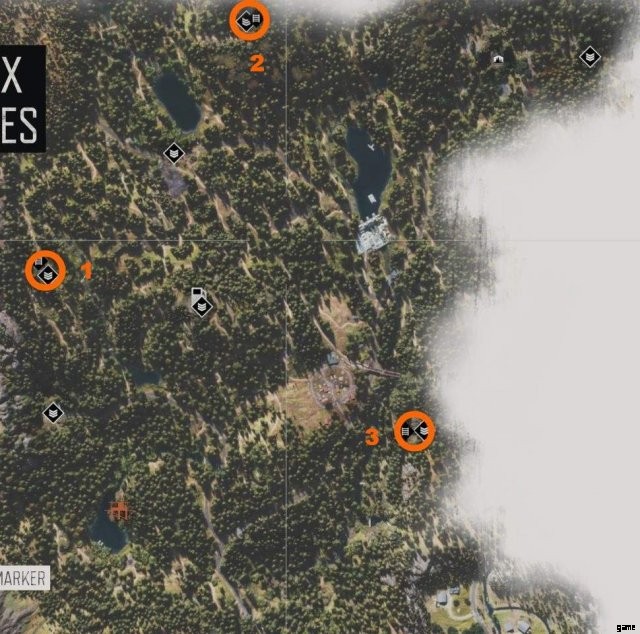
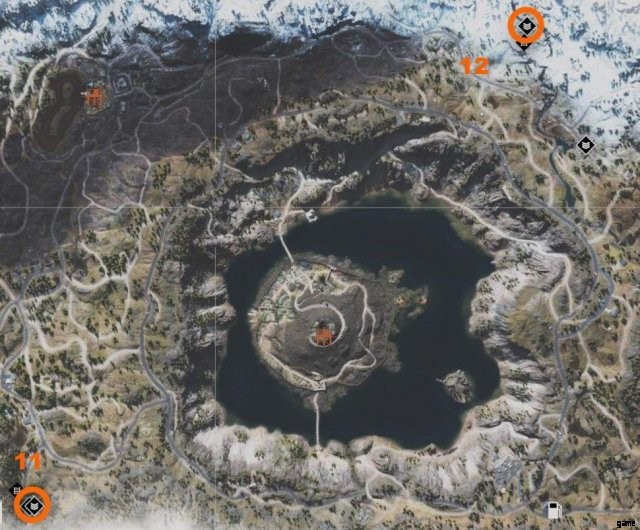
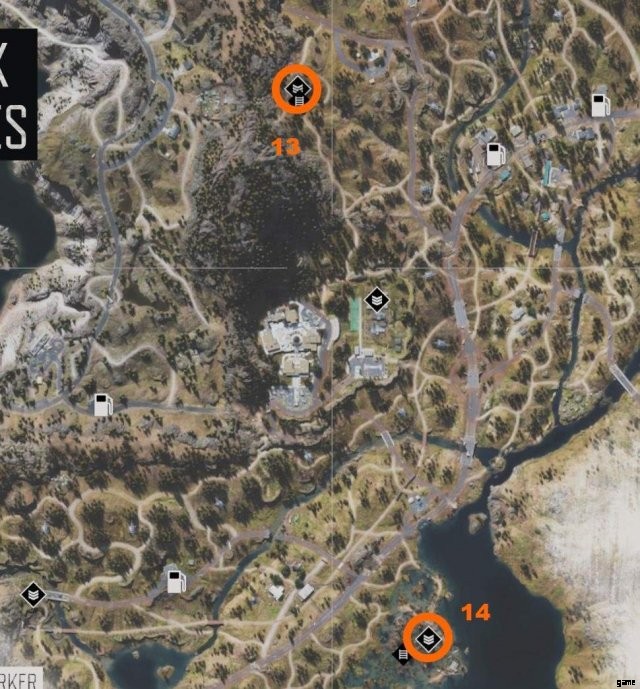
The “Ambush Camp Hunter” storyline involves killing all enemies at 14 different sites across the map. Each site also houses an underground bunker whose entrance must be located. Inside this bunker you will find a map that clears nearby fog and reveals nearby Historical Markers on your map. Clearing these camps also awards crafting recipes and unlocks a fast travel point for future use, so it’s quite useful to complete these objectives when able as you play through the game.
These camps are marked on the map as a red icon very similar in appearance to the achievement icon. Unlike Marauder Camps, there are no missions/jobs that lead you to these camps, only exploration.
You can check your progress by pausing> select Storylines> Progress> Ambush Camp Hunter.
Below are the locations of each camp. Click or tap to enlarge image.
Cascade Region
- 1:Cascade Radio Tower
- 2:Jefferson Rail Tunnel
- 3:Horse Creek
Belknap Region
- 4:Black Crater
- 5:Belknap Caves
- 6:Bear Creek Hot Springs

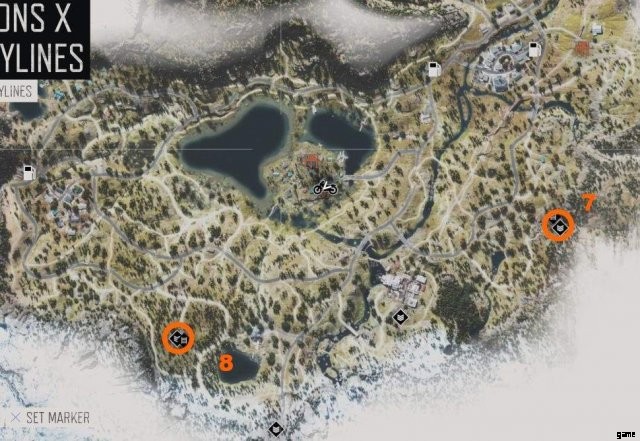
Lost Lake Region
- 7:Deerborn
- 8:Berley Lake
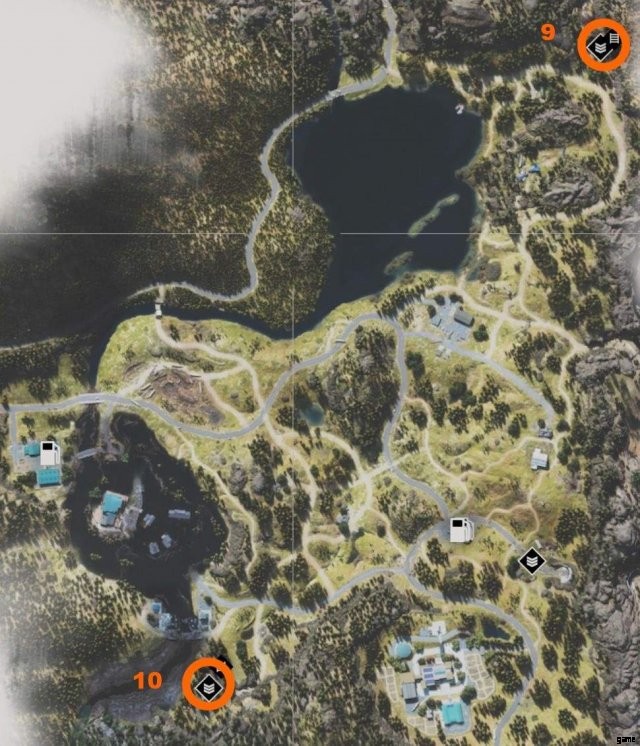
Iron Butte Region
- 9:Wagon Road
- 10:Redwood RV Park
Crater Lake Region
- 11:Spruce Lake
- 12:Cascade Lakes Railway
Highway 97 Region
- 13:Aspen Butte
- 14:Bare Bay
Infestation Exterminator
- Complete the Infestation Exterminator storyline
The “Infestation Exterminator” storyline involves clearing out 12 (technically 13, read further) infected areas around the map. These areas are marked by a large red circle that changes into an icon showing the precise location when the player is close enough. Each infected area contains anywhere from 3-6 separate nests that must be destroyed with fire, so ensure you have sufficient incendiary supply before taking them on.
The northern region of the map only contains Freaker nests, these can be found in cars, buildings or caves.
The southern region contains not only Freaker nests but also includes Crier (infected crow) nests. These nests are often high up in trees or on electric poles so Molotov’s or Incendiary Crossbow Bolts will be required as opposed to fuel cannisters.
In the case of both nests, once you damage them several enemies will spawn from within and attack you.
The 13th infected “area” is actually 18 separate Crier nests spread out over the Crater Lake and Highway 97 regions. These will need to be discovered either by thorough exploration or by watching the video guide below.
Depending on the location of the nest, causing too much noise can sometimes attract a nearby horde, complicating the situation quite a bit. It may be wise to avoid such locations until you have better gear to take on the combined threat.
You can check your progress by pausing> select Storylines> Progress> Infestation Exterminator.
List of Infestation Areas/Locations
- Cascade Region – Logging Camp
- Cascade Region – Pioneer Cemetery
- Belknap Region – Crazy Willie’s
- Belknap Region – Marion Forks
- Belknap Region – Patjens Lakes
- Lost Lake Region – Sherman’s Camp
- Lost Lake Region – Rogue Camp
- Lost Lake Region – Berley Lake
- Crater Lake Region – Tumblebug River
- Crater Lake Region – Rimview Ranch
- Highway 97 Region – Cascade Lakes Rail Line
- Highway 97 region – Chemult College
- Crater Lake and Highway 97 Regions.
Marauder Camp Hunter
- Complete the Marauder Camp Hunter storyline
The “Marauder Camp Hunter” storyline requires you to simply kill all enemies at 10 different camps across the map. However unlike the other two Storyline quests above, these camps can only be completed during specific missions/side mission.
The first 2 camps are cleared during 2 story missions, the following 7 from different Encampment Jobs and the final 10th camp after all others camps are cleared. Just complete any Encampment Jobs (you need to anyway for other achievements) and you’ll naturally complete these.
You can check your progress by pausing> select Storylines> Progress> Marauder Camp Hunter.
List of Marauder Camp Missions
- Story Mission:Drifters on the Mountain
- Story Mission:Smoke on the Mountain
- Lost Lake Encampment Job 2/7:Drifters at Eden Hall
- Cascade Encampment Job 5/6:Here’s a Little Chaos
- Lost Lake Encampment Job 6/7:He’s Just a Kid
- Belknap Encampment Job 7/8:Rippers, Rest in Hell
- Crater Lake Encampment Job:Just Doing My Job
- Crater Lake Encampment Job:A Bunch of Cavemen
- Crater Lake Encampment Job:He’s Feeding the Freaks
- Crater Lake Encampment Job:How Do I Get Them?
Collectibles
You’ve Got Red on You
- Collect 541 Items from corpses
This achievement is listed in both the Collectible and Combat sections as it technically both.
I highly recommend you start making progress on this achievements from the beginning of the game. This can be a serious grind if you aren’t making an effort to progress this as you play normally. You can only make progress on this achievement by looting human corpses, Freakers do not count (they have their own achievement).
You must also always be aware that you have limited inventory space for crafting supplies (what you will be looting the most). You can clearly see your inventory is full when you try to loot and a red icon appears over the body. Items must be successfully looted for them to count towards the achievement.
You can check your progress by pausing> select Storylines> Achievements> You’ve Got Red on You.
Lend Me Your Ears
- Collect 989 Freaker Ears
This achievement is listed in both the Collectible and Combat sections as it technically both.
This is much easier than the “You’ve Got Red On You” achievement as not only are Freakers far more common than humans, you will automatically pick up Freaker Ears by simply walking over their bodies. You can even pick them up on your bike.
If you haven’t gotten this while completing all Mission/Side content, clearing out the last few hordes should easily award this to you. Just be sure you are picking them up.
You can check your progress by pausing> select Storylines> Achievements> Lend Me Your Ears.
Go Kick Rocks
- Knock down 12 Anarchist Cairns
Cairns are stacked piles of rocks left by the Anarchist faction. While there are over 40 scattered around the map, you can find 10 Cairns during the mission “Just Doing My Job”.
You can check your progress by pausing> select Storylines> Achievements> Go Kick Rocks.
Performance Enhanced
- Max out either your Health, Stamina, or Focus
In order to upgrade your Health, Stamina and Focus you will need to find NERO Injectors. These are located at NERO Checkpoints and NERO Research Stations around the map.
There are enough NERO Injectors to Max all three stats, however for this achievement you only need to max one.
Finders Keepers
- Unlock your first collectible
See “The Broken Roadshow” below.
Wannabe Fortune Hunter
- Unlock over 50% of the collectibles
See “The Broken Roadshow” below.
The Broken Roadshow
- Unlock over 75% of collectibles
For this achievement there are 240 relevant collectables of 10 different types. You will need to collect 181 to reach the 75% needed.
As there are a substantial number of collectibles I recommend making it easy on yourself and simply waiting until after the main story is complete. The map will open back up and you can follow any of the video guides below to easily collect anything you were missing.
Collectible List
- 6 Sarah’s Lab Notes – All of these are unlocked upon completing Story Missions.
- 20 Radio Free Oregon – All of these are unlock as you progress through the story and will play on their own.
- 6 Colonel Garret Speeches – These start to become available after the mission “I Know the Look” after Kouri calls you and tells you about the Colonel’s speeches. Every morning at the Wizard Island Encampment the you can find the Colonel at the gallows (represented by a mission marker on the map) giving one such speech. As you progress the game he will continue to give new speeches so it’s worth checking your map every so often to see if there is a new icon. Though this needn’t be a priority as any missed speeches can be accessed as audio recording in the Colonels tent after completing the main story.
- 52 Nero Intel – These are mainly acquired during the main story or found at various NERO sites throughout the map, see “World’s End” in the Map Completion section for more information on these sites.
There are also a handful of recordings left behind by Nero Soldiers at places where you see them during the story. These aren’t terrible hard to find, but missing a few isn’t a big deal. - 43 Historical Markers – These will be revealed on the map as you clear Ambush Camps, see “Ambush Camp Hunter” in the Map Completion section for more information.
- 33 Character Collectibles
- 13 R.I.P. Sermons
- 28 Tourism Collectibles
- 33 Herbology Plants
- 6 Camp Guitarists
Encampments
As you progress through the main story you will encounter multiple Encampment sites. These are essentially small survivor settlements that act as safe areas, trading posts as well as a location to get side quests. Completing encampment Jobs, quests, bounties, and selling supplies rewards you with Trust Points. Each Trust Level you advance unlocks better weapons and bike upgrades you can purchase.
There are 5 Encampments around the map. Three in the northern region:
- Copeland’s Camp
- Hot Springs
- Iron Mike’s Camp
And 2 in the southern region:
- Diamond Lake
- Wizard Island
I recommend you complete Encampment Jobs as they become available, as not only is completing many of them required for several other achievements. The new weapons you unlock make several other tasks much easier, namely killing hordes.
Burnout Apocalypse
- Use nitro and drift at the same time on your bike for at least 5 seconds
This achievement is listed in both the Encampment and Bike sections as it technically both.
While the achievement action itself doesn’t involve Encampments like the others here, the Nitro 3 upgrade required is only available once you reach Trust Level 3 with the Diamond Lake Encampment.
This achievement is best attempted in a flat, open area and may take some practice to preform.
On Xbox Controller:
- Hold RT + B + A
On Playstation Controller:
- Hold R2 + Circle + X
While holding the above buttons, lightly accelerate and drive in a circle for at least 5 seconds.
Best Friends Forever
- Receive the Allied Trust status with an Encampment
Best Friends Forever (For Life)
- Gain the Allied Trust status with three different Encampments
The 3 Encampments I recommend you reach Allied Status (level 3) with are Iron Mike’s, Wizard Island and the Diamond Lake Encampments. Iron Mike’s and Wizard Island will receive a good amount of progress naturally as they are who you spend a large portion of the main story with and Level 3 Trust with the Diamond Lake Encampment is required for the “Burnout Apocalypse” achievement.
If you have completed the Main Story and a large portion of side content and find you are still level 2 with an Encampment, the best way to increase trust is the kill hordes in that camps region. To ensure you are helping your desired camp, hover your cursor over a horde and it will tell you which camp receives Trust Points.
Surviving isn’t Living
- Rescue 10 survivors
As you play you will encounter survivors stuck in precarious situations, either as hostages or surrounded by Freakers. Speaking to a survivor after rescuing them gives you the option to send them to an Encampment of your choice, gaining you trust with that camp.
While playing through the main Story you will rescue 7 or so survivors, so this achievement will be easily gotten.
Kitchen Courier
- Sell Animal Meat or Plants to any Encampment
As you explore you can harvest a variety of different plants as well as meat from different animals you hunt. Once in an encampment, locate the “Kitchen” (a boiling pot) and activate it to initiate trade. Simply sell anything and the achievement should unlock.
Make it Rain
- Spend 20,000 credits at one Encampment
Each encampment has it’s own currency, and you earn that camps currency from doing most content related to it (Main story, camp jobs, clearing hordes, selling items, etc…). You should earn more then enough as you max out your Trust Level with a specific camp. If not, clear any hordes you may have missed and keep an eye out for survivors as you explore.
Fähigkeiten
As you play you will earn experience and gain skills. There are 3 skill trees with 15 skills each:Ranged, Melee and Survival. Story missions, side missions, activities and hordes are all good sources of experience. Depending on how much of these things you do during your play through, you may be short a few skill from the 45 needed for the final achievement.
As you will need to do most side missions (Storylines, Encampment Jobs, Map Completion) for the other achievements anyway, it’s best to focus on these before taking on extra hordes. While there is more then enough experience for all skills if you have done absolutely everything, unless you enjoy killing hordes it’s best to leave that for the final bit of experience you need. Northern region hordes award 3,000 XP and southern region award 4,000 XP. All hordes are marked on your map after you complete the main story.
Don’t Stop Me Now
- Unlock your first skill
I’m Out of Control
- Unlock 15 Skills
There’s No Stopping Me
- Unlock 30 skills
Mr. Fahrenheit
- Unlock 45 skills
Kampf
You’ve Got Red on You
- Collect 541 Items from corpses
This achievement is listed in both the Collectible and Combat sections as it technically both.
I highly recommend you start making progress on this achievements from the beginning of the game. This can be a serious grind if you aren’t making an effort to progress this as you play normally. You can only make progress on this achievement by looting human corpses, Freakers do not count (they have their own achievement).
You must also always be aware that you have limited inventory space for crafting supplies (what you will be looting the most). You can clearly see your inventory is full when you try to loot and a red icon appears over the body. Items must be successfully looted for them to count towards the achievement.
You can check your progress by pausing> select Storylines> Achievements> You’ve Got Red on You.
Lend Me Your Ears
- Collect 989 Freaker Ears
This achievement is listed in both the Collectible and Combat sections as it technically both.
This is much easier than the “You’ve Got Red On You” achievement as not only are Freakers far more common than humans, you will automatically pick up Freaker Ears by simply walking over their bodies. You can even pick them up on your bike.
If you haven’t gotten this while completing all Mission/Side content, clearing out the last few hordes should easily award this to you. Just be sure you are picking them up.
You can check your progress by pausing> select Storylines> Achievements> Lend Me Your Ears.
This is a Knife
- Kill a Breaker, Reacher, or Rager with a knife
Each of these enemies are encountered through story progression and after defeating them the first time can be found throughout the map. Each enemy is unique and provides their own challenge in killing, especially with a knife.
By far the easiest way is on Playing All Night mission where you fight a Breaker. As this is a pseudo boss fight, the breakers health bar is displayed on the screen. This allows you to easily use other more powerful weapons to bring it to the brink of death and finish it off with your knife.
If you missed this opportunity, it’s not the end of the world. As I mentioned all three spawn in the world naturally and provide plenty of opportunity to try again. In the Melee skill tree, the executioner skill allows you to use stealth takedowns on Breakers. Combine this with a smoke grenade and you can easily kill one without much trouble.
Additionally, tagging a Breaker with binoculars apparently (I haven’t done this myself) causes the health bar to display on screen, allowing you to use the first method outside of the required mission.
Ghost of Farewell
- Get 100 stealth kills
Enemy awareness in this rivals that of a Bethesda game. That is to say enemies will rarely detect you regardless of what you do. Simply walk up behind an enemy and perform a stealth take-down 100 times.
Old Reliable
- Kill 200 Enemies with a Crafted Weapon
This one is also fairly simple, but there are a few thing you can do to make it even easier.
By completing Ambush Camps you unlock crafting recipes. Some of these recipes allow you to create more powerful melee weapons such as Nail Bats or a Buzzsaw. Combine that with the Field Repairs skill and you can repair your melee weapons with scrap, an abundant resource. With this you’ll almost never need to craft new weapons.
Most enemies don’t take many hits to bring down, but Freaker “Newts” are by far the best target for achievement progress as they only take 1 hit to kill.
Variety is the Spice of Life
Kill an enemy with every type of crossbow bolt
There are 5 different types of bolts:
- Crossbow Bolt:Unlocked from the start.
- Residue Bolt:Unlocked by completing the “They’re Not Sleeping” mission.
- Poison Bolt:Unlocked by completing the “I’ve Got a Plan” mission.
- Incendiary Bolt:Unlocked by clearing 8 Ambush Camps.
- Explosive Bolt:Unlocked by clearing 12 Ambush Camps.
Bike
Burnout Apocalypse
- Use nitro and drift at the same time on your bike for at least 5 seconds
This achievement is listed in both the Encampment and Bike sections as it technically both.
While the achievement action itself doesn’t involve Encampments, the Nitro 3 upgrade required is only available once you reach Trust Level 3 with the Diamond Lake Encampment.
See the Encampment section of the guide for more information.
This achievement is best attempted in a flat, open area and may take some practice to preform.
On Xbox Controller:
- Hold RT + B + A
On Playstation Controller:
- Hold R2 + Circle + X
While holding the above buttons, lightly accelerate and drive in a circle for at least 5 seconds.
Farewell Drift
- Accumulate 10 minutes of drifting while on your bike
Fairly simple, just a bit grindy.
To drift hold:
- B on Xbox Controller
- Circle on Playstation Controller
And move the directional keys or analog stick in any direction.
You can check your progress by pausing> select Storylines> Achievements> Farewell Drift.
First Time Buyer
- Upgrade your bike for the first time
Each camp has a mechanic that can upgrade your bike. Just buy any upgrade.
Farewell Original
- Purchase an upgrade under the Performance, Visual, and Paint Categories for your bike
Simply buy one of each the three different category’s and the achievement will pop.
The Art of Bike Repair
- Apply 100 scrap to your bike
When you crash or are hit by enemies you bike will take damage. If you have scrap you can use it to repair any damage.
You can check your progress by pausing> select Storylines> Achievements> The Art of Bike Repair.
Sonstiges
D.I.Y. Oregonian
- Craft 50 items
You will likely craft much, much more than is required during your playthrough.
One Percenter
- Go above and beyond, unlocking every achievement in Days Gone
This should only require the base game achievements, not Challenge Mode, Survival Mode or NewGame+ achievements.
W.I.P.