Diese Anleitung erklärt die unbeabsichtigte Funktion des manuellen Qi-Bursting und wie man es benutzt. Die in diesem Leitfaden verwendeten Arrays sind nur als Beispiel gedacht, da sie ausschließlich für die maximale Qi-Sammlung ohne weitere Überlegungen zu den verwendeten Gegenständen oder ihrem Element dienen. Diese Anleitung erklärt die grundlegendste Version des manuellen Qi-Burstings mit 4 Knoten mit identischer Reichweite.
ACS Manuelles Qi-Bursting
Diese Anleitung erklärt die unbeabsichtigte Funktion des manuellen Qi-Bursting und wie man es benutzt. Die in diesem Leitfaden verwendeten Arrays sind nur als Beispiel gedacht, da sie ausschließlich für die maximale Qi-Sammlung ohne weitere Überlegungen zu den verwendeten Gegenständen oder ihrem Element dienen. Diese Anleitung erklärt die grundlegendste Version des manuellen Qi-Burstings mit 4 Knoten mit identischer Reichweite. Es gibt andere Methoden, wie die Verwendung von 8 Knoten oder die Verwendung von Artikeln mit gemischter Reichweite, aber sie liegen derzeit außerhalb des Bereichs dieses Leitfadens.
Manuelles Qi-Bursting
Manuelles Qi-Bursting ist die Verwendung einer unbeabsichtigten Mechanik, um die Qi-Menge auf einer Kachel zu erhöhen. Wird hauptsächlich für Kultivierungsanordnungen im Endspiel und Durchbrüche des Goldenen Kerns verwendet, kann aber auch verwendet werden, um Qi-„Leerstellen“ zu beseitigen (eine Situation, in der die Kachel nur wenig Qi enthält, aber viel Qi ansammelt).
Manuelles Qi-Bursting setzt die Qi-Sammlung der umgebenden Kacheln (aber nicht der mittleren Kachel) einer Anordnung zurück, um die Qi-Menge auf der mittleren Kachel zu erhöhen.
Um zu verstehen, warum es funktioniert, muss die Funktion von Kultivierungs-Arrays erklärt werden.
Anbau-Arrays
Kultivierungsfelder werden gebaut, um das Qi auf einer Kachel zu erhöhen. Die Menge an Qi auf einer Kachel hängt mit der Menge an Qi zusammen, die sich auf einer Kachel ansammelt. Die Qi-Sammlung wird erhöht, wenn Gegenstände mit Qi-Sammlung in der Nähe sind.
[Technisch]
- Die Beziehung zwischen Qi und Qi-Sammlung wird in XiaWorld.LingMapData.UpdateLingUnit() angesprochen, lesen Sie Code Diving von inari für weitere Details oder graben Sie sich selbst in den Code ein.
- Weitere Einzelheiten finden Sie in der Anleitung zu Qi Link.
[Ende der Technik]
Eine Kultivierungsanordnung hat ein einziges Zentrum, in dem die Qi-Sammelmenge durch Qi-Sammelgegenstände in der Nähe erhöht wird. Während Gegenstände zum Sammeln von Qi viele Werte zu berücksichtigen haben, wird sich dieser Leitfaden nur mit Reichweite und Wert befassen.
Es ist wichtig zu beachten, dass Qi basierend auf mehreren Faktoren aktualisiert wird, einer davon ist der Unterschied in der Qi-Sammlung für benachbarte Kacheln. Qi sammelt sich normalerweise zu Quadraten mit höherer Qi-Ansammlung. Je größer der Unterschied zwischen den Qi-Sammelwerten der Kacheln, desto mehr Qi wird übertragen. Manuelles Qi-Bursting setzt die Qi-Sammlung für Kacheln in der Nähe der Mitte zurück, was den Unterschied von winzig (2000 in der Mitte, 1800 in der Nähe, eine Differenz von 200) bis riesig (2000 in der Mitte, 0 in der Nähe, eine Differenz von 2000) ausmacht.
Bereich
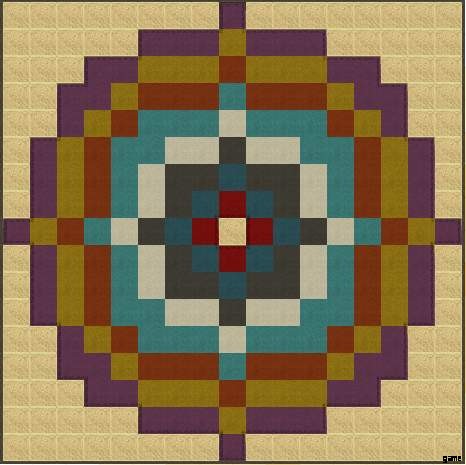
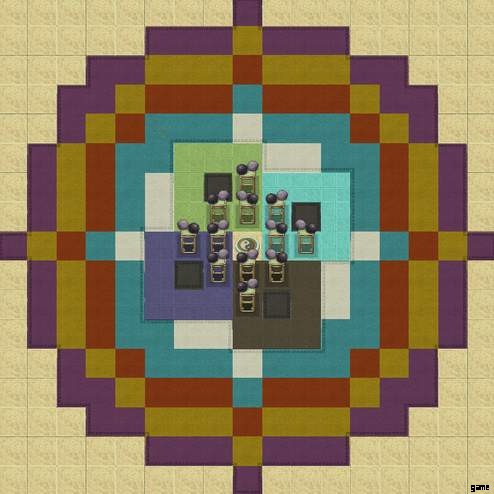
Qi-Sammelgegenstände erhöhen den Qi-Sammelwert in ihrer Reichweite. Hier ist ein Beispiel mit einem Gegenstand, der eine Qi-Sammelreichweite von 5 hat:
Um zu verstehen, was die Bereiche sind, ist hier ein Bild, das sie veranschaulicht:
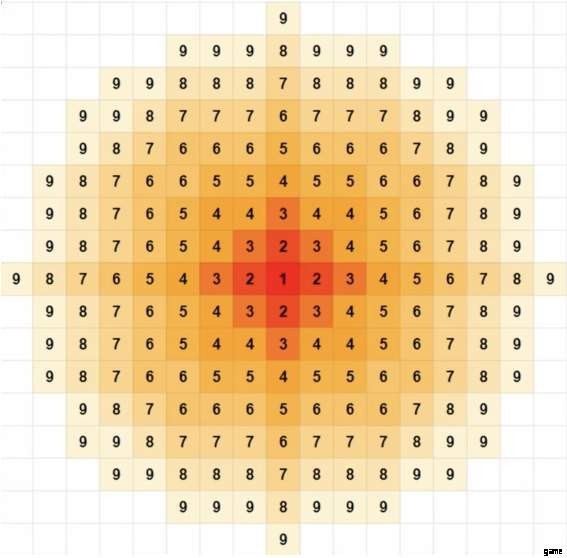
Bereich von 1 ist die Kachel des Gegenstands. Derzeit sind Artikel aus Bereich 1 verwanzt. Glücklicherweise ist das Qi-Kissen der einzige Gegenstand der Reichweite 1 im Spiel. Daher sollte der Qi-Sammelgegenstand für Reichweite 5 auf den Plättchen für Reichweite 5 platziert werden, um das Beste daraus zu machen.
Eine andere Sichtweise auf das obige Bild:Die mittlere Fliese mit Holy Stone Flooring ist Bereich 1. Bereich 2 – Roter Stoffteppich. Bereich 3 – Blauer Stoffteppich etc.
Wert
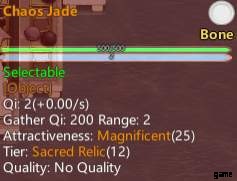
Der Qi-Sammelwert ist die Menge an Qi, die der Gegenstand sammelt. Während der Effekt über Entfernungen normalerweise reduziert wird, ist das Hauptkonzept, dass höher besser ist. Hier ist ein Beispiel für einen geheimen Boss-Drop:
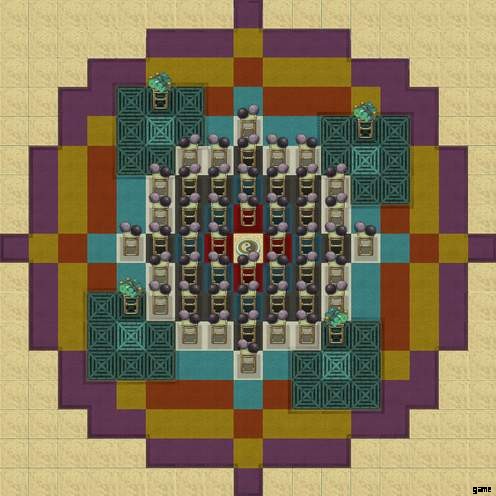
Beispiel-Endspiel-Array
Um das Qi-Bursting zu erklären, hier ein Beispiel dafür, wie eine Endspiel-Kultivierungsanordnung aussehen könnte (die verwendeten Gegenstände).
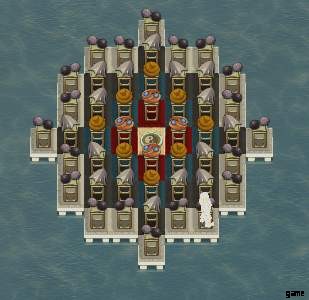
Das Array verwendet keine aufgestiegenen Xiandao-Statuen oder Relikte (Geisterpagode). Verwendete Artikel:
- Bereich 1 (1 Stück):Chaos Jade unter dem Kissen
- Bereich 2 (4 Artikel):Chaos-Jade
- Bereich 3 (8 Artikel):Drachenkot
- Bereich 4 (16 Artikel):Weiße Skala
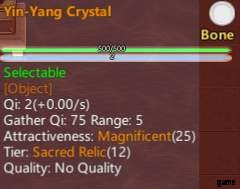
- Sortiment 5 (20 Artikel):Yin-Yang-Kristall
Das Endergebnis wird dazu führen, dass sich auf der mittleren Kachel etwa 3,5.000 Qi ansammeln.
Qi-Sammlung zurücksetzen
Durch das Platzieren oder Entfernen eines Gegenstands wird die Qi-Sammlung der Kacheln in der Nähe zurückgesetzt. Die Reichweite der betroffenen Kachel basiert auf der Qi-Sammelreichweite des Gegenstands.
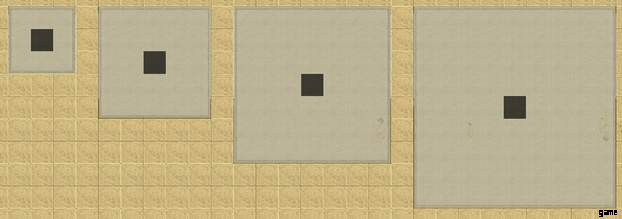
- Gegenstände der Reichweite 2 wirken sich auf ein 3×3-Quadrat aus, das auf dem Gegenstand zentriert ist (schwarzes Quadrat).
- Gegenstände der Reichweite 3 wirken sich auf ein 5×5-Quadrat aus, das auf dem Gegenstand zentriert ist (schwarzes Quadrat).
- Gegenstände der Reichweite 4 wirken sich auf ein 7×7-Quadrat aus, das auf dem Gegenstand zentriert ist (schwarzes Quadrat).
- Gegenstände der Reichweite 5 wirken sich auf ein 9×9-Quadrat aus, das auf dem Gegenstand zentriert ist (schwarzes Quadrat).
- Basierend auf Berechnungen würde ein Gegenstand der Reichweite 7 ein 13×13-Quadrat beeinflussen.
- Basierend auf Berechnungen würde ein Objekt der Reichweite 9 ein 19×19-Quadrat beeinflussen.
Die Formel für den betroffenen Bereich:
- Quadratdurchmesser =(Qi-Sammelbereich * 2 – 1)
Auslösen des Zurücksetzens
Während es mehrere Methoden gibt (Aus dem Inventar fallen lassen, vom Stand fallen lassen, ungebannt aufheben), um das Zurücksetzen auszulösen, gibt es einen einfacheren Weg, der das geringste Mikromanagement erfordert.
Legen Sie zuerst den Gegenstand auf den Boden und verbieten Sie ihn. Um den Gegenstand zu platzieren, lassen Sie ihn entweder aus dem Inventar eines Schülers oder von einem Ständer fallen. Es wird immer ein Feld südlich abgelegt, es sei denn, es steht etwas im Weg. Bannen Sie den Gegenstand, nachdem er fallen gelassen wurde. Hier ist ein Beispiel dafür, wie Sie das Display platzieren würden. Auf der Teppichfliese wird der Gegenstand verboten.
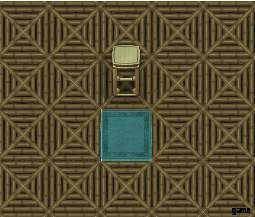
Entfernen Sie das Display, nachdem der Artikel gesperrt wurde. Um das Zurücksetzen auszulösen, bauen Sie ein Tic-Tac-Toe (zu finden unter Freizeit) über dem Gegenstand. Da es keine Materialien kostet und sofort gebaut wird, kann es während der Pause ausgeführt werden.
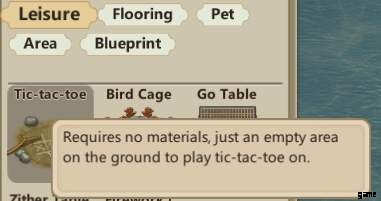
Um den Reset erneut auszulösen, bauen Sie das Tic-Tac-Toe wieder auf. While the reset won’t happen when you remove the Tic-tac-toe, keeping the Tic-tac-toe will be a reminder which items have already been reset.Using the Tic-tac-toe will let you save space, since you don’t need to mess with walls near the array.
Resetting Item Placement
While it’s important to know how to reset the gathering, knowing where to place the item is important as well. Since we know the amount of tiles affected, we can take that into consideration when placing the item. The items are placed off-center, going clockwise. The exact position is dependent on your cultivation array. While the example array above is using Range 5 items, you can also use Qi bursting with smaller arrays, even with one using only range 2 items. The important thing to consider:
If your array is using range X, you’d need the resetting item to have a range of X-1 or greater. So if your array is up to Range 4 and filled with Spiritwood, then you’d need to use items with a Qi gathering range of 3 or greater. While you could go below it by removing some Displays, it’s not something you should be doing (explained further in the Cultivation Array guide [Link TBA]). Spiritwood is cheap and can be used even with the example end-game array.
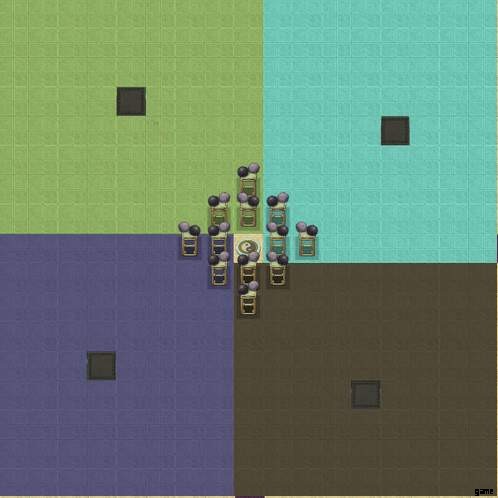
To give a better visual example, here’s where you’d place the resetting item for a 4 Node Manual Qi Burst.
Range 2 items
The black carpet tiles, at Range 4, is where the items should be placed when using Range 2 items for resetting. While it is an option, I wouldn’t suggest it due to there being no cheap Range 2 items.
Range 3 items
The black carpet tiles, at Range 5, is where the items should be placed when using Range 3 items for resetting. Useful if you’re not using Range 5 Qi gathering items in your array and you’re lacking space.
Range 4 items
The black carpet tiles, at Range 6, is where the items should be placed when using Range 4 items for resetting. This is the most common method, due to the low cost of Spiritwood. Needed for the end-game arrays using Range 5 items.
Range 5 items
The black carpet tiles, at Range 8, is where the items should be placed when using Range 5 items for resetting. This should be used if you’re using end-game arrays with Xiandao statues at Range 9.
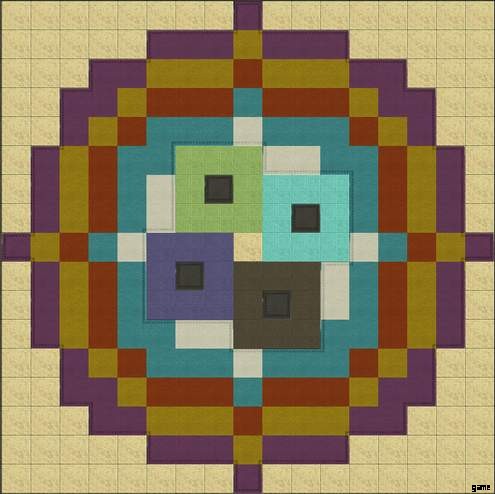
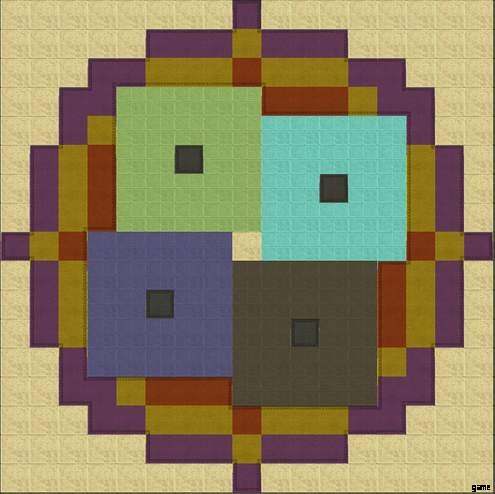
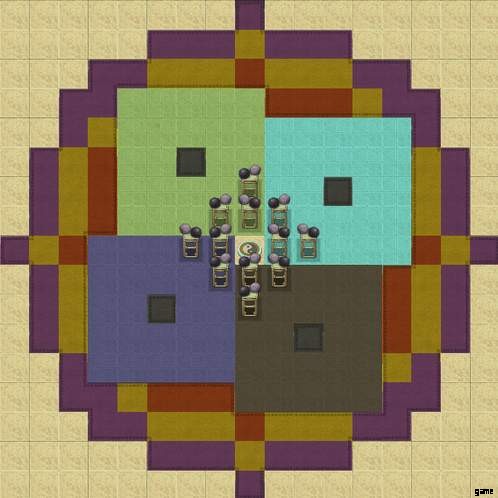
To clear things up, here’s another version of those images. The Displays mark the place where the items should be placed on the ground. The ones on Black carpet for Range 2, White Carpet for Range 3, etc.

Preparing for Manual Qi Bursting
Taking the knowledge of making arrays, and resetting the tiles of it, we can now look at the bursting process. Taking another end-game array as a base, the first step is adding the resetting items. Since the array is using Range 5 (Yin Yang Crystals) items, you’d need at least Range 4 items for resetting. For this example, Spiritwood will do fine. Now to place the Spiritwood where it needs to be.
For that, I’m using the method of placing them on Displays, then dropping the item where it needs to be. The Spiritwood flooring is where the items will end up being.
While the game is still paused, I’ll remove the Spiritwoods from Displays and then ban them.
Since I have no need for the empty displays, I’ll remove them. Now it’s only a matter of waiting until the Qi gathering reaches the peak value. That’ll take 5 days, which you can always check with MoreGridInfo or a similar mod.
This is the end result, and it’s now ready for Manual Qi Bursting.
Manual Qi Bursting
At this point, we have our array ready and the cultivator is using it. Whether you plan to use manual Qi bursting for cultivation or breakthroughs, the method is the same. The Qi on the center tile is around 1.9K (Qi and not Qi gathering).
First, build a Tic-tac-toe over the bottom right item. Now the area surrounding the Spiritwood will have its Qi gathering reset. You might also notice the Qi on the center tile jumping up.
Now wait an ingame hour. The previous image was done at 12:00, the next will be at 13:00. Build a Tic-tac-toe over the bottom left item (since we’re going clockwise). Now the area surrounding that Spiritwood will have its Qi gathering reset.

Now wait another ingame hour. At 14:00, build a Tic-tac-toe over the top left item. The area surrounding that Spiritwood will have its Qi gathering reset.
Now wait another ingame hour. At 15:00, build a Tic-tac-toe over the top left item. The area surrounding that Spiritwood will have its Qi gathering reset.
At this point a full circle has been done, and the original 1.9K Qi on the center tile has turned into 4.7 Qi. If the breakthrough continues, you can also keep going with manual Qi bursting. While you can continue right after building the last Tic-tac-toe, I suggest you wait until the Qi gathering increases a bit. That way the results will be greater. This would be a good point to remove the placed Tic-tac-toes in preparation for the next manual Qi burst.
For that purpose, I’ll wait 24 ingame hours, from the moment the first Tic-tac-toe was added. It’s 12:00, and the center tile has 5.4K Qi. Now build a Tic-tac-toe over the bottom right item. Then wait another hour and build a Tic-tac-toe over the bottom left item. And so on and so on.
Qi Void and Other Anomalies
While the technical part was touched upon by the Code diving guide, the most common anomaly you could face is when the highest amount of Qi on a tile is not on the center tile. The so-called Qi void will have similar symptoms, so I’ll be treating it as the same thing.
It will happen when the Qi gathering in the array is unbalanced, two ways in particular:
- The highest Qi gathering value occurs on multiple tiles away from the center.
- The center and 3×3 square surrounding it have identical Qi gathering values.
The main reason for the anomaly is messing up the ranges. To illustrate the example here’s what an “array” with incorrect ranges looks like:
That mess of an array has the highest Qi Gathering on multiple tiles, with the highest Qi on the edges. The middle has over 3K Qi gathering, but due to the Qi void, there’s a 5×5 square with 0 Qi. The four corners of Bamboo flooring get 2.5K Qi every once in a while, but it isn’t spread any further.
To avoid the anomaly happening, don’t mix up the ranges. Have the Range 5 items at Range 5 from the cushion, have the Range 2 items at Range 2, and so on. Another way of solving that is building asymmetrical arrays and|or having Qi Corridors.
While there are reasons you might want to go against that, like when you lack the more appropriate materials or when you’re using a full 48 Mortal Bodies, you will have a higher chance of experiencing the Qi anomalies.
To fix the anomaly, trigger a manual Qi Burst. That will make the above “array” usable for cultivation.
Other Concepts
While the previous should be enough to explain Manual Qi Bursting, there are other factors to consider as well.
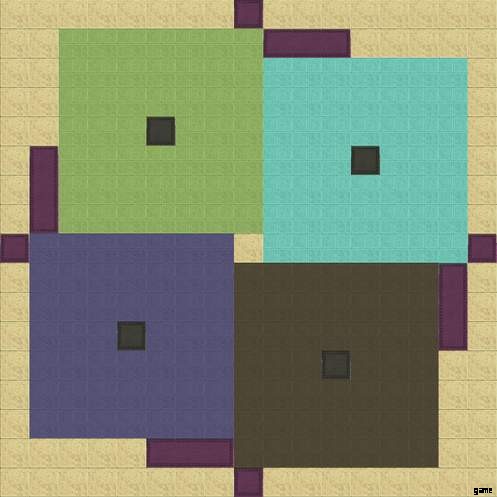
8 Node Bursting
A tile has 8 surrounding tiles. The order that Qi is transferred goes from incrementally on the horizontal axis, then on the vertical axis. To put it in simpler terms, here’s an image illustrating it:
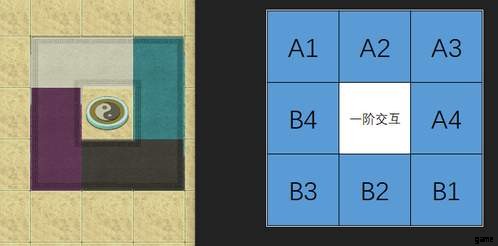
So the order goes B3>B2>B1>B4>Center>A4>A1>A2>A3. The A|B separation is related to the Flow and Return Directions (complex topic, out of scope for this guide). The order is also why the resetting starts from the bottom right and goes clockwise. The image on the left displays the affected tiles surrounding the cushion if you’re using a 4 Node Manual Qi Bursting design.
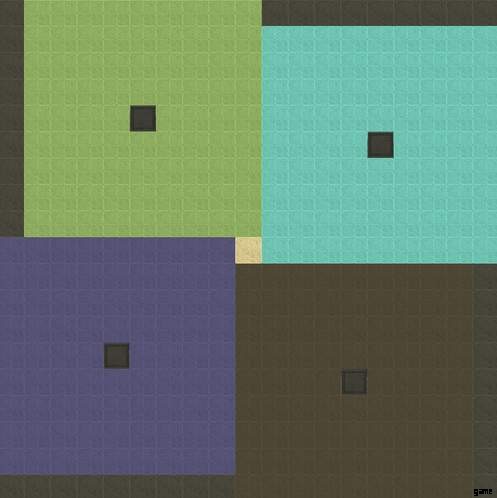
While it’s not a big issue, there are slight inefficiencies, since you’re resetting two tiles near the cushion at once. To fix that, you need to use an 8 Node Manual Qi Bursting Design, which will make the affected tiles more like this:
To illustrate, here’s what an AR 5 BR 4 would look like if it’s using 8 Node Manual Qi Bursting Design:
To utilize it, the same logic applies as a 4 Node Design. Start at bottom right and go clockwise.
In this example, the Spiritwood on Holy Stone(light flooring) would be triggered first, as it resets the B1 tile.
- Then trigger the Spiritwood on Graystone (dark flooring), as that resets B2. Waiting an hour before you trigger the next one still applies.
- Then trigger Spiritwood on Bamboo (green flooring), as that resets B3.
- Then trigger the Spiritwood on the bottom left corner, as that resets B4.
- Then trigger the Spiritwood on Bamboo (green flooring) in the top left, as that resets A1.
- Then trigger the Spiritwood on Graystone (dark flooring), as that resets A2.
- Then trigger the Spiritwood on Holy Stone (light flooring), as that resets A3.
- Finally, trigger the Spiritwood in the top right corner, as that resets A4.
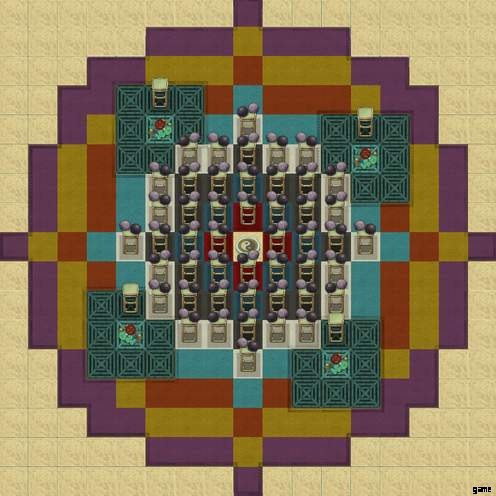
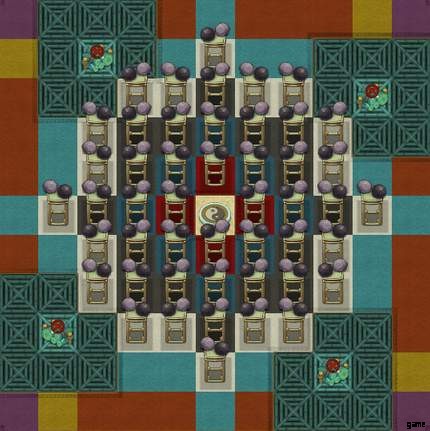
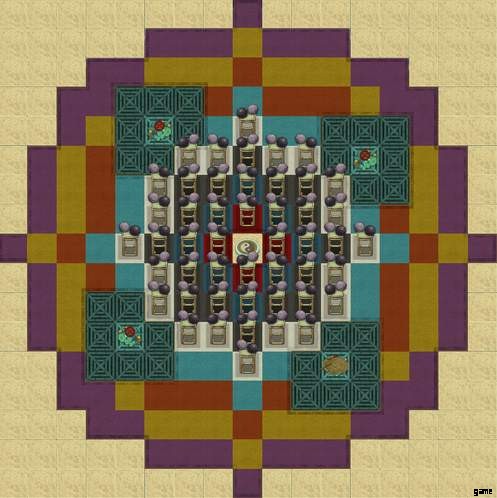
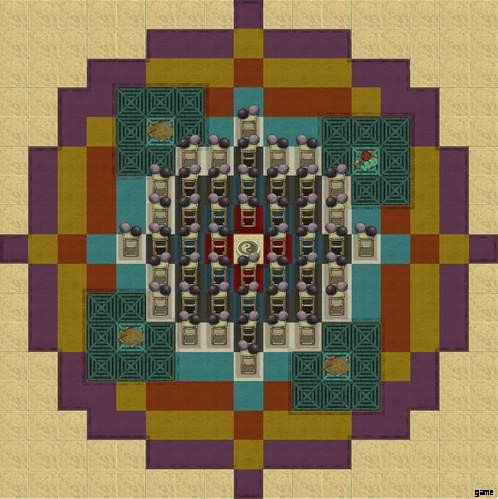
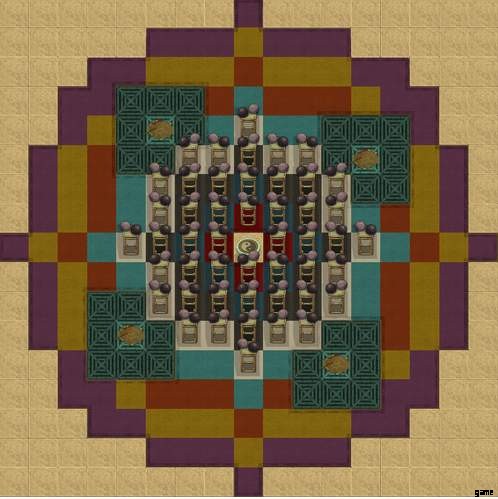
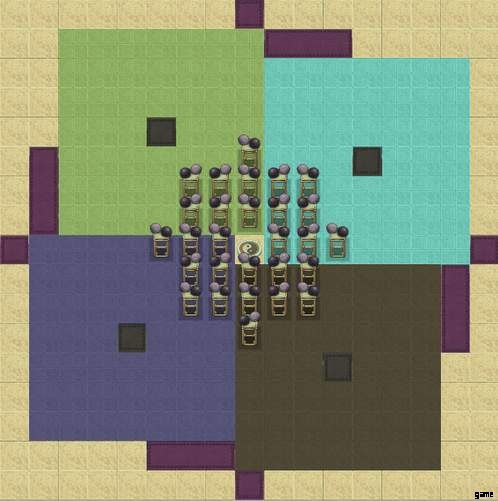
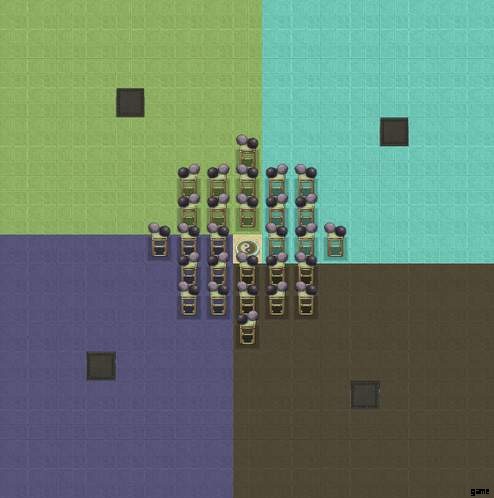
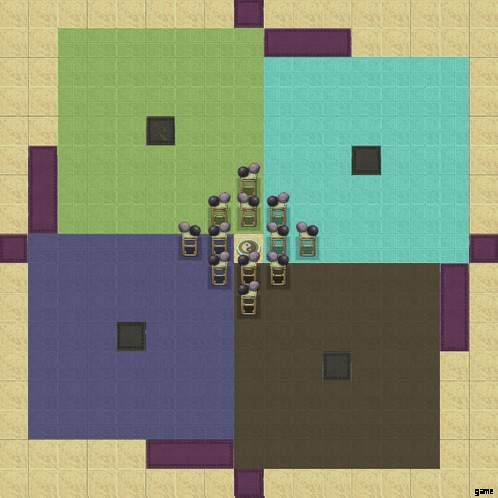
Examples
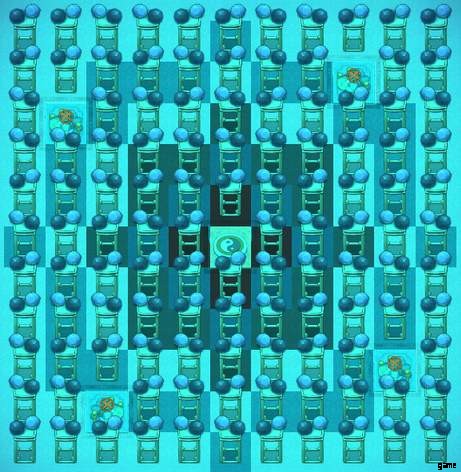
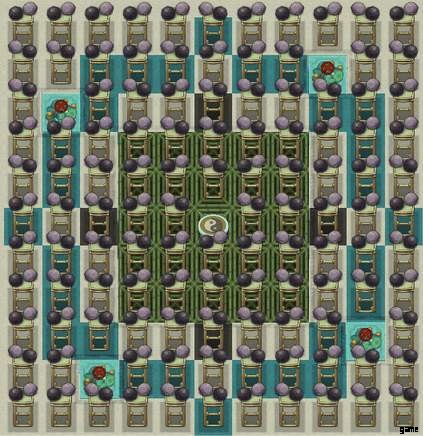
The example arrays with manual Qi bursting capabilities are built with Yin Yang Crystals, assuming a symmetrical array. The colored squares are the tiles reset, while the Black carpeted tiles are where the resetting items should be placed.
This is using a simple 4 node design.
AR for Array Range, based on the highest range items used in the array.
BR for Burst Range, based on the range of the Qi resetting item. (Qi Gather Range of the item)
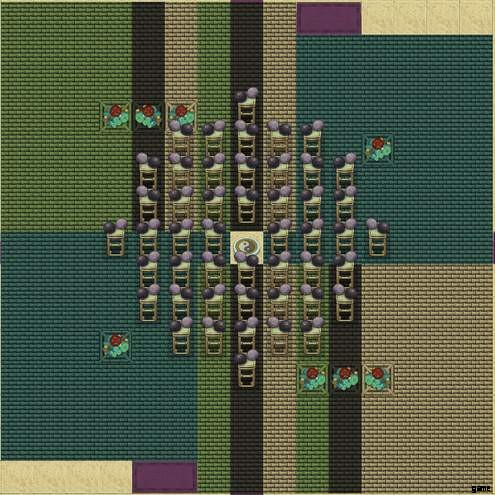
AR 5 BR 4
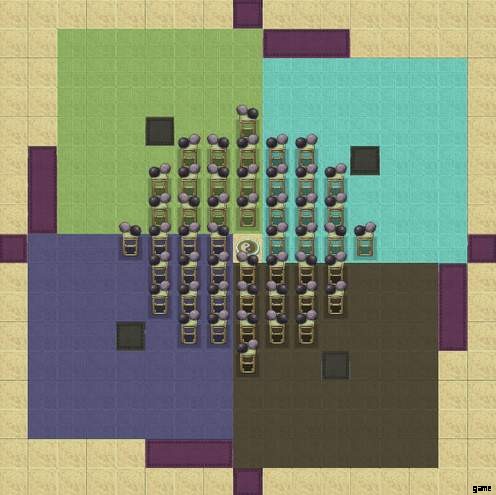
AR 5, BR 5
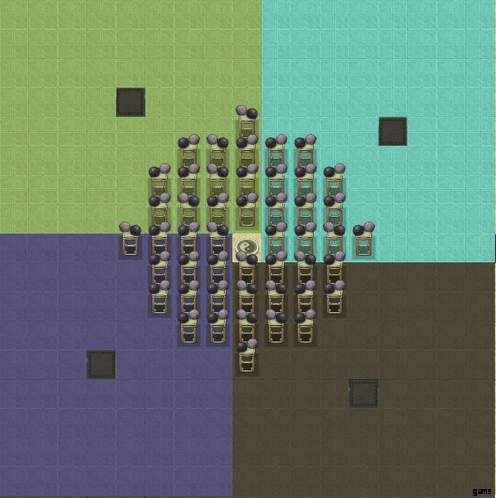
AR 4, BR 3
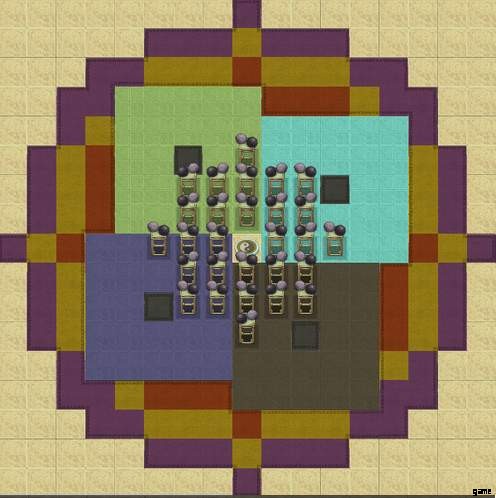
AR 4, BR 4
AR 4, BR 5
AR 3, BR 2
AR 3, BR 3
AR 3, BR 4
AR 3, BR 5