
Ulimate Map Editor-Handbuch
Grundlagen
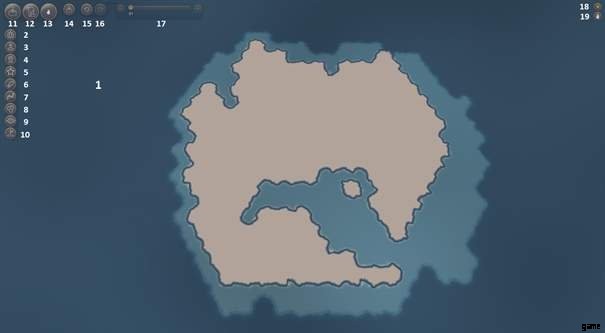
Starten des Humankind-Karteneditors
Gehen Sie im Hauptmenü auf „Extras“, dann auf „Community“ und „Karteneditor“.
Von dort aus können Sie entweder:
- Starte den Editor mit der Standardkarte, indem du auf „Editor starten“ klickst.
- Laden Sie eine der voreingestellten Karten (Winzig, Klein, Normal, Groß und Riesig).
- Laden Sie eine zuvor bearbeitete Karte.
Hinweis:In der aktuellen Version des Editors ist dies die einzige Möglichkeit, eine Karte zu laden.
Verknüpfungen
- Linksklick: Bewegen Sie die Kamera.
- Mittelklick: Platziere eine Kachel.
- Rechtsklick: Wählen Sie den Wert der schwebenden Kachel aus. Klicken Sie mit der rechten Maustaste auf eine Kachel und halten Sie die rechte Maustaste gedrückt, während Sie die Maus bewegen, um die Kachel zu duplizieren. Auf diese Weise können Sie eine Kachel „zeichnen“.
- Mausrad: Vergrößern/Verkleinern.
- Strg + Rechtsklick: Wählen Sie eine Kachel aus.
- Strg + Rechtsklick &Ziehen: Wählen Sie ein Rechteck aus Kacheln aus.
- B: Verringern Sie die Pinselgröße.
- N: Erhöhen Sie die Höhe der schwebenden Kachel.
- W: Verringern Sie die Höhe der schwebenden Kachel.
- X: Erhöhen Sie die Pinselgröße.
- Strg + Z: Rückgängig machen.
- Strg + Y: Wiederholen.
- C: Nächster Bearbeitungsmodus.
Schnittstelle
- Ansichtsfenster
- Kachelmodus
- Höhenmodus
- Point-of-Interest-Modus
- Naturwunder-Modus
- Wahrzeichenmodus
- Flussmodus
- Gebietsmodus
- Sichtbarkeitsmodus
- Startpunktmodus
- Speichern unter…
- Validieren
- Höhenkarte importieren
- Schnellspeichern
- Rückgängig machen
- Wiederholen
- Pinselgröße
- Schließen Sie Map Maker
- Minimieren Sie die Benutzeroberfläche (zum Beispiel, um glänzende Screenshots Ihrer Karte zu machen)
Die Karte erstellen
Gelände platzieren
Klicken Sie im Menü auf die Schaltfläche „Fliese“ und wählen Sie einen Fliesentyp (Wald, Prärie…) aus. Bewegen Sie den Mauszeiger über das Ansichtsfenster und klicken Sie mit der mittleren Maustaste, um es zu platzieren.
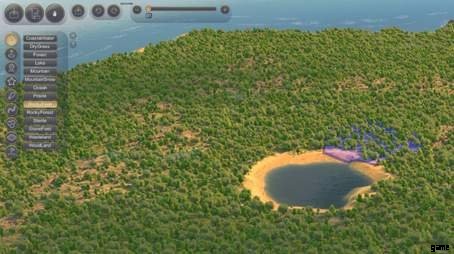
Sie können auch mit der rechten Maustaste auf eine vorhandene Kachel klicken, sie gedrückt halten und über Ihre Karte bewegen, um diese Kachel an eine beliebige Stelle zu ziehen.
Sie können die Größe Ihres Pinsels anpassen, indem Sie den Cursor am oberen Rand des Bildschirms bewegen oder die Tastenkombinationen B und N verwenden.
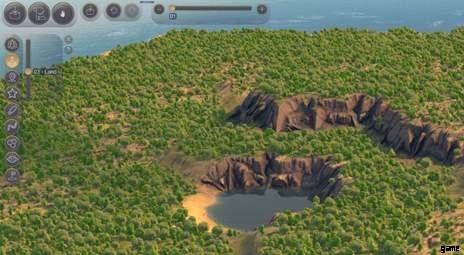
Um die Höhe Ihrer Kacheln anzupassen und Ihrer Karte Tiefe hinzuzufügen, wählen Sie die Schaltfläche „Höhe“ im Menü und eine Höhe (0 =Bodenhöhe, -1 =Meereshöhe). Bewegen Sie dann die Maus über die Kacheln, die Sie anpassen möchten, und klicken Sie mit der mittleren Maustaste.
Sie können auch über eine Kachel im Gelände schweben und dann die Tastenkombinationen W und X verwenden, um die Höhe der Kachel anzupassen.
Einen Fluss platzieren
Um einen Fluss zu platzieren, wählen Sie die Option „Fluss“ im Menü, klicken Sie dann mit der mittleren Maustaste auf die Karte, wo der Fluss beginnen soll, und ziehen Sie ihn an eine Küste oder einen See. Sie können zwei Flüsse verbinden, indem Sie einen Fluss auf einen anderen ziehen.

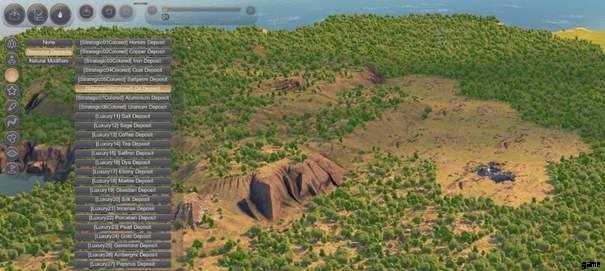
Sonderziel platzieren
Um einen Point of Interest zu platzieren, wähle die Schaltfläche „Point of Interest“ im Menü und klicke dann auf die Kategorie, die du platzieren möchtest:Resources Deposit oder Natural Modifiers. Wählen Sie das Element aus, das Sie platzieren möchten, bewegen Sie den Mauszeiger über den Bereich, in dem Sie es platzieren möchten, und klicken Sie dann auf die mittlere Maustaste, um es zu platzieren.
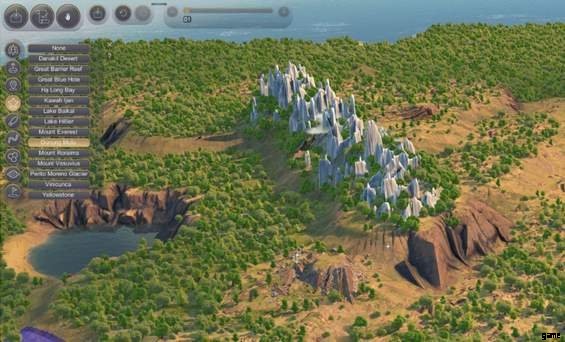
Ein Naturwunder platzieren
Um ein Naturwunder zu platzieren, wählen Sie die Schaltfläche „Naturwunder“ im Menü, klicken Sie dann auf das Wunder, das Sie platzieren möchten, bewegen Sie den Mauszeiger über den Bereich, in dem Sie es platzieren möchten, und klicken Sie dann mit der mittleren Maustaste, um es zu platzieren.
Importing a heightmap
The HUMANKIND map editor allows you to import heightmap images to automatically generate a terrain. You will need two images to do so:
- The heightmap itself, with clear colors or shades to define each height.
- The palette, a reference image which will be used by the Map Maker.
The two images must be in PNG and placed in the Documents/Humankind/Maps folder.
Depending on the map size, your heightmap image should have a 2:1 ratio.
There are 16 height levels, from –3 to 12, 0 being the first land level (-1 is the sea level).
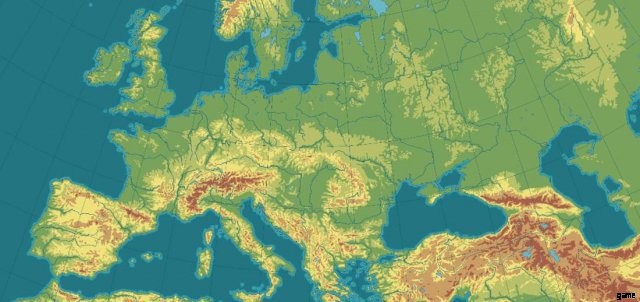

Colored map and palette, with only 7 levels defined, from -1 (deep sea) to 5 (mountains).
To create a palette from your heightmap, you can use the Humankind_Sample_Palette.png file and replace the colors by the ones in your heightmap, the fifth color being the floor level “0”.
You can simply pick the colors from your heightmap and drop them in the corresponding square on the palette.

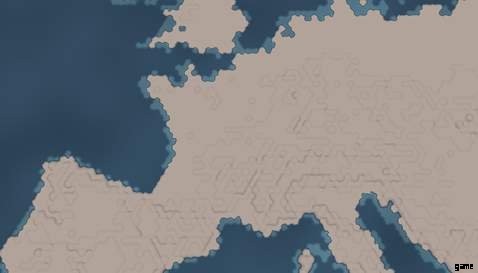
Once your two files are in the Documents/Humankind/Maps, launch the editor and click on the “Import button”. The import interface is divided in two:
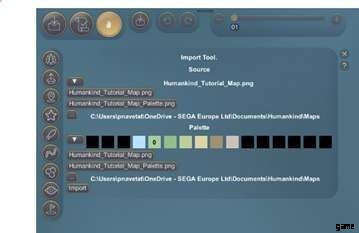
In the “Source” area, select your heighmap. In this example, this is the Humankind_Tutorial_Map.PNG file.
In the “Palette” area, select your palette. In this example, this is the Humankind_Tutorial_Map_Palete.PNG file.
Click on Import to complete the process. Your map should be showing in the viewport, time to customize it and make it playable!
Constraints
Basic constraints:
- All the strategic resources must be placed.
- Luxe resources must be placed.
- Natural wonders must be placed.
Gameplay constraints:
- Every player must have a starting point in every version of the map.
Territories must follow these constraints:
- Not too big, not too small (roughly 50 tiles for a Continent Territory). Ocean territories can be bigger than continents.
- Must be flagged as a continent or as an ocean.
- Only one global Ocean allowed, one Earth territory allowed.
- All “reachable” tiles (not mountains/wonder/water/ water/some POI) in a territory must be reachable from any other reachable tile without having to exit the territory. For example:a territory cut in two parts, separated par water is not a valid territory.
All territories with islands must be “Ocean” territories.
- Ocean Natural Wonders must be placed in the Ocean.
- Ocean POI must be placed in the Ocean.
- Natural Wonders shouldn’t be cut or partly erased.
- No underwater river.
Aesthetics constraints:
- A natural wonder should be placed on a flat surface.
- Avoid 3-level high cliffs, as it blocks visibility.
- Rivers must start from a terrain and end up in a lake or in the sea.
Placing Starting Points
You will need to place starting points in your map to be able to play it.
For example, if you want your map to be playable up to 3 players/civilizations, you will need to place starting points like this:
- Place the starting point #1 for the 1-player version.
- Place the starting point #1 and #2 for the 2-player version.
- Place the starting point #1, #2 and #3 for the 3-player version.
To do so in the editor, first click on “Starting Points”. The first row is the version of the map, the second row counts the number of Starting Points you placed:

Green =Good, Red =Bad.
So, click on the “1” button for the “1-player version” of the map, then middle-click in your map to define the starting point. After that, click on the “2” button for the “2-player version” of the map, then middle-click in your map to define first starting point and a second time for the second starting point, etc.
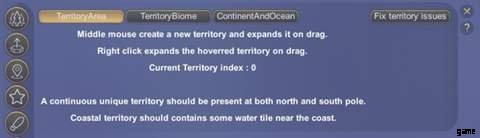
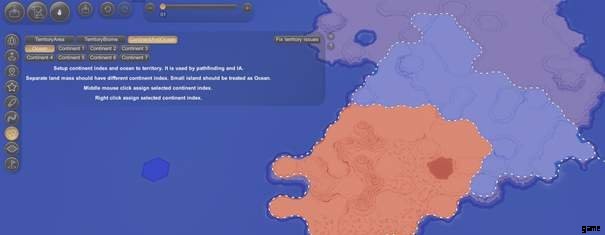
Adding Territories
To add territories, we recommend you to zoom out to have the aerial view of the map.
Adding territory is done in three steps:
- Creating each territory’s area.
- Defining each territory’s biome.
- Indicating, for each territory, if it is a “Continent” or an “Ocean” territory.
You will need to define territories for the entire map, and these territories must not be too small or too big.
Click on the “Territory” button, then, when you are in the “TerritoryArea” map, you can draw territories on your map by clicking on the middle mouse button. Every time you click, you create a new territory, which has a different color.
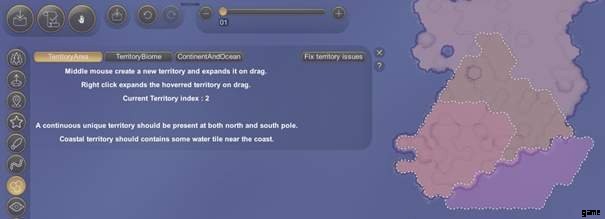
You can expand a territory by right-clicking in your territory, maintaining the click and dragging your mouse where you want to expand it.
The index of the current selected territory displayed in the tab:
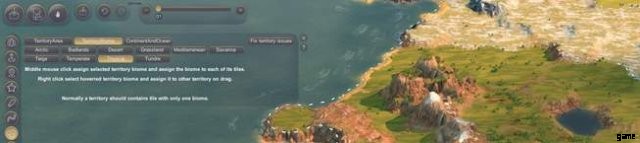
To determine which biome applies to each territory, zoom in back to a closer view of your map. Click on the “TerritoryBiome” tab, then select a biome and middle click on the territory you wish to apply this biome to.
To define the territory type (Continent or Ocean), zoom-out to have a global view of your map, select the “ContinentAndOcean” tab, then select the territory type (Ocean, or Continent) and middle-click on the territory to define its type.
Validating Your Map
To validate your map, click on the “Validate” button on the top of the interface.
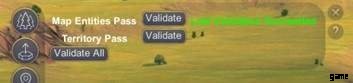
- Map Entities Pass validates that all the Starting Points are correctly set.
- Territory Pass validates that all Territories are correctly set, in terms of size, accessibility and type.
Note:the error message concerning territories is sometimes misleading, saying that “One of the Ocean territories contains more continent than water”, when it’s the opposite (a Continent containing too much water). It will be fixed soon.
The rules are simple:
- An Ocean territory must contain at least 50% of water tiles.
- A Continent territory must contain at least 50% of continent tiles.
- A Continent territory should be roughly 50-tiles big.
Bekannte Probleme
We have identified some issues with this early version of the editor. We will improve the tool following its release.
- The “Close the editor” button closes the game too.
- The “W” and “X” shortcuts are hard to use on a QWERTY keyboard, they will be replaced by other shortcuts in a future version.
- The “Visibility” tool will fully useable later.
- The “Landmark” tool has a UI bug when typing the name of the landmark.