Volt ist eines von Warframes drei Startcharaktere, die die Kraft der Elektrizität nutzen, um Feinde aufzulösen und seine Verbündeten zu stärken. Von den Startern ist Volt wohl der vielseitigste der Gruppe. Er rennt schnell, verursacht soliden Schaden und kann sein Team mit Überschilden und elektrischen Barrieren unterstützen.
Mit dieser Macht geht ein großer Kompromiss einher. Volt ist wohl der am schwierigsten zu startende Warframe, für den man am Anfang einen Build erstellen kann, und erfordert viele High-Level-Mods, um sein volles Potenzial auszuschöpfen. Aber wenn Sie bereit sind, in diesen Charakter zu investieren, werden Sie mit einem der vielseitigsten Charaktere von Warframe belohnt. Hier ist eine vollständige Anleitung zum Erstellen und Verwenden von Volt in Warframe.
Wie man Volt herstellt

Volt ist einer von drei Starter-Warframes, die während der „Erwachen“-Quest verfügbar sind. Wenn Sie Volt nicht als Ihren Starter ausgewählt haben, können Sie seine Komponenten aus dem Tenno-Labor eines beliebigen Clan-Dojos replizieren. Treten Sie einem entwickelten Clan bei, stellen Sie einen Dojo-Schlüssel aus Ihrer Gießerei her und besuchen Sie dann die Tenno-Labore.
Volt-Blaupause
| Drop Source | Tenno Lab (35.000 Credits) |
|---|---|
| Herstellungskosten |
|
| Herstellungszeit | 72 Stunden |
Volt-Neuroptik
| Drop Source | Tenno Lab (15.000 Credits) |
|---|---|
| Herstellungskosten |
|
| Herstellungszeit | 12 Stunden |
Volt-Chassis
| Drop Source | Tenno Lab (15.000 Credits) |
|---|---|
| Herstellungskosten |
|
| Herstellungszeit | 12 Stunden |
Volt-Systeme
| Drop Source | Tenno Lab (15.000 Credits) |
|---|---|
| Herstellungskosten |
|
| Herstellungszeit | 12 Stunden |
Zurück zu Quicklinks
Wie man Volt Prime herstellt

Prime Warframes sind etwas stärkere Versionen ihrer Nicht-Prime-Pendants mit einem anderen Aussehen. Wenn du ein neuer Spieler bist, konzentriere dich zuerst darauf, den Standard-Volt-Warframe zu bekommen.
Die Komponenten von Volt Prime können von bestimmten Void-Relikten gedroppt werden. Zum Zeitpunkt des Schreibens ist Volt Prime derzeit gewölbt, wodurch seine Void-Relikte im normalen Spielverlauf nicht erhältlich sind. Zuvor verdiente Volt-Prime-Relikte und -Komponenten können weiterhin zwischen Spielern gehandelt werden.
Wann immer Volt Prime entwölbt ist, besuchen Sie Maroos Basar, um Void-Relikte von Volt Prime für Aya zu kaufen. Unvaulting-Events rotieren monatlich. Besuchen Sie unseren Prime Resurgence-Leitfaden für weitere Informationen darüber, wie der Unvaulting-Prozess funktioniert.
Volt-Prime-Blaupause
| Drop Source |
|
|---|---|
| Herstellungskosten |
|
| Herstellungszeit | 72 Stunden |
Volt-Prime-Neuroptik
| Drop Source |
|
|---|---|
| Herstellungskosten |
|
| Herstellungszeit | 12 Stunden |
Volt-Prime-Chassis
| Drop Source |
|
|---|---|
| Herstellungskosten |
|
| Herstellungszeit | 12 Stunden |
Volt-Prime-Systeme
| Drop Source |
|
|---|---|
| Herstellungskosten |
|
| Herstellungszeit | 12 Stunden |
Zurück zu Quicklinks
Volt-Fähigkeiten

Statistiken
| Volt | Volt Prime |
|---|---|
|
|
Passiv

Passiv: Geerdete Bewegung erzeugt eine elektrische Ladung, die 10 Schaden pro Meter aufbaut, der beim nächsten Angriff entfesselt wird.
Für jeden Meter, den Volt zurücklegt, erhält dein nächster Angriff einen zusätzlichen Elektrizitätsschaden von +10. Dieser Bonusschaden ist auf +1.000 Elektrizitätsschaden begrenzt. Nur kritische Werte können diesen Bonusschaden beeinflussen; Warframe-Fähigkeits-Buffs, Fähigkeitsstärke und Waffen-Mods (einschließlich Elementar-Mods) werden nicht beeinflussen diese zusätzliche Schadensquelle.
Es ist erwähnenswert, dass der zusätzliche Elektrizitätsschaden auf alle wirkt Gegenstände, die Schaden verursachen, sogar Angelspeere. Das macht Volt zu einem fantastischen Warframe zum Angeln in Open-World-Kachelsets, mit dem Sie jeden Fisch sofort fangen können, ohne die Speere wechseln zu müssen.
Schock

Schock: Schieße ein Voltaic-Projektil ab, das seine Ziele betäubt und beschädigt. Eine elektrische Kette erstreckt sich vom Ziel, um Gegner in der Nähe zu schocken.
Diese Fähigkeit kann mit dem Helminth-System kombiniert werden.
| Schockstatistiken | |||
|---|---|---|---|
| Entleeren | 15 Energie | ||
| Bereich | 15 Meter | ||
| Ketten | Bis zu 5 Feinde | ||
| Schaden | 200 Strom | ||
| Anwendbare Mods | |||
| Dauer | Bereich | Effizienz | Stärke |
| N/A | Beeinflusst die Zauberreichweite | Beeinflusst die gewirkten Energiekosten | Beeinflusst den verursachten Schaden |
Volt entfesselt Kettenblitze aus seinen Fingerspitzen und trifft jeden auf deinem Cursor. Bis zu fünf Ziele in der Nähe können von Schocks Kettenblitzeffekt getroffen werden und erleiden vollen Schaden durch die Fähigkeit. Das Wirken von Schock ist eine einhändige Aktion, mit der Sie Ihre Waffen abfeuern oder mitten im Wirken nachladen können. Die Anzahl der Ketten kann nicht modifiziert werden.
Schock skaliert gut mit Fähigkeitsstärke und Reichweite. Stärke erhöht den Schaden der Elektrizität, und die Spezifikation für Reichweite wird den Abstand der Kettenglieder zwischen den Zielen drastisch erhöhen. Dies ist eine leistungsstarke, kostengünstige Fähigkeit zum Töten von Gruppen in Low-Tier-Inhalten. Sobald Sie sich mit schwierigeren Inhalten beschäftigen, wird empfohlen, dass Sie entweder das Shock Trooper-Augment (später vorgestellt) verwenden oder Shock durch eine andere Fähigkeit des Helminth-Systems ersetzen.
Geschwindigkeit

Geschwindigkeit: Verkörpern Sie einen elektrischen Strom. Volt und seine Verbündeten erhalten einen kurzen Bewegungsgeschwindigkeitsschub und einen Nachladegeschwindigkeitsbuff.
| Geschwindigkeitsstatistiken | |||
|---|---|---|---|
| Entleeren | 25 Energie | ||
| Bereich | 25 Meter | ||
| Dauer | 12 Sekunden | ||
| Buffs | Bewegungsgeschwindigkeit: 1,75x | ||
| Nahkampfangriffsgeschwindigkeit: +75 % | |||
| Nachladegeschwindigkeit: 25 % | |||
| Anwendbare Mods | |||
| Dauer | Bereich | Effizienz | Stärke |
| Beeinflusst die Dauer der Geschwindigkeit | Beeinflusst den Wurfradius | Beeinflusst die gewirkten Energiekosten | Beeinflusst die Buff-Stärke |
Geschwindigkeit erfüllt Volt und alle Verbündeten in der Nähe für die nächsten 12 Sekunden mit Elektrizität. Während du gebufft bist, bewegst du dich 75 % schneller, lädst 25 % schneller nach und schwingst deine Nahkampfwaffe 75 % schneller. Die Erhöhung der Bewegungsgeschwindigkeit ist mit anderen Quellen multiplikativ und verleiht Volts Mobilität einen drastischen Buff. Die Buffs der Nachladegeschwindigkeit und der Nahkampf-Schwunggeschwindigkeit addieren sich mit ihren jeweiligen Mod-Typen.
Geschwindigkeit skaliert am besten mit Fähigkeitsdauer und -stärke. Dauer verbessert die ansonsten kurze Betriebszeit der Fähigkeit, und Stärke erhöht die Bewegungsgeschwindigkeit und die Nahkampf-Schwinggeschwindigkeitsverbesserungen, die durch Geschwindigkeit bereitgestellt werden, drastisch. Diese Fähigkeit ist fantastisch für Speedrunning-Missionen, das Durchqueren von Kacheln in der offenen Welt und das Polieren von schlagkräftigen Nahkampfwaffen, die ansonsten einen schlechten Angriffsgeschwindigkeitswert haben.
Elektrischer Schild

Elektrischer Schild: Volt setzt einen elektrischen Schild ein, der Projektile blockiert.
| Elektrische Schildstatistiken | |||
|---|---|---|---|
| Entleeren | 50 Energie | ||
| Dauer | 25 Sekunden | ||
| Zusätzlicher Schaden | +50% Electricity (base damage, stacks per shield) | ||
| 200% Critical Multiplier (multiplicative, doesn't stack with multiple shields) | |||
| Applicable Mods | |||
| Duration | Range | Efficiency | Strength |
| Affects the duration of the shield | N/A | Affects cast Energy cost | N/A |
Volt creates a 6x4 shield in front of himself that lasts for 25 seconds, absorbing all incoming damage while active. Hitscan and projectile attacks are absorbed by Volt's Electric Shield, making this a powerful defensive tool. You may shoot through the Electric Shield while it's up, and doing so infuses your projectiles with a 50% bonus Electricity damage and a doubled critical multiplier, both of which benefit from weapon mods but not Ability Strength. You may spawn up to six shields at a time, and stacking shields will grant the bonus Electricity damage multiple times. The critical multiplier buff does not stack with multiple shields.
Shock Synergy
Casting Shock through an Electric Shield will buff Shock's damage and infuse your shield with lightning. All hostiles that touch the shield will take damage equal to your Shock ability. You can increase this damage output further by charging Volt's passive before casting Shock.
At any time while the shield is active, Volt can interact with the shield to pick it up, turning it into a smaller riot shield. Holding the shield doesn't restrict your actions in any way and blocks all incoming frontal projectiles. Running into targets with a riot shield will cause them to ragdoll. You can only hold one shield this way at a time.
Since the buffs from your shield and its size are unaffected by mods, Electric Shield scales best with Ability Duration and Efficiency. As for its viability, Electric Shield is a fantastic ability for defending objectives and buffing your weapons. Every weapon is buffed from this shield, even weapons that aren't tied to your Warframe like turrets. Cast your shield whenever you have spare energy to maximize your damage and survivability.
Discharge

Discharge: Volt discharges the electricity that courses through him. The shockwave paralyzes and damages nearby enemies. Enemies on the edge of the shockwave are stunned.
| Discharge Stats | |||
|---|---|---|---|
| Drain | 100 Energy | ||
| Range | Cast: 20 meters | ||
| Discharge Arcs: 8 meters | |||
| Duration | Initial Wave: 4 seconds | ||
| Discharge Effect: 6 seconds | |||
| Damage | 1,200 Electricity per second | ||
| Applicable Mods | |||
| Duration | Range | Efficiency | Strength |
| Affects the duration of Discharge's debuff on targets | Affects the cast and discharge arc range | Affects cast Energy cost | Affects damage dealt |
A massive wave of electricity releases from Volt's body, expanding outward for the next four seconds. Every enemy hit by the wave will become discharged for the next six seconds, affected by Ability Duration. Discharged targets are stunned and release bolts of arcing electricity once every 0.5 seconds. Anyone caught near a discharged target will get hit, taking an immense amount of damage. This makes Discharge a devastating ability against tightly-packed groups of enemies.
Discharge benefits greatly from Strength, Range, and some Duration. Range allows you to tag far more enemies with the initial wave and chain the discharge lighting bolts further, killing entire hordes of enemies in a single cast. Paired with enough Strength and Range, entire hordes will drop from a single Discharge cast. This ability truly excels in activities with high enemy density, notably Steel Path and Sanctuary Onslaught. Bear in mind that Electricity damage isn't effective against armored targets, so consider replacing one of Volt's abilities with an armor-stripping ability to increase Discharge's damage output in high-level content.
Return to Quick Links
Volt Augments

Volt has six augments for players to use. Four of these augments may be purchased from the Arbiters of Hexis or Red Veil Syndicates, requiring 25,000 Standing each. The Recharge Barrier augment may be purchased from the Nightwave Cred Offerings store or obtained through PvP.
A sixth augment mod named Kinetic Collision also exists for Volt, but we've excluded it from this guide since it only works in PvP.
Shock Trooper

Shock Trooper: Shock Augment:Hold to cast will grant all allies within 15m an additional 100% Electricity Damage for their attacks for 40s.
Holding the Shock input will release a wave of energy around Volt. Both Volt and everyone near you will gain 100% of their damage as bonus Electricity damage for the next 40 seconds, the damage being affected by Ability Strength. Once you trigger Shock Trooper, the effect will remain until the duration ends, even if allies leave the 15-meter radius. This mod is affected by Ability Strength, Range, and Duration.
The bonus damage provided by Shock Trooper is additive with elemental damage mods. Treat Shock Trooper as an elemental mod that goes on your Warframe. The damage bonus merges with other elements as well, allowing you to change the damage profile of your weapons and Warframe abilities. For example, buffing an Ember with Shock Trooper will cause all of Ember's abilities to deal Radiation damage instead of Heat.
Shocking Speed

Shocking Speed: Speed Augment:Enemies touched while sprinting under the effects of Speed will take 175 Electricity damage with a guaranteed Status effect.
Running within three meters of a target will shock them, dealing 175 Electricity damage and inflicting the Electricity status. The damage triggers upon touching enemies, containers, or any environmental effects with health bars. You can increase the damage of this ability with Ability Strength mods, but you cannot enhance its effective range with Ability Range effects. All allies affected by Speed get the effects of Shocking Speed, not just Volt.
Transistor Shield
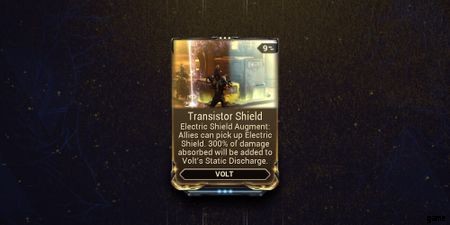
Transistor Shield: Electric Shield Augment:Allies can pick up Electric Shield. 300% of damage absorbed will be added to Volt's Static Discharge.
Allies can now grab Volt's Electric Shields, following the same mechanics and restrictions as Volt. Allies may only grab one shield at a time. Allies that absorb damage this way will charge Volt's passive equal to 300% of the damage prevented. You still cannot exceed the passive's cap of +1,000 Electricity damage through this augment. The damage conversion is affected by Ability Strength.
Recharge Barrier
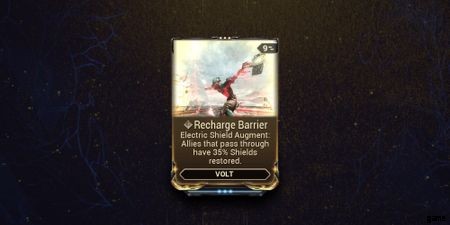
Recharge Barrier: Electric Shield Augment:Allies that pass through have 35% Shields restored.
Recharge Barrier grants 35% shields to anyone who runs through the shield, Volt included. This effect may only trigger once per cast , significantly reducing its effectiveness in PvE builds. The shield restore is affected by Ability Strength, although it cannot provide overshields.
Capacitance
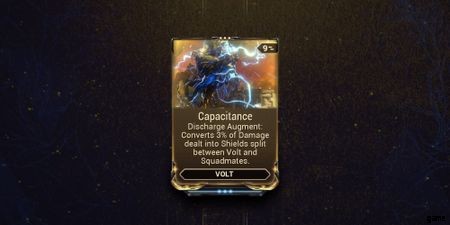
Capacitance: Discharge Augment:Converts 3% of Damage dealt into Shields split between Volt and squadmates.
Capacitance converts 3% of Discharge's damage into shields for Volt and his allies, capable of granting overshields. The conversion rate is unaffected by mods, but Ability Strength indirectly buffs it by increasing Discharge's damage output. So long as you deal enough damage, it's possible to maintain maximum overshields for yourself and your squad solely through this augment.
Return to Quick Links
Volt Builds

We'll be looking at five builds today that showcase Volt's excellent utility. Since Volt is a starter Warframe, our first two builds will have minimal investment to give newer players a good idea of what they should be aiming for. More niche builds are shown near the end of this section. Bear in mind that the first two builds use standard Volt; the rest of the builds showcase Volt Prime.
As for overall playstyle, Volt relies on Electric Shield and shield-gating to stay alive. You'll want to use the Capacitance augment if you're farming activities with hundreds of enemies. If you dislike Discharge for whatever reason, you can sustain your shields through Harrow's Condemn, Hildryn's Pillage, or by spamming your Electric Shield ability with Brief Respite and a few Augur mods. Sevagoth's Gloom is also a great option for melee-focused builds.
However, most players use Volt for speedrunning missions or hunting Eidolons, both of which aren't tough enough to make survivability a major concern. If you're using Volt to kill bosses, consider replacing Discharge with a damage ability like Rhino's Roar. For your Focus School (spoilers), use Zenurik. The passive Energy regeneration from Zenurik is fantastic for just about every Volt build.
Archon Shards
If you want to install Archon Shards on Volt, we recommend two yellow and three red shards . The two yellow shards should grant cast speed, making it much safer to cast Discharge. Your three red shards should give Ability Strength or Duration, your choice. None of the builds listed below use Archon Shards.
The Essentials (0 Forma, No Reactor)

- Forma: 0
- Subsume: None
This build should make Volt a solid pick for most of the Star Chart. We first get our hands on Steel Charge to increase our mod capacity by a whopping 18 points. You can purchase this aura mod from the Nightwave store. If it's not currently available, wait for the store to refresh. If you don't own Steel Charge, any aura works.
We use Vitality to increase Volt's survivability, upgrading the mod to R7. Continuity and Augur Message increase Volt's Ability Duration by 54%, giving you 18 seconds of Speed and Electric Shields that last for nearly 40 seconds. Intensify will enhance your Speed buffs and make your abilities hit harder. Stretch will help the overall consistency of your kit, and Streamline will make your abilities much cheaper. If you don't have Streamline, Flow is a great alternative.
All of these mods can be earned quite early in the Star Chart. If you're struggling to get a particular mod, feel free to ask for some spare mods in trade chat. The Warframe community is incredibly helpful and will typically give you copies of essential mods for free.
Return to Quick Links
Starter Builds (0 Forma, With Reactor)

- Forma: 0
- Subsume: None
This build expands on the essentials we showcased earlier, giving Volt a reliable way of getting his shields back while drastically improving his Energy economy. The first notable change is the removal of Vitality in place of Capacitance , an augment you can purchase from the Arbiters of Hexis or Red Veil Syndicates. If you can't get this mod, use Vitality or Redirection in its place. This mod will give you an absurd boost to your shields on every Discharge cast, allowing you to reach maximum overshields if you hit enough targets. It gives shields to your team too.
We also replace our aura with Energy Siphon , helping Volt's Energy economy until you can unlock the Zenurik Focus School. To further improve your Energy economy, we use the Fleeting Expertise mod at R4. This grants a whopping 50% Ability Efficiency with a -50% Duration drawback. We can mitigate this drawback with Continuity and Augur Message . Paired with Streamline , your Discharge ability will only cost 25 Energy, and your Speed buff only costs 6.25 Energy to cast.
To round out the build, we use Stretch and Augur Reach to increase the range of your abilities, drastically improving Discharge's consistency. The final slot uses Intensify to buff your damage output and the effects of Speed. Feel free to adjust the mods to suit your playstyle, and consider using any Primed mod variants if you have them.
Return to Quick Links
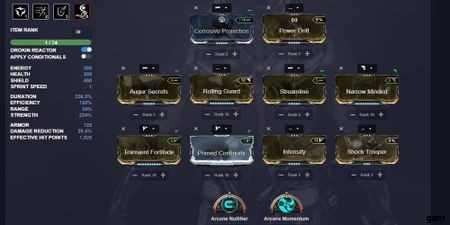
Discharge Volt (3 Forma, Fire Blast Subsume)

- Forma: 3 (D, –, – (Aura))
- Subsume: Fire Blast (Ember)
This build focuses on making Discharge as powerful as possible. Our goal is to maximize the ability's effective range and enhance its damage. We start by using Overextended, Archon Stretch, and Augur Reach to give Volt 265% Ability Range. This gives Discharge's arc lightning more than enough range to chain between targets, which is where most of this build's damage comes from.
To ensure the negative Strength from Overextended doesn't affect us as much, we use Transient Fortitude and Molt Augmented to reach 155% Ability Strength at maximum stacks. You gain an additional 20% Ability Strength from Zenurik's Hardened Wellspring ability as well, allowing you to reach 175% Ability Strength in modes like ESO without much hassle. We also use Capacitance to convert that damage into shields, increasing our survivability. If you'd prefer more Ability Strength, you can replace Capacitance with Augur Secrets . Any stronger Ability Strength mods will require an additional Forma.
For Ability Efficiency, we're using Streamline to reduce Energy costs, then we're pairing Primed Flow and Preparation zusammen. This mod combo forces you to spawn with 850 Energy at the start of every mission. For Sanctuary Onslaught, you'll spawn with max Energy for each wave. We then give ourselves some passive Energy regeneration through Archon Stretch and the Zenurik Focus School's Wellspring ability. In total, you'll regenerate seven Energy per second, removing the need to use Arcane Energize.
Since this build frequently casts Discharge, we recommend slotting two yellow Archon Shards into Volt, both of which should be set to cast speed. This should make the playstyle much more fluid. It's not required for the build to function but highly recommended.
To wrap up the build, we use Primed Continuity and Molt Efficiency to increase Discharge's duration, assisting our Energy economy. The damage of Discharge might not seem great thus far, but this is more than plenty for killing Corpus or Infested. Grineer will survive due to their armor, but we can fix that by using Corrosive Projection as our aura and by subsuming Ember's Fire Blast in place of Volt's Shock ability. Fire Blast removes 75% of a target's armor across a radius that's larger than Discharge. Corrosive Projection removes another 18%, totaling 94% armor reduction. That should make Discharge capable of killing ESO Grineer targets.
The playstyle of this build is incredibly simple:cast Fire Blast, then cast Discharge . Reposition while Discharge is active, refresh Zenuirk's Wellspring ability, then recast your abilities once Discharge ends. You should have enough Ability Efficiency and passive Energy regeneration to complete an entire ESO wave without needing many Energy Orbs. It's the perfect build for farming Focus in Sanctuary Onslaught or kills in general.
Return to Quick Links
Speedrunning Volt (3 Forma, Infested Mobility Subsume)

- Forma: 3 (D, –, – (Aura))
- Subsume: Infested Mobility (Helminth)
If you're looking to break the sound barrier, you've come to the right build. The goal of this build is to make Volt an absurdly fast Warframe that can farm Capture and Exterminate missions in a minute or less. Survivability and endurance runs aren't this build's strong suit.
We start by speccing into Ability Strength to increase the movement multiplier of Speed. Blind Rage and Augur Secrets will increase your Ability Strength to 233%, giving you a 112% movement speed bonus. You can increase this value further with Arcanes and stronger mods, but that will require another Forma and doesn't make a large difference. If you can get in the habit of using your Operator, Molt Vigor grants another 45% Ability Strength for free.
Duration is handy for minimizing recasting, so we opt for Augur Message and Primed Continuity to increase our Speed duration to 18 seconds. If you own Molt Efficiency , it's not a bad idea to run this Arcane for another 36% Ability Duration.
Efficiency is an issue due to Blind Rage, but we counteract this by using Streamline , Primed Flow , and Preparation. Preparation will start you with 850 Energy at the start of each mission, and Streamline will make your abilities slightly cheaper. This gives you a few minutes of Speed uptime, more than enough to complete most content.
To round off the build, we use Speed Boost and Rush to increase our sprint speed, and we use Primed Sure Footed to ignore knockdown effects. If you're trying to speedrun Steel Path content and need some survivability, install another Forma and replace either Rush or Augur Message for Rolling Guard (your choice). And for even more speed, we use Infested Mobility from the Helminth system (in place of Shock) to increase our sprint speed even further. This is overkill for narrow indoor tilesets, but this can come in handy in larger tilesets or open world zones.
Return to Quick Links
Eidolon Volt (3 Forma, Eclipse Subsume)
- Forma: 3 (D, –, – (Aura))
- Subsume: Eclipse (Mirage)
Using the same polarities as our previous builds, the goal with this setup is to tackle Eidolons and Profit Taker as Volt. It's not the most optimal setup—for that, you'll want to install Umbral mods and spec for more damage—but this should give you a respectable Volt setup for boss fights without breaking the bank.
Before we start, we highly recommend you replace Discharge with a damage ability, preferably Mirage's Eclipse or Rhino's Roar. Both abilities grant a massive damage increase for a moderate duration, allowing you to pop Eidolon limbs or Profit Taker's armor much faster.
You'll want to focus on Ability Strength and Duration for this build. We use Transient Fortitude, Intensify, and Power Drift to increase our Ability Strength to 223%. For Ability Duration, we opt for Narrow Minded (R10) and Primed Continuity. This will give you more than enough duration for most content. Run Streamline to make casting your abilities a little cheaper.
For optimal damage, we also run the Shock Trooper augment for Shock. This grants a massive Electricity damage bonus to our weapons, stacking with Eclipse/Roar and your Electric Shield. Paired with a good sniper, most bosses should melt in a couple of shots. Deploy your shield, activate your damage buffs, then fire away.
To round off the build, we use Corrosive Projection to reduce enemy armor, Rolling Guard for survivability—although feel free to replace Rolling Guard with something else—and Arcane Nullifier to become immune to the Magnetize status effect that's rampant in Eidolon and Profit Taker fights. The second Arcane slot is entirely up to you. We recommend Arcane Momentum to reload your sniper rifles much faster between boss phases.
Return to Quick Links