Die härteste Errungenschaft/Trophäe im Ubisoft-Portfolio, leicht gemacht.
Besiege das Spiel auf Expert Survivor
Bevor Sie fortfahren, STOPPEN Sie das Spiel, wenn Sie das Spiel im Schwierigkeitsgrad „Experte“ und im Überlebensmodus ohne Permadeath nicht abgeschlossen haben.
Du tust dir keinen Gefallen, wenn du stundenlanges Gameplay in Lauf für Lauf steckst und all deine Lektionen auf die harte Tour lernst. Selbst nachdem man Expert Survivor geschlagen hat, brauchen die meisten Leute mindestens mehrere Läufe auf Permadeath, bevor sie Survival Of The Fittest verdienen. Der Rest dieses Leitfadens gilt weiterhin, aber gehen Sie Ihrer Sorgfaltspflicht nach und genießen Sie es, zuerst "Top Of The Food Chain" zu werden.
Grundlegende Einstellungen
Neues Spiel starten
Dies sind die Einstellungen, die Sie zum Freischalten von Survival of the Fittest benötigen:
- Überlebensmodus:EIN
- Permadeath:EIN
- Spielschwierigkeit:Experte
Suchanimationen:AUS
Ohne dies werden Sie jedes Mal, wenn Sie eine Ressource aufheben, für eine einsekündige Animation anhalten. Erzwungene Animationen können töten. Sie sollten in der Lage sein, Ressourcen in einem vollen Sprint aufzunehmen.
Jäger-Sichtdauer:Unendlich
Sie werden Hunter Vision fast während des gesamten Spiels aktiv haben wollen.
Musik AUS
Raubtiere erscheinen nicht im Sichtfeld des Jägers, also hörst du sie, bevor du sie siehst.
Helligkeit (+)
Hell genug, dass Sie nachts sehen können.
Sie können auch mit Kontrast und Gamma spielen, um das Grauwerden von Hunter Vision auszugleichen.
Sichtfeldskalierung (~105)
Dies schützt vor Flanken, aber eine zu hohe Einstellung erzeugt einen Fishbowl-Effekt. Machen Sie so hoch wie Sie können, ohne krank zu werden oder Ihr Ziel zu verlieren. Für mich liegt der Sweetspot bei 105.
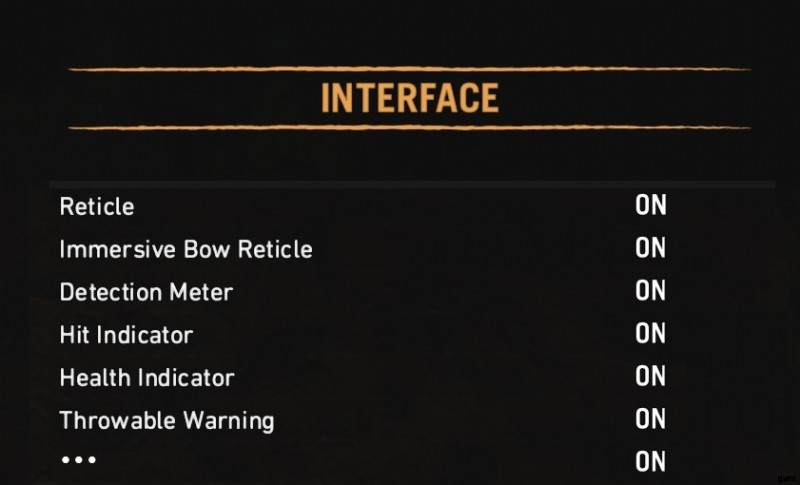
Schnittstellenoptionen alle EIN
Warum sollten Sie Ihre Informationen einschränken?
Einige davon sind von unschätzbarem Wert. Die einzigen, die ich überspringe, sind Tooltips / Tutorial-Updates (wenn Sie diese brauchen, lesen Sie die falsche Anleitung) und die Hockanzeige, die ich ablenkend finde.
Die Strategie
In groben Zügen besteht meine Strategie darin, das frühe Spiel mit so wenig Risiko wie möglich zu überstehen und direkt auf das Ziel zuzusteuern, einen Sabretooth zu zähmen. Sobald du einen Sabretooth an deiner Seite hast, wird das Spiel dramatisch fehlerverzeihender.
Von dort aus ist es eine Strategie, zuerst auf die wirkungsvollsten Fähigkeiten und Ausrüstungen mit minimal riskanten EP-Möglichkeiten abzuzielen, während die Story-Missionen vorangetrieben werden.
Die letzten beiden Missionen sollten Ull und Batari töten. Selbst voll ausgerüstet sind beides riskante Schlachten.
Das frühe Spiel überleben
Far Cry Primal wurde entwickelt, um mit einem Haustier gespielt zu werden. Bis du einen bekommst, bist du sehr, sehr matschig. Das erste Ziel ist es, den Weißen Wolf zu zähmen, ohne sich von all den Dingen ablenken zu lassen, die dich töten können. Regel Nr. 1 lautet also:Vermeiden Sie jede Begegnung, bis Sie diesen Wolf gezähmt haben.
Pfad nach Oros
Zum Glück ist der Prolog selbst nicht sehr tödlich. Tatsächlich ist es einer der sichersten Orte im Spiel, um Ressourcen zu sammeln. Nachdem Sie Ihr Lager aufgeschlagen und Ihre Keule hergestellt haben, kehren Sie in das Gebiet zurück, in dem Sie Ziegen gejagt haben, und Sie werden feststellen, dass es voller fügsamer Tapire ist. Stellen Sie sicher, dass Sie Ihre Ressourcen auffüllen, bevor Sie fortfahren.
Wenn Sie Saylas Spuren folgen, stellen Sie auch sicher, dass Sie bei jeder Gelegenheit nachforschen. Jede Untersuchungsstelle gibt Ihnen risikofreie XP.
Bevor Sie das Höhlensystem betreten, müssen Sie an drei Wölfen vorbeikommen. Erschrecke sie mit Feuer und gehe weiter. Die Jagd auf Wölfe wird viel einfacher, sobald Sie einen eigenen haben.
Tiefe Wunden
Es ist schwer zu unterschätzen, wie schwach Sie an diesem Punkt des Spiels sind. Irgendein fairer Kampf? Du verlierst. Du willst also weglaufen? Meist zu langsam. Die einzigen Optionen sind Deaktivierungen oder vollständige Vermeidung.
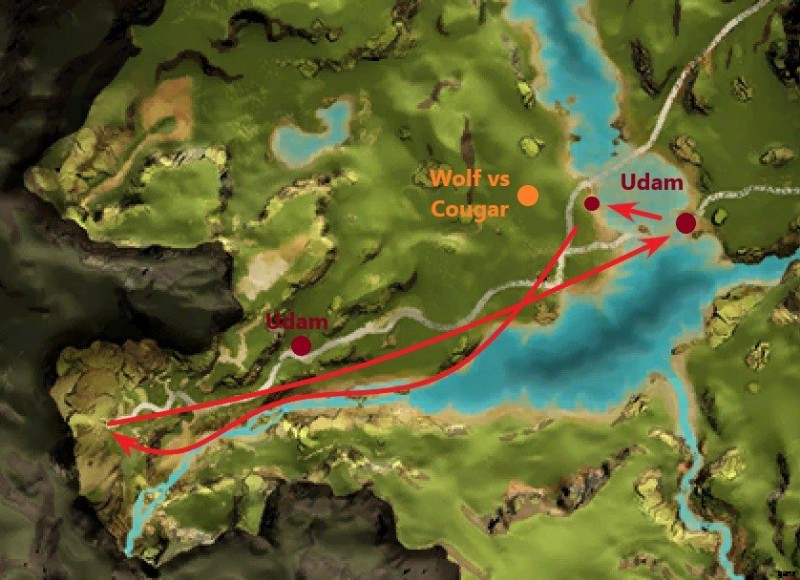
Folgen Sie dem Bach, der aus dem Dorf herauskommt, hinunter zum Fluss, wo Sie zwei Udam auf der anderen Seite und einen auf der linken Seite (der nahen Seite des Flusses) sehen. Gehen Sie zuerst zu den beiden auf der anderen Seite des Flusses. Nähern Sie sich schnell und schleichen Sie nur die letzten 20 Fuß oder so. Schalte zuerst den Udam auf der rechten Seite aus und dann sofort den anderen. Ernte die grünen Blätter und plündere die Leichen.
Es besteht die Möglichkeit, dass ein Körper ein grünes Blatt hat, in diesem Fall können Sie direkt ins Dorf zurückkehren. Andernfalls kreuzen Sie zurück zur Dorfseite des Flusses und nehmen Sie das Grüne Blatt hinter dem letzten Udam, ohne ihn zu töten. Weiter hinter ihm kämpft ein Jaguar mit einem Wolf, dem Sie ausweichen möchten.
Grüne Blätter in der Hand, gehe zurück zum Bach, der aus dem Dorf kommt. Gehen Sie nicht die Reben rechts hinauf, sonst kommen Sie mitten in drei Udams, die spazieren gehen. Gehen Sie weiter das Bachbett hinauf und klettern Sie die letzten Reben auf der linken Seite hinauf.
Tensay der Schamane
Zum ersten Mal haben Sie außerhalb von Missionen unbegrenzte Freiheit. Das ist eine schlechte Sache:kein Neuladen vom Checkpoint und Begegnungen sind zufällig.
Gehen Sie das Flussbett hinunter und folgen Sie Ihrer Questmarkierung zum Nakuti-Lagerfeuer. Die einzige wirkliche Bedrohung hier sind Wildschweine, Wenja-Ereignisse und die Möglichkeit eines wandernden Dhole. Widerstehe der Jagd auf Hirsche und Ziegen.
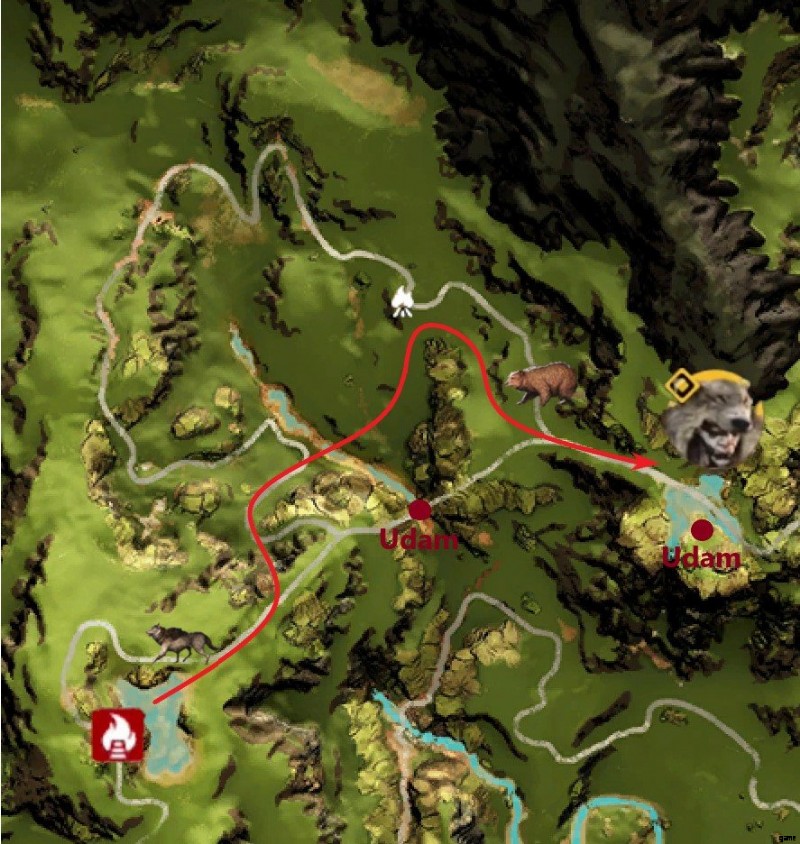
Nachdem Sie das Leuchtfeuer beansprucht haben, nutzen Sie den Aussichtspunkt, um nach einem umherstreifenden Wolf Ausschau zu halten. Wenn Sie dem Questmarker folgen, werden Sie über Prashrawas Geburt geführt, aber die Chancen stehen gut, dass drei Udam dort campen werden. Rutschen Sie stattdessen den Hügel nach links hinunter und überqueren Sie das darunter liegende Tal. Wenn Sie beginnen, die andere Seite zu erklimmen, halten Sie Ihre Ohren offen für einen Bären. Wenn es dich sieht, gleite zurück ins Tal und umkreise es auf der anderen Seite von Prashrawas Geburt.
Abgesehen davon ist das Rutschen von Hügeln super wichtig, besonders im frühen Spiel. Bis Sie sich die Fertigkeit „Für immer sprinten“ leisten können, ist dies oft die einzige Möglichkeit, Feinden davonzulaufen. Selbst dann besteht der einzige Ausweg aus einem Mammut- oder Nashornangriff darin, nach oben oder unten zu klettern, und normalerweise bleibt keine Zeit für „nach oben“.
Wenn Sie sich Tensays Höhle nähern, treffen Sie möglicherweise auf drei Udam, die an den Steinfingern lagern. Wenn sie nicht da sind, heben Sie die beiden Daysha-Hände in der Nähe auf, bevor Sie hineingehen. Achten Sie nach Vision of Beasts darauf, Tensays Höhle zu verlassen, da die drei Udam oder Bären möglicherweise erschienen sind. Die zweite Tensay-Mission im Nordwesten.
Herr der Bestien
Diese Mission besteht aus drei Teilen:Udam-Wolfsjäger, den Weißen Wolf zähmen und Udam jagen.
Der Umgang mit den drei Udam-Wolfsjägern ist Ihr erster echter unvermeidlicher Kampf. Sprinte nach rechts und kreise hinter ihnen herum. Sie müssen sich nicht schleichen, gehen Sie einfach nach oben und klettern Sie direkt über ihnen auf den Felsen. Der Trick besteht darin, zwischen den Aufnahmen schnell zu sein. Richten Sie den ersten aus und stellen Sie sicher, dass Sie einen sauberen Kopfschuss erhalten. Normalerweise dauert es eine Sekunde, bis sie erkennen, was passiert ist, was genug Zeit ist, um einen weiteren Schuss zu bekommen. Ich hebe meinen Speer für den Bogenschützen auf.
Danach gibt es eine kurze Wanderung, um Ihren Weißen Wolf zu zähmen, und Sie haben endlich die Leibwache, die Sie brauchen, um kleine Scharmützel zu überleben.
Marsa-Höhle
Jetzt, wo du ein Haustier hast, ist es an der Zeit, es aufzurüsten.
Fast travel back to the village and upgrade Tensay’s hut. DO NOT also build Sayla’s hut, until you are ready to trigger the Attack Of The Udam mission. First, we need to visit magical Marsa Cave, so named because three rare beasts spawn there.
When you visit Marsa Cave, you will encounter one of the following (each variant has equal probability of 20%):
- 1 Black Jaguar;
- 1 Stripe Wolf + 2 gray wolves;
- 1 Black Lion;
- 1 Brown Bear;
- 3 Udam – one armed with a club, one with spears and the 3rd one with poison bombs (in an early stage of the game you shouldn’t mess with the last one if you’re not 100% sure that you’ll get an arrow to the head of a moving target in a split second;).
The technique to find all animals at that location is … when you see something you no longer need, save and quit to menu, then reload the game and travel back to the cave from nearest discovered/conquered resting point.
That’s 3 rare and 2 common animals to tame just in the cave. There are also Jaguars by Roaring Falls Bonfire and Cave Lions that lurk near the entrance to Marsa Cave, for a total of 7 tamable animals.
Taming Beasts
A couple tips on taming beasts. I’d argue the most useful thing about having a pet is their ability to scare off wildlife. Animals can generally scare off other animals of their tier or lower, with those tiers being:
- Tier 1 – Dhole, Wolf, Jaguar, Leopard
- Tier 2 – Cave Lion, Brown Bear
- Tier 3 – Sabretooth, Cave Bear
- Tier 4 – Badger (Mammoth, Rhino)
With your White Wolf, taming the rest of the Tier 1 animals is fairly easy. Just be careful of hit-and-run tactics of Jaguars and Leopards. Taming a Cave Lion, on the other hand, is a whole other story. If it locks onto you, flaming arrows or your pet attacking won’t stop it. It can climb onto elevation. You might be able to kill it with a spear to the head, but that doesn’t help taming. Your best defense is actually your bait. Also worth noting that Brown Bear, Cave Bear, and Sabretooth all require half-health before tamable, which is difficult if they aren’t scared by your pet.
The strategy, then, is to try to get the drop on a Cave Lion and tame it before it kills you. Use the Cave Lion to protect you while you tame a Brown Bear (or the Rare Black Lion at Marsa). But how are you supposed to tame a Sabretooth? Answers lie at the lucky Bone Cave. For now, keep farming the Bone Cave until you have at least a Cave Lion. Then we’re back to the village.
But one other word of warning, as long as we’re here…
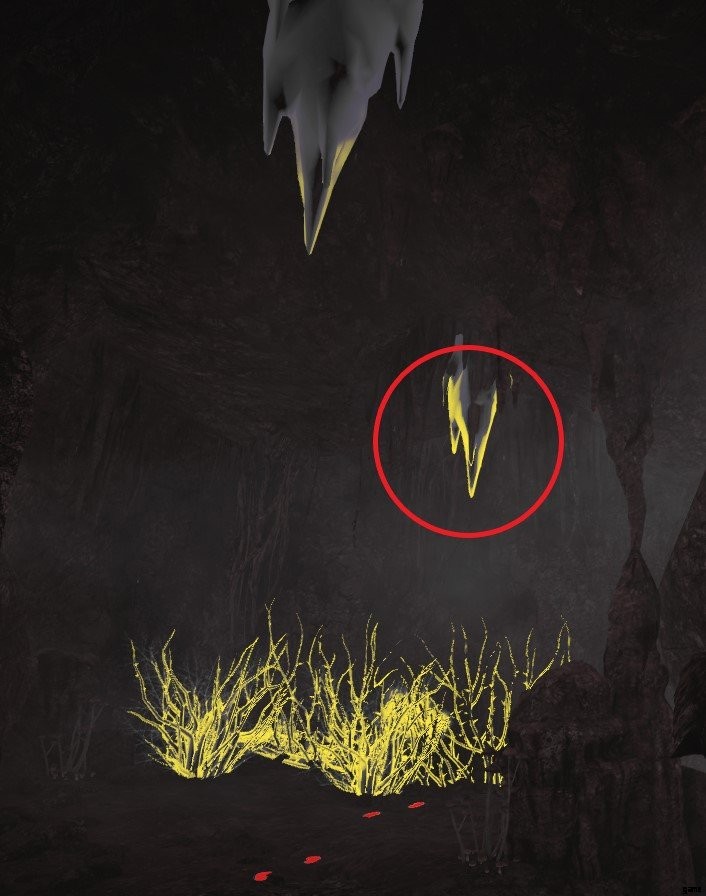
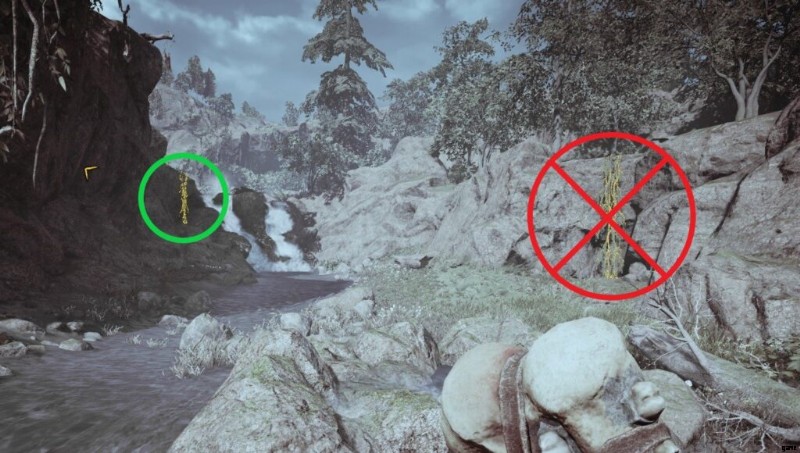
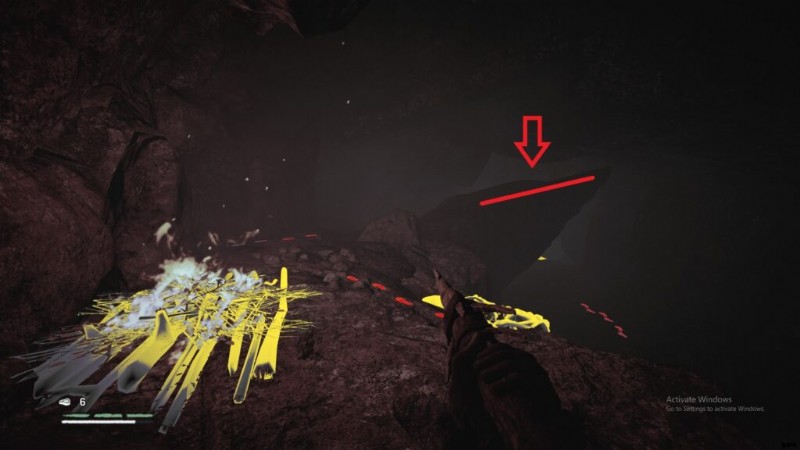
The cave painting at Marsa Cave is a trap. When you light the vines on fire to clear them, the flames run up the wall to the roots in the ceiling and catch the stalactite right above you. In about ten seconds it’ll come crashing down right where you’re standing. So back up!
You’re welcome.
Attack of the Udam
A Choice
I recommend you tame every beast, upgrade all your equipment, and unlock every skill you can before progressing the main quest. I prefer to advance to the Bone Cave, where you have an opportunity to safely tame a sabretooth. With a sabretooth at your side, the rest of game is easier and waaaay safer.
Attack of the Udam:defending the village
Time to prepare for a battle. Top off your meat and weapon stores, summon your best pet (hopefully the Rare Black Lion), and lock in any skill points. I recommend both ‘Extra Health I’ and ‘Sprint Heal’. Once you’re ready, upgrade Sayla’s hut and follow the prompts.
The strategy is to not be a hero and let your pet and Wenja allies do the heavy lifting while you support with spears and arrows. When you do melee, it should be to revive your pet or peal off Warriors who are pinning down your ranged Wenja. Look for safe Takedown opportunities, where a Udam turns his back to you, either because he ran past you or is attacking a Wenja on the front line. If anything starts going sideways, remember:this is a mission. You can reload from last checkpoint anytime.
You start with 3 Wenja archers and 2 Spears.
There are 19 Udam that come in four waves:
- 1st Wave I (front):4 Warriors, 3 Archers
- 2nd Wave II (cave):3 Warriors, 1 Archer, 1 Spear, 1 Scourge (poison bomber)
- 3rd Wave III (front):2 Warriors, 2 Spear, 1 Scourge
- 4th Wave IV (cave):1 Scourge
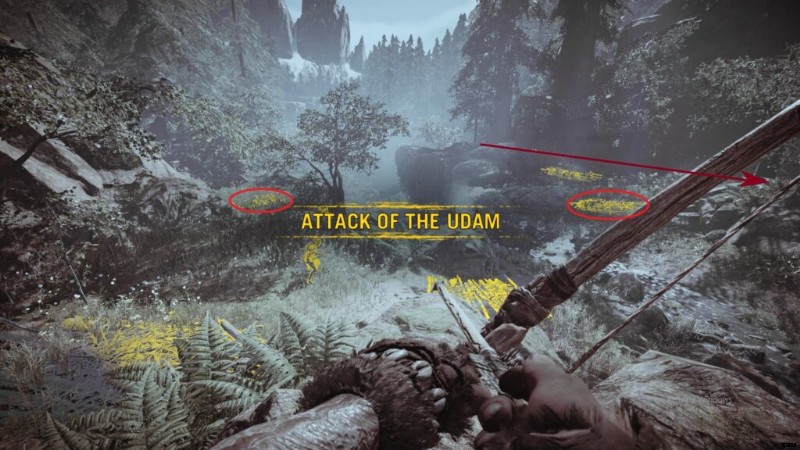
1st Wave
Right away, light these two barricades on fire. The right one will divert the first wave into a kill zone up to the right, while the left one will help with the third wave. You can light all on fire if the third wave is giving you trouble. This is a chaotic melee, with the Udam hitting almost all at once, so take care not to get drawn into a cluster. When there are only 2 Udam remaining, you will hear a war horn signaling the next wave is on its way from the cavern entrance.
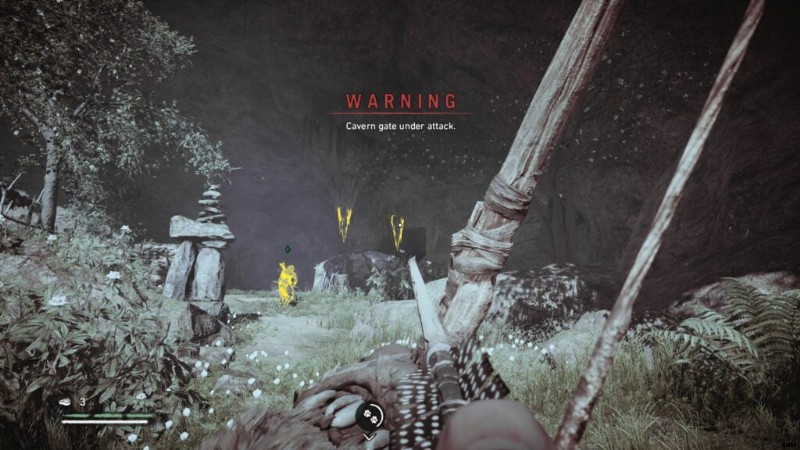
2nd Wave
The Udam will spawn in three sets of two:2 Warriors, Archer/Spear, then Warrior/Scourge. The temptation is to lead out with the stalactite overhanging the barrier for an easy double-kill, but because the last set doesn’t spawn until the barrier is down, doing so will prematurely trigger the third wave. Instead, wait for them to break down the barrier and charge. Use stalactites to kill Udam lingering in the cave, and hit the Scourge with your pet once it spawns. When there are only two left, the third wave will trigger.
3rd Wave
Udam will spawn all over the front part of the village, and if you lit all of the fire barricades, a few will be boxed in. Because they are so scattered, this wave is perfect for mopping up with Takedowns and your pet. As always, when there are only two left, the final wave with trigger.
4th Wave
A single Scourge spawns from the cavern entrance. Take your time.
Attack of the Udam:the Udam camp
Once the Udam attack is repelled, Sayla tells you to go take the fight to their camp. Keep a low profile and avoid random skirmishes or wildlife.
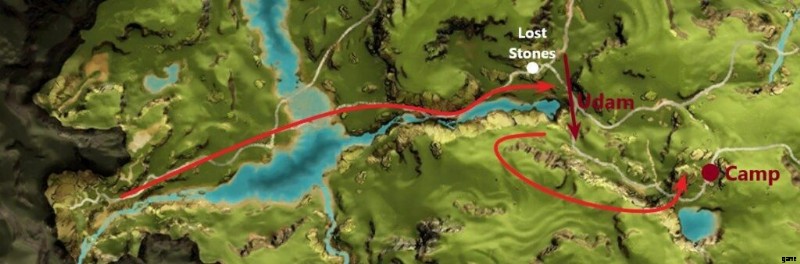
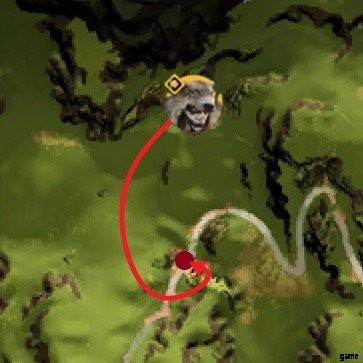
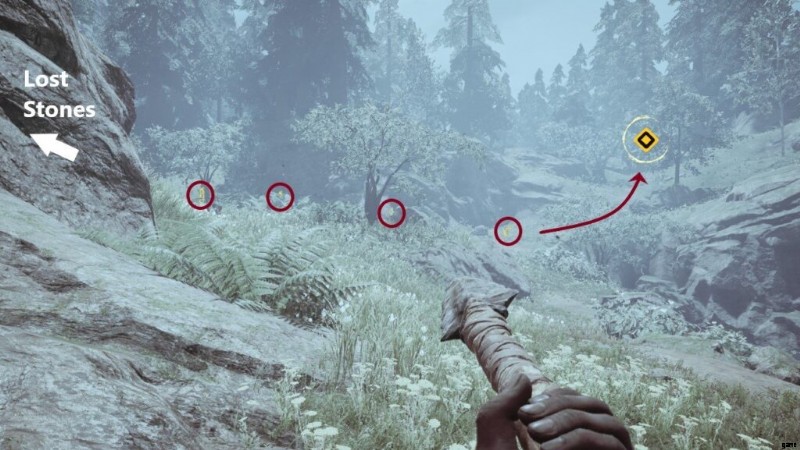
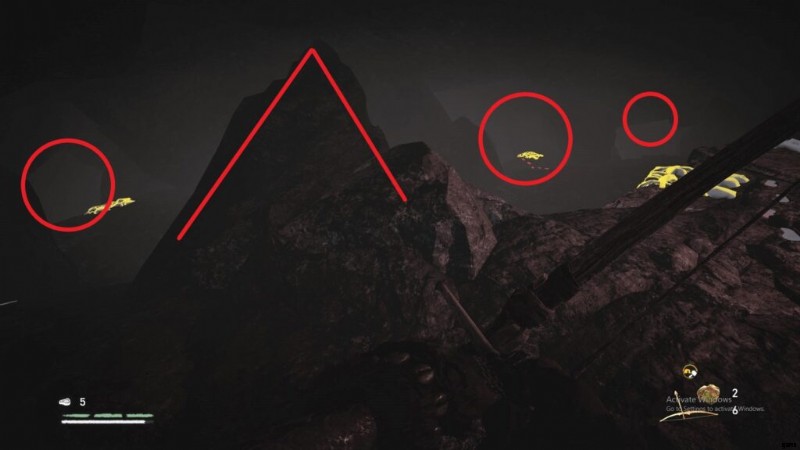
As you round the bend at the Lost Stones, you will see four Udam running away in single-file, heading for their camp. When you first encounter them, they will be too far ahead to stop, but if you reload from the last checkpoint, you can catch them. Send your pet to attack the first in line to slow them down, then sprint behind the last and Takedown them one at a time.
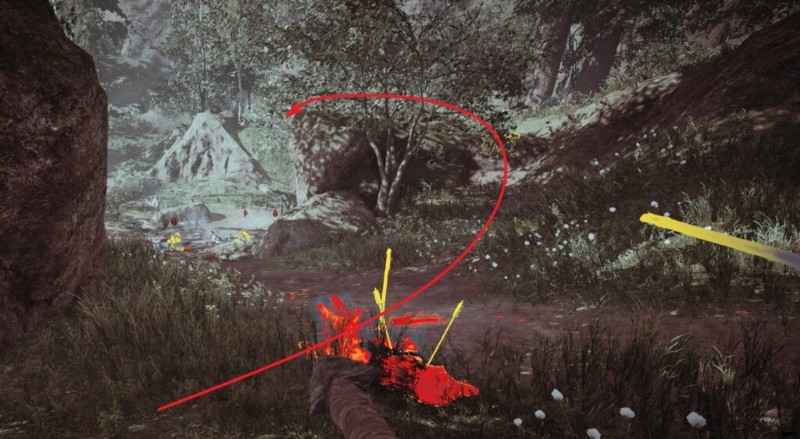
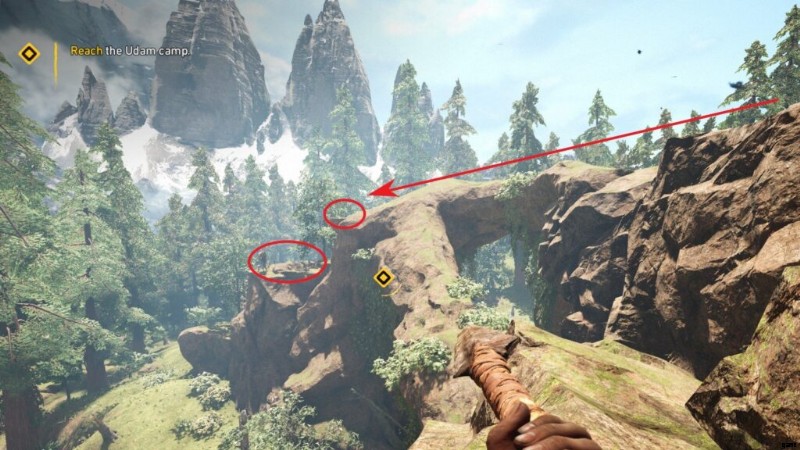
Up the hill to your right is a ridge. Circle all the way back to get on top of it (you’ll get a warning that you are leaving the mission zone). This will let you enter the camp from a perfect sniping position. If you succeeded at the Lost Stones, there should only be four Udam left to deal with, and the first one is served up on the middle ledge below you. Pick them off one at a time from this ledge, and if they notice you, climb the vine to the higher platform or hide in the bushes to finish them off.
Each bone tree will spawn 3 Udam, but the first will also summon 4 Wenja to join you. Stay back and let your pet and the Wenja mop them up, one wave at a time. Once it’s done, you will travel back to the village to plan your next move.
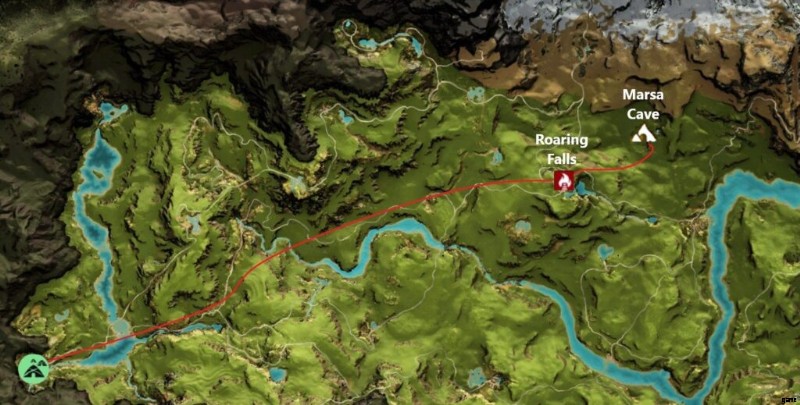
The Bone Cave
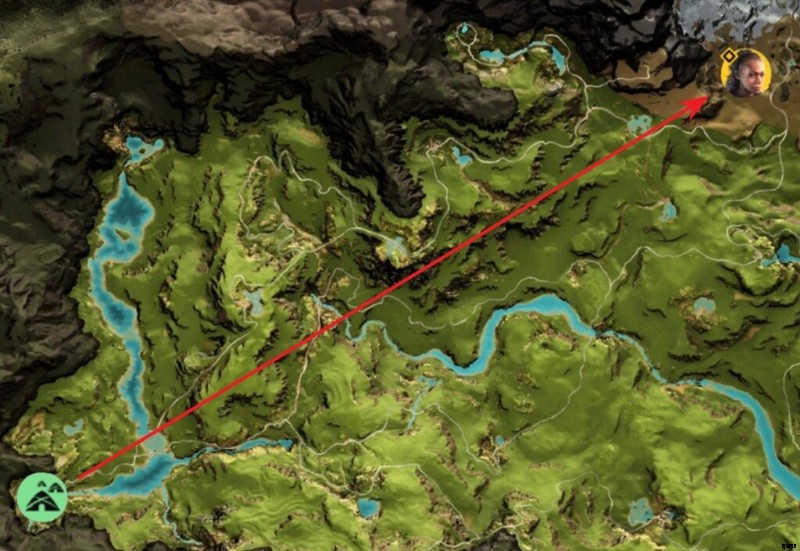
Speak with Tensay to complete Vision of Ice, then speak with Sayla to trigger The Bone Cave mission in the north. Go there, and be ready to tame a sabretooth.
There are two Cave Lions to deal with in the first large chamber of the cave. Bring a Cave Lion or Brown Bear to deal with one, and be ready to kill (or tame) the other.
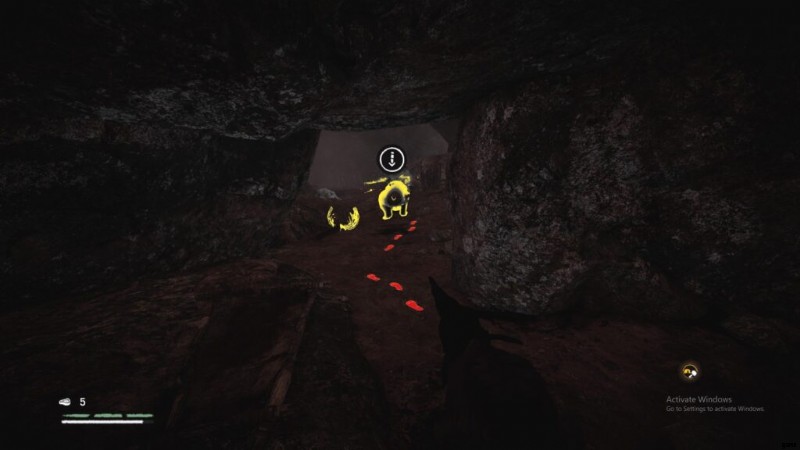
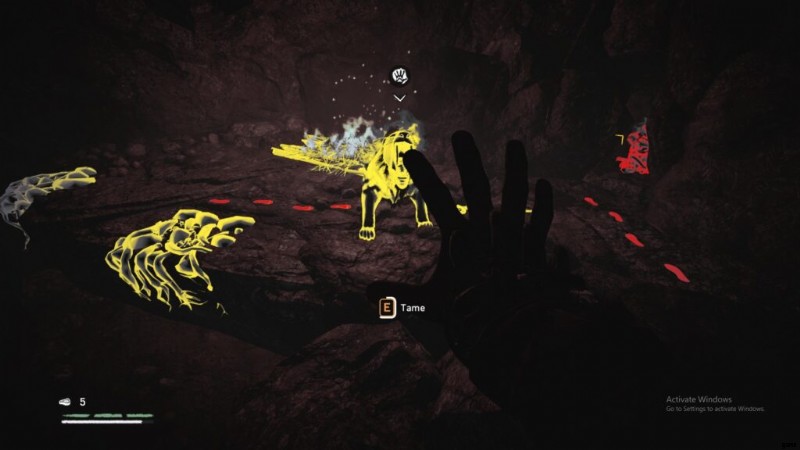
Once they’re dispatched, keep climbing up until you reach the back of the cave, where a wounded Wenja is hiding in a narrow gap in the rock. Before talking to him, turn around and scout the platform. There is a ‘V’-shaped outcropping the rises up to the ceiling. Walk as far up as you can go, and you will be safe and out of reach. Go back, talk to the Wenja, move back to safety, and wait.
Another Cave Lion and your future best-friend Sabretooth will come into view. You can ignore the Cave Lion for now, and focus on bringing the Sabretooth down to half health. Sei geduldig. You can lure both cats into view by backing down to the main platform. Keep all three entrances to the cavern in view so you know when to run back up to the “safe” zone.
The Sabretooth usually notices you much faster than the Cave Lion, which is helpful in pealing him off. Once you’ve stuck him with 2-3 spears or flaming arrow headshots, throw bait on the platform right outside the “safe” zone, so that the Cave Lion doesn’t get to you while taming.
If any part of the plan goes sideways, remember you can always restart the quest. If you accidentally kill the Sabretooth, restart the quest. If you run out of arrows, restart the quest. If you take a hit from any of the cats, restart the quest (a second hit will kill you). If you’re patient, you will eventually be rewarded with a bodyguard that can take you through the end of the game.
Surviving the Middle Game
W.I.P.
Cheating
Primal is a AAA game, but it’s not perfect. I’ve had Bloodfang vanish permanently, and died from a myriad of glitches ranging from true technical issues to poor game design. I’ve died from grappling hook failure, melee auto-aim launch me over a cliff, once in the middle of a field from nothing, a stalactite that didn’t stun Ull, etc., etc. If any of that would ruin your enjoyment of the game, consider these alternatives:
- Restart a Mission. A surprising amount of a playthrough is going on missions. While on a mission, you can restart or load the last checkpoint at any point. You can, for example, restart any time you break stealth or take damage (most enemies take two hits to kill you). You can choreograph every move until you can play the mission perfectly, as long as you’re quick on the ‘Escape’ key. To my mind, this is squarely fair game, as it’s how the developers made it.
- Save and Quit. Also fair game. As long as you aren’t taking damage, you can usually quit and reload normally. For example, when a herd of Rhinos are inches away from trampling you to death, or a moment before hitting the ground in a fall.
- Force Quit. During combat, you can still hit ‘Esc’, and force quit the game through the task manager. Sometimes you can quickly Alt-Tab as Tekkar is falling dead and still force quit with your game intact. I consider all of this cheating. But when the game actually glitches, like a tamed Bloodfang just disappearing permanently out of nowhere, for myself I’m okay doing this.
- Copy Your Save Files. There are a number of guides about how to do this, including the link below. Basically, you opt out of cloud-based saves and copy the save files somewhere safe. This is the only way to resurrect a game after the death screen. On one hand, this effectively negates the Permadeath setting. On the other, Primal is pretty glitchy game for an AAA title. Choice is yours.