Lernen Sie die Grundlagen des traditionellen Roguelike-Survival und jeder Anfang kann gewinnen.
Leitfaden für Taktiken
Vorwort
Dies ist ein Taktikleitfaden für Rogue Fable III, der Ihnen helfen soll, eine Mentalität zu entwickeln, um dieses und andere traditionelle Roguelikes zu spielen und dabei jeden Trick im Buch anzuwenden, um unfaire Kämpfe in faire Kämpfe zu verwandeln. Dies ist insbesondere kein Strategieleitfaden oder Bauleitfaden. Es wird dir nicht sagen, wie du eine bestimmte Rasse oder Klasse spielen sollst. Dieses Zeug ist relativ selbsterklärend und macht tatsächlich Spaß, es selbst herauszufinden – dieser Leitfaden konzentriert sich auf die „unsichtbaren“ Aspekte des Spielens eines Roguelikes – Möglichkeiten, Feinde aufzuteilen oder ihre Fähigkeit zu neutralisieren, Sie mit Angriffen zu bewerfen, die Sie könnten nicht einmal daran gedacht und das wird das Spiel nie andeuten.
Es wird allgemein gesagt, dass jeder Seed in Rogue Fable III gewonnen werden kann, dass es keine Situationen gibt, die nicht zu gewinnen sind, außer die, die man für sich selbst schafft – und obwohl ich nicht weiß, wer der beste RF3-Spieler ist, weiß ich, dass es der beste Nethack-Winstreak aller Zeiten ist ist 61 und der beste Dungeon Crawl Stone Soup Winstreak aller Zeiten ist 62. Sie betrügen nicht, sondern spielen nur mit der höchstmöglichen Vorsicht, Risikoaversion und Turn-by-Turn-Optimierung. Mit nur einem Bruchteil dieser Disziplin können Sie Ihren eigenen Gewinn erzielen.
Ihre Ziele für dieses Spiel sollten sein, zuerst zu gewinnen, dann mit jeder Klasse zu gewinnen, dann eine Siegesserie von 3 zu erreichen, dann eine Siegesserie von 3 für die tägliche Herausforderung zu erreichen. Danach können Sie sich als RF3-Meister betrachten und Sie sollten erwägen, das, was Sie gelernt haben, zu anderen traditionellen Roguelikes mitzunehmen! Fangen wir an.
Regel 0
Regel 0 taktischer Roguelikes lautet:„Standardmäßig ist es ein Fehler, auf einen Feind zuzugehen“. Lassen Sie uns verschiedene Situationen und Taktiken untersuchen, in denen diese Regel gilt, und auch die Ausnahmen, in denen dies nicht der Fall ist.
- Triff den ersten Treffer: Es ist geringfügig, aber neue Spieler des Genres denken vielleicht nicht daran – wenn Sie neben einen Nahkampfgegner treten, wird er Sie zuerst treffen. Aber wenn Sie stillhalten, tritt der Feind neben Sie und Sie erhalten den ersten Treffer. Versuchen Sie auf ähnliche Weise, den ersten Treffer auch bei Fernkampfgegnern zu landen.
- Spähen in die Ecke: Wenn Sie einen Fernkampf-Feind mehrere Kacheln von sich entfernt entdecken, wird er mehrere Treffer einstecken müssen, wenn Sie auf ihn zugehen, aber die Sichtlinie (im Folgenden LoS) unterbrechen, indem Sie um eine feste Mauer oder eine Schusslinie (im Folgenden LoF) treten, indem Sie hinter einen treten Hindernisse werden es zwingen, zu Ihnen zu kommen.


Beachten Sie jedoch, dass kitende Feinde schlau genug sind, sich zum am weitesten entfernten Feld zu bewegen, von dem aus sie auf Sie schießen können, sodass nicht alle Ecken gleich gut funktionieren.) (Beachten Sie auch, dass einige Effekte nur LoS und nicht LoF erfordern. LoS ist asymmetrisch , und der Goblin-Sturmmagier könnte mich sehen und eine Sturmkugel hierher beschwören!

- LoS-Edge-Kiten: Wenn Sie einen Feind aus maximaler Entfernung angreifen (erfordert ein „???“ und kein „?“ – versuchen Sie, genau 7 Kacheln orthogonal oder eine Diagonale von 6,3 entfernt zu sein) und dann weglaufen, beginnt er jede Runde nicht im Spiel deine LoS und muss auf dich zukommen. Auf diese Weise können Sie sogar Bogenschützen in günstiges Gelände kiten – stellen Sie einfach sicher, dass das Level-Layout es Ihnen ermöglicht, sie jederzeit fernzuhalten, beachten Sie, dass Diagonalen Sie „weiter“ wegbringen als orthogonale Bewegungen, und haben Sie einen Plan, um mit minimalem Schaden in Reichweite zu kommen genommen, wenn Sie mit dem Kiten fertig sind. (Außerdem haben viele Fernkampfeinheiten eine maximale Reichweite von weniger als 7,5 – standardmäßig haben Elementare/Statuen 7, Bogenschützen 5 und Magier 4! Dadurch können Sie sogar Kacheln in LoS zum Kiten verwenden.)

- Diagonaltauchen: Da LoS und Reichweiten in RF3 Kreise sind, können Sie sich Feinden schneller nähern/zurückziehen, wenn Sie einen diagonalen Weg nehmen. Im Speziellen; Wenn Sie sich einem Feind orthogonal nähern, wird er für 7 Kacheln in LoS und für 7 Kacheln in Erkennungsreichweite gebracht (oder 6, wenn Sie die Annäherung 1 oder 2 Kacheln höher beginnen); wohingegen eine Diagonale es für 5 Kacheln in LoS und nur für 4 Kacheln in Erkennungsreichweite bringt.
- Engpässe: Je mehr Feinde Sie auf einmal in Schusslinie bringen, desto schlechter ist Ihre Position. Eine feindliche Gruppe anzustürmen ist eine gute Möglichkeit, sie umzingeln und beschimpfen zu lassen. Wenn Sie sich in eine Ecke oder einen Kachelkorridor zurückziehen, wird die Oberfläche begrenzt und Sie können sie einzeln bearbeiten.
- Fürchte das Unbekannte: Bis Sie etwas anderes wissen, sollten Sie davon ausgehen, dass jede unerforschte Kachel voller Feinde ist. Wenn Sie sich zurückziehen oder Feinde anlocken, ziehen Sie sie näher an die Treppe oder nützliches Terrain – laufen Sie nicht in unerforschtes Gebiet und bringen Sie möglicherweise mehr Feinde in den Kampf. Beachten Sie auch, dass, während der Feind andere Feinde innerhalb von 6 Feldern um den Schreier angreift, jeder Feind, der mehr als 10,5 Felder von Ihnen entfernt ist, auf diese Weise nicht angegriffen werden kann und Schreie außerhalb Ihrer LoS auf 3 Felder halbiert werden. Indem ich diesen ersten Goblin-Sturmmagier angreife und ihn aus meiner LoS heraus und auf mich zubewege, ist sein anderer Goblin-Sturmmagier-Freund kaum 3 Kacheln von seinem ersten Schrei entfernt und wird nie bemerkt! Das ist Pack Splitting (Shout Dampening Variant).

- Säulentanz: Wenn Sie vor einem Feind davonlaufen müssen und keinen Platz mehr haben möchten, können Sie eine einzelne Kachelsäule oder eine geschlossene Schleife verwenden. Da Sie und der Feind sich mit derselben Geschwindigkeit bewegen, wird der Feind niemals einholen, und Sie können Ressourcen/Abklingzeiten nach Belieben regenerieren. Beispielsweise sollte ein Krieger niemals stillhalten und einen Nahkämpfer im Nahkampf angreifen, sondern sich stattdessen zurückziehen, wenn „Schilde hoch“ auf Abklingzeit ist. Wenn der Feind jedoch Fernkämpfer ist, müssen Sie eine einzelne Kachelsäule verwenden. Wenn der Gegner die ganze Zeit außerhalb von LoS ist, können Sie den Gegner als Bonus zusätzlich de-aggronieren. Beachten Sie auch, dass Feinde Ihnen in die andere Richtung folgen, wenn Sie die 50%-Marke einer geschlossenen Schleife überschreiten, sodass Sie möglicherweise flankiert werden. (aber du könntest das absichtlich benutzen…?)
- Stairdance: Wenn Sie die Treppe nehmen, vergeht eine Runde, in der Feinde handeln können, und nach dieser Runde wechseln Sie zwischen den Ebenen. Feinde, die sich jetzt neben Ihnen befinden, werden Ihnen folgen (nehmen Sie also die Treppe, wenn sie eine Kachel entfernt sind, wenn möglich); Alle zurückgelassenen Feinde werden deaggroisieren und an Ort und Stelle warten, ohne dass Zeit vergangen ist. Sie regenerieren nicht einmal HP oder tragen Statuseffekte/Wolken ab! Daher gibt es drei Hauptmodi des Stairdancing:„Spähen“, wo Sie die Treppe hinaufgehen, um alle Ressourcen zu regenerieren, dann zurückkehren und weiter kämpfen; „Pulling“, bei dem Sie feindliche Rudel aufteilen, indem Sie sie einzeln oder zu mehreren auf eine andere Ebene ziehen; "Parken", wo Sie ein Monster, gegen das Sie jetzt nicht kämpfen möchten, auf eine gelöschte Ebene bewegen, es juken und es irgendwo deaggroisieren, wo Sie es bis später ignorieren können. (TODO:Was bewirkt ein Sturz in eine Grube? Wenn es sicher ist, können Sie es als Alternative zur Treppe verwenden)
- Verwenden Sie günstiges Gelände: Während Sie Feinde von der Stelle weglocken, an der Sie sie gefunden haben, ziehen Sie in Betracht, sie zu vorteilhaften Geländemerkmalen zu locken:Instabiles Gelände verursacht, dass physische Angriffe den 1,5-fachen Schaden verursachen und wiederholt verwendet werden können. Brennbare Gegenstände können einem Feuerangriff AoE-Schaden hinzufügen. Wasser- und Schockschilf wirken ähnlich für Blitze (und vergessen Sie nicht, dass sie auch instabil sind!). Wolken können LoS blockieren und verhindern, dass Feinde Sie sehen, aber Sie können sie sehen (und Wasser kann verwendet werden, um Ihre eigenen zu machen!). Feuerpilze und andere zerstörbare Gegenstände werden schmerzhaft explodieren. Brunnen können dir mitten im Kampf Ressourcen geben. Gruben töten einen eingeschlagenen Feind sofort und geben einen Fluchtweg. Säulen, Ecken und Schleifen können LoS brechen oder Ihnen Rückzugsmöglichkeiten geben. Feinde berücksichtigen bei der Auswahl von Zügen niemals gefährliches Gelände!

- Chumpblocking: Feinde blockieren die LoF der anderen. Ein weniger furchterregender Feind kann also einen furchterregenderen Feind daran hindern, auf Sie zu schießen. Sie können es sogar absichtlich manövrieren oder am Leben erhalten. Wenn Sie einen Nahkampffeind zwischen sich und einem Fernkampffeind halten, können Sie den Fernkampffeind unbegrenzt herumdrachen! Nichts hindert Sie daran, als Chumpblocker eine Ratte durch das ganze Spiel zu kiten, aber das könnte zu albern sein. (Außerdem bewegen sich Ratten manchmal zufällig, also sei vorsichtig.) Außerdem schießen Chumpblocker-Bogenschützen manchmal auf den Chumpblocker, aber ich weiß nicht, wie ich ihn auslösen soll.

- Pack-Splitting (De-Aggro-Käse-Variante): Wenn Sie einen Feind in der maximal möglichen Entfernung von Ihnen angreifen (7 Kacheln orthogonal entfernt) und ihn dann 20 Runden hintereinander aus Ihrer LoS fernhalten, wird er de-aggro (er verschwindet von der Karte und der Minikarte). werden alle anderen Feinde seinen Schrei auch angreifen. An diesem Punkt hören sie auf, sich zu bewegen und halten still, und je nachdem, wie sich das Rudel ausbreitet, sind sie beide viel weiter von unerforschten Gebieten entfernt (können sicher bekämpft werden, wenn man weiß, dass keine weiteren Verstärkungen kommen) und weniger Rudel werden angegriffen im Kampf.
Ausnahmen zu Regel 0
- Ich bekomme diese Fernkampfeinheit nicht näher: Wenn das Gelände einfach nicht günstig ist oder Sie bereits in einer schlechten Position sind, können Sie gezwungen sein, sich ihm zu nähern. Ebenen mit weiten offenen Bereichen und dem Fehlen echter Wände können dies verursachen. Besonders wenn sich die Einheit „intelligent“ verhält und sich zum am weitesten entfernten Kachel in Ihrer LoS bewegt, hat sie eine Mindestreichweite von 3 – sich ihr zu nähern, wenn keine anderen Feinde in der Nähe sind, kann sie harmlos machen.
- Immobile Einheiten: Spawner, Statuen und Schwimmer können einfach nicht auf den Teil des Levels Ihrer Wahl gekitet werden. Wenn Sie sie lieber töten als ignorieren möchten, müssen Sie sich ihnen möglicherweise nähern. Möglicherweise möchten Sie zuerst die umliegenden Teile des Levels räumen, um Ihre Optionen zu verbessern.
- Schnelle Feinde, langsame Spieler: Wenn sich der Feind schneller bewegt als Sie, können Sie nur begrenzt kiten. Finden Sie heraus, was die günstigste Position ist, die Sie rechtzeitig erreichen können. Wenn Sie langsamer sind UND es sich um einen schießenden Feind handelt, gibt es möglicherweise kein besseres Spiel, als sofort einzugreifen. (Umgekehrt, immer wenn du schneller als eine feindliche Einheit bist – wenn es ein Meleer ist, kannst du unendlich viele freie Züge bekommen, ohne Ressourcen zu verbrauchen!)
Die Roguelike-Mentalität
Das Ziel, einen traditionellen Roguelike zu spielen, besteht nicht darin, den besten und stärksten Charakter aller Zeiten zu machen oder eine Spielstil-Fantasie zu erfüllen oder schließlich zu gewinnen, indem man nur lange genug spielt. Das Ziel ist zu gewinnen, und zwar so oft wie möglich. Es gibt keine Bonuspunkte dafür, dass man in eine gefährliche Situation gerät und knapp überlebt – nur die Chance, dass man sich verrechnet und neu anfangen muss. Es gibt keinen Druck, schnell zu denken oder zu spielen – das Spiel ist rundenbasiert. Es gibt keine Belohnung für den Sieg, ohne all Ihre Verbrauchsmaterialien zu verwenden oder auf bestimmte Strategien zu verzichten – außer für Herausforderungsläufe, wenn das Spiel zu einfach wird. Diese Grundsätze führen zu folgenden Faustregeln:
- Verbrauchsmaterialien frühzeitig verwenden: Some consumables are designed as panic buttons (like the potion of healing) – others may have greater use if employed before the tide of the battle turns against you. A potion of power boosts your DPS, but you can’t later decide you wanted to use it at the start of the fight. A well timed javelin or wand may kill a troublesome enemy before it can snowball out of control. A wand of blades zap may relieve pressure and give you several free turns when you can make them most count. Usw. As a result, the skill of risk assessment, determining how hard a fight will be before you begin it, is an important one to cultivate. But even more to the point, ‘this is the end of the game, I won’t ever have another chance to use them’, or ‘this is a boss fight, it’s going to be hard’ are also simple and useful pattern recognition heuristics.
- Use Consumables Often: Rogue Fable 3 is a short game – it can be beaten in 2 hours playing at a typical pace. There’s not that much game for you to save consumables for, and no consolation price for dying with a potion of healing still in your backpack. Use them or lose them.
- Risk Assessment: RF3 has a useful feature – you can mouse over each enemy and see the maximum possible damage they can deal. This lets you, for example, calculate the worst possible case scenario for a turn, as long as you also take into account surprises (hazardous terrain, damage shields, the 1.5x damage multiplier for being constricted, etc). How many turns you’ll die in if you sit still and do nothing is an important metric to always be aware of – if you’re going to die right now, you need to stop and think of what your highest probability out is. If you’re going to die in two turns, it’s now your job to play smartly and use consumables so you don’t fall into the previous category. Even dying in three or more turns is a situation to take seriously. And you should always play more conservatively than how much damage you can take implies; you may not instantly be able to bail yourself out, you may have missed an interaction or non-damage effect an enemy can do, and given that this is a game where a damageless run is possible, you should take any and all opportunities to minimize how much damage your run takes.
- Cool and Level Headed: You’re not in a hurry, this is a turn based game. More to the point, the emotional state you’re in might influence your decisions. Being mad, salty, sleepy or loopy are signs that you need to take a step back from the game before you take an ill-advised move that could end your run. The moments where you feel the strongest emotions are when you should try the hardest to remain analytical and objective – but you also have to play the rest of the game carefully too, so you don’t sleepwalk from an easy encounter into an unwinnable one. Figure out what mental strategies work best to maintain self-discipline, and always play to win.
- Learn and Remember: RF3, like other traditional roguelikes, is a game full of mechanics, interactions and threats. If you don’t know how something works, and it might mean the difference between life and death in a future run, endeavour to figure it out and write it down. If a fight went poorly, but you knew what you should have done better, write it down so you can do it next time. Your future self will thank you. Also don’t feel afraid to ask in the official Discord Server – we’re all here to learn from each other.
- Food is a Resource, but so is Hunger: You don’t have to eat foot when your hunger is at 3/20 or less – technically you can wait until you’re about to die from starvation damage, but I tend to wait until the starvation damage starts then eat it. On the other hand, you get more food than you need to beat RF3, and you can buy even more from the Merchant, so you don’t be stringy with it – the lower your hunger is, the more you should value food as a very useful consumable. It’s an instant half heal of HP, MP and SP, and if you end the game with food still in your inventory, then you could have used more. Plus, if you feel safer taking a full rest or retreating to use an earlier fountain you skipped than pushing on with depleted resource meters, that’s a choice you can make, and the better you are at avoiding HP loss, the more options you have on how to spend your hunger and food.
Speed is King
It’s a common refrain on the Discord server that the proper way to build most characters is to get 1 dex for your first SP, then enough stat for all of your talent unlocks, then dex for the rest of the game. But why would you not want to keep pumping str or int forever? There are valid reasons to do so (more DPS is great, more survivability is great) but dex offers a power unmatched by anything else in the game; free movement that regenerates very quickly. Let’s explore all of the things you can spend an SP to get.
- +1 Range: You can instantly move one tile closer to an enemy and shoot it or melee it. This effectively increases the range of all of your attacks and abilities by 1. (It doesn’t truly do so, since at the same time you’re moving into range of that enemy and any other enemies around. But if you’re ready to finish the fight after starting it, then it lets you skip one turn of enemy attacks.) Plus, moves with a ‘minimum’ range (like charge and fireball) can now be used from melee if you spend an SP first.
- -1 LoS: When retreating from a monster, either to stop it from attacking you or to get it to forget you entirely, spending an SP saves you from one turn’s worth of attacks, or makes it go from completely impossible to possible.
- Dodging Hazards:Several things an enemy do can be completely nullified by spending an SP or two – thrown bombs, ice bombs, smite, a melee enemy being uncomfortably close to you, et cetera. You’re effectively spending an SP to avoid tanking a lot of damage.
- Mistake Erasing: In a roguelike, spending a turn doing something unproductive or that you could have foreseen is one of the worst mistakes you can make. Whenever you’re on the wrong tile by accident (maybe you woke up a storm mage while standing in water, or you can’t quite get your perfect fireball lined up, or you REALLY REALLY need to be next to that fountain/on that stairs to use it) you can spend an SP to fix your mistake then go back to what you were really wanting to do, attack and use abilities.
- Monster Aggro Avoiding: Several forms. if you accidentally step into a ‘???’ monster’s detection radius and can’t leave it in one turn, you can spend SP to guarantee 100% it won’t wake up. If you DO wake it up ‘!!!’, then using all your SP before it is able to shout for the first time on its next turn can be used to very effectively split that monster from the rest of its group (since any monster more than 10.5 tiles from you stops being able to aggro from shouts, AND if it ends its move outside of your LoS its shouts only reach 3 tiles, not 6!). Finally, you might just run enough to move an aggro enemy out of your LoS. Kite it for 20 turns, and it’ll forget about you and you can try again in a more favourable position.
- SP Regen Surfing: You regenerate 1 SP every 10th turn (e.g. T in the bottom left corner =10, 20, 30…) no matter your SP max. This is both why the first SP point is the most important, and means that if you have control over when you use your first SP in a fight, use it just before it regenerates, not jsut after.
The only question is, when to spend your SP? An argument could be made for spending at least your first SP very early (so it can regenerate), but beyond that, they should of course be spent whenever they reduce the expected amount of damage (or need to use consumables to avoid lethal damage) in the remainder of the fight, which is a matter purely of calculation and experience. Whether you use them to aggressively explode enemies, to kite enemies in a dance or save them for an emergency is a playstyle distinction and up to you to cultivate. The fact that it’s powerful like Haste or Swiftness in Dungeon Crawl Stone Soup but even more so since you can choose when it fires off and is a renewable resource is hardly a surprise.
Miscellaneous Noteworthy Mechanics
This section is specifically for things that are less fundamental, and more specific to the way RF3 works.
- Zigzagging: If you move one or more tiles before ending your turn (normal move, speed points move, I believe abilities work too) and an enemy tries to attack you with a basic projectile, there is a 20% chance that it will target the square that you were last on. This means that all other things being equal, you should move/spend SP at an angle towards, away from enemies or instead of passing a turn, to take 20% less damage on average.
- Smoke Bomb Abuse: First off, the clouds it makes block LoS – even if it’s only for 2 turns. Second, it aggros the enemy while putting it to sleep – so if you sleep bomb an enemy and walk 10.5 tiles away, it’ll aggro and follow you without any of its enemies being able to hear shouts and follow. Third, a deep sleep only ends upon taking damage or the duration ending – so you can take an enemy completely out of a fight by chain smoke bombing it. You can smoke bomb an enemy to get ‘free SP’ by reposition while it sleeps, you can smoke bomb and run away, you can smoke bomb an enemy to block a corridor, et cetera.
- Ally Tanking: Allies are traditionally OP in traditional roguelikes, but in RF3 they’re even better, because whether an enemy prefers to target an ally or you is deterministic! If the ally is closer, the ally takes priority; if you’re both equally close, then it depends on a directional priority. (In order around the enemy it’s W, N, S, E, NW, SW, NE, SE. There’s a pattern for range 2 and beyond if you want to find it yourself. Confused enemies use the same logic.) (A few known exceptions:If you or an ally zigzags then enemy or ally projectiles might accidentally hit you, you can incidentally be hit by AoEs and hazardous terrain still, and whip pulls always target you. (TODO:Some other abilities might still be buggy and always target you, too?)). Popping a flaming battle sphere or a wand of blades can give you an instant effective HP boost. As another tactic, you can summon an ally, then run away, and let the ally fight for you – due to the 10.5 tile aggro limit for shouts, this can be another way to split large fights into smaller ones.
- Cloud Abuse: Clouds can be made by using fire over water, using Smoke Bomb, and certain natural features create it too. Clouds can be moved and shot through, but cannot be seen through. While enemies are always aware of your location, they are not permitted to shoot you without LoS – but you CAN shoot THEM. By using clouds you can create a safe retreat or get a very large number of free turns. It also encourages kiting enemies to get closer to you if they can’t see any way to stand and shoot you from a distance.
- Shoutless: Because monsters only start shouting once they take turns while aggroed, and only have a 50% chance to shout when they die, if you kill a monster before it becomes aggro, you only have a 50% chance of alerting nearby enemies. Remember, attacks don’t make noise, only monsters do!
- Levitation Abuse: If you have levitation from Shroud of Wind 2 or the ring, then you can hover OVER hazardous terrain (pits, lava, water, bones…) and everyone who wants to approach you has to step on it and take the penalty. Or, even better, you can just fly PAST the pit and non-flying enemies can’t even pursue you! This can give you a huge advantage especially against melee enemies.
- Wandering Monsters: Monsters are normally generated stationary, but occasionally are generated asleep or wandering instead. Wandering monsters move in a straight line until they hit a wall (note that being obstructed by another enemy doesn’t count) or roll a 5% chance, then pick another straight line. You can’t tell if a monster is wandering or stationary until you see it move unaggroed.
- Kiting Flag: Ranged attacking monsters generally have the kiting flag. This makes them move into your LoS at the furthest away tile they can shoot you from, and sometimes (25%) back up when 3 or less tiles away from you. You can expect anything that can shoot an arrow or bomb or elemental attack or use priest spells to have it.
- Reflective: Enemies listed as ‘Reflective’ actually have 75% reflection. So, what’s actually reflected? It’s the actual projectile itself. Edge cases include:Lightning Bolt can’t be reflected since the entire thing is an AoE. Fireball and Smoke Bomb can be until they land, then they turn into AoE which can’t be. Anything smite targeted (LoF not required) can’t be reflected. And of course, melee works perfectly fine.
- Pits: Pits are powerful. Besides jumping down them on purpose to go down a floor, any non-flier knockbacked onto a pit will instantly die, give you full EXP, and if it dropped an item it teleports onto the nearest floor. And they’re useful for you, too. Jump in a pit (by clicking it) and without even spending a turn, you’ll change floors and de-aggro everything (like taking the stairs), landing somewhere random. You will lose half your current HP if not levitating, however, but if you are levitating it takes an extra turn to fall down (have to be above a pit and press>), which might be worse. And don’t take a pit at the bottom of a branch or you’ll instantly die!
- Constriction: Constriction is a very strong mechanic enemy golems (and some other monsters) can use. While constructed, you can’t move or use SP and you take 1.5x damage. You can knock the enemy away, kill it, teleport or blink, and if you can’t do one of those your run might be over, so be very careful. (Also, Shields Up doesn’t stop it.)
- Ice/Oil Infinite: Ice (made by a frost mage or naturally) or oil (made by a dying clockwork or naturally) is not just unstable terrain, but causes enemies meleed on it to be knocked back and lose their turn. This gives a free, resourceless way to infinite combo such enemies.
How Aggro Works
Becoming Aggroed
There are three main ways the enemy can gain aggro (assuming they aren’t created already aggro) – Being hit by an attack, detecting the player, or hearing a shout. The first one is trivial, so let’s clarify the other two.
Detecting the Player
Note:I tried source diving for this, but the actual behaviour I observed in-game seemed to be totally different. So I rewrote it with the rules I’ve observed, but may be missing some nuance.)
Every time an enemy gets its turn, it checks if the player is within detection radius. (It displays ‘???’ if yes, ‘?’ if no.)
Detection radius is calculated as follows:1.5 tiles (8-way adjacency) for sleeping (‘ZZZ’) enemies, 0 tiles if the player has Vanish up, 0 tiles if the enemy is in a deep sleep (Smoke Bomb). If none of those exceptions apply, it’s 7 – the player’s stealth. (Note that LoS is 7.5 tiles – so not all tiles on the edge of LoS work. Notably, 7,0 and 6,3 do.) There is an additional rule:You had to be in LoS or in detection range on the previous turn. If that’s true and monster can detect you (‘???’), then it has a % chance to actually succeed and aggro (‘!!!’). Being closer to the monster makes it more likely, higher stealth makes it less likely, and higher level monsters are more observant, while sleeping monsters are very inobservant.
A monster that aggros via detecting you does not immediately get a turn, so this is often a preferrable way to aggro a monster. This is also why I often forego stealth mechanics in traditional roguelikes – not being able to wake up a monster at maximum range under my control and have it follow me around can be a disadvantage.
Here’s an example of the ‘player had to be in detection radius or LoS last turn’ mechanic. I walked to the NE and back 20 times in a row and this fire mage never woke up. But if I instead move N and back, the fire mage will have chances to wake up.

Another example:In this situation after moving east (and the enemy was not in my detection radius before) I got noticed in one turn. So being in LoS on the previous turn was sufficient.
Hearing a Shout
Enemies shout every turn they’re aggroed (as long as they moved or are currently visible), and also have a 50% chance to shout when they die.
Shouts aggro every enemy that is both within 6 tiles of the shout and also within 10.5 tiles of the player (As in, both conditions have to be true.).
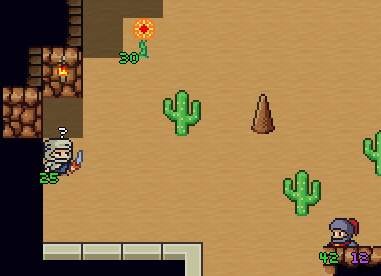
Asleep monsters only respond to shouts within 3 tiles (instead of 6). Deep sleep monsters (from Smoke Bomb) don’t respond to shouts at all. Shouts originating more than 7 tiles away from the player have their radius halved from 6 to 3 tiles. (The halvenings from asleep and outside 7 tiles stack.) (Note:It’s>7, not>7.5! So it’s not the same ‘as being in your LoS’. Shouts on the edge of your LoS that aren’t at 7,0 or 6,3 are halved. (Worked example:This sunflower is more than 7 tiles from me, so its shouts are halved to 3 and don’t reach the second enemy.)
Besides the normal kinds of shout enemies make, there are some other things that are technically a shout:
- Hidden enemies, when they aggro, perform an ‘ambush’ shout that only wake up other hidden enemies within their ambush distance of the player.
- Opening a glyph door performs a ‘strong’ shout that ignores the 10.5 tile limit and ‘radius halvening for being more than 7 tiles from the player’ (In practice I think neither fact matters though.).
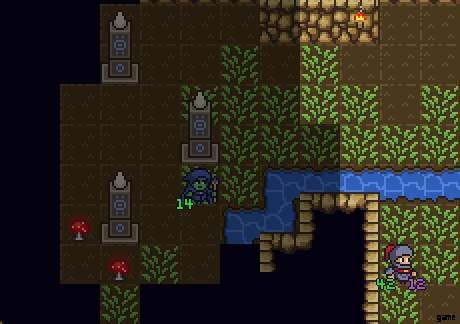
Here’s a worked example. I would like to not wake up the unique. So, I should fight the other band of enemies (that definitely will notice me) without letting any of them move onto any of the red dots (where asleep monster would hear a shout within 3 tiles and wake up). If the unique was stationary rather than sleeping I’d have to keep monsters out of a much larger 6 tile radius, but I still could have gone for it.

Because enemies only shout 3 tiles if they’re out of LoS, aggroing an enemy and immediately running out of LoS might cause it to not wake up its friends. That 3 tile radius is very small! Plus, it has to be within 10.5 tiles of my new location, too.

Note that enemies only shout when they move to a new tile or if they’re visible (This mostly matters for immobile enemies, which as a result can’t shout if you can’t see them.).
Having and Losing Aggro
Monsters that you’ve aggroed have perfect knowledge of where you are… but the same is true for you! They’ll be visible on the map and minimap unti they deaggro. Even when not in line of sight, they can be shot/targeted (even though the enemy can’t do the same back to you) and the moment they deaggro you can notice this and act accordingly.
unagroTimer goes up by 1 every turn an enemy can’t see you, plus an additional 1 if the enemy is a stationary swimmer or immobile. When it hits 20 turns, the enemy de-aggros. If it can see you, unagroTimer becomes 0 again.
An enemy that deaggros goes back to its previous behaviour – sitting still or wandering.
Some special enemies can never lose aggro once they have it:Grax The Frost Shaman, The Frost Giant King, The Kraken and its Tentacles, Expanderis The Slime King, The Efreeti Lord, Lavosa The Eel Queen.
Advice for Specific Levels
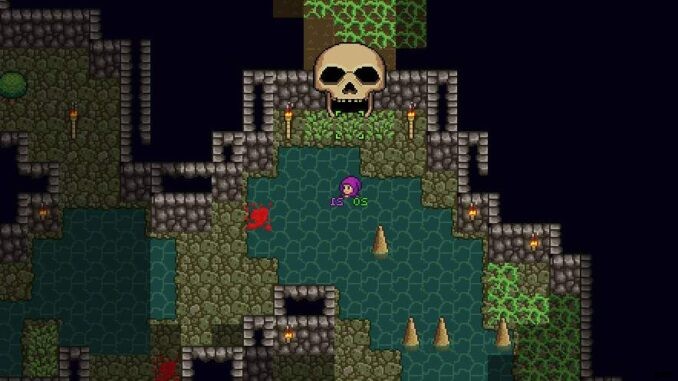
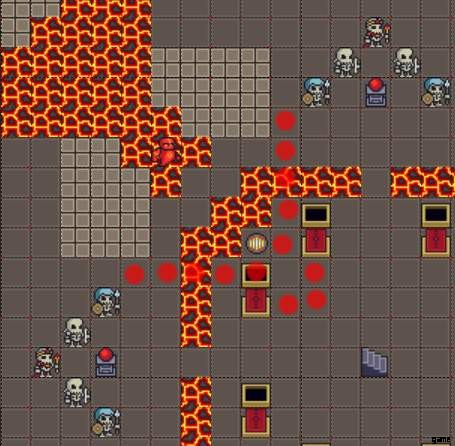
Vault of Yendor – ‘Lava Surround’
This is the floor that looks like this:This is the floor that’s most likely to kill you even with cautious play, because how it works is very spoilery. A common death on this floor looks like this:‘walk to a side, see some skeletons, aggro both fire elementals in the corners, start to get overwhelmed, aggro the rest of the floor, try to take the stairs, die in one turn’. Instead, do the following, which relies on a precise understanding of how aggro works:
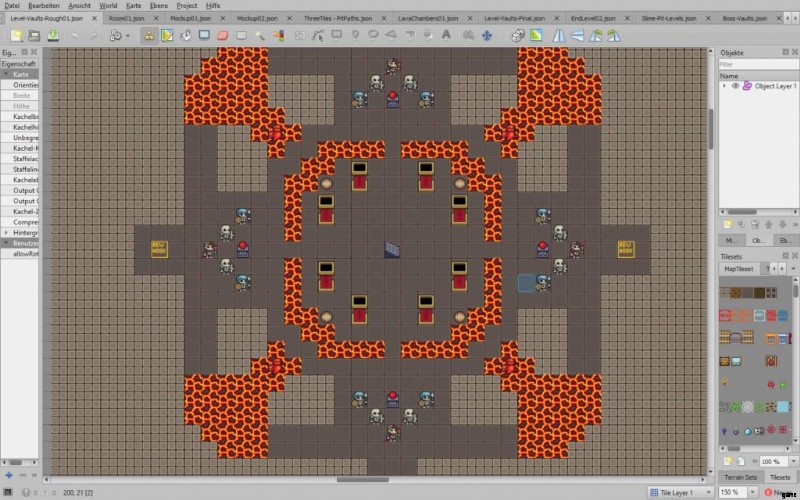
- Pick a north diagonal since the stairs are always north.
- Beeline to the diagonal fire elemental – don’t aggro it until you’re inside the cage (see image below) – then kill it. This’ll wake the surrounding two skeleton packs, but not any other fire elementals as long as you don’t step onto any of the red dots (because that’d put you 10.5 tiles or closer to that other fire elemental, and they’d hear an aggroed skeleton shout (radius 6) and aggro).
- Kill both skeleton packs. If you have levitation/lavaproof, hang out in the lava to make it easier. Or if you have speed points, move through 4 tiles of lava to get to the back. This is recommended over just hang out in the ‘cage’ and gun them down.
- Once you have a corner done, you can circle around or go straight to the north stairs and leave.
TODO:Random595 has an idea for an alternate strat where you go north, aggro the skeleton pack, SP retreat to a specific point, and you can pick off just the skeletons. But it needs testing before I add it.)
The Kraken
This boss appears at the end of The Sewers branch about 50% of the time. What makes it potentially very difficult is that if you have no ranged options besides fire magic, the fact that it’s wet basically makes it impossible to kill, and you took a one way teleporter to get here. Here are some options you can consider to make the fight easier (or possible):
- Keep your eyes open for a different ranged option. Lightning Bolt is the absolute best, but anything that’s not fire can be passable. Javelins are very good, don’t underrate them.
- If you have Cone of Cold/Wand of Cold and aim it such that all 8 surrounding tiles are frozen, the Kraken can’t move anymore. Then simply never thaw those tiles and you have an easy win.
- If you can’t burst down the head quickly but you can out-range and out-mobility the Kraken, killing the tentacles one by one can work instead. Grab the energy fountain for restoration, use the one-way portals to indefinitely kite, blink and use speed points as needed to retreat and drag things out as long as you can.
- Be aware the tentacles block line of sight for the Kraken’s tentacle attack, and that the tentacles can’t go further than 2 tiles from the Kraken.
- A power potion popped before you start dealing damage will improve your output a lot.
- You don’t have to fight the Kraken now. In fact, you don’t have to fight the Kraken ever. You can go get the other two runes to beat the game.
- If you have a source of blinking, you can blink past the gate and abstain from fighting the boss.