Eine Kurzanleitung zum Bau einer Killbox, die dich im Endlosmodus auf 30+ bringt.
Einführung
Kurz und bündig. Ich wurde in einem Thread gebeten, meine hohen Endless-Scores zu erweitern, also werde ich das hier tun. Dies ist eher ein Leitfaden über Endless als darüber, wie man jede Karte vervollständigt, und die hier erwähnten Türme werden andere Verwendungszwecke haben, als wenn Sie nur versuchen würden, jede Karte zu schlagen. Ein gutes Beispiel dafür ist der Sniper. In einem normalen Spiel ist dieses Ding S Tier. Ein paar zufällige Türme + ein Sniper-Turm, der den Siphoner-Pfad hinuntergeht, kann jede einzelne Karte schlagen. Auf Endlos fällt der Sniper-Schaden jedoch ab, da er keine inhärente Skalierung in Bezug darauf hat, wie hart Feinde werden, und der Sniper kann Feinde in keiner Weise debuffen. Beachten Sie auch, dass dies bei allen Anarchy-Mods gilt. Ohne Anarchie-Mods reicht es aus, die Karte nur mit Windpilzen und Feuerflüchen zu füllen, um bis zum Ende der Zeit alles zu töten.
Turm-Upgrades und Effizienz
Türme, die auf die Killbox zielen können:
- Wald – Zersetzung
- Sprengstoff – Feuer:Elite-Vernichtung – Wind:Feuerhagel – Schock:Clusteranzahl/Feuerhagel
- Scharfschütze – Siphoner
- Gatling – Titanentöter
- Fluch – Pestilenz
- Göttlich – Wind:Energiewelle – Feuer/Schock:Göttlicher Champion
- Pilz – Todeswolke
- Wirbelsturm – Unglück
Laser – Iconic Trio> Find Enlightenment> Fear No Elite – Das hängt alles von der Karte ab. Wenn Sie einen oder zwei Strahlen dazu bringen können, Ihre Killbox zu kreuzen, nehmen Sie Iconic Trio. Wenn nicht, können Sie den Turm an einer Stelle platzieren, an der er einen Haufen leerer Kacheln aufnehmen kann, die dann von anderen hochwertigen Kacheln umgeben sind. Nehmen Sie Find Enlightenment. Wenn nicht, nimm Fear No Elite.
Zu überspringende Türme:
Fire Forest und Lightning Explosive bieten nicht viel von allem. Feuerwald verwirrt mich. Es ist wohl schlechter als ein normaler Waldturm und definitiv der schlechteste Turm im Spiel. Ich verstehe nicht, warum es schlimmer wird, wenn Sie Ihr Fire Hellement verbessern. Die erste und dritte Stufe sind großartig, aber die zweite Stufe, die Sie alle 2 Sekunden in einen Angriff verwickelt, ist einfach schrecklich. Lightning Explosive ist in Ordnung, wenn Sie es in eine Position quetschen können, die die Killbox trifft, aber es bietet nichts außer Schaden und ist normalerweise nur schlimmer als das Hinzufügen eines normalen Fluchturms.
Füllen Sie den Rest der Karte mit Scharfschützentürmen, Göttlichen Türmen und Waldtürmen aus, wenn Sie genügend große zusammenhängende Klumpen bekommen, um sie auf der Leylinien-Manipulationsroute zu nehmen. Es ist auch wichtig zu beachten, dass die Slots, die Sie auf der Seite des Bildschirms für zehn aktivierte Fähigkeiten erhalten, die einzigen zehn sind, die Sie haben können. Wenn Sie 11 Scharfschützentürme mit Siphoner platzieren, werden nur zehn aktiviert. Sie nehmen bereits 3 Siphoner, 1 Lightning Curse und 1 Wind Cyclone aktive/s, sodass Sie nur Platz für 5 weitere Siphoner haben, wenn Sie diese Route wählen. Full Auto ist gut für entfernte Sniper hinter der Killbox, aber für alles davor ist das Fehlen von Durchdringung nicht gut.
Bauen Sie die Göttlichen Türme mit + Reichweite, es sei denn, Sie können allen drei Zyklonen irgendwie sowohl die Fähigkeit geben, permanent auf Luft zu zielen, als auch die Fähigkeit, auf die Killbox zu zielen. Bauen Sie die Laser mit erhöhter Reichweite. Windfluch erlaubt es allen Türmen, verfluchte Flieger zu treffen. Baue Zyklone mit Rüstungsreduzierung. Baue Gatlings mit pauschalen Schadensboni, damit Titan Slayer mehr Schaden zu multiplizieren hat. Das Rang-2-Pilze-Upgrade hängt davon ab, ob Sie die Platzierungsreichweite benötigen oder nicht.
Killbox-Bild
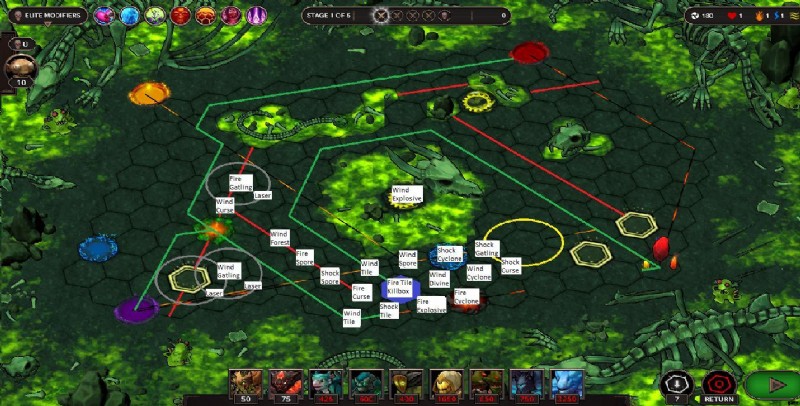
- Grüne Linien =Feindlicher Weg
- Rote Linien =Segen
- Graue Kreise =Mögliche Platzierung von göttlichen Feuer-/Blitzstrahlen
- Gelber Kreis =Platzierung des göttlichen Windstrahls
- Blaues Sechseck =Killbox
Dies ist ein sehr einfaches Beispiel für eine Killbox, bei der jeder platzierte Turm die Killbox treffen kann. Platziere Scharfschützentürme irgendwo im Grau und platziere irgendwo einen einfachen Göttlichen Turm mit einem Strahl, der für Schaden gebaut ist und sich auf die Schockspore konzentriert, um dem Feuerfluch eine größere Reichweite zu ermöglichen. Der feindliche Pfad kann angepasst werden.
Killbox erklärt
Das Ziel hier ist es, die Luft- und Bodenrouten so nah wie möglich an einem Punkt zu kombinieren, um keinen Schaden zu verschwenden. Sie möchten, dass viele Dinge an einem Punkt kombiniert werden:Alle drei Fluchtürme, alle drei Zyklontürme, alle drei Pilztürme (im Bild als Spore bezeichnet) innerhalb der Energiewellenreichweite des göttlichen Turms, innerhalb der Betäubungsreichweite der Windsporen innerhalb the Wind Explosive tower initial stun range and within the Wind Cyclone and Wind Laser stun range. You also want a fire tile placed on the box, a lightning tile placed right before it and wind tiles after the box and before the lightning. Then you have to worry about towers that exist to deal damage rather then these that are here to debuff. This is a lot to get right and is only possible on 5 maps:Meadows, Tundra, Forest, Toxic Boneyard and Dojo. I’ve had the most success on Tundra but they all work.
Here’s what happens to enemies who hit the killbox:
Initial 2-second stun from divine beam> Wind Mushroom debuff starts building up> enemy is hit either by Mushroom stun or Energy Wave stun for 2 seconds> enemy hit by whichever stun they weren’t hit by the first time for another 2 seconds> enemy moves slightly into the divine beam and is hit by the 6-second stun of the Wind Explosive> enemy hit by a barrage of 2-second stuns from Energy Wave, Wind Mushroom, Wind Explosive, Wind Cyclone and Wind Laser(Get a sense of which Hellement is the best yet?). All of these stuns happen on a single tile and it’s important that this is a divine beam tile and it’s also important to remember that the Wind Mushroom is building up a constant increased damage taken debuff. The longer they stay on this tile, the more damage they are taking and the goal is to hit them more than once with a Fire Curse for the tougher enemies.
You’ll note how I listed that the Wind Explosive stun happens after the other stuns but how can that be?. Dies ist sehr wichtig. With the Hail of Fire upgrade we can manually decide where the Explosive tower hits and you want it to hit the tile AFTER the killbox. This is because of the explosion radius on the attacks of the tower. It extends naturally to about halfway through the tiles next to the impact zone. If we targeted the killbox, we’d actually be stunning enemies for 6 seconds before they entered the divine beam area. So the enemies get stunned by a few things entering the killbox, move to the halfway point of the killbox tile, then get stunned by the Wind Explosive tower.
Your main sources of damage are Fire Curse, the three Gatling towers and Fire Sniper. Fire Sniper effectively reduces the health of all enemies by 25% and is incredibly good. Fire Curse is going to be doing millions or billions of damage and is what’s going to actually kill most things. Your three Gatling towers are going to be dealing incredible amounts of damage thanks to Titan Slayer. It’s one of the few upgrades that scales with the enemies and will be increasing your Gatling tower damage with each wave. It’s important to try and place the Fire and Wind Gatling towers in the center of your Lightning/Fire Divine beams for maximum flat damage. The multiplier of Titan Slayer wants a big flat base number.
As for what’s going on in the killbox on the damage side of things:Three Cyclone towers lowering armor and increasing the damage enemies take by 100%, three Deathclouds increasing damage by 25%, Wind Mushroom stacking increased damage by 1%, three Curse towers lowering Health Regen and Armor which will cause enemies to take bonus damage from having negative armor, Fire Explosive lowering armor, Fire Laser lowering armor, the Fire tile increasing damage and lowering Health Regen, the Lightning tile chaining damage, the divine beam lowering armor and the Lightning Cyclone applying shock and increasing its own damage with each swing against a shocked elite.
Endless Modifiers (Important)
The last thing to talk about are the modifiers you’re going to be picking up at the end of each wave. There are four choices:Permanent enemy speed, permanent enemy Health Regen, permanent enemy Armor and permanent enemy Health.
We’ve discussed why giving them Health isn’t a problem – Titan Slayer. Speed and Armor are a different beast. We want enemies to have as little armor as possible so our Curse towers can increase the damage the enemies receive by having negative Armor. Giving them armor a few times is okay if it’s getting you something big like your last Hellement upgrade but I would hold off unless you absolutely need it. Health regen is laughable. Your Gatling towers will be doing 9999 many, many times a second and your Fire Curse will be chunking enemies for millions so 200 health regen or whatever a second means nothing. The real problem is enemy Speed. I’m still not exactly sure how it works but enemy speed is somehow tied to how long your stuns last. The internal speed of an enemy also seems to speed up how quickly they break out of being stunned. We want enemies to stay stunned as long as possible, so that’s a big no. On wave 3 or 4 you’re sometimes given the option of upgrading a Hellement for a very minor permanent enemy speed increase. This usually takes the enemies from a 5.5 to a 6 or 6.5. You can take this if you want but just know that way down the line this will eventually be what kills you.
So, in the order you want to take each modifier:
- 1 – Health Regen
- 2 – Health
- 3 – Armor
Das ist es. You’re never taking speed so it isn’t an option.
One last things before I go. Upon entering Endless Mode, the game will sometimes forget to give you your 1 Blessing at the end of each Boss Wave. If you enter Endless Mode, beat the very first encounter and then exit to menu and resume playing, you’ll get your Blessings at the end of each Boss Wave like normal. This occasionally has the adverse effect of starting a Boss Wave when you re-enter and I can’t explain it much better than seeing for yourself. It’ll give you the option of taking any of the very first Boss Wave bonuses of 600 souls, 4 blessings or a random hellement. I don’t know if this is somehow repeatable or abuseable but it’s either you live with the bug of not getting blessings anymore or the bug of getting a random small reward in exchange for getting blessings again so you’re damned if you do, damned if you don’t.