Diese Anleitung erklärt, wie man ein neues Land modifiziert oder erstellt. Es wird dir zu Beginn des Spiels sagen, wie du ein Land gründest, und auch formbare Gegenstände abdecken.
Leitfaden zum Erstellen eines Landes
Einführung
Diese Anleitung behandelt, wie man ein neues Land im Spiel erstellt / erstellt / modifiziert, sodass es beim Start des Spiels im Jahr 1836 existiert.
Wichtige Anfangshinweise:
- Es wird empfohlen, die Textbearbeitung mit einem besseren Editor als dem einfachen Notepad durchzuführen. Meine Empfehlungen sind Notepad++ (was in diesem Handbuch verwendet wird), VisualStudioCode und Sublime.
- Alle .txt-Dateien im Spiel müssen die Codierung UTF8-BOM haben. Sie funktionieren möglicherweise nicht richtig, wenn sie das nicht haben. Wenn Sie nicht wissen, wie Sie die Codierung festlegen, kopieren Sie einfach eine vorhandene Datei und ändern Sie deren Inhalt.
- Alles nach einem # in einer Textdatei wird „auskommentiert“, was bedeutet, dass das Spiel ignoriert, was hinter dem # steht.
- Wenn Sie Fehler erhalten oder etwas schief gelaufen ist, ist es wahrscheinlicher, dass Sie einen Fehler gemacht oder diese Anleitung nicht genau befolgt haben. Fast nichts hier ist nutzlos, also pass gut auf!
Das Land definieren
Mit „definieren“ meinen wir zwei Dinge:
- Eine menschliche Bedeutung von „entscheiden, wo das Land sein wird und wie es aussehen wird.“
- Ein Code, der bedeutet, dem Spiel Informationen über unser Land mitzuteilen, damit es weiß, was das Land ist.
Denken Sie also zuerst darüber nach, welches Land Sie möchten und vor allem wo es sich befinden soll.
Mein Land wird Cyrenacia heißen und sich hier in Tripolitaniens Land befinden.
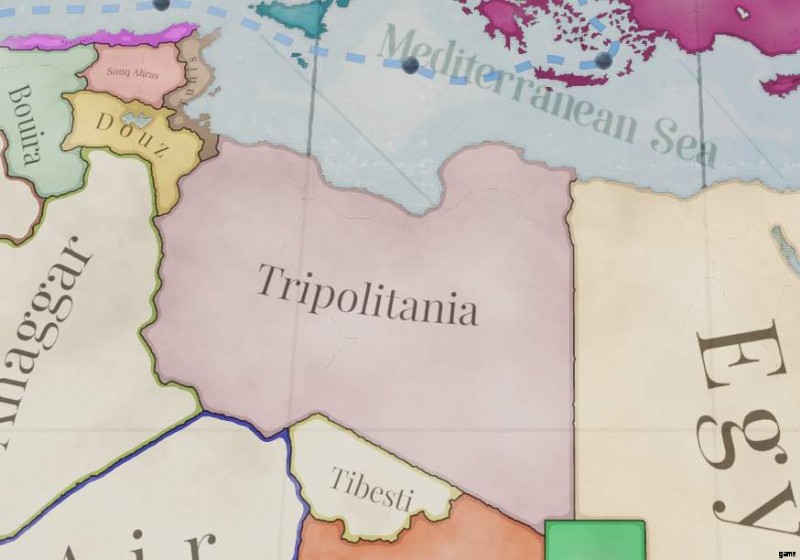
Ich denke, dass ich den gesamten libyschen Wüstenstaat besitzen möchte.
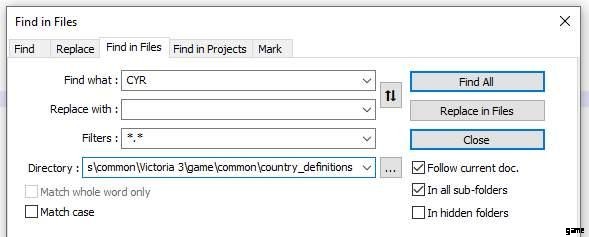
Nachdem ich diese Dinge entschieden und über einige andere nachgedacht habe, muss ich mich für ein Tag entscheiden (ein dreistelliger kurzer Codename für das Land). Ich denke, dass CYR als Tag sinnvoll ist.
Stellen wir sicher, dass CYR nicht bereits im Basisspiel verwendet wird, indem wir die Funktion „In Dateien suchen“ von Notepad++ verwenden, um zu sehen, ob CYR irgendwo in den Länderdefinitionsdateien des Basisspiels auftaucht.
Und das tut es nicht, großartig! Jetzt gehe ich zum Länderdefinitionsordner meiner Mod.

Und ich werde eine Definition dafür hinzufügen.
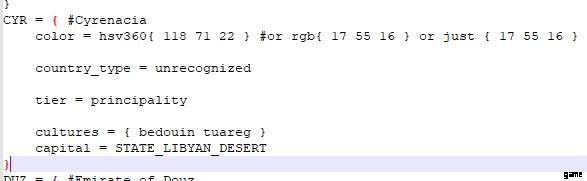
Wie Sie vielleicht sehen können, gibt es einige wichtige Teile einer Länderdefinition.
Es beginnt mit dem Tag, dann fügen Sie eine Farbe hinzu (dies kann entweder im HSV360-Format oder RGB sein). Verwenden Sie ein Online-RGB-Farbauswahltool oder eine Bildbearbeitungssoftware, um die gewünschte Farbe zu finden.
Danach entscheiden Sie, um welche Art von Land es sich handelt:
- Anerkannt – Wird hauptsächlich für „westliche“ Länder verwendet.
- Unbekannt – Wird für „nicht-westliche“ Länder verwendet, ähnlich wie Vic2s „unzivilisiert“.
- Dezentral – Für Länder ohne zentrales Regierungssystem, normalerweise für indigene Völker verwendet.
- Kolonial – Für Länder, die Kolonien anerkannter Länder sind.
Geben Sie dann die Ebene an, die im Wesentlichen der Größe des Landes entspricht:
- Stadtstaat
- Fürstentum
- Großfürstentum
- Königreich
- Imperium
- Hegemonie – Bei der Veröffentlichung im Basisspiel ist nur das Land Indien eine Hegemonie. Betrachten Sie es als ein Megaimperium
After that you’ll put the cultures in. The in-game spellings are usually the same as the code spellings, but not always. You can always double check in the base game’s common/cultures folder.
And finally say what state the capital is in. As above, this is normally the same as what’s written in game, except that spaces are always underscores, which is why my state capital is STATE_LIBYAN_DESERT instead of Libyan Desert. So your state will always be something like STATE_(NAME). If you’re not sure, check in map_data/state_regions or common/history/states.
Make sure you’ve got a closing bracket, too. Most fancier word processors like Notepad++, VisualStudioCode and Sublime have some way of doing this. Proper bracketing is very important!
Making the Country Show Up (Ft. the History Folder)
Now that the country is defined, let’s make it show up in the game. Right now, the game only knows that CYR is a possible country, but it hasn’t been told that it should exist. To do this, we need the history folder, and specifically these three folders.
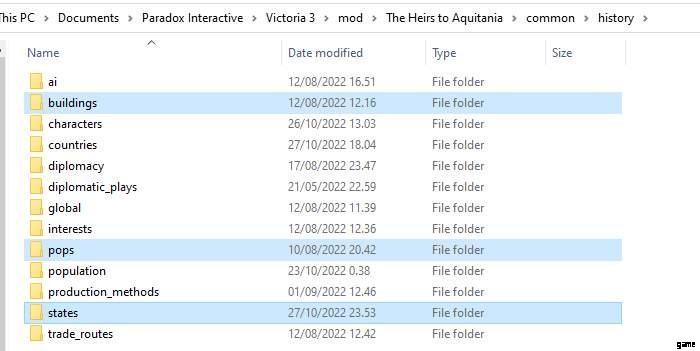
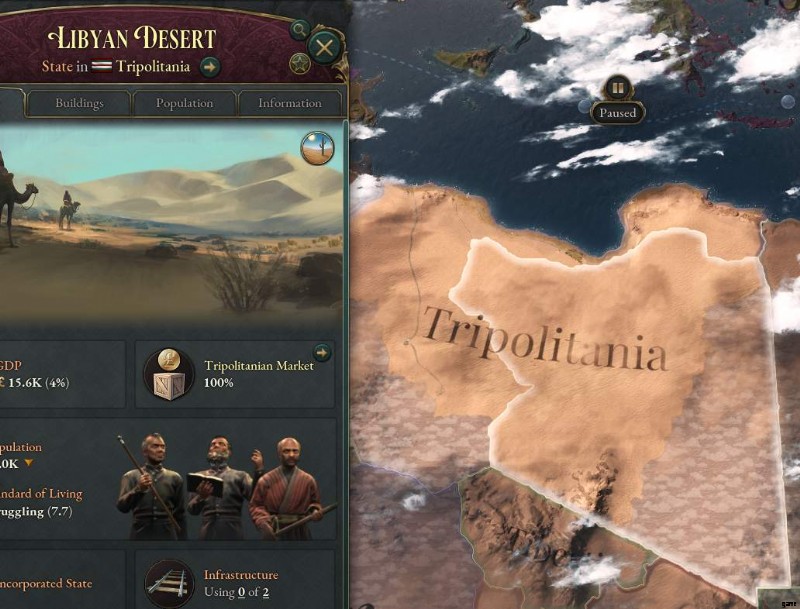
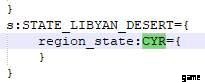
Let’s start at the bottom with states. The file(s) in this folder tell the game who owns what states (or what provinces in the state) at the start of the game, as well as information about what cultures consider the state to be their homeland. Let’s navigate to STATE_LIBYAN_DESERT:
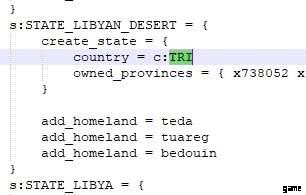
As we can see from the highlighted section, TRI (Tripolitania) currently controls the state. Let’s just change that:
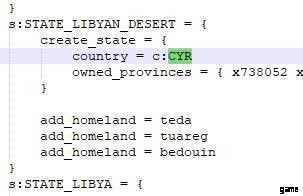
If you launch the game now, you will see that CYR controls the state, but it’s missing information about population and buildings, so it’s kind of useless.
So head over to the pops folder, and once again find STATE_LIBYAN_DESERT, and there, too, change TRI to CYR:
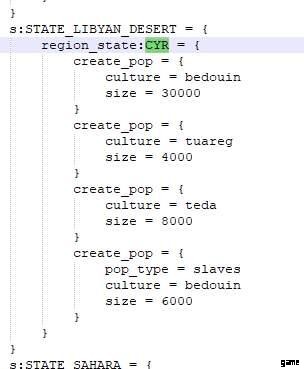
And do the same in the buildings folder:
Here we can see that there are no buildings in the state. That makes sense, considering it’s mostly desert and has a very small population.
And with that, the history folder entries are done for now.
Finishing Touches
Our country is now playable, but if we launch the game it’ll be called CYR instead of a proper country name! That’s where localization comes in.
Localization is the way that you translate code into human languages like English. Let’s navigate to our mod’s localization folder.

You may see that I have a custom file name. The game supports that kind of thing, but some things are quite important. The file must:
- be .yml format
- have _l_english at the end of the file name (if your localization is English)
- start with l_english:in the contents of the file
I suggest just copying localization file from another mod or the base game and emptying it (except for the l_english:part).
The localization is pretty simple, as shown here:
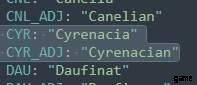
TAG: "country name"
TAG_ADJ: "country adjective"
Just replace TAG with your own TAG, i.e. CYR in my case.
Again, you can boot the game now and the country will be visible, but I’ll recommend two more things.
- Your country needs a country history to customize what it’s like at the start of the game. This will tell the game what kind of technology it has, as well as laws and other information. I recommend just going and copying a similar country’s history. That’s what I’ve done for my country history.

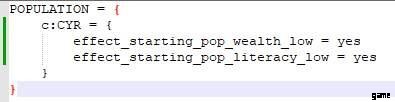
- Quite optional:Population information. The population folder in the history folder gives information about the people who live in the country, specifically their wealth and their literacy. You can create a new file for your country and the two following things can be added:
Wealth:(defined in common/scripted_effects/00_starting_pop_wealth.txt)
- effect_starting_pop_wealth_low
- effect_starting_pop_wealth_medium
- effect_starting_pop_wealth_high
- effect_starting_pop_wealth_very_high
Literacy (defined in common/scripted_effects/00_starting_pop_literacy.txt)
- effect_starting_pop_literacy_baseline
- effect_starting_pop_literacy_very_low
- effect_starting_pop_literacy_low
- effect_starting_pop_literacy_middling
- effect_starting_pop_literacy_high
- effect_starting_pop_literacy_very_high
I’ve decided to go with the following:
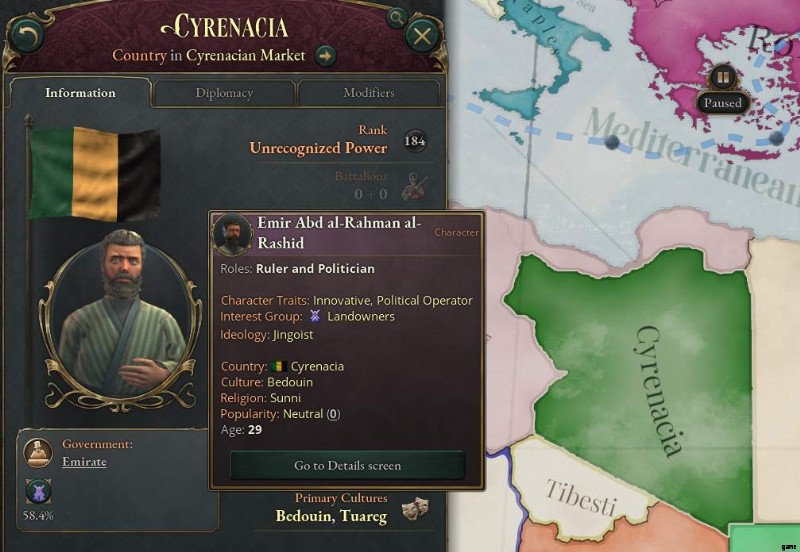
Finished!
Launch the game and voilà!
This guide will eventually cover creating a flag and setting characters, too. But this is enough to get you started!